Table of Contents
Advertisement
Advertisement
Table of Contents

Related Manuals for SKY-WATCHER AZ-Go2


Summary of Contents for SKY-WATCHER AZ-Go2
- Page 1 INSTRUCTION MANUAL AZ-Go2 Mount Copyright © Sky-Watcher...
-
Page 2: Table Of Contents
1.1 Finderscope/Red dot finder assembly ..............3 1.2 Eyepiece assembly ....................4 1.3 Tripod assembly ......................5 1.4 Telescope assembly ....................6 PART II : USING THE AZ-Go2 MOUNT 2.1 Control with a SynScan Hand Control ..............7 2.2 Control with a Mobile Device .................7 2.3 Wi-Fi Connection ....................7 2.4 Firmware Update ....................7... -
Page 3: Part I: Assembling Your Telescope
PART I: Assembling Your Telescope Before you begin This instruction manual is applicable to 3 models. Take a moment to find the model of your telescope. Follow the instructions for your specific model in the manual. Read the entire instructions carefully before beginning. Your telescope should be assembled during daylight hours. -
Page 4: Eyepiece Assembly
PART I: Assembling Your Telescope 1.2 Eyepiece assembly 1. Inserting eyepiece for refractor and Maksutov(Fig.1.2.1a) • loosen the thumbscrew on the end of the focus tube. • Insert the diagonal into the focus tube and re-tighten the thumbscrew to hold the diago nal in place. -
Page 5: Tripod Assembly
PART I: Assembling Your Telescope 1.3 Tripod assembly 1. Adjusting tripod legs(Fig.1.3.1a) • Slowly loosen the height adjustment clamp and gently pull out the lower section of each tripod leg.Tighten the clamps to hold the legs in place. • Spread the tripod legs apart to stand the tripod upright. •... -
Page 6: Telescope Assembly
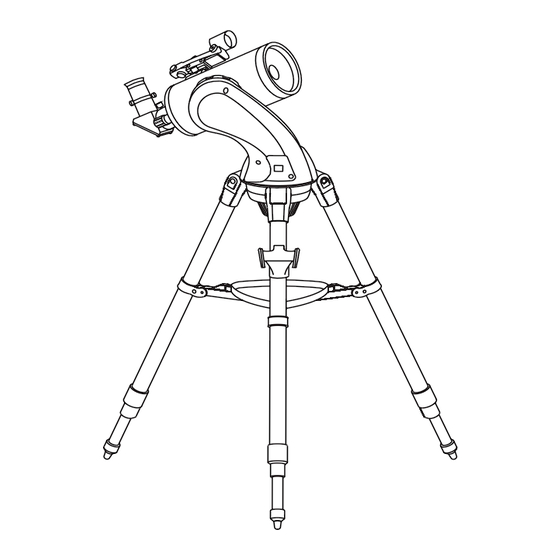
PART I: Assembling Your Telescope 1.4 Telescope assembly 1. Attaching the mount the tripod(Fig.1.4.1a) • Place the single arm mount into the tripod head. • Push the large cup underneath the tripod head upward and turn counter-clock wise to secure the mount to the tripod. Fig.1.4.1a 2 Attaching the telescope tube to the mount(Fig.1.5.2a) •... -
Page 7: Part Ii: Using The Az-Go2 Mount
PART II: USING THE AZ-Go2 MOUNT 2.1 Control with a SynScan Hand Control Plug in the SynScan hand control into the hand control port in order to control the telescope and mount for astronomical observation. Please refer to the SynScan hand control manual for operation instructions. -
Page 8: Part Iii: Operating Your Telescope
PART III: Operating Your Telescope 3.1 Aligning and using the finderscope/red dot finder Aligning and using the finderscope These fixed magnification scopes mounted on the optical tube are very useful accesso- ries. When they are correctly aligned with the telescope, objects can be quickly located and brought to the center of the field. -
Page 9: Focusing The Telescope
PART III: Operating Your Telescope • Open the battery cover by pulling it down (you can gently pry at the 2 small slots) and remove the plastic shipping cover over the battery(Fig.3.1.2b). • Turn on the Red Dot Finder by rotating the variable brightness control clockwise until you hear a “click”. -
Page 10: Choosing The Appropriate Eyepiece
PART III: Operating Your Telescope 3.3 Choosing the appropriate eyepiece • The magnification produced by a telescope is determined by the focal length of the eye- piece that is used with it. To determine a magnification for your telescope, divide its focal length by the focal length of the eyepieces you are going to use. -
Page 11: Part Iv: Observing The Sky
PART IV: Observing the sky 4.1 Sky Conditions • Sky conditions are usually defined by two atmospheric characteristics, seeing, or the steadiness of the air, and transparency, light scattering due to the amount of water va- pour and particulate material in the air. When you observe the Moon and the planets, and they appear as though water is running over them, you probably have bad “seeing”... -
Page 12: Cooling The Telescope
PART IV: Observing the sky 4.4 Cooling the Telescope • Telescopes require at least 10 to 30 minutes to cool down to outside air temperature. This may take longer if there is a big difference between the temperature of the telescope and the outside air. -
Page 13: Part V: Proper Care For Your Telescope
PART V: Proper Care for Your Telescope 5.1 Cleaning Your Telescope • Replace the dust cap over end of telescope whenever not in use. This prevents dust from settling on mirror or lens surface. Do not clean mirror or lens unless you are familiar with optical surfaces. - Page 14 AZ-Go2 Mount AZ-G02-F-V1.00-EN © 2021, Sky-Watcher, All Rights Reserved Apple, the Apple logo, iPhone, and iPod touch are trademarks of Apple Inc., registered in the U.S. and other countries. App Store is a service mark of Apple Inc. Android, Google Play and the Google Play logo are trademarks of Google Inc.
Need help?
Do you have a question about the AZ-Go2 and is the answer not in the manual?
Questions and answers