Table of Contents
Advertisement
Advertisement
Table of Contents

Related Manuals for HBC-Radiomatic technos A


Summary of Contents for HBC-Radiomatic technos A
- Page 1 Operating Instructions Original Operating Instructions technos A YOT100U0...
-
Page 2: Table Of Contents
Table of Contents Safety Instructions ........................... 4 Intended Use ............................ 4 Safety Instructions for Installation and Operation ................4 FCC Notes ............................5 IC Notes ............................6 Transmitter Equipment ..........................7 Operation ..............................8 Activating the Transmitter ......................... 8 Deactivating the Transmitter ......................9 Automatic Power Off (APO) Function .................... - Page 3 Important information about the operation of the radio system . Manufacturer: HBC-radiomatic GmbH • Haller Straße 45 – 53 • 74564 Crailsheim • Germany • Tel. +49 7951 393 -0 • info@radiomatic.com. HBC-radiomatic GmbH is not liable for any misprints or errors! ®...
-
Page 4: Safety Instructions
Modifications to the radio system may only be carried out by specialist personnel who have been trained and authorized by HBC-radiomatic. All modifications must be documented at the factory in the radio control master file. -
Page 5: Fcc Notes
FCC Notes Part 15.21 Statement Changes or modifications made to this equipment not expressly approved by HBC -radiomatic GmbH may void the FCC authorization to operate this equipment. Part 15.105 Statement This equipment has been tested and found to comply with the limits for a Class B digital device, pursuant to Part 15 of the FCC Rules. -
Page 6: Ic Notes
IC Notes RSS-GEN – User Manual Statements (English/French) Licence exempt This device complies with Part 15 of the FCC Rules and Industry Canada licence -exempt RSS standard(s). Operation is subject to the following two conditions: 1. this device may not cause interference, and 2. -
Page 7: Transmitter Equipment
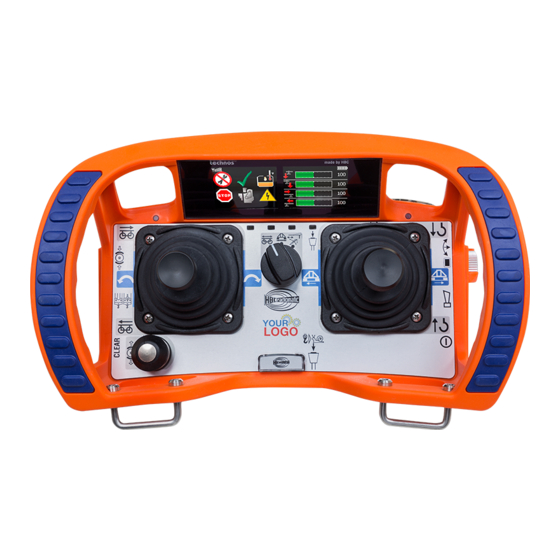
Transmitter Equipment radiomatic ® infrakey (optional) Front panel lighting 1.77˝ color TFT displays radiomatic iLOG Connection for cable control ® Multifunctional switch radiomatic iCON STOP switch Horn Integrated LED flashlight Start button 7 / 34... -
Page 8: Operation
Operation ® ® The transmitter is equipped with an electronic radiomatic iLOG key. radiomatic iLOG contains all the data required for operating the transmitter. Operation is not possible without radiomatic ® iLOG! Depending on the version the radiomatic ® iLOG can also be used for operation of replacement transmitters of identical construction. -
Page 9: Deactivating The Transmitter
® With merlin 1. Insert a charged battery into the battery compartment . 2. Turn the STOP switch to unlock. The display shows Apply merlin ® TUC. ® 3. Hold the merlin TUC to the position on the transmitter marked with this symbol (cf. -
Page 10: Automatic Movement Off (Amo) Function
Automatic Movement Off (AMO) Function After a defined time after the last movement command / Si 2 command has been operated, the transmitter switches into the AMO operating mode and no more movement commands / Si 2 commands can be executed. Si 1 commands, such as horn, can still be executed. -
Page 11: Display Content And Functions
Display Content and Functions Status bar The upper edge of the display is reserved for the HBC status bar. It shows the field strength, the battery status as well as the page title and time (if applicable). In addition, the status bar can show additional symbols, e.g. -
Page 12: Navigation
Navigation ® The multifunctional switch radiomatic iCON (turn forward = away from the operator / turn backward = to the operator; perspective with hip belt) with integrated selection button is used for display navigation . By pressing the selection button, the operator can : show and select menus and Softkeys for selections, activate objects for input, save input / settings,... -
Page 13: Hbc Menu
HBC Menu Symbol Label Description In this menu, system, connection and safety settings can be configured HBC menu and information items can be shown. Warnings This submenu shows warnings. Information This submenu shows system information. This menu item accesses the phone number and Email address of the Service address service hotline. -
Page 14: Warnings
1. Navigate to the submenu Information and select it. 2. Navigate to the menu item Service Address and select it. The phone number and Email address of the HBC-radiomatic service hotline or a service partner are shown. Exit the menu item Service Address with the Softkey... -
Page 15: Software / Config
Software / config To access the menu item Software / config: You are in the HBC menu. 1. Navigate to the submenu Information and select it. 2. Navigate to the menu item Software / config and select it. The software version and the display configuration are shown here . Exit the menu item Software / config with the Softkey Information text The info text (e.g. -
Page 16: Language
Language To access the menu item Language: You are in the HBC menu. 1. Navigate to the submenu Personalize and select it. 2. Navigate to the menu item Language and select it. The language for display contents can be selected here . Exit the menu item Language with the Softkey To change the language for the display contents: You are in the menu item Language. -
Page 17: Connections
Connections The display configuration and the RF interface can be configured in this submenu . To access the submenu Connections: You are in the HBC menu. Navigate to the submenu Connections and select it. Exit the submenu Connections with the Softkey To (de-)activate the display configuration: Note: Additional software is required for this function. -
Page 18: Settings
Settings In this menu item you can enter and change an info text as well as (de-)activate the access to the Master level. To access the submenu Settings: You are in the HBC menu. Navigate to the submenu Settings and select it. Exit the submenu Settings with the Softkey Set information text To enter the information text:... -
Page 19: Safety Functions
Safety functions The transmitter is equipped with different safety features. These safety features can be individually configured in the submenu Safety functions. To access the submenu Safety functions: You are in the HBC menu. Navigate to the submenu Safety functions and select it. Exit the submenu Safety functions with the Softkey Safety features This menu item allows you to adjust the sensitivity of the safety features radiomatic... -
Page 20: Inclination Switch
inclination switch ® In this menu item you can (de-)activate the safety feature radiomatic inclination switch and adjust the trigger time and angle. ® To adjust the safety feature radiomatic inclination switch: You are in the submenu Safety functions. 1. Navigate to the menu item inclination switch. 2. -
Page 21: Apo / Amo
APO / AMO In this menu item you can configure the safety features APO (Auto Power Off) and AMO (Auto Movement Off). To set the safety feature APO: You are in the submenu Safety functions. 1. Navigate to the menu item APO / AMO and select it. 2. -
Page 22: Manage Pin
Manage PIN In this menu item you can change your current PIN. To change your current PIN: You are in the submenu Safety functions. 1. Navigate to the menu item Manage PIN and select it . 2. Enter your current PIN by turning and pressing the radiomatic ®... -
Page 23: Battery And Battery Charger
When storing Li-ion batteries, recharge them after a maximum time of 3 months and adapt the charging time correspondingly. When handled properly, Li-ion batteries by HBC-radiomatic can reach up to 500 charging cycles. Even after that, your batteries can be used for some time with a slightly decreased capacity . - Page 24 DC battery charger The scope of delivery of the battery charger includes a DC connection cable with a suitable wall plug and an AC wall plug transformer. Please adhere to the following safety notifications in all cases. When the charger is improperly handled, there is the risk of fire and of electrical shock.
-
Page 25: Charging The Battery
Charging the Battery 1. Connect the charger to the power supply via the connecting cable or the wall plug transformer. 2. Insert the battery into the compartment. Charging will start automatically. A duo LED indicates the current operating state of the battery. The battery is charged The battery is charging The battery is defective... -
Page 26: Options
Options The availability of the following functions depend s on the design and configuration of your radio control system. Safety Features radiomatic ® shock-off / zero-g / inclination switch In specific emergency situations, these safety features can prevent unintended movement commands from being given to the machine, protecting the operator as well as other personnel in close proximity to the machine in use. - Page 27 ® radiomatic infrakey The radio system can only be activated via an infrared link between the transmitter and the receiver. This increases the safety of operation, i.e. the machine can not become inadvertently enabled. ® radiomatic infrakey operates either with an infrared ®...
-
Page 28: Frequency Management
Frequency Management Fixed Frequency If the identification plate in the battery compartment of the transmitter shows a frequency value (e.g. 433,500 MHz), the transmitter operates with a fixed frequency. Please contact your service department if the frequency has to be changed because the radio channel is already assigned to another user. -
Page 29: Catch-Release
Catch-Release Via the Catch-Release option two or more transmitters can control a machine alternately. When the receiver is switched on, the machine can initially be controlled via any associated transmitter. Once the receiver is taken over by one transmitter, the other transmitters no longer have access . Take over machine 1. -
Page 30: Tandem Operation
Tandem Operation Tandem Operation T1 The radio system consists of 1 transmitter and 2 receivers for 2 machines. The transmitter can control the machines individually or in parallel The machines are selected at the transmitter via a rotary switch : only machine A machine A + machine B only machine B... -
Page 31: Pre-Selection Of Trolley Or Hoist
Pre-selection of Trolley or Hoist The operator is able to select the trolley or hoist that he wishes to control. It is also possible to simultaneously control both trolleys/hoists, for example in order to transport particularly long or wide loads. Cable Control With a cable you can generate a direct data connection between the transmitter and receiver. -
Page 32: Technical Data
Technical Data Max. number of control commands Unique system addresses Over 1.000.000 combinations Supply voltage 3.7 V Safety function E-STOP: Performance Level d, category 3 according to EN ISO 13849-1:2015 Frequency ranges 405 – 475 MHz , 865 – 870 MHz, 902 –... -
Page 33: Troubleshooting
Check if all connecting out. cables and cable junctions Interruption in the connecting are tight. cable to the machine. If none of the measures mentioned resolve the problem, then please contact your service technicia n, dealer or HBC-radiomatic. 33 / 34... -
Page 34: Maintenance
Never try to repair the electronics of the radio control system! Opening the transmitter or receiver housing terminates the manufacturer guarantee. Send any defective or faulty equipment to your local distributor or to HBC-radiomatic, Inc. They are experts and have the necessary know-how and OEM spare parts.
Need help?
Do you have a question about the technos A and is the answer not in the manual?
Questions and answers