Advertisement
Table of Contents
We thank you for purchasing the Custom Dynamics® ProBEAM® BCM COMPLIANT TURN SIGNAL CONVERSION KIT (1157 REAR,
1157 FRONT) LED turn signals! Our LEDs offer maintenance free service and higher visibility. Our ProBEAM® product line utilizes
the latest technology and automotive grade components to ensure the highest level of reliable service. Custom Dynamics®
offers one of the best warranty programs and customer support in the industry. If you have any questions during the installation
of this product please call us at 1(800) 382-1388.
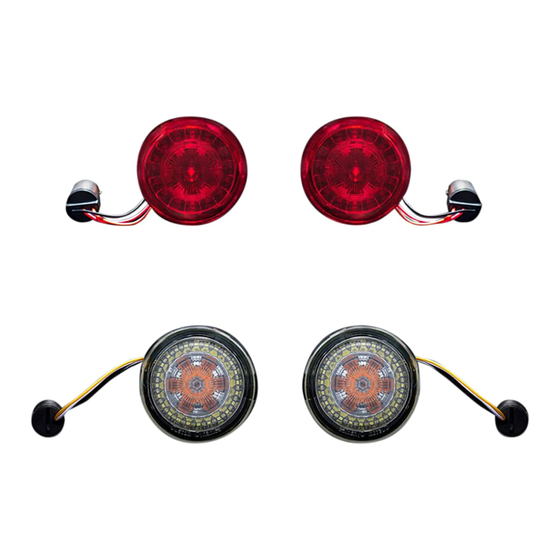
Package Contents:
- Front 1157 LED Turn Signals: Choice of Amber/
White w/ Smoke lens or Amber w/ Amber
Lens (1pr)
- Rear 1157 LED Turn Signals: Choice of Red Ring or
Solid Red w/ Red Lens (1pr)
US Patent 830597, 830595, 830596, 851817, 851327
Chinese Patent ZL-201830045649.4, ZL-201830409102.8, ZL-
201830409095.1, Other Patent Pending
Fitment:
2014-2022 Harley-Davidson® Street Glide (FLHX),
Street Glide Special (FLHXS), Road Glide (FLTRX), Road Glide
Special (FLTRXS), Road King Special (FLHRXS), 2018-2022 Softail
Street Bob (FXBB/FXBBS), Fat Boy (FLFB/FLFBS), Fat Bob (FXFB/
FXFBS), Softail Standard (FXST), Slim (FLSL) and Breakout (FXSB/
FXSR) 2011-2017 Blackline (FXS), Slim (FLS), Slim S (FLSS),
Breakout (FXSB), Street Bob (FXDB), 2012-2017 Dyna Wide Glide
(FXDWG), Low Rider S (FXDLS), 2014-2022 XL883N, XL1200X,
XL1200V, XL1200CX, XL1200NS, 2011-2012 Softail Convertible
CVO (FLSTSE2), 2014-2015 Softail Deluxe CVO (FLSTNSE), and
2014 Softail Breakout CVO (FXSBES).
ATTENTION
Please read all Information below before Installation
Note:
•
Use care in removing the OEM lens and bulbs from
the housing, so as not to scratch or mar the chrome
housing. Custom Dynamics® is not liable for damage
to chrome housing during installation.
•
Dielectric grease does not need to be used with this
LED product, it can actually prevent them from work-
ing. Remove any excess grease from your turn signal
sockets before inserting.
***IMPORTANT***
This LED product is BCM compliant. However, you must
run the 4 way hazard flashers for 3 minutes with ignition
switch in the "OFF" position to allow the BCM to sync the
new LED turn signals after they are installed.
Questions? Call us at: 1 (800) 382-1388 M-TH 8:30AM-5:30PM / FR 9:30AM-5:30PM EST
Installation:
1.
Remove the existing lens from turn signal housing. Use care in re-
moving the OEM lens and bulbs from the housing, so as not to
scratch or mar the chrome housing.
2.
Remove existing bulb from turn signal housing.
3.
Remove any corrosion or dielectric grease from the socket to insure
the socket contacts are clean.
4.
Using a small flat blade screwdriver, go around the perimeter of the
reflector and slightly push the black gasket into the housing to allow
proper clearance of the new LED turn signal. (see Figure 1)
5.
Confirm the proper orientation of the socket base and insert the base
into the socket. If it seems hard to twist the base in the socket or
hard to remove, it is probably orientated the wrong way.
6.
Twist the LED turn signal a few rotations to coil wire from the turn
signal to the socket base. Insert LED turn signal into housing and
install new lens.
7.
Confirm lens is installed correctly to prevent excess moisture or water
from entering the turn signal housing (see back page).
8.
Check operation of turn signal in all modes.
Caution: If there is a gap between the lens and the hous-
ing, water will leak into the unit and cause damage, be
sure the lens is fully seated all the way around the pe-
rimeter.
SEE BACK OF PAGE
Figure 1
P/N: PB-BCM-KIT1
02-2022
Advertisement
Table of Contents

Related Manuals for Custom Dynamics ProBEAM PB-BCM-KIT1


Summary of Contents for Custom Dynamics ProBEAM PB-BCM-KIT1
- Page 1 P/N: PB-BCM-KIT1 We thank you for purchasing the Custom Dynamics® ProBEAM® BCM COMPLIANT TURN SIGNAL CONVERSION KIT (1157 REAR, 1157 FRONT) LED turn signals! Our LEDs offer maintenance free service and higher visibility. Our ProBEAM® product line utilizes the latest technology and automotive grade components to ensure the highest level of reliable service. Custom Dynamics®...
- Page 2 PREVENTING WATER DAMAGE Custom Dynamics® ProBEAM® LED Turn Signals are coated with a thick layer of conformal coating which protects the circuit board from a normal amount of moisture or water damage. Follow the steps below to ensure your new ProBEAM®...
Need help?
Do you have a question about the ProBEAM PB-BCM-KIT1 and is the answer not in the manual?
Questions and answers