Advertisement
Quick Links
Advertisement

Related Manuals for BALDR HG01


Summary of Contents for BALDR HG01
- Page 1 USER MANUAL HG01 HS666 BALDR Email: service@baldr.com...
- Page 2 Thank you for choosing BALDR Wi-Fi weather station! We founded it...
- Page 3 Contents 1.INTRODUCTION -------------------------------------- 2.INSTALLATION --------------------------------------- 3. APP Functions --------------------------------------- 4.Troubleshooting 5. Warranty 6. FCC Statement...
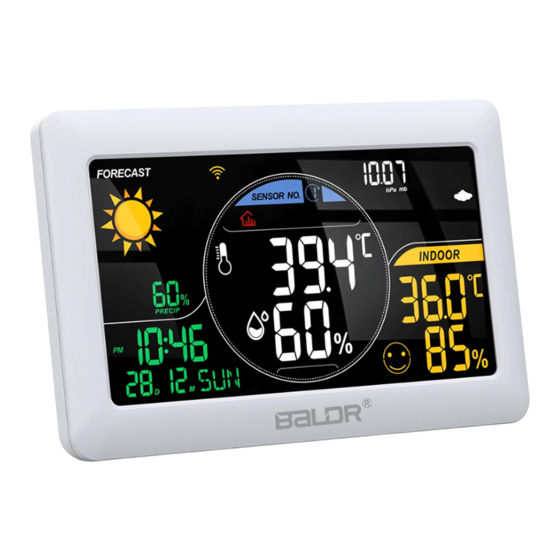
- Page 4 1. INTRODUCTION 1.1 Wi-Fi Weather Station Hub 1. Weather forecast 2. Rainfall probability 4. Icon for failed server connection 5. WIFI signal indication 6. Indoor sensor indication 7. Outdoor sensor indication 8. Soil sensor indication 9. Sensor channel display Every 5 seconds, each channel will display a cycle. 1 1 1...
- Page 5 11. Barometric pressure 16. Outdoor humidity 17. Weekday abbreviation 12. Indoor temperature 18. Calendar 13. Indoor humidity 20. Current time 15. Outdoor temperature SET +/ SENSOR buttons DC Inlet Wall mounting holes Standing bracket Backlight button To get accurate readings, please keep the devices away from dust, humidity, rain, heat source and direct sunlight. ...
- Page 6 1.2 Weather forecast Sunny Cloudy Rainy Snowy cloudy (night) • The GPS location is only used to receive the real-time weather forecast. None can check for your location in any way. Once you authorize it on app, you can get the most accurate weather conditions for your location. (My Home→ Home Management→ Home Settings→ Location ) • PRECIP icon shows the probability of rain. The percentage is from 1%-99%. The higher the percentage is, there is more chance to rain. Today is a cloudy day, and the probability of rain is only 25%.
- Page 7 1.3 Outdoor Sensor 1 1 1 1 1 1 1 1 3 2 1 Note: ·Please keep the detection window ventilated and avoid water ingress. ·Please make the sensor detection window to keep a appropriate distance about 2cm/0.79 inch from the wall. 330 feet / 100 m Update Rate of Outdoor Sensor: 2 minutes Water in the air (humidity) will affect the RF reception.
- Page 8 WiFi Weather Station AC Adapter Input: 100-240 V, 50/60 Hz DC Output: 5.0V 1.2 A 3 × AA batteries ( Not included) Note:WiFi weather station (Display hub) requires adapter for full functional display. We do recommend using DC adapter for better performance.Note:WiFi weather station (Display hub) requires adapter for full functional display.
- Page 9 Set up video Please choose your nation to get the common units such as ℃ or ℉. Tap the Initial word of you nation to fast find it out.
- Page 10 If do not receive the code: 1 . Please check if the registered email address is correct. 2 . Please check the spam mailbox. 3 . Please check if the country/region is correct. Please tap If you can account@homgarus.com register. We will manually create an account for you.
- Page 12 •2. Select 2.4 GHz Wi-Fi and enter the password: Add Device Select 2.4 GHz Wi-Fi and enter password WiFi 5, Wi-Fi 6 and dual-band routers need to split 2.4 GHz band and disable smart connect. Common router setting method 2.4G Only 2.4G Wi-Fi networks are supported Return to HomGar from the Wi-Fi Settings Next...
- Page 13 displays "SCAN": We do recommend using DC adapter for better performance. Batteries provide backup power only in an emergency.
- Page 14 18:00 Add Device Searching... Keep your phone and the device close to the wiFi router Devices Found: HWS388WRF-V7@ZT 019-V1 019-V1 019-V1 Display Hub...
- Page 15 * AP mode to connect the Wi-Fi weather station : Display Hub AP mode: •1. Tap "+ " to add a device on the HomGar Home page, then Display Hub. •2. Select 2.4 GHz Wi-Fi and enter the password. 18:00 18:00 Add Device Select 2.4 GHz Wi-Fi and...
- Page 16 •3. Tap " " 18:00 18:00 Add Device Add Devic e Switch Mode Switch Mode Smart W iFi Connection AP Connection Mode Mode 1.Hold the “ ” button of the hub for 5 seconds till it displays “SCAN”. 1.Turn on the power of the device and makesure (Note: Please power up the hub via AC adapter the device is ready for connecting.
- Page 17 till it displays “SCAN AP”. SCAN AP...
- Page 18 •5. Connect your phone to the device's Wi-Fi. Tap “Go Connecting” to connect the phone to the “HomGar_XXXX” Wi-Fi network. Please REFRESH your Wi-Fi networks if you can not Tap “Next” to continue. 2.4 GHz Wi-Fi.
- Page 19 •6. Auto pairing NOTE: If your weather station hub is disconnected from the HomGar APP, all you need to do is log in to the APP again and the weather station hub will automatically connect to the APP. 2.3 Connect the Outdoor Sensor SENSOR NO 1.
- Page 20 dashes appear on the screen. 3 2 1 3 2 1 •5. Repeat steps 1 ~ 4 to add sensor 2, and sensor 3. NOTE: If your sensor is disconnected from the HomGar APP or weather station, you can remove the sensor's batteries and reinstall it, and the sensor will automatically connect to the weather station or APP.
- Page 21 2.4 Install the Outdoor Sensor...
- Page 22 Channel 4~8: Soil Moisture Channels. sensors can detect and record soil temperature and humidity. BALDR Wi-Fi weather station and RainPoint HomGar Series are compatible with each other. Channel 9: Rain Gauge Channel.
- Page 23 3.1 HomGar App Home Page 18:00 Home Add Devices home Management 21mph 35 26 Rain 0% Home All Devices Living room Bedroom Weather Settings HWS388WRF-V7 sensor 1#1 Station Hub 24.5 C 26.4 C 5 9% Settings 49 % 1016mb sensor 2#2 sensor 3#3 Outdoor 25.1 C...
- Page 24 3.3 Home Management Add or Delete Home 3.4 Home Settings Update Your Location Set your home location for an online weather forecast. The GPS location is only used to get the local weather forecast and temperature and humidity in channel 0 from online. None can check for your location in any way.
- Page 25 3.5 Wi-Fi Weather Station Settings 18:00 18:00 HWS388 1009 outdoor 1 outdoor 2 22.5 22.5 Sub-devices Ch a rts "Charts": check the curve chart about temperature/ humidity/ air pressure of 24hours/10 days/more. Tip: Click "V" to select and switch to the item you need.
- Page 26 Buttons Function Enter setting page to edit the device name, view device information, set the display language of the weather station hub, adjust automatic backlight and so on. Set the background image and font color at lower right UI DIY corner of “UI DIY”...
- Page 27 3.6 Outdoor Sensor Settings Charts: You can check the 24 hours, 10 days, and more historical temperature/ humidity data via the charts. Setting: Edit your device name, DIY UI, check the battery status. back online when the RF signal gets better.
- Page 28 3.7 Account Settings John Account Setting: Change your profile photo, nickname, password or delete the account.
- Page 29 3.8 Backlight How to Adjust the Backlight? In Normal Mode: When powered on DC adapter, the screen of the weather station hub will permanently light up until you press the button to adjust the brightness. In APP: (My Devices(Weather Station Hub)→ Weather Station Settings→ Automatic Backlight→ Adjust the Backlight)
- Page 30 3.9 Supplement About Time Setting Manually Step1: Get the Indoor and Outdoor Data (1)Power on the weather station hub by DC Adapter. The indoor humidity & temperature will display on the screen as well as the barometric pressure. (2)Hold the “SENSOR” button to start RF reception. The “----” will flash on the screen.
- Page 31 (5)MD/DM Format: The “M& D” symbol will flash. (M: Month, D: Date). Press “ ” or “-” button to select M/D or D/M format. Press "SET" button to confirm. (6)Month: The “month” symbol will flash. Press “ ” or “-” button to adjust the value.
- Page 32 What happend Factors Solutions Can't log in to 1. Incorrect account 1. Check your account the HomGar app. name or password. name and password. If 2. Poor network. you forgot password, please tap "Forgot password". 2. Change to a better network and try again.
- Page 33 What happend Factors Solutions How to make the 1.Neither mode can Please Note: once you product exit be exited, you need press and hold the "SCAN" "SCAN to wait for the conne "+/ " button, the AP" mode? -ction to time out and weather station will erase exit automatically.
- Page 34 What happend Factors Solutions 5. Please do not delete the grayed-out sensor icon, otherwise the original settings and data will not be retained after reconnection. wrong date and Time zone was wrong. 1. Check for the yellow Or Manually set the time Wi-Fi icon in the upper time was wrong.
- Page 35 What happend Factors Solutions 1. "PRECIP" is also a inaccurate 1. Weather forecasts more important parameter, weather forecast are based on online you need to consider the weather forecasts and probability of rain. local data analysis 2. Check if your location Can't be 100% is correct: Open the accurate.
- Page 36 5.Warranty For more help: Email:service@baldr.com...
Need help?
Do you have a question about the HG01 and is the answer not in the manual?
Questions and answers