Table of Contents
Advertisement
Quick Links
Advertisement
Table of Contents

Subscribe to Our Youtube Channel
Related Manuals for Campbell MetSENS Series


Summary of Contents for Campbell MetSENS Series
- Page 1 Revision: 05/2023 Copyright © 2019 – 2023 Campbell Scientific, Inc.
-
Page 2: Table Of Contents
Table of contents 1. Introduction 2. Precautions 3. Initial inspection 4. QuickStart 5. Specifications 5.1 Air temperature measurement 5.2 Relative humidity measurements 5.3 Barometric pressure measurements 5.4 Wind speed measurements 5.5 Wind direction measurements 5.6 Precipitation input 5.7 Precipitation measurements 5.8 Compass 6. - Page 3 Appendix A. Importing Short Cut code into CRBasic Editor Appendix B. SDI-12 sensor support B.1 SDI-12 command basics B.1.1 Acknowledge active command (a!) B.1.2 Send identification command (al!) B.1.3 Start verification command (aV!) B.1.4 Address query command (?!) B.1.5 Change address command (aAb!) B.1.6 Start measurement commands (aM!) B.1.7 Start measurement commands with cyclic redundancy check (aMC! and aCC!) 28 B.1.8 Stopping a measurement command...
-
Page 4: Introduction
Care should be taken when opening the shipping package to not damage or cut the cable jacket. If damage to the cable is suspected, consult with a Campbell Scientific support and implementation engineer. -
Page 5: Quickstart
4. QuickStart A video that describes data logger programming using Short Cut is available at: www.campbellsci.com/videos/cr1000x-data logger-getting-started-program-part-3 . Short Cut is an easy way to program your data logger to measure the sensor and assign data logger wiring terminals. Short Cut is available as a download on www.campbellsci.com . - Page 6 4. Click the Wiring tab to see how the sensor is to be wired to the data logger. Click OK after wiring the sensor. 5. Repeat steps three and four for other sensors. 6. In Output Setup, type the scan rate, meaningful table names, and Data Output Storage Interval.
- Page 7 7. Select the measurement and its associated output option. 8. Click Finish and save the program. Send the program to the data logger if the data logger is connected to the computer. 9. If the sensor is connected to the data logger, check the output of the sensor in the data display in LoggerNet, RTDAQ, or PC400 to make sure it is making reasonable measurements.
-
Page 8: Specifications
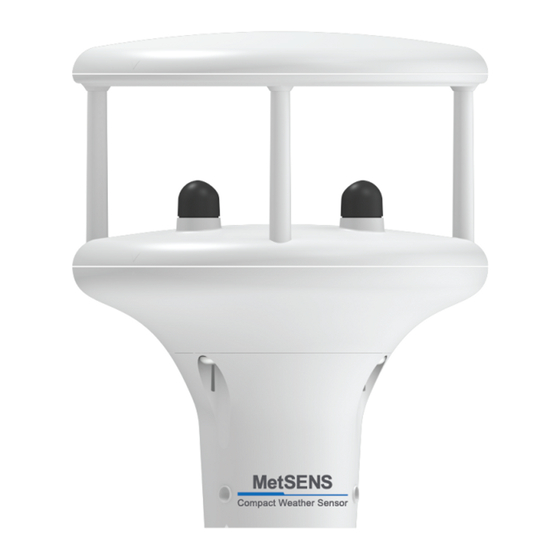
5. Specifications Sampling rate: 1 Hz Digital communication modes: Serial RS-232, RS-485, SDI-12, NMEA, Modbus, ASCII Default configuration RS-485: 19200 baud rate, 8 data bits, even parity, one stop bit; default Modbus address is 41 SDI-12: Default SDI-12 address is 0 RS-232: 9600 baud rate, 8 data bits, even parity, one stop bit IP rating:... - Page 9 Table 5-1: Measurements, weight, and dimensions Model Measurements Weight Dimensions Wind speed MetSENS200 Wind direction 0.5 kg (1.1 lb) Compass 142mm Air temperature MetSENS300 Relative humidity 0.5 kg (1.1 lb) Barometric pressure Ø38.5mm Ø44.5mm MetSENS-Series Compact Weather Sensors...
- Page 10 Table 5-1: Measurements, weight, and dimensions Model Measurements Weight Dimensions 142mm Air temperature Relative humidity Barometric pressure MetSENS500 0.7 kg (1.5 lb) Wind speed Wind direction Compass 38.5mm 44.5mm 142mm Air temperature Relative humidity Barometric pressure Wind speed MetSENS550 0.7 kg (1.5 lb) Wind direction Compass Connector for the...
-
Page 11: Air Temperature Measurement
Table 5-1: Measurements, weight, and dimensions Model Measurements Weight Dimensions 142mm Air temperature Relative humidity Barometric pressure MetSENS600 Wind speed 0.8 kg (1.8 lb) Wind direction Compass Precipitation (optical) Ø38.5mm Ø44.5mm 5.1 Air temperature measurement Measurement range: –40 to 70 °C Resolution: 0.1 °C Accuracy:... -
Page 12: Wind Speed Measurements
5.4 Wind speed measurements Measurement range: 0.01 to 60 m/s Resolution: 0.01 m/s Starting threshold: 0.01 m/s Accuracy: ±3% (up to 40 m/s), ±5% (up to 60 m/s) 5.5 Wind direction measurements Measurement range: 0° to 359° Resolution: 1° Accuracy: ±3°... -
Page 13: Installation
(Table 6-1 [p. 10]). Other Campbell Scientific data loggers can use an MD485 multidrop interface to read the RS-485 output. Refer to the MD485 manual for more information. The Modbus address must be unique and may need to be changed if another sensor on the bus has the same address. -
Page 14: Rs-232 Wiring
Assumes the sensor directly connects to the data logger. 6.2 Programming Short Cut is the best source for up-to-date programming code for Campbell Scientific data loggers. If your data acquisition requirements are simple, you can probably create and maintain a data logger program exclusively with Short Cut. -
Page 15: Modbus Programming
The RS-485 output can be directly read by a MeteoPV, CR6-series, CR1000X-series, or Modbus RTU RS-485 network. Other Campbell Scientific data loggers can use an MD485 multidrop interface to read the RS-485 output. Refer to the MD485 manual for information about using the MD485. -
Page 16: Sdi-12 Programming
ModbusClient() instruction has the following syntax: ModbusClient (Result, ComPort, Baud, Addr, Function, Variable, Start, Length, Tries, TimeOut, [ModbusOption]) The Addr parameter must match the sensor Modbus address. To collect all of the values, the Start parameter needs to be 1 and the Length parameter needs to correspond with the [p. -
Page 17: Siting Considerations For Wind Measurements
Table 6-4: RS-232 serial instructions Instruction Function SerialFlush() Clears the buffer. Scan() Establish a scan rate. SerialOut() Send command to sensor. Set up the COM port to receive the incoming serial data. Note that in the beginning of the CRBasic program, the variable used in SerialIn() SerialIn() instruction needs to be declared as an ASCII string... -
Page 18: Operation
NOTE: When installing the unit, handle with lint free gloves and degrease the unit to reduce the build-up of deposits. Mounting procedure: 1. If using the mounting pipe kit, thread the connector end of the cable through the tubing; start at the end without the three threaded holes. 2. - Page 19 Table 7-1: MetSENS200 RS-485 registers Starting register Register Data Label Units Description number count format Current, uncorrected 40001 FLOAT ° wind direction 40003 FLOAT SPEED Current wind speed Compass heading 40005 FLOAT COMPASSH ° of north mark 40007 FLOAT VOLT Supply voltage 5 min.
- Page 20 Table 7-3: MetSENS500 RS-485 registers Starting register Register Data Label Units Description number count format Current, uncorrected 40001 FLOAT ° wind direction 40003 FLOAT SPEED Current wind speed Compass heading 40005 FLOAT COMPASSH ° of north mark 40007 FLOAT PRESS Barometric pressure 40009 FLOAT...
-
Page 21: Sdi-12 Measurements
Table 7-4: MetSENS550/MetSENS600 RS-485 registers Starting register Register Data Label Units Description number count format Current, uncorrected 40001 FLOAT ° wind direction 40003 FLOAT SPEED Current wind speed Compass heading 40005 FLOAT COMPASSH ° of north mark 40007 FLOAT PRESS Barometric pressure 40009 FLOAT... - Page 22 Table 7-5: SDI-12 commands and values returned Response SDI-12 command Values returned Units time 1. Address (0 through 9) 1. n/a 2. Relative wind direction 2. ° 3. Relative wind speed 3. m/s aM! or aMC! 4. Corrected wind direction 4.
-
Page 23: Rs-232 Default Settings
7.3 RS-232 default settings The following are factory-default data strings. Table 7-6 (p. 22) provides the RS-232 default settings. MetSENS200 NODE, DIR, SPEED, CDIR, VOLT, STATUS, CHECK ┐ Q,021,000.01,090,+05.1,0000,└ Where, ┐ : STX (Start of String character; ASCII value 2) Node letter 021: Wind direction... - Page 24 Checksum (2 digit Hex Checksum sum figure calculated from the Exclusive OR of the bytes between, and not including, the STX and ETX characters) MetSENS500 NODE, DIR,SPEED, CDIR, PRESS, RH, TEMP, DEWPOINT, VOLT, STATUS, CHECK ┐ Q,021,000.01,090,1015.3,041,+022.0,+008.5,+05.1,0004,└ Where, ┐ : STX (Start of String character;...
- Page 25 0000.200: Precipitation total 000.200: Precipitation intensity +05.1 Supply voltage 0004 Status └ ETX (End of String character; ASCII value 3) Checksum (2 digit Hex Checksum sum figure calculated from the Exclusive OR of the bytes between, and not including, the STX and ETX characters) Table 7-6: Default settings Setting Setting...
-
Page 26: Sensor Status Code
7.4 Sensor status code NOTE: For all factory repairs, customers must get an RMA number. Customers must also properly fill out a “Declaration of Hazardous Material and Decontamination” form and comply with the requirements specified in it. Refer to the Assistance page at the back of this manual for more information. -
Page 27: Appendix A. Importing Short Cut Code Into Crbasic Editor
Appendix A. Importing Short Cut code into CRBasic Editor Short Cut creates a .DEF file that contains wiring information and a program file that can be imported into CRBasic Editor. By default, these files reside in the C:\campbellsci\SCWin folder. Import Short Cut program file and wiring information into CRBasic Editor: 1. -
Page 28: Appendix B. Sdi-12 Sensor Support
Serial Data Interface at 1200 baud (SDI-12 ) is a protocol developed to simplify sensor and data logger compatibility. Only three wires are necessary—serial data, ground, and 12 V. With unique addresses, multiple SDI-12 sensors can connect to a single SDI-12 terminal on a Campbell Scientific data logger. -
Page 29: Acknowledge Active Command (A!)
Table B-1: Campbell Scientific sensor SDI-12 command and response sets Name Command Response Address query a<CR><LF> aAb! Change address b<CR><LF> Start measurement atttn<CR><LF> aM1!...aM9! Start measurement aMC! atttn <CR><LF> aMC1!...aMC9! and request CRC Start concurrent measurement atttnn<CR><LF> aC1!...aC9! aCC! Start concurrent measurement atttnn<CR><LF>... -
Page 30: Start Verification Command (Av!)
ll = SDI-12 version number (indicates compatibility) cccccccc = 8-character vendor identification vvv = 3 characters specifying the sensor version (operating system) xxx…xx = Up to 13 optional characters used for a serial number or other specific sensor information that is not relevant for operation of the data logger <CR><LF>... -
Page 31: Start Measurement Commands (Am!)
B.1.6 Start measurement commands (aM!) A measurement is initiated with the M! command. The response to each command has the form atttn<CR><LF>, where a = sensor address ttt = time, in seconds, until measurement data is available; when the data is ready, the sensor notifies the data logger, and the data logger begins issuing D commands. -
Page 32: Stopping A Measurement Command
Data logger security may need to be unlocked before activating the transparent mode. Transparent mode is entered while the computer is communicating with the data logger through a terminal emulator program. It is accessed through Campbell Scientific data logger support MetSENS-Series Compact Weather Sensors... -
Page 33: Changing An Sdi-12 Address
Data logger keyboards and displays cannot be used. The terminal emulator is accessed through Campbell Scientific Device Configuration Utility software. Watch videos/sdi12-sensors-transparent-mode from our website. Data loggers from other manufacturers will also have a transparent mode. Refer to those manuals on how to use their transparent mode. - Page 34 5. Click the Terminal tab. 6. Select All Caps Mode. 7. Press Enter until the data logger responds with the data logger (CR1000X>) prompt. 8. Type SDI12 and press Enter. 9. At the Select SDI12 Port prompt, type the number corresponding to the control port where the sensor is connected and press Enter.
- Page 35 11. To change the SDI-12 address, type aAb!, where a is the current address from the previous step and b is the new address. Press Enter. The sensor changes its address and responds with the new address. In the following example, the sensor address is changed from 0 to B. 12.
- Page 36 See Product Details on the Ordering Information pages at www.campbellsci.com . Other manufacturer's products, that are resold by Campbell Scientific, are warranted only to the limits extended by the original manufacturer. Refer to www.campbellsci.com/terms#warranty for more information.
- Page 37 To obtain a Returned Materials Authorization or Repair Reference number, contact your CAMPBELL SCIENTIFIC regional office. Please write the issued number clearly on the outside of the shipping container and ship as directed. For all returns, the customer must provide a “Statement of Product Cleanliness and Decontamination”...
- Page 38 Do not recharge, disassemble, heat above 100 °C (212 °F), solder directly to the cell, incinerate, or expose contents to water. Dispose of spent batteries properly. WHILE EVERY ATTEMPT IS MADE TO EMBODY THE HIGHEST DEGREE OF SAFETY IN ALL CAMPBELL SCIENTIFIC PRODUCTS, THE CUSTOMER ASSUMES ALL RISK FROM ANY INJURY RESULTING FROM IMPROPER INSTALLATION, USE, OR MAINTENANCE OF TRIPODS, TOWERS, OR...
- Page 39 Campbell Scientific Regional Offices Australia France Thailand Location: Garbutt, QLD Australia Location: Vincennes, France Location: Bangkok, Thailand Phone: 61.7.4401.7700 Phone: 0033.0.1.56.45.15.20 Phone: 66.2.719.3399 Email: info@campbellsci.com.au Email: info@campbellsci.fr Email: info@campbellsci.asia Website: www.campbellsci.com.au Website: www.campbellsci.fr Website: www.campbellsci.asia Brazil Germany Location: São Paulo, SP Brazil...
Need help?
Do you have a question about the MetSENS Series and is the answer not in the manual?
Questions and answers