
Related Manuals for Campbell HydroSense II Series


Summary of Contents for Campbell HydroSense II Series
- Page 1 HS2 and HS2P (HydroSense II) Revision: 1/19 Copyright © 2011 – 2019 Campbell Scientific...
- Page 3 Quotations for repairs can be given on request. It is the policy of Campbell Scientific to protect the health of its employees and provide a safe working environment, in support of this policy a “Declaration of Hazardous Material and Decontamination”...
- Page 5 PLEASE READ FIRST About this manual Please note that this manual was originally produced by Campbell Scientific Inc. primarily for the North American market. Some spellings, weights and measures may reflect this origin. Some useful conversion factors: Area: 1 in...
- Page 7 • Periodically (at least yearly) check electrical ground connections. WHILE EVERY ATTEMPT IS MADE TO EMBODY THE HIGHEST DEGREE OF SAFETY IN ALL CAMPBELL SCIENTIFIC PRODUCTS, THE CUSTOMER ASSUMES ALL RISK FROM ANY INJURY RESULTING FROM IMPROPER INSTALLATION, USE, OR MAINTENANCE OF TRIPODS, TOWERS, OR ATTACHMENTS TO TRIPODS AND TOWERS...
-
Page 9: Table Of Contents
Table of Contents PDF viewers: These page numbers refer to the printed version of this document. Use the PDF reader bookmarks tab for links to specific sections. 1. Introduction..............1 2. Precautions ..............2 3. QuickStart ..............2 4. Overview ..............3 5. - Page 10 Table of Contents What is stored? ................... 18 Software ..................... 19 Connecting via Bluetooth ..............19 Collecting Data................... 19 9. GPS ................19 GPS Synchronization ................. 20 Geotagging and Zones ................ 20 10. Troubleshooting ............22 11. Maintenance ............. 22 11.1 Batteries .....................
- Page 11 Table of Contents Tables 4-1. Comparison of HydroSense II and HydroSense(I) .......4 4-2. HydroSense II Parts ................5 6-1. Default Soil Profiles ................10 7-1. Status Icons ..................16...
-
Page 13: Introduction
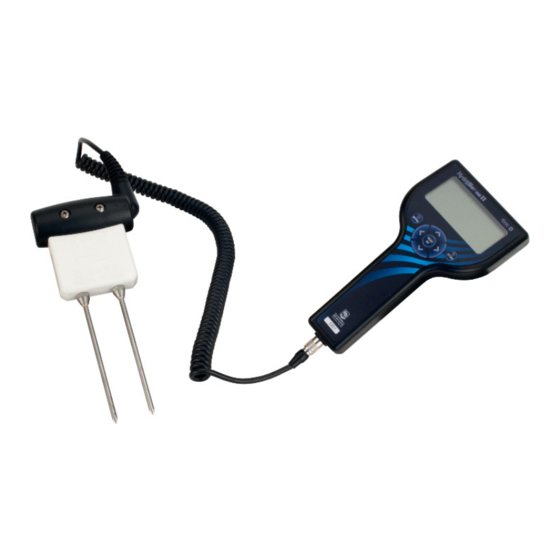
HS2 and HS2P Introduction FIGURE 1-1. HS2 HydroSense II System FIGURE 1-2. HS2P HydroSense II Pole System... -
Page 14: Precautions
A sensor with 12 cm rods (model CS659 or CS659P) and a sensor with 20 cm rods (model CS658 or CS658P) are available. Campbell Scientific offers the HS2, the standard HydroSense II system, and the HS2P, a HydroSense II system with a strong handle and pole. FIGURE 1-1,... -
Page 15: Overview
HS2 and HS2P CAUTION The connector is a push-pull type with locators to align the connectors. The connectors can be damaged if the user attempts to screw or unscrew them. To mate the connectors, simply bring them together and turn until they are aligned, then applying firm pressure, slide them together until they click. -
Page 16: Comparison Of Hydrosense Ii And Hydrosense(I)
HS2 and HS2P TABLE 4-1. Comparison of HydroSense II and HydroSense(I) Feature HydroSense II HydroSense (I) Volumetric water Yes, period as μs Yes, period as ms content and period Relative water content Yes (10 profiles) Yes (5 sites) and water deficit with wet and dry references Sensor rod length 20 cm and 12 cm... -
Page 17: Hydrosense Ii Parts
HS2 and HS2P The HydroSense II has these default power saving features: turns off when idle for a configurable period • • adjustable backlight brightness and on-time backlight automatically disabled in bright conditions • GPS and Bluetooth can each be forced off. •... -
Page 18: Hs2 Parts In Hard Carrying Case
HS2 and HS2P Screwdriver CS658 Wrench Loctite HS2 Display Spare Battery Holder FIGURE 4-1. HS2 Parts in Hard Carrying Case FIGURE 4-2. HS2P Carrying Tote HydroSoft CD HS2P Pole CS659P Display Wrench Spare Battery Holder Loctite FIGURE 4-3. HS2P Parts... -
Page 19: Specifications
HS2 and HS2P Below are spare and supporting parts available from Campbell Scientific: Spare 20 cm rods (pn #26483) for the CS658 or CS658P sensor • Spare 12 cm rods (pn #10184) for the CS659 or CS659P sensor • USB Bluetooth adapter for supporting PCs (pn #28411). -
Page 20: Physical
HS2 and HS2P Precision: <0.05% Accuracy: ±3% VWC in mineral soils with solution EC ≤4.0 dS/m (20 cm rods) with solution EC ≤6.5 dS/m (12 cm rods) 5.2.2 Physical Weight: 0.45 kg (0.99 lb) Sensor body dimensions (L x W x H): 100 x 92 x 40 mm (3.9 x 3.6 x 1.6 in) Rod length: 20 cm and 12 cm;... -
Page 21: Water Content Data
HS2 and HS2P Water Content Data Volumetric water content (VWC) and period (PER) data are retrieved from the sensor. The HydroSense II sensor uses a proprietary technique to determine water content over widely varying soils while correcting for a range of bulk electrical conductivities. -
Page 22: Soil Types
HS2 and HS2P An RWC value greater than 100% indicates that the soil has a water content value greater than the “wet” reference; a negative value indicates that the water content is below the “dry” reference. Water required (in mm of applied water) to return the soil to the “wet” reference is also calculated and reported as water deficit. -
Page 23: Configuring Soil Profiles
HS2 and HS2P 6.4.2 Configuring Soil Profiles When Deficit Mode is enabled (Section 7.3.4, Deficit Display ), soil (p. 17) of the HydroSense II. To profiles are accessed from the main screen (p. 15) select the current soil profile (“SOIL 1” in the preceding figure), press the button. -
Page 24: Storage
HS2 and HS2P The screen will show MEASURING… while the measurement is taken. After 3 to 4 seconds, the soil profile page will be shown with the reference value changed. Repeat this process for the remaining wet or dry set point. If desired, the soil profile can be cleared by selecting CLEAR SOIL then... -
Page 25: Rod Insertion
EC. The calibration coefficients to convert measured time of travel to dielectric constant and water content are contained within the sensor head and are the intellectual property of Campbell Scientific. 6.4.4.2 Rod Insertion For accurate, repeatable measurements, the rods of the sensor must be fully inserted into the soil. -
Page 26: Measurements In Special Materials
HS2 and HS2P otherwise occupied by the fine soil fraction, but they do not hold water in the same manner as soil. If two proximal measurements are made in rocky soil, the measured water content can differ significantly if large quantities of rock occupy part of the sensitive volume of one measurement but not the other. -
Page 27: Splash Screen
HS2 and HS2P Splash Screen To turn the HydroSense II on, press and hold for 3 seconds. The following splash screen is displayed. The operating system version number and device serial number are displayed. The splash screen is shown for 2.5 seconds. Main Screen After the splash screen, the main screen is shown. -
Page 28: Status Information
HS2 and HS2P 7.3.2 Status Information The zone name is shown in the upper left of the screen: When the current position is not within an existing zone, NOT IN A ZONE is displayed. When the HydroSense II is moved within the boundaries of an existing zone (such as ZONE 00001 in the following figure), the zone name will be displayed. -
Page 29: Measurement Display
HS2 and HS2P 7.3.3 Measurement Display The centre left of the screen contains the measurement results. VWC — This section shows volumetric water content in percent. This • value is automatically compensated for varying soil conditions. If the measurement is out of range the display will show “---” in this position. PER —... -
Page 30: Data Storage And Retrieval
HS2 and HS2P The water deficit section of the display contains the following information. SOIL # (soil profile number) — Range: 1 to 10. • RWC — relative water content. Range: 0% to 100% where 0% represents • “dry” (wilting point) and 100% is “wet” (field capacity). DEF—... -
Page 31: Software
The HydroSense II ships with the latest version of the HydroSense II Support Software on CD. For the latest version, please contact Campbell Scientific. For a complete guide to the use of this software, please refer to the HydroSense II Support Software user guide. -
Page 32: Gps Synchronization
HS2 and HS2P more than four satellites, it will use the additional data to determine a more accurate position. GPS Synchronization The GPS receiver needs a clear view of the sky to reliably calculate position. When the receiver resolves the current position, it has achieved “synchronization”. - Page 33 HS2 and HS2P To create a new zone, select YES and press . To exit without storing, press When a new zone is created, the following screen is displayed. Use the buttons to select the radius to use for this zone and press to save the new zone details.
-
Page 34: Troubleshooting
Check that the connectors are mated correctly, the pins are clean, and the connector has not been damaged. If this problem persists, please contact Campbell Scientific. Display shows “NO GPS This warning indicates that the GPS has not LOCK. STORE achieved synchronization with the GPS satellite ANYWAY?”... -
Page 35: Replacing The Battery Pack
HS2 and HS2P have replacement batteries available. The HydroSense II carry case has a spare battery pack (holder only – batteries not included). Configuration settings, stored data, and zones are stored in flash memory such that they will be preserved during battery replacement. 11.1.1 Replacing the Battery Pack The process to replace the battery pack is: If using the HS2P, follow the procedure provided in Section 11.2,... -
Page 36: Removing Display From Hs2P Pole
HS2 and HS2P 11.2 Removing Display from HS2P Pole Disconnect the sensor cable at the bottom of the display. Squeeze the clip to release the display from its holder. -
Page 37: Rod Replacement
Small bends can often be straightened by hand, but more serious bends may require rod replacement. Spare rods can be purchased from Campbell Scientific. • Spare 20 cm rods (pn #26483) for the CS658or CS658P sensor Spare 12 cm rods (pn #10184) for the CS659 or CS659P sensor •... - Page 38 HS2 and HS2P The procedure for replacing the rods is as follows: If using the HS2P, slip off the plastic bumper. Bumper Sensor Head Wrench Use the wrench (pn #26156) to unscrew the rods. Ensure that the threads of the replacement rods and the sensor body are clean and free from damage.
-
Page 39: Replacing An Hs2P Sensor
HS2 and HS2P 11.4 Replacing an HS2P Sensor HS2P Pole Sensor Bumper Hex Bolt Unplug the cable that attaches the sensor to the display. Remove the plastic bumper. Use the wrench to remove the hex bolts and nuts that secure the sensor to the pole. - Page 40 HS2 and HS2P Begin an operating system upgrade with a fresh set of batteries. If the batteries in the HydroSense II fail during the update process, corruption of the operating system can result. Normally, the batteries can be replaced and the update restarted.
-
Page 41: Configuration Menus
Appendix A. Configuration Menus A.1 Main Menu To enter the main menu, press from the . Using the main screen (p. 15) buttons, select the desired menu item and press . To exit the menu, press A.2 Deficit Mode This menu selects whether or not soil deficit is displayed. Select ON to show deficit results and OFF to hide them. -
Page 42: Time/Date Menu
Appendix A. Configuration Menus A.4 Time/Date Menu This submenu contains a list of settings to configure the clock system of the HydroSense II. Using the buttons, highlight one of the options and press . Alternatively, press to quit this menu. A.5 Time Set The HydroSense II clock is normally set automatically at GPS sync. -
Page 43: Time Zone
Appendix A. Configuration Menus A.7 Time Zone The HydroSense II is able to use its GPS to provide a very accurate clock. Whenever a valid GPS signal is detected, the clock is adjusted using the received time (in UTC) and the time zone selected in this menu. Time zones from UTC-12 to UTC+14 are available. -
Page 44: Time Synchronization
Appendix A. Configuration Menus A.8 Time Synchronization The HydroSense II uses its GPS to provide a very accurate clock. Whenever a valid GPS signal is detected, the clock is adjusted using the received time (in UTC) and the configured time zone. To use GPS synchronization, select ON from the list, or OFF to ignore the GPS time. -
Page 45: Brightness
Appendix A. Configuration Menus A.11 Brightness This menu allows the brightness of the LCD backlight to be adjusted. Since the backlight uses a significant amount of power, reducing the brightness will extend battery life. In bright, sunny conditions, the backlight has very little effect and generally doesn’t help readability, so the HydroSense II detects the ambient light conditions and automatically turns off the backlight when exposed to bright daylight. -
Page 46: Gps Settings
Appendix A. Configuration Menus A.14 GPS Settings This submenu contains a list of settings related to the GPS. Using the buttons, highlight one of the options shown and press to select that item. Alternatively, press to exit the menu. A.15 GPS Power This menu controls power to the GPS module. -
Page 47: System Settings
Appendix A. Configuration Menus A.17 System Settings This submenu contains a list of system-wide settings. Using the buttons, highlight one of the options shown and press . Alternatively, press to exit the menu. A.18 System on Time To save power, the HydroSense II will automatically power off after a period of inactivity. -
Page 48: Serial Number
Appendix A. Configuration Menus A.20 Serial Number This screen displays the serial number of the HydroSense II. This should match the serial number labelled on the front panel of the unit. to exit this Press screen. - Page 50 Campbell Scientific Worldwide Offices Australia Germany Location: Garbutt, QLD Australia Location: Bremen, Germany Email: Email: info@campbellsci.com.au info@campbellsci.de Website: www.campbellsci.com.au Website: www.campbellsci.de Brazil South Africa Location: São Paulo, SP Brazil Location: Stellenbosch, South Africa Email: andread@campbellsci.com.br Email: sales@csafrica.co.za Website: Website: www.campbellsci.com.br www.campbellscientific.co.za...
Need help?
Do you have a question about the HydroSense II Series and is the answer not in the manual?
Questions and answers