
Subscribe to Our Youtube Channel
Related Manuals for Mustek PowerMust 6054 LCD


Summary of Contents for Mustek PowerMust 6054 LCD
- Page 1 USER MANUAL PowerMust 6054 LCD (6KVA),RM, Online, IEC PowerMust 10900 LCD (10KVA),RM, Online, IEC...
-
Page 2: Table Of Contents
Contents 1. Introduction ..................1 2. Safety Warnings .................. 4 2.1 Installation ..................4 2.2 Operation ..................5 2.3 Maintenance, servicing and faults ........... 6 2.4 Transport ..................7 2.5 Storage ................... 7 2.6 Standards ..................7 3. Installation ................... 9 3.1 Inspecting the Equipment .............. - Page 3 8.1 Typical Alarms and Conditions ............53 9. Communication ................. 58 9.1 RS-232 and USB Communication Ports ........58 9.2 Network Management Card (Optional) .......... 60 9.3 UPS Management Software ............60 9.4 REPO Function ................61...
-
Page 4: Introduction
1. Introduction This Online R/T Series is an uninterruptible power supply incorporating double-conversion technology. It provides perfect protection specifically for computer equipment, communication systems to computerized instruments. It protects your sensitive electronic equipment from basic power problems such as power failures, power sags, power surges, brownout, and line noise. - Page 5 Figure 1-2: Online R/T 10K UPS Online R/T UPS as Tower installation. Figure 1-3: Online R/T 6K UPS Figure 1-4: Online R/T 10K UPS...
- Page 6 Providing outstanding performance and reliability, the UPS’s unique benefits include: Online UPS design with pure sine wave output. True online double-conversion technology with high power density, utility frequency independence, and generator compatibility. Intelligent Battery Management technology that uses advanced battery management to increase battery service life, optimize recharge time.
-
Page 7: Safety Warnings
2. Safety Warnings CAUTION: Before performing the procedures in this document, read and follow the safety instructions and important regulatory information in your Safety, Environmental, and Regulatory Information document. IMPORTANT SAFETY INSTRUCTIONS FOR EACH STEP SAVE THESE INSTRRUCTIONS. 2.1 Installation Condensation may occur if the UPS is moved directly from a cold to a warm environment. -
Page 8: Operation
3 mm. Uninterruptible power supply 240V output power 40 amp PowerMust 6054 LCD RM 2-pole circuit breaker 63 amp PowerMust 10900 LCD RM 2-pole circuit breaker You can connect four extended battery modules to the uninterruptible power supply. -
Page 9: Maintenance, Servicing And Faults
Ensure that no liquid or other foreign objects can enter the UPS. The UPS can be operated by any individual without previous experience. 2.3 Maintenance, servicing and faults The UPS operates with hazardous voltages. Maintenance should be carried out only by qualified maintenance personnel. Caution - risk of electric shock. -
Page 10: Transport
5) Do not open or destroy batteries. Effluent electrolyte can cause injury to the skin and eyes. It may be toxic. Please replace the fuse only with the same type and of the same amperage in order to avoid fire hazards. Do not dismantle the UPS, except the qualified maintenance personnel. - Page 11 Power-frequency Magnetic field..:IEC/EN 61000-4-8 Level 3 Low Frequency Signals....:IEC/EN 61000-2-2 Warning: This is a product for commercial and industrial application in the second environment-installation restrictions or additional measures may be needed to prevent disturbances.
-
Page 12: Installation
3. Installation This chapter explains: Equipment inspection Unpacking the cabinet Checking the Accessory UPS setup and installation Connecting the internal battery Connecting the EBM(Extended Battery Modules) Installation requirements 3.1 Inspecting the Equipment If any equipment has been damaged during shipment, keep the shipping cartons and packing materials for the carrier or place of purchase and file a claim for shipping damage. - Page 13 Step 1: Open the outer carton and remove the accessories out of the carton (see Figure 3-1&3-2). Online R/T 6K UPS: Figure 3-1: Unpacking the carton of 6K UPS Online R/T 10K UPS Figure 3-2: Unpacking the carton of 10K UPS...
- Page 14 CAUTION: The cabinet is heavy. Lifting the cabinet out of the carton required two persons at least. Step 2: With one person on each side, carefully lift the cabinet out of the outer carton using the handles on the cardboard and set it on a flat, stable surface (see Figure 3-3&3-4).
-
Page 15: Ups Rear Panel
Figure 3-4: Lifting the Cabinet out of 10K UPS carton Step 3: Discard or recycle the packaging in a responsible manner, or store it for future use. 3.3 UPS Rear Panel This section shows the rear panel of the Online R/T models. PowerMust 6054 LCD RM Figure 3-5:... -
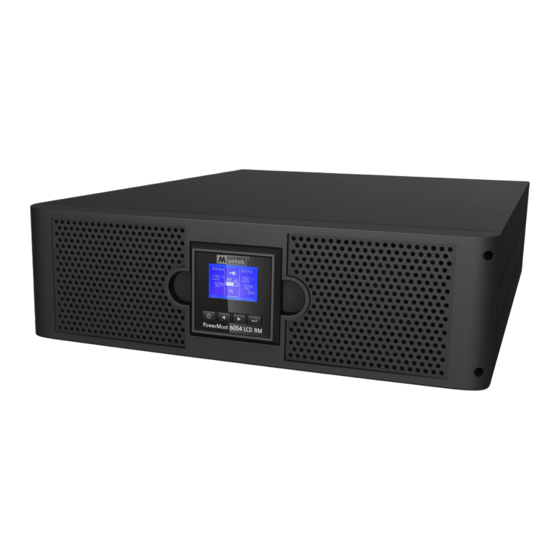
Page 16: Ups Front Panel
PowerMust 10900 LCD RM Figure 3-6: 3.4 UPS Front Panel This section shows the front panel of the Online R/T UPS. The Online series have the same LCD panel and the same control button. Figure 3-7: The Online R/T UPS Front Panel... -
Page 17: Rackmount Setup
3.5 Rack mount Setup CAUTION: The cabinet is heavy, so: 1) Remove the battery tray from the UPS before lifting. 2) Lifting the cabinets into the rack requires a minimum of two people. CAUTION: Removing the batteries requiered precautions, which should be performed or supervised by personnel with knowledge of batteries . - Page 18 5. Pull the battery tray out using the plastic tabs and then remove the battery tray. Figure 3-11: Removing the Battery Tray 6. Install the PDU’s ears to the UPS Figure 3-12. Install the PDU’s ears to the UPS 7. Select the proper holes in the rail for positioning the cabinet in the desired location in the rack.
- Page 19 Figure 3-13. Install the sliding rails 9. For 10K---Install the battery pack and battery protection plate, then replace the front panel. Figure 3-14. Installing the Cabinet 10. For 6K---Replace the battery tray, and connect the internal battery connector, then replace the protection plate and the front panel.
- Page 20 To install EBMs: 6K Model: 1. Plug the EBM cable into the UPS battery connector Figure 3-15. Plug the EBM cable into the UPS battery connector 2. Replace UPS’s front panel and EBM’s front panel. Figure 3-16. Replace UPS’s front panel and EBM’s front panel.
Need help?
Do you have a question about the PowerMust 6054 LCD and is the answer not in the manual?
Questions and answers