H3C S9500E Series Installation Manual
Routing switches
Hide thumbs
Also See for S9500E Series:
- Configuration manual (459 pages) ,
- Command reference manual (225 pages) ,
- Security configuration manual (207 pages)

Related Manuals for H3C S9500E Series


Summary of Contents for H3C S9500E Series
- Page 1 H3C S9500E Series Routing Switches Installation Manual Hangzhou H3C Technologies Co., Ltd. http://www.h3c.com...
- Page 2 SecPro, SecPoint, SecEngine, SecPath, Comware, Secware, Storware, NQA, VVG, V G, V G, PSPT, XGbus, N-Bus, TiGem, InnoVision and HUASAN are trademarks of Hangzhou H3C Technologies Co., Ltd. All other trademarks that may be mentioned in this manual are the property of their respective owners.
- Page 3 The H3C S9500E documentation set includes 13 configuration guides, which describe the software features for the H3C S9500E Series Routing Switches and guide you through the software configuration procedures. These configuration guides also provide configuration examples to help you apply software features to different network scenarios.
- Page 4 Conventions This section describes the conventions used in this documentation set. Command conventions Convention Description Boldface Bold text represents commands and keywords that you enter literally as shown. italic Italic text represents arguments that you replace with actual values. Square brackets enclose syntax choices (keywords or arguments) that are optional.
- Page 5 Network topology icons Convention Description Represents a generic network device, such as a router, switch, or firewall. Represents a routing-capable device, such as a router or Layer 3 switch. Represents a generic switch, such as a Layer 2 or Layer 3 switch, or a router that supports Layer 2 forwarding and other Layer 2 features.
- Page 6 Provides a complete guide to hardware installation Installation guide and hardware specifications. Card manuals Provide the hardware specifications of cards. H3C N68 Cabinet Guides you through installing and remodeling H3C Hardware Installation and Remodel N68 cabinets. Introduction specifications and installation...
- Page 7 Obtaining documentation You can access the most up-to-date H3C product documentation on the World Wide Web at http://www.h3c.com. Click the links on the top navigation bar to obtain different categories of product documentation: [Technical Support & Documents > Technical Documents] –...
- Page 8 Table of Contents Preface ·········································································································································································· 3 Audience ············································································································································································ 3 Conventions ······································································································································································· 4 About the H3C S9500E Documentation Set ·················································································································· 6 Product overview ························································································································································ 12 Overview········································································································································································· 12 Physical architecture ······················································································································································ 12 Chassis and slots ··················································································································································· 12 Backplane ······························································································································································ 18 Power supply system ············································································································································· 19 Fan tray ··································································································································································...
- Page 9 EMS requirements ················································································································································· 40 Grounding requirements ······································································································································· 41 Power supply requirements ·································································································································· 41 Space requirements ··············································································································································· 41 Cabinet-mounting requirements ··························································································································· 41 Installation tools ······························································································································································ 41 Installing the switch ···················································································································································· 43 Installation flow ······························································································································································ 43 Installing the switch ························································································································································ 43 Installation preparation ········································································································································· 43 Installing the switch in the rack ····························································································································...
- Page 10 Updating applications on the BootWare menu ································································································· 69 Updating applications at the CLI ························································································································· 79 Troubleshooting software update ························································································································ 80 Password loss ························································································································································· 81 Obtaining support for your product·························································································································· 82 Register your product ····················································································································································· 82 Purchase value-added services ····································································································································· 82 Troubleshoot online ························································································································································...
- Page 11 Japan regulatory compliance ····································································································································· 106 VCCI ····································································································································································· 106 CISPR 22 compliance ·················································································································································· 106 Safety information Sicherheits informationen安全信息 ························································································ 107 Overview Überblick 概述 ············································································································································ 107 Conventions used Symbole Erläuterung应用惯例 ···························································································· 108 General requirements Allgemeine Anforderungen通用要求 ·········································································· 109 Electricity safety Elektrische Sicherheit 用电安全 ······································································································ 111 High Voltage Hochspannung高电压...
- Page 12 In this manual, hardware configurations and installation of the S9505E, S9508E-V and S9512E are the same unless otherwise specified. Physical architecture The S9500E series use an integrated chassis, which consists of a backplane section, power supply section, fan section, and board section. Chassis and slots Your devices may look different from the diagrams in the manual.
- Page 13 (1) MPU slots (slots 0 and 1) (2) LPU slots (slots 2 to 6) (3) PoE power entry module (reserved, not supported at present) (4) PSUs (5) ESD-preventive wrist strap port Figure 2 S9505E rear view...
- Page 14 (1) Fan tray slot (2) Rear cover handles (3) Grounding screw • An MPU and an LPU cannot be intermixed. • At the bottom of the chassis is the PSU section. The PSU section contains PSUs that provide AC input and DC input. Redundant backup is supported. •...
- Page 15 (1) Fan tray (2) MPU slots (slots 4 and 5) (3) LPU slots (slots 0 to 3, 6 to 9) (4) Air inlet (5) PSUs (6) PoE power entry module (reserved, not supported at present) (7) ESD-preventive wrist strap port Figure 4 S9508E-V rear view...
- Page 16 (1) Rear cover handle (2) Grounding screw • An MPU and an LPU cannot be intermixed. • At the bottom of the chassis is the PSU section. The PSU section contains PSUs that provide AC input and DC input. Redundant backup is supported. •...
- Page 17 (1) LPU slots (slots 0 to 5, 8 to 13) (2) PoE power entry module (reserved, not supported at present) (3) PSUs (4) MPU slots (slots 6 and 7) (5) ESD-preventive strap port Figure 6 S9512E rear view...
- Page 18 (1) Fan tray and handle (2) Rear cover handle (3) Grounding screw • An MPU and an LPU cannot be intermixed. • At the bottom of the chassis is the PSU section. The PSU section contains PSUs that provide AC input and DC input. Redundant backup is supported. •...
- Page 19 Power supply system The S9500E series switches support both AC and DC power supply. You can select either AC or DC PSUs as needed. However, PSUs of different types cannot operate on the same S9500 series switch. H3C recommends that you configure redundancy backup of PSUs.
- Page 20 • A fan tray on the S9505E and the S9512E consists of 4 fan units. The power of a fan tray ranges from 12 W to 40 W. • A fan tray on the S9505E-V consists of 6 fan units. The power of a fan tray ranges from 16 W to 60 W.
- Page 21 The models of the active MPU and the standby MPU must be the same; otherwise, the standby MPU • cannot boot normally. To use USB disks on an MPU, you are recommended to use the USB disks provided by H3C (optional • when you purchase an MPU).
- Page 22 (1) SMB coaxial clock interfaces (reserved, not supported at present) (2) LPU LED (the numbers are slot numbers) (3) MPU LED (4) Reset button (5) Active (HOST)USB interface (6) Standby (DEV) USB interface and the LED (7) AUX port (8) Console port (9) RS232/485 interface (reserved, not supported at present) (10) Network management port (11) CF card and LED...
- Page 23 LEDs Table 5 Description of CF and LEDs Status Description The CF card is in position and idle. Do not hot-unplug it now. The CF card is in position and performing read/write operations. Blinking Do not unplug it now. The CF card is out of position or offline. You can plug in or unplug the CF card now.
- Page 24 Item Description MPC8544 Boot ROM 2 MB SDRAM 512 MB Dimensions (the filler panel included) (H × W × D) 40 × 400 × 380 mm (1.57 ×15.75 ×14.96 in.) Chassis S9505E/S9508E-V/S9512E Table 9 Interface type and power consumption of each LPU LPU model Interface type and number Power consumption...
- Page 25 (1) 10/100/1000 Mbps auto-sensing RJ-45 electrical interfaces and LEDs (16 in total) (2) Combo interfaces (8 in total) (3) Combo interface LEDs The appearance of the LSR2GT24LEB1 is similar to that of the LSR1GT24LEC1. The auto-sensing RJ-45 electrical interfaces are numbered from 1 to 16. Refer to the following table for the interface LEDs description.
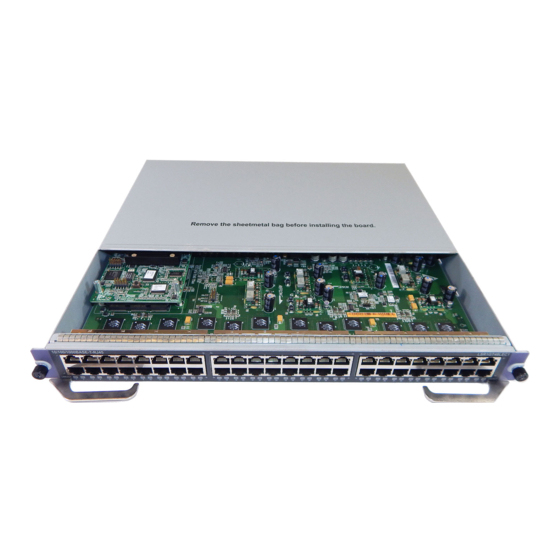
- Page 26 (1) 10/100/1000 Mbps auto-sensing RJ-45 electrical interfaces and LEDs (48 in total) (2) Interface LEDs The appearance of the LSR2GT48LEB1 is similar to that of the LSR1GT48LEC1. The auto-sensing RJ-45 electrical interfaces are numbered from 1 to 48. Refer to Table 10 for the interface LEDs description.
- Page 27 (1) GE SFP/LC optical interfaces (48 in total) (2) Interface LED The appearance of the LSR1GP48LEC1 is similar to that of the LSR1GP48LEB1. The GE optical interfaces are numbered from 1 to 48. See Table 10 for the interface LEDs description.
- Page 28 The appearance of the LSR1XP2LEB1 is similar to that of the LSR1XP2LEC1. The 10G optical interfaces are numbered 1 and 2. See Table 12 for the interface LEDs description. Table 12 Description of interface LEDs Color Status Description No link is present. LINK Green A link is present.
- Page 29 The interface is receiving or sending data. The 10G SFP+ optical interfaces are numbered from 1 and 16. For the models and attributes of the optional SFP+ transceivers, refer to Table 20. Interface specifications The S9500E series support the following interface types: • Console port •...
- Page 30 Figure 18 An RJ-45 connector Table 14 Console port specifications Item Specification Connector type RJ-45 Interface standard Asynchronous EIA/TIA-232 Baud rate 9600 bps to 115200 bps, 9600 bps by default It can be connected to the serial interface of a local PC running terminal emulation software, or to an ASCII terminal.
- Page 31 It can be used to record logs, store multiple program files and configuration CF card functions files. Use CF cards provided by H3C only. The device may be incompatible with other CF cards. • An inserted CF card can be used only after you install and fasten the card cover.
- Page 32 Central Max transmission Model Connector Fiber wavelength distance 62.5/125 μm 33 m (108.27 ft.) multimode fiber XFP-SX-MM850 850 nm 50/125 μm multimode 300 m (984.25 ft.) fiber 9/125 μm single mode XFP-LX-SM1310 1310 nm 10 km (6.21 miles) fiber XFP-LH40- 9/125 μm single mode 1550 nm 40 km (24.86 miles)
- Page 33 Central Type Model Connector Fiber transmission wavelength distance optical fiber SFP-GE- LH40- SM1310 40 km (24.86 miles) SFP-GE- LH40- SM1550 SFP-GE- 70 km (43.50 LH70- 1550 nm miles) SM1550 SFP-GE- 100 km (62.14 LH100- miles) SM1550 SFP-GE-LX- 1490 nm 10 km (6.21 SM1310- (receive)/1310 miles)
- Page 34 Central Type Model Connector Fiber transmission wavelength distance SFP-GE- LH70- 1470 nm SM1470- SFP-GE- LH70- 1490 nm SM1490- SFP-GE- LH70- 1510 nm SM1510- SFP-GE- LH70- 1530 nm SM1530- GE CWDM 70 km (43.50 transceivers miles) SFP-GE- LH70- 1550 nm SM1550- SFP-GE- LH70- 1570 nm...
- Page 35 Currently, the SFP-FE-SX-MM1310-GE only supports an interface speed of 100 Mbps. 10/100/1000 Mbps electrical interface A 10/100/1000 Mbps electrical interface adopts an RJ-45 connector, which connects with a category 5 twisted pair cable with a maximum transmission distance of 100 m (328.08 ft.). Table 22 Pin assignment of the RJ-45 connector 10Base-T/100Base-TX/1000Base-T...
- Page 36 Item S9505E S9508E-V S9512E System switching capacity 720 Gbps/1.92 Tbps* 1.44 Tbps/3.84 Tbps* 1.44 Tbps/3.84 Tbps* Number of MPU slots LSR1SRP2B2 LSR1SRP2B1 • • MPU model LSR1SRP2C2 LSR1SRP2C1 • • Number of LPU slots LSR1GT24LEC1/LSR2GT24LEB1 • LSR1GT48LEC1/LSR2GT48LEB1 • LSR1GP24LEC1/LSR2GP24LEB1 • LSR1GP48LEB1/LSR1GP48LEC1 •...
- Page 37 Preparing for installation Safety recommendations To avoid possible bodily injury and equipment damage, please read the following safety recommendations carefully before installing the S9500E series. The recommendations do not cover every possible hazardous condition. General safety recommendations • Take necessary safety measures to avoid injury and device damage. For example, wear an ESD-preventive wrist strap.
- Page 38 Floor loading requirements Because the S9500E series are very heavy, make sure the floor is sturdy enough to support the weight of the chassis, its accessories, and if the chassis is workbench or cabinet mounted, the workbench or cabinet.
- Page 39 Chassis Floor loading (the minimum) S9505-E 450 kg/m (92.25 lb/ft Directly mounted on the S9508E-V 680 kg/m (139.40 lb/ft floor S9512E 700 kg/m (143.50 lb/ft S9505-E 440 kg/m (90.20 lb/ft Mounted in the S9508E-V 543.75 kg/m (111.47 lb/ft N68-18 cabinet S9512E 512.5 kg/m (105.06 lb/ft...
- Page 40 If the relative humidity is too low, the captive screws may become loose due to the insulation washer contraction. Meanwhile, the electrostatic is likely to be produced in the dry environment, which will jeopardize the CMOS circuit of the switch. Cleanness requirements Dust is a hazard to the operating safety of the switch.
- Page 41 PSU specifications. Space requirements H3C recommends that the front and rear of the cabinet should be at least 0.8 m (31.50 in.) away from walls or other devices, and that the headroom in the equipment room should be no less than 3 m (9.84 ft).
- Page 42 ESD-preventive wrist strap, cable stripper, crimping pliers, RJ-45 crimping pliers, wire Special tools punch-down tool Multimeter, 500 V Meg-ohmmeter (used for measuring the insulation resistance), error Meters detector, optical power meter, earth resistance tester The instruments and tools are not shipped with the S9500E series.
- Page 43 Installing the switch The S9500E series switches can only be used indoors. To prevent injury, do not touch any wires, terminals, and parts with a high-voltage hazard sign. Installation flow Figure 19 Installation flow of the switch Start Start Prepare for installation...
- Page 44 Attach the mounting brackets onto the left and right sides of the switch, as shown in Figure Figure 20 Install the mounting brackets and cable management brackets (1) Mounting brackets (2) Cable management bracket (3) Mounting screws Installing the mounting brackets and cable management brackets (for the S9508E-V) Install the cable management brackets on the mounting brackets with tapping screws.
- Page 45 (1) Mounting brackets (2) Cable management bracket (3) Mounting screws Installing the switch in the rack Make sure a support tray is already installed on the rack for the switch before installing the switch in the • rack. The support tray should be sturdy enough to support the device weight. Install the switch as lower as possible to lower the gravity center for the device.
- Page 46 Installing the switch on a workbench You can also install the switch on a clean and stable workbench or the ground. Carry the switch at both sides to the place in front of the workbench slowly. Lift the device a little higher than the workbench and put it on the workbench. Verifying installation After installing the switch, check the installation against the following checklist.
- Page 47 Connecting the PGND cable The switch must be well grounded. The resistance reading between switch chassis and the ground must be less than 1 ohm. Connection in generic grounding environment Generally, cabinets are equipped with a grounding strip. You can connect the grounding wire (yellow-green PGND cable) of the switch to the grounding strip.
- Page 48 Installing the power system Installing a PSU The S9500E series switches support both AC and DC power supply. You can select either AC or DC power module as needed. 1+1 redundancy is recommended. • DC PSU models: NEPS1200-D, NEPS2000-D and NEPS3500-D.
- Page 49 Installing a sub-PSU This operation is applicable to the NEPS3500-A only. Pull the handle of a sub-PSU downward to the unlock position. Gently push the sub-PSU into the AC PSU enclosure (NEPS3500-A) until the rear side of the sub-PSU has a good touch with the power frame backplane. Push the handle upward so that the handle locks the sub-PSU in place, as shown in Figure Figure 25 Install a sub-PSU...
- Page 50 Installation procedure Move the ejector levers outwards, hold the module by the handle, and push the board into the slot along slide rails slowly. Push the ejector levers inward to ensure a firm contact between the board and the backplane. Figure 26 Install an MPU (for an S9505E or S9512E) Figure 27...
- Page 51 Connecting power cables Connecting an AC power cable Plug one end of the AC power cable into the power receptacle of the PSU. Attach the bail latch to the power receptacle of the PSU to fix the power cable. Plug the AC power cable into the power receptacle providing power supply for the switch. Figure 28 Connect the power cable to the NEPS3500-A (1) AC sub-PSU 1 and LED...
- Page 52 (1) Grounding strip (NEG(-), RTN(+) and PGND from up to down) (2) Input LED (IN) (3) Output LED (OUT) (4) Fault LED (FAIL) (5) Power switch To connect the PSU, follow these steps: Remove the protection cover from the power module. Loosen the fastening screw on the wiring terminal with a Phillips screwdriver.
- Page 53 Installing a fan tray (for an S9508E-V) Put on an ESD-preventive wrist strap and make sure it is well grounded. Push the fan tray along the guide rails until it has a good contact with the backplane, as shown in Figure 31. Figure 31 Install a fan tray Verifying the installation...
- Page 54 Result Item Remarks The PGND cable is correctly grounded. Fan trays are correctly installed and have a tight contact with the backplane. PSUs are correctly installed and have a good contact with the frames. Power cords are correctly connected. MPUs are correctly installed and have a good contact with the backplane.
- Page 55 Connecting the switch to the network Logging in to the switch Logging in through the console port is the most common way to log in to a switch. It is also the prerequisite to configure other login methods. Connecting the console cable Before logging in to the switch through the console port, use a console cable to connect the serial port of your PC (or terminal) to the console port of your switch.
- Page 56 Connection procedures Plug the DB-9 female connector of the console cable to the serial port of the PC or terminal where the switch is to be configured. Connect the RJ-45 connector of the console cable to the console port of the switch. Figure 33 Diagram for connecting the console cable A PC serial port does not support hot-swapping;...
- Page 57 Enter the name of the new connection in the Connection Description dialog box, and click OK. The system displays the interface shown in Figure 35. Select a port in the Connect using drop-down list. Figure 35 Select a port for the HyperTerminal connection Set serial port parameters.
- Page 58 Click OK after setting the serial port parameters to enter the HypterTerminal window, as shown in Figure 37 HyperTerminal window. Figure 37 HyperTerminal window Select Properties in the HyperTerminal window to access the Properties window. Click Settings in the Window, select VT100 for terminal emulation, and click OK.
- Page 59 H3C recommends that you select the Windows keys option button. Figure 38 Set the terminal emulation parameters Powering on the switch Checklist for switch power-on Before powering on the switch, confirm the following settings: • The interface cables, power cables and the grounding cable are correctly connected.
- Page 60 Turn on the power switch of the PWR on the switch. Verifying after power-on (recommended) To ensure the configuration works, H3C recommends that you check the following settings after you power it on: • The cooling system is working (you can hear the noise caused by fan rotation and feel air exhausted out.)
- Page 61 # The switch initiates the self testing and the results are displayed at the console terminal. Board self testing......Board steady testing... [ PASS ] Board SlotNo... Subcard exist testing... [ FAIL ] DX246 testing... [ PASS ] PHY88E1111 testing... [ PASS ] CPLD1 testing...
- Page 62 Press Enter to begin configuring the switch at the prompt: <H3C> The S9500E series provide abundant command views. For more information about the configuration commands and the CLI, see H3C S9500E Series Routing Switches Operation Manual. Connecting the AUX cable Use an AUX cable when configuring a switch with the remote modem dial-up approach.
- Page 63 The installation method described below is based on an N68 cabinet. The installation procedure is for reference if you use a non-N68 cabinet. A FMT is installed in a cabinet for winding redundant fibers between the S9500E and other devices. Preparations The installation prerequisites are as follows: •...
- Page 64 Period of force Tensile load (N) Crush load (N/100 mm) Short period Long term Connection procedures Connect one end of the fiber to the SFP module of the S9500E series. Connect the other end of the fiber to the peer device.
- Page 65 Cable routing recommendations Interface cables and power cords should be separately routed. Reasonable cable routing can improve efficiency by facilitating installation and removal of fan trays, PSUs and some other components. Workbench-mounted switch All interface cables are routed at left and right sides of the chassis and power cords are routed at the chassis back.
- Page 66 Maintaining and updating the switch Maintaining the switch Removing the PSU PSUs for the S9500E are hot-swappable. When installing and removing a PSU with the device powered on, pay attention to operation procedures and electricity safety issues. To avoid injury, do not touch any wires, terminals, and parts with a high-voltage hazard sign.
- Page 67 This operation is applicable to the NEPS3500-A only. Pull down the handle of the sub-PSU, and gently separate the sub-PSU from the backplane of the PSU, as shown in Figure 42. Figure 42 Remove a sub-PSU Supporting the bottom of the sub-PSU with one hand and holding the sub-PSU handle with the other hand, gently pull out the sub-PSU.
- Page 68 Removing a fan tray (for an S9508E-V) Press and hold the release button with your thumb and pull the fan tray slightly out. Pull out the fan tray along the guide rails, as shown in Figure 44. Figure 44 Remove a fan tray Software update Do not power off the switch during software update.
- Page 69 Booting Normal Extend BootWare The Extend BootWare is self-decompressing......Done! **************************************************************************** H3C S9500E BootWare, Version 1.02 **************************************************************************** Copyright (c) 2004-2008 Hangzhou H3C Technologies Co., Ltd. Compiled Date : Sep 24 2008 CPU Type : MPC8548E CPU L1 Cache : 32KB...
- Page 70 BASIC CPLD Version : 001E EXTEND CPLD Version : 001E PCB Version : Ver.A Board self testing......Board steady testing... [ PASS ] Board SlotNo... Subcard exist testing... [ FAIL ] DX246 testing... [ PASS ] PHY88E1111 testing... [ PASS ] CPLD1 testing...
- Page 71 When loading the host program through the BootWare menu, you must configure correct attributes of the serial interface (such as the bits per second, data bit, parity, stop bits, and flow control). Otherwise, the HyperTerminal does not respond. For details, refer to Chapter 4 “Commissioning the Switch”.
- Page 72 |<5> 115200 |<0> Exit =========================================================================== Enter your choice(0-5):1 Select the appropriate downloading speed as needed. For example, enter 1 to select the downloading speed of 9600 bps. The default baud rate of the console port is 9600 bps. The system uses the default setting at reboot even if the baud rate was modified.
- Page 73 Click Send and the following interface pops up. Figure 46 Sending file page After downloading the program successfully, the system will access the serial interface submenu again, and the user can make selection as needed. The details will not be covered here.
- Page 74 Connect the switch to a PC where the desired file is located via the management Ethernet port. In this case, you should know the IP address of the PC. At the same time, connect the switch to an external PC, which can be the same one that contains the desired file, via the console port.
- Page 75 Updating software through management Ethernet port (FTP) Introduction to FTP The S9500E series applications can also be updated through the Ethernet port using FTP. The following updating procedure uses the switch working as an FTP Client as an example. Update procedure Connect the Switch to the PC containing the desired file via the management Ethernet port.
- Page 76 Modifying file attributes After downloading the host program through the BootWare menu, you must specify it as the next boot program. Select 4 in the BootWare menu to enter the file control submenu. ===========================<EXTEND-BOOTWARE MENU>========================= |<1> Boot System |<2> Enter Serial SubMenu |<3>...
- Page 77 Modifying device working mode Modification of the device working mode through the BootWare menu is supported only on hosts with the version being Release 1221 or above. Follow these steps to modify the device working mode through the BootWare menu: Select 9 in the BootWare menu to enter the product special operation submenu.
- Page 78 Modifying system working mode Follow these steps to modify the system working mode through the BootWare menu: Select 9 in the BootWare menu to enter the product special operation submenu. ===========================<EXTEND-BOOTWARE MENU>========================= |<1> Boot System |<2> Enter Serial SubMenu |<3> Enter Ethernet SubMenu |<4>...
- Page 79 If the switch has two MPUs, you also can copy the host and BootWare program files to the standby MPU. Load the BootWare program. <H3C> bootrom update file flash:/swv1r1.btw slot 0 Specify the next boot program. <H3C> boot-loader file flash:/SWITCH002.bin slot 0 main <H3C>...
- Page 80 <H3C> reboot BootWare and host program loading is completed now. Reboot the switch using the reboot command to validate the host program. • Make sure that you save other configurations before reboot. • Remote loading using TFTP Using TFTP is similar to using FTP in remote loading via commands. The only difference is that you use the tftp get command to download software to the switch.
- Page 81 Check if the uploaded file is the right one. • Download the correct file and perform application update again. Password loss If the super password or BootWare password of the switch is lost, contact the local agent or H3C technical support.
- Page 82 Contact your authorized reseller or 3Com for a complete list of the value-added services available in your area. Troubleshoot online You will find support tools posted on the web site at http://www.h3cnetworks.com/ under Support, Knowledgebase. The Knowledgebase helps you troubleshoot H3C products. This query-based interactive tool contains thousands of technical solutions.
- Page 83 Access software downloads Software Updates are the bug fix / maintenance releases for the version of software initially purchased with the product. In order to access these Software Updates you must first register your product on the web site at http://www.h3cnetworks.com, go to Support, Product Registration.
- Page 84 Cable management Correct use of labels Before binding the cables, fill in the labels for them and attach them to the right position on the cables. For details, refer to the description of label usage in Appendix A Engineering Labels for Cables.
- Page 85 • Cut the extra parts of the ties neatly after binding the cables, leaving no sharp or angular tips. See the following figure: Figure 48 Cable binding example II • Bind the cables wherever cable bending cannot be avoided. However, the cable ties cannot be placed inside the bending area in case of the likelihood of cable core break due to excessive stress.
- Page 86 Figure 50 Cable fixing example (1) (1)(2) (1) (1)(2) (1) Flat washer (2) Spring washer (3) Nut • Fix a hard power cord near its terminal to free the terminal and the cable from stress. • Do not use tapping screws to fasten the connecting terminals. •...
- Page 87 Engineering labels for cables Engineering labels are affixed to both ends of the cables to identify the physical positions of cables on different devices. Labels on the cables facilitate proper connection of cables and easy maintenance after the installation. There are two types of engineering labels specialized for the power cables and signal cables. The power cables include the AC power cables and DC power cables (excluding the power cable that connects the distribution box and the cabinet).
- Page 88 84.0 11.0 10.0 11.0 37.0 (1) Dividing line (2) Cut dotted line The dividing lines on the label help to specify more clearly the position of a cable. For example, there is a line between the cabinet number and the frame number and another one between the frame number and the slot number.
- Page 89 (3) Dividing line on the label Printing labels The contents can be printed or written on the labels. H3C recommends that you print the labels. Template for printing The Word template is available for label printout. You can get the template from H3C.
- Page 90 Cover the blank paper onto the whole page of label paper, and check whether the page setup conforms to the requirement. Make sure the printer properties, such as "paper size" and “direction”, have been set correctly. If the warning prompt as shown in Figure 53 appears before printing, click <Ignore> to continue the printing.
- Page 91 In special cases, black ball-pens are allowed, although not recommended. When writing with a ball-pen, take care not to leave oil on the label, which may contaminate the label and blur the words. Use standard typeface as much as possible. Figure 54 shows the standard typeface. Table 35 Standard typeface for handwriting Write the characters in proper size, and the direction is as shown in Figure 54:...
- Page 92 Cable Stick side Fold down Cable Fold to right Stick side The length of the narrow part is based on an external cable diameter of 2.6mm. After this part has been stuck to the back of the label, it may not overlap the entire printed part. Fold the printed part along the dotted line according to the directions shown in Figure 56.
- Page 93 Cable Cable A03 33 33 33 33 Affixing the label to the power cable Remove the label from the bottom page and affix it to the identification plate on the cable tie. The label should be stuck to the rectangular flute, and should be stuck to only one side of the identification plate.
- Page 94 For signal cables The two sides of the label affixed on the signal cable carry information about the location of the ports connected to both ends of the cable, as shown in Figure 59. The information is given like this: •...
- Page 95 Table 36 Information on labels affixed to the Ethernet cables Content Meaning Example MN: Cabinet number For example, A01 Numbered in top-down order with two digits, for B: Frame number example, 01 MN-B-C-D Numbered in top-down and left-right order with two C: Physical slot number digits, for example, 01 Numbered in top-down and left-right order with two...
- Page 96 “A01-03- 1 0-05” indicates that on the local end of the Ethernet cable is connected with Ethernet Port 05, Slot 10, Frame 03 of the cabinet on Row A, Column 01 in the machine room. “B02-03- 1 2” indicates that the opposite end of the Ethernet cable is connected with Ethernet Port 12, Frame 03 of the cabinet on Row B, Column 02 in the machine room.
- Page 97 Content Meaning Example MN: cabinet number The meanings are the same as above. When the B: frame number local device and the opposite end device are not in the same machine room, MN can be the name C: physical slot number MN-B-C-D-R/T of the machine room.
- Page 98 Content Meaning Example MN: cabinet number For example, A01 Numbered in bottom-up order with two digits, for B: frame number example, 01 Numbered in top-down and left-right order with C: physical slot number two digits, for example, 01. MN-B-C-D-R/T Numbered in top-down and left-right order with D: optical interface number two digits, for example, 05 R: optical receiving interface...
- Page 99 Engineering labels for power cables Labels for DC power cables The labels are affixed to the DC cables that provide power for the cabinets, and the protection grounding cables, including the -48V, PGND, and BGND cables. The labels for DC power cables are affixed to one side of the identification plates on cable ties.
- Page 100 On the loaded cabinet side, the label marked with “A01/B08--48V2” on the cable indicates that the cable is -48V2 DC supply, which is from the 8 connecter on the second row of -48V bus bar in the cabinet on Row A, and Column 1 in the machine room. On the distribution box side, the label marked with “B03--48V2”...
- Page 101 A01 AC B01 AC In 0, (1) indicates the label on the loaded cabinet side, which carries the information about the position of the cable on the power socket. (2) indicates the label on the power socket side, which carries the information about the position of the cable on the loaded cabinet side. On the loaded cabinet side, the label marked with “A01-AC”...
- Page 102 Installation of lightning arrester for AC power Lightning arrester will not be shipped with the switch. If an outdoor AC power cord should be directly led to the switch, please serially connect the lightning arrester for AC power (Socket Strip with Lightning Protection) before you plug AC power cord into the switch, thus to prevent the possible damage to the switch due to lightning strike.
- Page 103 socket of arrester to correct polarity. After that, if the red LED still alarms, it means that the arrester is not well grounded yet.
- Page 104 Regulatory compliance information Regulatory compliance standards Table 41 Regulatory compliance standards Discipline Standards FCC Part 15 (CFR 47) CLASS A ICES-003 CLASS A VCCI-3 CLASS A CISPR 22 CLASS A EN 55022 CLASS A AS/NZS CISPR22 CLASS A CISPR 24 EN 55024 EN 61000-3-2 EN 61000-3-3...
- Page 105 (WEEE) Directive and must be disposed of in a responsible manner. USA regulatory compliance FCC Part 15 H3C S9500E Series Routing Switches complies with Part 15 of the FCC Rules. Operation is subject to the following two conditions: • This device may not cause harmful interference.
- Page 106 When such trouble occurs, the user may be required to take corrective actions. CISPR 22 compliance H3C S9500E Series Routing Switches complies with the requirements of CISPR 22 for Class A Information Technology Equipment (ITE). Warning: If this equipment is used in a domestic environment, radio disturbance may arise.
- Page 107 Safety information Sicherheits informationen安全信息 Overview Überblick 概述 This section introduces part of the safety precautions that should be followed during the installation and maintenance of the equipment. And for the safety statements and warnings, there followed the translations of both German and Chinese to comply with the national requirements. Dieser Abschnitt macht Sie mit den Sicherheitsvorschriften vertraut, die Sie bei der Installation und Instandhaltung der Ausrüstung beachten müssen.
- Page 108 Lesen Sie bitte alle Arbeitsanweisungen und Sicherheitvorschriften sorgfältig durch, bevor Sie mit dem Arbeiten beginnen. Nur durch Beachtung dieser Hinweise lässt sich das Unfallrisiko minimieren. Die in anderen Handbüchern aufgeführten Symbole Anmerkung, Achtung, Warnung und Gefahr beinhalten nicht alle zu beachtenden Sicherheitvorschriften. Sie dienen lediglich der Ergänzung. Deshalb muss sich das für die Installation und Instandhaltung der Ausrüstung verantwortliche Personal mit allen Sicherheitshinweise vertraut machen.
- Page 109 Sicherheitssymbole und Beschreibung安全标识和描述 Safety Symbol Description Symbole Erläuterung 安全标识 描述 Generic alarm symbol: To suggest a general safety concern Alarm: Hinweis auf ein generelles Sicherheitsproblem 一般注意标识:用于一般安全提示 ESD protection symbol: To suggest electrostatic-sensitive equipment. ESD-Schutz: Hinweis auf Beschädigung infolge elektrostatischer Entladung 防静电标识:用于表示静电敏感的设备...
- Page 110 • Do not block ventilation openings while the system is on, and keep at least 5 cm distance from ventilation openings and walls or other things which may block the openings • Sorgen Sie dafür, dass die Öffnungen der Ventilation zu keinem Zeitpunkt verschlossen, verstopft oder anderweitig blockiert sind.
- Page 111 • AC供电:插座必须随时可用,因为它是主要的切断电源装置。 • Because the device has several power supplies, disconnect all of them to switch off the device. • Da das Gerät mehrere Energiequellen hat, ist es notwendig stets alle Verbindungen zu unterbrechen, um den energiefreien Zustand zu erreichen. •...
- Page 112 • Conducting articles, such as watch, hand chain, bracelet and ring are prohibited during the operation. • Es ist nicht erlaubt während dieser Arbeiten leitende Gegenstände wie Uhren, Armbänder, Armreifen und Ringe am Körper zu tragen. • 在操作中不能穿戴导电性的物品,如:手表,手琏,手镯和项链等。 • When water is found in the rack, or the rack is damp, please immediately switch off the power supply.
- Page 113 Das Entfernen und Anbringen von Zuleitungen ist strengstens verboten. Kurzschlüsse zwischen innerem und äußerem Leiter können Lichtbögen oder Funkenflug verursachen, was zu Feuer oder einer Augenverletzung führen kann. 禁止安装和移动带电的线缆。因为导电体和带电的线缆,即使短暂接触,也会引起电火花或电弧,从而导 致失火或是伤害眼睛。 • Before the power cable is installed or removed, the power switch must be turned off. •...
- Page 114 Thunderstorm Gewitter 防雷击 High voltage and AC operations or operations on a steel tower and a mast on a thunderstorm day are prohibited. In order to prevent the equipment from being damaged by lightning, proper grounding is required. Arbeiten mit Hochspannung und Wechselstrom oder Arbeiten auf Stahltürmen und masten während eines Gewitters sind verboten.
- Page 115 Do not dispose of Lithium Battery in fire Entsorgen Sie die Lithiumbatterien auf keinen Fall durch Verbrennen! 请勿将锂电池置入火中。 Fuse Sicherung 保险丝 For the safety of continuous operation, please replace the fuse with that of the same type and rating, if necessary.
- Page 116 When performing installation and maintenance operations of optical fibers, you should not stand close to, or look into the optical fiber outlet directly with unaided eyes. Während der Installation und Instandhaltung der optischen Fasern dürfen Sie nicht zu nahe am Ausgang der optischen Fasern stehen und nicht ohne Augenschutz in die optischen Fasern sehen.
- Page 117 Acronyms # A B C D E F G H I K L M N O P Q R S T U V W X Z Full spelling Return 10GE Ten-GigabitEthernet Return Authentication, Authorization and Accounting Activity Based Costing Area Border Router Alternating Current Acknowledgement Access Control List...
- Page 118 Full spelling Auxiliary (port) Active Virtual Forwarder Return Bearer Control Backup Designated Router Best Effort Bidirectional Forwarding Detection Border Gateway Protocol BIMS Branch Intelligent Management System BOOTP Bootstrap Protocol BPDU Bridge Protocol Data Unit Basic Rate Interface Bootstrap Router BitTorrent BSR State Burst Tolerance Return...
- Page 119 Full spelling CIDR Classless Inter-Domain Routing Committed Information Rate CIST Common and Internal Spanning Tree Command Line Interface CLNP Connectionless Network Protocol Customer Premise Equipment CPOS Channelized POS Central Processing Unit Custom Queuing Carriage Return Cyclic Redundancy Check CR-LSP Constraint-based Routing LSP CR-LDP Constraint-based Routing LDP CSMA/CD...
- Page 120 Full spelling Designated Router DSCP Differentiated Services Codepoint Priority Digital Signal Processor Data Terminal Equipment Downstream Unsolicited DUID DHCP Unique Identifier DUID-LL DUID based Link Layer address Distance Vector Routing Algorithm DVMRP Distance Vector Multicast Routing Protocol DWDM Dense Wavelength Division Multiplexing Return EBGP External Border Gateway Protocol...
- Page 121 Full spelling Frame Relay Fast ReRoute FRTT Fairness Round Trip Time Finite State Machine Functional Test File Transfer Protocol Return GARP Generic Attribute Registration Protocol Gigabit Ethernet Graceful Restart Generic Routing Encapsulation Generic Traffic Shaping GVRP GARP VLAN Registration Protocol Return High Availability HABP...
- Page 122 Full spelling IEEE Institute of Electrical and Electronics Engineers IETF Internet Engineering Task Force IGMP Internet Group Management Protocol IGMP-Snooping Internet Group Management Protocol Snooping Interior Gateway Protocol Incoming Label Map Internet Locator Service Intelligent Network IntServ Integrated Service Internet Protocol IPng IP Next Generation IPSec...
- Page 123 Full spelling LACP Link Aggregation Control Protocol LACPDU Link Aggregation Control Protocol Data Unit Local Area Network Link Control Protocol LDAP Lightweight Directory Access Protocol Label Distribution Protocol Label Edge Router LFIB Label Forwarding Information Base Label Information Base Link Layer Control LLDP Link Layer Discovery Protocol LLDPDU...
- Page 124 Full spelling Multi-VPN instance Customer Edge Multicast Domain Medium Dependent Interface Multicast Distribution Tree Multi-Exit Discriminator MAC Forced Forwarding Management Information Base Multicast Listener Discovery Protocol MLD-Snooping Multicast Listener Discovery Snooping Meet-Me Conference MODEM MOdulator-DEModulator Multilink PPP MP-BGP Multiprotocol extensions for BGP-4 Middle-level PE MP-group Multilink Point to Point Protocol group...
- Page 125 Full spelling NBMA Non Broadcast Multi-Access NetBIOS over TCP/IP Network Control Protocol Neighborhood discovery NetStream Data Analyzer Network Data Collector Neighbor Discovery Protocol NetBIOS Network Basic Input/Output System NHLFE Next Hop Label Forwarding Entry Network Load Balancing NLPID Network Layer Protocol Identifier NLRI Network Layer Reachability Information Network Management Station...
- Page 126 Full spelling Provider P2MP Point to MultiPoint Point To Point Password Authentication Protocol Printed Circuit Board Pulse Code Modulation Powered Device, Prefix Delegation or Pure Data Protocol Data Unit Provider Edge Penultimate Hop Popping Physical layer Protocol Independent Multicast PIM-DM Protocol Independent Multicast-Dense Mode PIM-SM Protocol Independent Multicast-Sparse Mode...
- Page 127 Full spelling QACL QoS/ACL QinQ 802.1Q in 802.1Q Quality of Service QQIC Querier's Query Interval Code Querier's Robustness Variable Return Registration Authority or Router Advertisement RADIUS Remote Authentication Dial in User Service random-access memory Routing Domain Router Distinguisher Random Early Detection Request For comments Routing Information Protocol RIPng...
- Page 128 Full spelling Return Source Active Sub-network Bandwidth Management SCFF Single Choke Fairness Frame Signal Degrade Synchronous Digital Hierarchy SETS Synchronous Equipment Timing Source Sampling Frequency Source-Filtered Multicast SFTP Secure FTP Share-MDT Share-Multicast Distribution Tree Session Initiation Protocol Site-of-Origin Site-of-Origin Service Level Agreement Standby Main Board SMTP Simple Mail Transfer Protocol...
- Page 129 Full spelling STM-16c SDH Transport Module -16c STM-4c SDH Transport Module -4c Spanning Tree Protocol Signaling Virtual Connection SVLAN Service Provider Virtual Local Area Network Switch-MDT Switch-Multicast Distribution Tree Synchronize Return Terminal Adapter TACACS Terminal Access Controller Access Control System Time Division Multiplexing Transmission Control Protocol Topology Change Notification...
- Page 130 Full spelling Virtual Channel Identifier Virtual Ethernet Virtual Forwarder Virtual File System VLAN Virtual Local Area Network Virtual Leased Lines Video On Demand VoIP Voice over IP Virtual Operate System VPDN Virtual Private Dial-up Network VPDN Virtual Private Data Network Virtual Path Identifier VPLS Virtual Private Local Switch...
- Page 131 Index architecture ..........12 floor loading requirements ......38 backplane ........... 18 grounding requirements ......41 cable management ........84 humidity requirements ........ 39 requirements ..........84 power supply requirements ......41 chassis ............12 space requirements ........41 configuration temperature requirements ......
- Page 132 MPU ............21 safety electrical safety ......... 37 LEDs ............23 ESD damage prevention ......37 overview ............12 handling safety ......... 38 physical architecture ........12 laser safety ..........38 power on ............. 59 slots ............12 boot interface ...........60 software update ...........
Need help?
Do you have a question about the S9500E Series and is the answer not in the manual?
Questions and answers