Kinetico Premier Compact Installation And User Manual
Hide thumbs
Also See for Premier Compact:
- User manual ,
- Installation and user manual (20 pages) ,
- Installation and user manual (58 pages)
Table of Contents
Advertisement
Available languages
Available languages
Quick Links
Advertisement
Table of Contents

Related Manuals for Kinetico Premier Compact


Summary of Contents for Kinetico Premier Compact
- Page 1 Water Softener Adoucisseur d’eau / Waterontharder Descalcificador Installation and User Manual Installation et Guide d’utilisation Installatie- en gebruikshandleiding Manual de instalación y de usuario PREMIER COMPACT HE INT visit www.kinetico.eu...
- Page 2 The Premier Compact HE INT Water Softener is Tested and Certified by WQA under NSF/ANSI 61 for Materials Safety Requirements Only. Not Certified for Contaminant Reductions or Structural Integrity by WQA. L’adoucisseur d’eau Premier Compact est testé et certifié par WQA sous la norme NSF/ANSI 61 seulement pour les exigences en matière de sécurité...
-
Page 3: Table Of Contents
Nuttige informatie Contenido Información de seguridad Contenido de la caja Especificaciones Primeros pasos con el descalcificador Lista de comprobación previa a la instalación Instrucciones de instalación Revisión de la instalación Instrucciones de puesta en marcha Información útil Original Version www.kinetico.eu... -
Page 4: Safety Information
24°C or cause the unit will flow away using gravity. to freeze. Freezing temperatures will damage the system. Kinetico Premier Compact Water Softener Installation and User Manual... - Page 5 Copper/Plastic Pipework Intended Use Where copper/plastic pipework is Not intended to be used for treating used, Kinetico advises adherence to water that is micro-biologically unsafe the regulatory requirements to ensure or water that has an unknown quality, adequate earth bonding is provided.
-
Page 6: Contents Of Box
Regeneration time 11 minutes Flow rate @ 1 bar pressure drop 22.7 l/min Pipe connections - in/out ¾” BSP Min/max operating pressure 1.8 - 6 bar Min/max operating temperature 2 - 24˚C Kinetico Premier Compact Water Softener Installation and User Manual... -
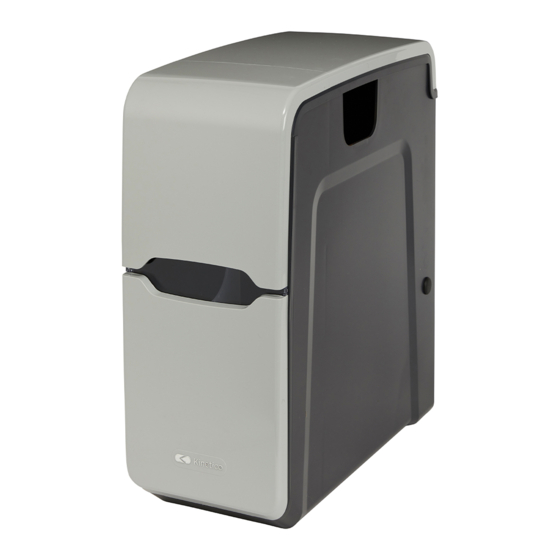
Page 7: Getting To Know The Softener
Getting to know the softener Top lid Front lid Drain connection Overflow Outlet Inlet Support Blanking plate (see page 10 for use and installation of blanking plate) Salt compartment Original Version www.kinetico.eu... -
Page 8: Pre-Installation Check List
Pressure regulating To home valve. Pre-filter Non-return valve: Local regulations must be adhered to. To drain Mains supply Air gap: Local regulations must be adhered to. To drain Cold water supply Kinetico Premier Compact Water Softener Installation and User Manual... - Page 9 A pressure regulating valve on the water supply to the softener where the incoming pressure exceeds 6 bar. A non-return valve on the mains water supply to the softener. If using a Kinetico supplied installation kit, a non-return valve is built into the inlet tee.
-
Page 10: Installation Instructions
105mm x w 194mm x d 80mm. Insert blanking plate: Insert the blanking plate into the outlet which is not in use. Lift up into position, then drop the plate down into the slot. Kinetico Premier Compact Water Softener Installation and User Manual... - Page 11 Or, establish a by-pass installation Fit inlet/outlet based on the following diagram. connection: When using the Kinetico blending by-pass valve, consult separate installation instructions. Please Pressure regulating valve note, the orientation of the valve...
-
Page 12: Installation Review
By-pass Position In Service Position Please note: Drain lines must not run more than 2.4m up or exceed a total of 9m. The drain line must not be restricted or kinked. Kinetico Premier Compact Water Softener Installation and User Manual... -
Page 13: Commissioning Instructions
When the cycle has finished “Useful Information” section (approx 4 mins), repeat the (page 15). procedure, turn the indicator dot to the next backwash cycle and allow to finish (approx 4 mins). Water level Actuator Indicator Grid plate Original Version www.kinetico.eu... - Page 14 Fit the lid: Replace the lids and check plumbing for any leaks. The installation is now complete. Tablet and Pellet Salt: Simply pour into the salt compartment. Kinetico Premier Compact Water Softener Installation and User Manual...
-
Page 15: Useful Information
You will hear a rush of water and air going to the drain. When the vessel has finished its cycle (approx 12 mins), repeat the procedure, advance the indicator dot to the word “BRINE” in the next section and allow to finish (approx 12 mins). Actuator Indicator Original Version www.kinetico.eu... - Page 16 25mm above the salt grid? Check that the brine valve is correctly held in place by the support bar and is seated firmly on the base of the cabinet. Kinetico Premier Compact Water Softener Installation and User Manual...
- Page 17 Depending on your water system and water usage, this may take a few weeks to clear. It is also advisable to check that the by-pass valve is closed, when not using the Kinetico blending by-pass valve. Original Version www.kinetico.eu...
-
Page 18: Informations De Sécurité
Il faut veiller à ce que le tuyau souple peut dépasser 24°C ou peut entraîner ne soit pas plus haut que le trop plein le gel de l'appareil. Les températures du coffret. négatives endommagent le système. Kinetico Premier Compact Adoucisseur d’eau Installation et Guide d’utilisation... - Page 19 Tuyauterie cuivre/plastique Utilisation abusive Lorsqu'une tuyauterie mixte cuivre/ Ne convient pas au traitement d'une eau plastique est utilisée, Kinetico conseille non sûre sur le plan microbiologique, ou de se fier aux obligations réglementaires d'une eau dont la qualité est inconnue, afin d'assurer une mise à...
-
Page 20: Contenu De La Boîte
Débit pour une perte de charge à 1 bar 22.7 l/min Raccords - entrée/sortie ¾” BSP Pression de service min/max 1.8 - 6 bar Température de service min/max 2 - 24˚C Kinetico Premier Compact Adoucisseur d’eau Installation et Guide d’utilisation... -
Page 21: Se Familiariser Avec L'adoucisseur
Se familiariser avec l'adoucisseur Couvercle supérieur Couvercle avant Evacuation d’eau de régénération Trop plein Sortie Entrée Barre de soutien Plaque d’obturation (voir page 24 pour l’utilisation et l’installation de la plaque d’obturation) Compartiment à sel www.kinetico.eu... -
Page 22: Vérifications Préalables
Clapet anti-retour : Doit être conforme aux réglementations locales en vigueur. Vers la purge Arrivée générale Prise d’air: Doit être conforme aux réglementations locales Vers la purge en vigueur. Alimentation en eau froide Kinetico Premier Compact Adoucisseur d’eau Installation et Guide d’utilisation... - Page 23 à 6 bar. b : Un clapet anti-retour sur l'alimentation principale de l'adoucisseur. Si un kit d’installation fourni par Kinetico est utilisé, un clapet anti-retour est inclus dans le raccord d’entrée. c : Une section de dérivation permettant d'isoler l'adoucisseur de l'alimentation en eau à...
-
Page 24: Instructions D'installation
H 105mm x L 194mm x P 80mm. Insérer la plaque d’obturation : Insérez la plaque d’obturation dans le trou du raccord non utilisé. Mettre en position puis glisser la plaque dans le trou Kinetico Premier Compact Adoucisseur d’eau Installation et Guide d’utilisation... - Page 25 Ou effectuez une installation avec un bypass Raccordements entrée/ conformément au schéma ci-dessous. sortie : Vers l’habitation En cas d'utilisation d’un By-pass Kinetico, veuillez consulter Régulateur de les instructions d'installation pression Arrivée générale spécifiques. Veuillez noter que l'orientation du By-pass clapet anti-retrour Pré-filtre...
-
Page 26: Inspection De L'installation
Position en service Remarque : Le dénivelé des lignes d’évacuation ne doit pas dépasser 2,4 m, et leur longueur maximale est de 9 m. La ligne d’évacuation ne doit présenter aucun écrasement ni aucune pliure. Kinetico Premier Compact Adoucisseur d’eau Installation et Guide d’utilisation... -
Page 27: Instructions De Mise En Service
(page 29). c : Une fois le cycle terminé (env. 4 min.), renouvelez l’étape «a» pour relancer un cycle de régénération et laissez ce Niveau de l’eau dernier se terminer (env. 4 min.). Actionneur Marqueur Grille www.kinetico.eu... - Page 28 Remettez le couvercle en place, recherchez les fuites éventuelles. L'installation est désormais terminée. Sel en tablettes ou granulés : Mettez simplement le sel dans le compartiment à sel. Kinetico Premier Compact Adoucisseur d’eau Installation et Guide d’utilisation...
-
Page 29: Informations Utiles
Vous entendez de l'eau et de l'air pénétrer dans l’évacuation. d : Une fois le cycle terminé (il dure env. 12 min.), recommencez la procédure, faites avancer le marqueur jusqu'au mot "BRINE" (saumure) suivant, et laissez ce dernier se terminer (env. 12 min.). Actionneur Indicateur www.kinetico.eu... - Page 30 25 mm recommandés de la grille de sel ? Vérifiez que la vanne de saumure est bien maintenue en place par la barre de support et est bien fixée sur la base du boîtier. Kinetico Premier Compact Adoucisseur d’eau Installation et Guide d’utilisation...
- Page 31 Cela peut prendre plusieurs semaines selon les installations et votre consommation d'eau. Il est également recommandé de vérifier que la vanne de dérivation est fermée si vous n’utilisez pas la vanne si vous n’utilisez pas le By-pass Kinetico. www.kinetico.eu...
-
Page 32: Veiligheidsinformatie
24°C kan komen of waar de unit kan Zorg ervoor dat de slang niet hoger bevriezen. Bij temperaturen onder het dan de slangaansluiting wordt geleid, vriespunt zal het systeem beschadigen. anders stroomt het water niet weg. Kinetico Premier Compact Waterontharder Installatie- en gebruikshandleiding... - Page 33 Kopen/kunststof leidingen Beoogd gebruik Als er koperen/kunststof leidingen Het systeem is niet bedoeld om water worden gebruikt, adviseert Kinetico de te behandelen dat microbiologisch voorschriften in acht te nemen zodat er onveilig is of water van onbekende adequate aarding is.
-
Page 34: Inhoud Verpakking
498 x 219 x 468 mm Gebruikt zout per regeneratie 0.34 kg Regeneratietijd 11 minutes Debiet @ 1 bar drukverlies 22.7 l/min Leidingaansluitingen - in/uit ¾” BSP Min/max bedrijfsdruk 1.8 - 6 bar Min/max bedrijfstemperatuur 2 - 24˚C Kinetico Premier Compact Waterontharder Installatie- en gebruikshandleiding... -
Page 35: De Ontharder Leren Kennen
De ontharder leren kennen Bovendeksel Deksel voorzijde Afvoer- aansluiting Overloop Uitgang Ingang Afsluitplaatje (Zie pg 38 hoe het afsluitplaatje te gebruiken en te bevestigen) Zoutcompartiment Verstevigingsbaar www.kinetico.eu... -
Page 36: Checklijst Voorafgaand Aan Installatie
Terugslagklep, plaatselijke voorschriften moeten worden nageleefd. Optioneel; Naar binnen Drukregelaar Voorfilter Terugslagklep; Plaatselijke voorschriften moeten worden nageleefd. Afvoeren Waterto- evoer (hoofdle- iding) Air gap; Plaatselijke voorschriften moeten worden Afvoeren nageleefd. Toevoer koud water Kinetico Premier Compact Waterontharder Installatie- en gebruikshandleiding... - Page 37 T-stukken, Enkelvoudige keerklep. Aansluitingen voor inlaat en uitlaat, of via flexibele drukslangen of via leidingen. Aansluitingen op de ontharder en het Kinetico meng/bypass ventiel zijn 3/4” BSP insteekfittingen met schroefdraad. Slang met 1/2” binnendiameter voor zowel overloop en de afvoer.
-
Page 38: Installatie-Instructies
105mm x b 194mm x d 80mm. Inbrengen van afsluitplaatje: Plaats het afsluitplaatje in de uitsparing die niet gebruikt wordt . Plaats het plaatje in de voorziene opening, duw plaatje naar beneden. Kinetico Premier Compact Waterontharder Installatie- en gebruikshandleiding... - Page 39 Of, voorzie een by-pass installatie zoals Inlaat/uitlaat aansluiting beschreven in het volgende diagram. aanbrengen: Onthard water, naar toevoerleiding Raadpleeg de aparte installatie- instructies als u het Kinetico meng/ Drukregelaar bypass ventiel wilt gebruiken. Let Watertoevoer op: de richting van het bypass (hoofdleiding) Terugslagklep...
-
Page 40: Installatiecontrole
Controleer of de assemblage in de "bypass"-positie is. Bypass-positie In service-positie Let op: Afvoerleidingen mogen niet meer dan 2,4 m omhoog lopen of langer zijn dan 9 m. De afvoerleiding mag niet gesmoord worden of knikken bevatten. Kinetico Premier Compact Waterontharder Installatie- en gebruikshandleiding... -
Page 41: Instructies Voor Inbedrijfstelling
U hoort een waterstroom en lucht naar de afvoer gaan. Wanneer de cyclus is beëindigd Water niveau (ca. 4 min), herhaalt u de procedure; zet de indicator op de volgende backwash-cyclus en laat deze voltooien (ca. 4 min). Actuator Raster plaat (zout) Indicator www.kinetico.eu... - Page 42 Het deksel plaatsen: Plaats het deksel en controleer de leidingen op lekkages. De installatie is nu compleet. Zouttabletten en -pastilles: Giet het zout in het zoutcompartiment. Kinetico Premier Compact Waterontharder Installatie- en gebruikshandleiding...
-
Page 43: Nuttige Informatie
U hoort een waterstroom en lucht naar de afvoer gaan. Wanneer de cyclus is beëindigd (ca. 12 min), herhaalt u de procedure, zet de indicator bij het volgende woord BRINE en laat de cyclus voltooien (ca. 12 min). Actuator Indicator www.kinetico.eu... - Page 44 Hoe kan ik de waterstand corrigeren als het water hoger staat dan de aanbevolen 25mm boven het zout raster? Controleer of de pekelklep correct op z'n plek wordt gehouden door de steunbalk. Kinetico Premier Compact Waterontharder Installatie- en gebruikshandleiding...
- Page 45 De ontharder geeft direct zacht water, maar totdat het leidingwater uit de leidingen, opslagtanks en heetwatersystemen is gespoeld, kan de waterhardheid variëren. Afhankelijk van uw watersysteem en -gebruik, kan dit enkele weken duren. Controleer ook of de bypass klep niet gesloten is, wanneer u geen Kinetico meng/bypass ventiel gebruikt. www.kinetico.eu...
-
Page 46: Información De Seguridad
Las la boquilla para tubos ya que al agua temperaturas de congelación dañarán el fluirá usando la gravedad. sistema. Kinetico Premier Compact Descalcificador Manual de instalación y de usuario... - Page 47 Tubería de cobre/plástico Uso previsto Cuando se utiliza una tubería de No debe usarse para tratar agua que cobre/plástico, Kinetico recomienda sea microbiológicamente insegura cumplir los requisitos normativos para o cuya calidad se desconozca sin la garantizar que se proporciona una toma adecuada desinfección antes o después...
-
Page 48: Contenido De La Caja
Caudal para una pérdida de carga a 1 bar 22,7 l/min Conexiones de tubería: entrada/salida P de ¾” Presión de funcionamiento mín./máx. 1,8 - 6 bares Temperatura de funcionamiento mín./máx. 2 - 24˚C Kinetico Premier Compact Descalcificador Manual de instalación y de usuario... -
Page 49: Primeros Pasos Con El Descalcificador
Primeros pasos con el descalcificador Tapa superior Tapa frontal Conexión de drenaje Rebosadero Salida Entrada Barra de Placa ciega soporte (consulte la página 52 para obtener información sobre el uso y la instalación de la placa ciega) Compartimento de sal www.kinetico.eu... -
Page 50: Lista De Comprobación Previa A La Instalación
Prefiltro Válvula antirretorno: Deber cumplir las normativas locales. Hacia drenaje Suministro de agua co- rriente Hueco de aire: Debe cumplir Hacia drenaje las normativas locales. Suministro de agua fría Kinetico Premier Compact Descalcificador Manual de instalación y de usuario... - Page 51 6 bares. Una válvula antirretorno en el suministro de agua corriente conectado al descalcificador.Si utiliza un kit de instalación facilitado por Kinetico, se incluye una válvula antirretorno en el tubo en T de entrada.
-
Page 52: Instrucciones De Instalación
80 mm de profundidad. Inserte la placa ciega en la salida que no está en uso. Elévela para colocarla en posición y luego encaje la placa en la ranura. Kinetico Premier Compact Descalcificador Manual de instalación y de usuario... - Page 53 O establezca una instalación de derivación Ajustar la conexión de basada en el siguiente diagrama. entrada/salida: Cuando utilice la válvula mezcladora de derivación de Kinetico, consulte las instrucciones de instalación Válvula de regulación de presión. específicas. Tenga en cuenta que la...
-
Page 54: Revisión De La Instalación
Posición en servicio Las líneas de drenaje no deben recorrer una distancia vertical superior a 2,4 m o superar un total de 9 m. La línea de drenaje no debe estar obstruida ni retorcida. Kinetico Premier Compact Descalcificador Manual de instalación y de usuario... -
Page 55: Instrucciones De Puesta En Marcha
“Información útil” (página 57). Cuando el ciclo haya finalizado (aproximadamente 4 minutos), Nivel del agua repita el procedimiento, gire el punto indicador hasta el siguiente ciclo de retrolavado y deje que termine (aprox. 4 minutos). Indicador Accionador Placa de rejilla www.kinetico.eu... - Page 56 Vuelva a colocar las tapas y compruebe que no hay fugas en las tuberías. La instalación está ahora completa. Sal en pastillas y bolitas: Simplemente viértala en el compartimento de sal. Kinetico Premier Compact Descalcificador Manual de instalación y de usuario...
-
Page 57: Información Útil
Escuchará una corriente de agua y aire pasando al drenaje. Cuando el recipiente haya finalizado su ciclo (aprox. 12 minutos), repita el procedimiento, avance el punto indicador hasta la palabra “BRINE” en la siguiente sección y permita que acabe (aprox. 12 minutos). Indicador Accionador www.kinetico.eu... - Page 58 25 mm recomendados por encima de la rejilla de sal? Compruebe que la válvula de salmuera esté correctamente asegurada en su posición mediante la barra de soporte y de que esté bien asentada en la base de la caja. Kinetico Premier Compact Descalcificador Manual de instalación y de usuario...
- Page 59 En función del sistema de agua y del uso, puede tardar unas semanas en limpiarse. También se recomienda comprobar que la válvula de derivación esté cerrada, cuando no se utiliza la válvula mezcladora de derivación de Kinetico. www.kinetico.eu...
- Page 60 Kinetico International Division, Sandvadsvej 7, Koge, DK – 4600 www.kinetico.eu © Kinetico 2017. 1.7/3 #16248C...
Need help?
Do you have a question about the Premier Compact and is the answer not in the manual?
Questions and answers