Table of Contents
Advertisement
Quick Links
Installation and Operating
Software
Cameras
24Z704USB
Prior to Using This Document: Videology reserves the right to modify the information in this
document as necessary and without notice. It is the user's responsibility to be certain they possess the
most recent version of this document by going to www.videologyinc.com, searching for the model
number, and comparing revision letters on the respective document, located in the document's footer.
For technical assistance with this product, please contact the supplier from whom the product was
purchased.
Videology
®
Imaging Solutions, Inc.
37M Lark Industrial Parkway
Greenville, Rhode Island 02828 USA
Tel: (401) 949 – 5332 Fax: (401) 949 – 5276
North/South American Sales:
www.videologyinc.com
Doc # INS-10002
Revision: A
IMAGING SOLUTIONS INC.
Original Equipment Manufacturer
Instructions
SFT-10002 / SFT-10011
24Z704USB / 24Z704USB-F
24Z704USB-SYS
24Z704USB-F
sales@videologyinc.com
24Z704USB-SYS
Videology
®
Imaging Solutions, Europe B.V.
5405 NH Uden, The Netherlands
Tel: +31 (0) 413 256261 Fax: +31 (0) 413 251712
European Sales:
Issue Date: 06/24/2013
Page 1 of 23
Neutronenlaan 4
info@videology.nl
www.videology.nl
Advertisement
Table of Contents

Related Manuals for Videology SFT-10002


Summary of Contents for Videology SFT-10002
- Page 1 24Z704USB-F 24Z704USB-SYS Prior to Using This Document: Videology reserves the right to modify the information in this document as necessary and without notice. It is the user’s responsibility to be certain they possess the most recent version of this document by going to www.videologyinc.com, searching for the model number, and comparing revision letters on the respective document, located in the document’s footer.
- Page 2 The Software is licensed, not sold, to you for use only under the terms of this Agreement. Videology grants to you, the purchaser, the right to use all or a portion of this Software provided that the Software is used only in conjunction with Videology's family of products.
-
Page 3: Table Of Contents
6.2.5. Illumination Control ....................12 6.2.6. Securing the System to the table top ................12 Software ..........................13 7.1. SFT-10002 USB Viewer Installation ................... 13 7.2. Using the Videology Viewer ....................15 7.3. Basic Camera Controls ..................... 16 7.3.1. Zoom Control ......................17 7.3.2. -
Page 4: Document History
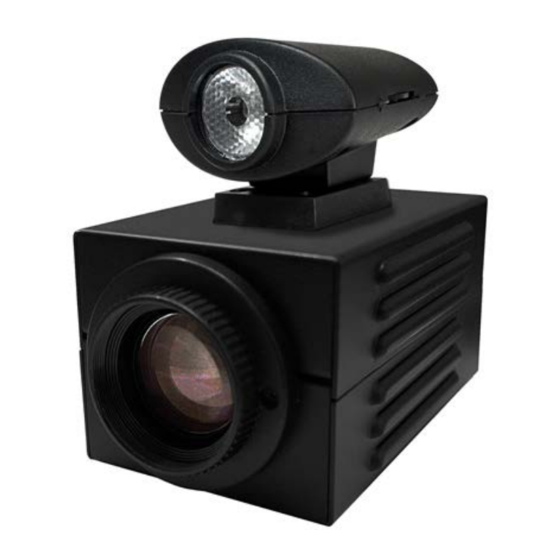
FIPS 201 compliance (in conjunction with appropriate software) • The 24Z704USB-F camera has a Led Illuminator designed for use with the Videology 24Z704USB Autofocus Zoom Camera. It uses a powerful white LED to provide very bright scene illumination at distances up to 20 feet. -
Page 5: Specifications
Software configurable) Contour Enhancement Yes (text mode or image mode) Viewer (included) • WDM device drivers Mirror Mode SFT-10002 • DirectX compliant (horizontal, horizontal + vertical) • TWAIN compliant Positive/Negative Mode Complete software development kit and support SFT-10002-SDK Video Output USB 2.0... -
Page 6: Dimensions
4. Dimensions 4.1. 24Z704USB The overall dimensions of the camera are shown in Figure 1. USB connector Power Figure 1. Overall Camera Dimensions 4.2. 24Z704USB-F The overall dimensions of the flash camera are shown in Figure 2. Flash Power USB connector Figure 2. -
Page 7: 24Z704Usb-Sys
4.3. 24Z704USB-SYS The heavy-duty steel construction of both the stand and camera housing make for a robust and durable design. A flexible gooseneck mount permits the camera to be tilted from back to front or side to side. The overall dimensions of the USB system are shown in Figure 3. Figure 3. -
Page 8: Minimum Computer System Requirements
5. Minimum Computer System Requirements A PC with USB 2.0 compatible port. USB 1.1 not supported. MAC is not supported. Preview only • PIII- 1.1GHz or above 128MB of RAM (256MB preferred) • • Windows XP/2000 for USB2.0 9.0c or later •... -
Page 9: Setup And Operation
6. Setup and Operation 6.1. Flash Camera Setup (24Z704USB-F) 6.1.1. Attaching the Illuminator on top of Flash Camera The illuminator is shipped with a mounting foot which is attached to the top of the camera using 2 screws, as shown in the illustration below. Flash Unit Intensity Control Screws... -
Page 10: Subject Distance
Flash DC Power In 12 VDC To PC In Line Hub and Control Unit Connections 6.1.3. Subject Distance For best results, the subject should be placed at a distance of not less than 6 feet from the camera. This will provide uniform, glare free illumination from the flash. 6.1.4. -
Page 11: White Balance
Intensity Control The intensity setting will vary depending upon the ambient light level and distance from the camera to the subject so some experimentation may be required to get the correct setting. 6.1.5. White Balance The 24Z704USB zoom camera has an automatic white balance (AWB) feature which enables the camera to adjust to varying illumination conditions such as sunlight, fluorescent lighting, incandescent lighting etc. -
Page 12: Usb System Setup (24Z704Usb-Sys)
6.2. USB System Setup (24Z704USB-SYS) 6.2.1. Camera Placement The system is designed for tabletop use, and should be located within 6ft of the PC to which it will be connected. If necessary, the system may be secured to the table top using the clamps provided (see figure 4) 6.2.2. -
Page 13: Software
To install the viewer application on your Windows OS system; Run the SetupPZV.exe program from the CD provided with the system/camera. A window pop-up will show asking if you want to install the Videology Power Zoom Viewer and the Flash Unit Driver. - Page 14 If you wish to install the viewer in a location other than the default directories, click on the Browse button and specify the desired location, otherwise click on the Install Button, and the following screens will appear Click Close. Simply connect the camera to a USB (2.0) port on your computer and launch the viewer from the desktop icon.
-
Page 15: Using The Videology Viewer
7.2. Using the Videology Viewer After software installation, plug in the USB cable from the camera. A window will pop up stating that Windows is installing the device drivers: Upon completion a second window will state the driver software installed successfully:... -
Page 16: Basic Camera Controls
7.3. Basic Camera Controls After software installation, open the PowerZoom software NOTE: Allow a few seconds after connecting the camera to the USB port. The camera is ready for operation when #1 appears in the box next to the Start button. Click on the START button in the top left hand corner and the camera image will appear. -
Page 17: Zoom Control
7.3.1. Zoom Control The Zoom control simply adjusts the level of magnification and thus the angular field of view of the camera. To zoom in or out, simply press and hold the up or down arrow (see figure 5) until the required field of view is obtained. -
Page 18: Advanced Camera Functions
7.4. Advanced Camera Functions To access the Advanced Camera Functions, press “Ctrl D” on the keyboard. The following screen options will appear: Manual White Focus Shutter Save Balance Controls Controls Speed Button Advanced Image Controls The advanced function menu allows you to adjust the following parameters: 7.4.1. -
Page 19: Focus
7.4.2. Focus The 24Z704USB Badging camera is capable of focusing in both Automatic Mode and Manual Mode. It is important to note that the camera defaults to the setting previously set in either Videology Viewer Mode or Badging Software Mode. - Page 20 Load Preset Menu User Preset Options To restore the camera to the factory default settings, select the Factory Reset option from the drop down list on the load presets menu. Doc # INS-10002 Issue Date: 06/24/2013 Revision: A Page 20 of 23...
-
Page 21: Twain Data Source Installation
7.5. TWAIN Data Source Installation To install the TWAIN data source, insert the CD labeled Twain Data Source and double click the executable file named SFT-10011 - TDS. Note: the file name might be slightly different depending on the revision level of the software. The following window will appear. -
Page 22: Twain User Interface
If you have installed the Twain interface (SFT-10011 - TDS), you can use the camera with any TWAIN Compliant Application. The TWAIN interface will attach itself to the first Videology camera it finds connected to the computer. For the best operation, the Twain Interface is intended to run on a system with only one Videology camera installed. -
Page 23: Contact Information
Fax: +31 (0) 413-251712 Please visit our website: videologyinc.com VIDEOLOGY IMAGING SOLUTIONS is an ISO 9001 registered video camera developer and manufacturer serving industrial, machine vision, biometric, security, and specialty OEM markets. Videology designs, develops, manufactures, and distributes video, image acquisition, and display technologies and products to OEMs worldwide.
Need help?
Do you have a question about the SFT-10002 and is the answer not in the manual?
Questions and answers