Table of Contents
Advertisement
Quick Links
Advertisement
Table of Contents

Related Manuals for LESITE LST-RM1


Summary of Contents for LESITE LST-RM1
- Page 1 LESITE Lesite Technology LST-RM1 Roofing Hot Air Welder Manual...
- Page 2 LESITE LST-RM1 Please read this manual carefully before using this machine, and keep it for future reference. Application It can be applicable for welding PVC-P、 PE、 TPO、 ECB、 CSPE、 EPDM、 PVDF and other Coated fabric covering, foil and homogeneous or coating sealing film and PE coating fabric.
- Page 3 530 × 330 × 280 mm Motor Brushless Weight 20 Kg Certification Warranty One year Nameplate The model identification and serial number identification are marked onthe nameplate of the machine you choose. Please provide these data when consulting Lesite Sales and Service Center.
-
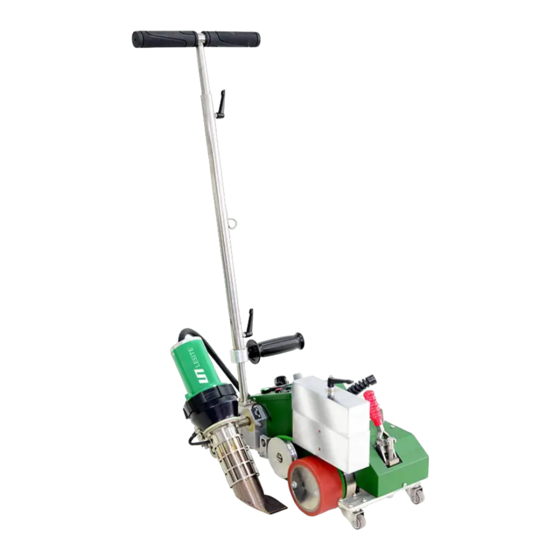
Page 4: Main Parts
LESITE LST-RM1 Main Parts 11 10 9 1、Drive Silica Roller 2、Drive Roller 3、Round Belt 4、Nozzle 5、Pulley 6、Hot Gun Fixed Plate 7、Pulley Connecting Rod 8、Belt Wheel Fixing Block 9、Floor Plate 10、Guide 11、Hot Gun Fixed Slider 12、Hot Gun Positioning Handle 13、Guide Wheel 14、Guide Wheel Support Block... - Page 5 LESITE LST-RM1 Main Parts 24、Handrail 25、Clamp 26、Movable Handle 27、General Power Line 28、Cable Connector 29、Handle 30、Lifting Handle 31、Side Wheel...
-
Page 6: Controller Panel
LESITE LST-RM1 Controller Panel 1、ON/OFF switch(40)is used for open the main power of the welder. 2、Open ON/OFF switch (40), LCD display is shown as figure 1, the hot air blower is under natural wind without heating. Current temp Current speed CT: 016℃... - Page 7 LESITE LST-RM1 Controller Panel 4、If press the bottoms (33) and (34) at the same time, LCD display shows as figure 1, the hot air blower is under natural wind without heating. 5、When the welding nozzle is at the right position, press the moving switch (39) and the welder starts to move and weld.
-
Page 8: Welding Steps
LESITE LST-RM1 Welding Steps 1、Setting welding parameters (see above). 2、When the temperature reaches the set value. 3、Welding machine positioning. 4、Pull up the positioning handle (12) of the air gun, lift the air gun (19), lower the air nozzle (4) and make it close to the submerged membrane. Move the air gun to the left to insert the air nozzle into the overlap membrane and make the air nozzle in place. - Page 9 LESITE LST-RM1 Instructions For Use Fixing screw Fixing screw In order to prevent the machine from being damaged during transportation, the machine is fixed in the steel packing box with screws. When using the machine for the first time, it is necessary to loosen three machine fixing screws and take them out to remove the machine from the packing box, as shown in the figure above.
-
Page 10: Quality Assurance
LESITE LST-RM1 Using Condition 1、The distance between hot air nozzle and ground should be shown as figure 5 (We have adjusted the distance). 2、 The distance between hot air nozzle and Drive roller should be shown as figure 6 (We have adjusted the distance). You can adjust Hot air nozzle adjusting screw figure 7 if the distance is not right. -
Page 11: Error Code
2.Replace thermocouple detected Repairs and Spare Parts · It is strongly recommended to send the product to Lesite company or authorized repair center for professional inspection and repair. · Only original Lesite spare parts are allowed. One year warranty... - Page 12 FUZHOU LESITE PLASTICS WELDING TECHNOLOGY CO.,LTD Tel: +86(591)83818890 E-mail: info@lesite.com.cn Web: www.lesiteweld.com Add: 5# Jingpu Road, Pushang Industry Park, Cangshan, Fuzhou, 350007, Fujian, China...
Need help?
Do you have a question about the LST-RM1 and is the answer not in the manual?
Questions and answers