
Related Manuals for Agora Models ALIEN


Summary of Contents for Agora Models ALIEN
- Page 1 A L I E N A L I E N Pack 01 B U I L D I N S T R U C T I O N S STAGE 01: THE UPPER JAW STAGE 03: THE SKULL & JAWBONE STAGE 02: THE LOWER JAW STAGE 04: THE TIBIA &...
- Page 2 Before you start... To help you get the best out of building the Xenomorph, we’ve prepared a modellers checklist with hints, tips and advice from our expert. The information below is aimed at making your build as enjoyable and professional as possible right from the start. Make sure you have good ventilation when using adhesives and to replace caps firmly.
-
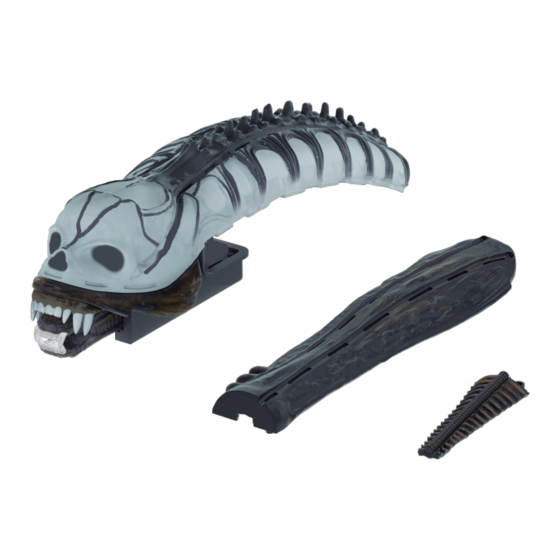
Page 3: Parts Supplied
A S S E M B L Y G U I D E S TA G E 1 : T H E U P P E R J AW The first stage of the model’s assembly starts with the upper jaw, which will become part of the Xenomorph’s skull. - Page 4 S T A G E 1 : T H E U P P E R J A W EXPERT TIP: If the screws are difficult to fit, it could be because they are cutting a thread as they are being screwed in. If this should be the case, try turning the 1-6 (C) screw forwards half a turn, then...
- Page 5 S T A G E 1 : T H E U P P E R J A W 1-8 (E) 1-9 (F) 1-10 (G) In a similar way to the previous step, fit the remaining Teeth (E), 1-9 (F) 1-10 (G) into their corresponding sockets in the Upper Jaw B 1-3.
- Page 6 S T A G E 1 : T H E U P P E R J A W 1-7 (D) The Upper Jaw B is fitted into the Upper Jaw A 1-2, as shown. Test-fit the large rectangular peg on part into the corresponding rectangular recess on the underside of part 1-2.
- Page 7 A S S E M B L Y G U I D E S TA G E 2 : T H E L O W E R J A W In this stage you will assemble the lower jaw pieces and parts of the retractable jaw.
- Page 8 S T A G E 2 : T H E L O W E R J A W Place parts 2-6, the work surface, as shown. The Retractable Jaw fits between the end of Jaw part 2-7. Align the holes in the two parts and push the Connecting Pin through the holes to join the parts together.
- Page 9 S T A G E 2 : T H E L O W E R J A W EXPERT ADVICE EXPERT ADVICE Protect painted parts from damage during assembly by working on a cutting mat or a sheet of cardboard. To clean components, use a soft, dry cloth so as not to damage your Xenomorph.
- Page 10 S T A G E 2 : T H E L O W E R J A W In a similar way, fit the Lateral Lower to the right hand side of the Jaw 2-1. Again, do not glue in place and if necessary, use a small piece of masking tape to temporarily hold the part in place.
- Page 11 A S S E M B L Y G U I D E S T A G E 3 : T H E S K U L L & J A W B O N E In this stage you will fix the teeth on the lower jaw and continue the assembly of the upper jaw and skull.
- Page 12 S T A G E 3 : T H E S K U L L & J A W B O N E ASSEMBLY ADVICE ASSEMBLY ADVICE 3-3 (1) 3-4 (2) 3-5 (3) 3-6 (4) 3-7 (5) 3-8 (6) 3-9 (7) The teeth are individually embossed with a number to help identify them.
- Page 13 S T A G E 3 : T H E S K U L L & J A W B O N E Turn over the Lower Jaw have the mandible ready. Locate the seven holes in the jaw assembly 2-1/2-2;...
- Page 14 S T A G E 3 : T H E S K U L L & J A W B O N E 3-15 3-15 3-15 3-11 3-10 3-10 Fit the Retractable Jaw Frame Cover Place the Retractable Jaw Frame 3-10 3-11 onto the four raised screw...
- Page 15 S T A G E 3 : T H E S K U L L & J A W B O N E 3-15 With the Retractable Jaw assembly 3-10 held upside down, locate the four clear raised screw sockets at the 3-10 front of the Skull assembly 1-1.
- Page 16 A S S E M B L Y G U I D E S TA G E 4 : T H E T I B I A & R E T R A C TA B L E J A W In this stage you’ll construct one of the shins and complete the retractable jaw of the Xenomorph.
- Page 17 S T A G E 4 : T H E T I B I A & R E T R A C T A B L E J A W Place the pile of Magnets on the work surface and mark It is very important that the the top Magnet.
- Page 18 S T A G E 4 : T H E T I B I A & R E T R A C T A B L E J A W Take the Tibias place them on your work surface. When fitting the Magnets, it is essential that they are all the same way up (same polarity).
- Page 19 S T A G E 4 : T H E T I B I A & R E T R A C T A B L E J A W The Magnets hold the Calf Skin to the Tibia. Place the Tibia 4-1/4-2 on top of...
-
Page 20: Circuit Board Diagram
S T A G E 4 : T H E T I B I A & R E T R A C T A B L E J A W TESTING THE RETRACTABLE JAW CIRCUIT BOARD DIAGRAM CIRCUIT BOARD DIAGRAM Here is a quick guide to the circuit board that was provided with Stage 3: A –... - Page 21 S T A G E 4 : T H E T I B I A & R E T R A C T A B L E J A W 3-14 3-13 3-12 The Retractable Jaw can now be tested. When Button D (circled in red) is pressed the jaw should extend forwards.
Need help?
Do you have a question about the ALIEN and is the answer not in the manual?
Questions and answers