Advertisement
- 1 Introduction
- 2 GENERAL INFORMATION
- 3 GENERAL SAFETY INSTRUCTIONS
- 4 CONDITIONS FOR USE
- 5 DESCRIPTION OF THE TRANSMITTER
- 6 SELECTING THE CONTROL MODE
- 7 ASSOCIATING THE TRANSMITTER
- 8 INSTALLING THE TRANSMITTER
- 9 USE CASE
- 10 DELETING THE TRANSMITTER
- 11 MISCELLANEOUS
- 12 TECHNICAL DATA
- 13 CONFORMITY
- 14 WARRANTY
- 15 Documents / Resources
![]()
Introduction
The transmitter micro-module allows a switch or push-button to be transformed into an io-homecontrol transmitter (lighting or roller shutter). It also allows a scenario programmed into the TaHoma interface to be activated via any push-button.
GENERAL INFORMATION
Read this installation guide and the safety instructions carefully before installing this Somfy product. All the instructions given must be followed closely and this guide must be stored in a safe place throughout the service life of your product. Before installation, check that this Somfy product is compatible with the associated equipment and accessories.
These instructions describe the installation and use of this product. Any installation or use outside the field of application specified by Somfy is forbidden. This invalidates the warranty and discharges Somfy of all liability, as does any failure to comply with the instructions given herein.
Somfy cannot be held responsible for changes to norms or standards occurring after the publication of these instructions.
GENERAL SAFETY INSTRUCTIONS
Children must not be allowed to play with the transmitter. Never immerse the transmitter in liquid.
This product is not designed to be used by persons (including children) with reduced physical, sensory or mental capacities, or persons lacking in experience or knowledge, unless they have received, from a person responsible for their safety, monitoring or prior instruction regarding the use of the product.
 Do not connect this product to the mains.
Risk of explosion if the battery is replaced by an incorrect type. Do not swallow the battery. If swallowed, the battery can cause chemical burns in only 2 hours and may be fatal. If swallowed, call a doctor immediately.
Do not throw onto a fire.
CONDITIONS FOR USE
Do not use this product outdoors. The radio range is limited by the radio appliance control standards. The transmitter range is heavily dependent on the environment in which it is used: interference may be caused by having large-scale electrical equipment near the installation and by the type of material used in the walls and partitions. The use of a radio appliances (e.g. a set of Hi-Fi radio headphones) operating on the same radio frequency might be detrimental to the product's performance.
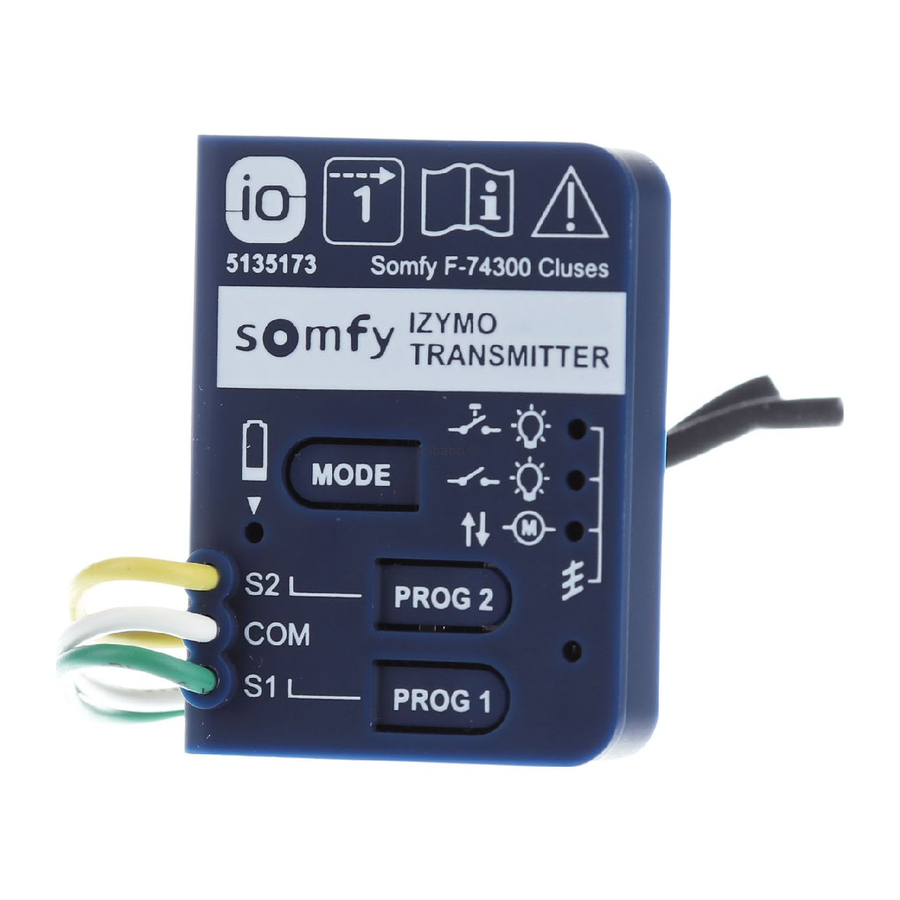
DESCRIPTION OF THE TRANSMITTER

SELECTING THE CONTROL MODE
The transmitter is set to mode 1 (push-button) by default.
To select a mode, push the MODE button on the transmitter briefly several times until you obtain the desired mode.

Once the mode has been selected, wait 2 seconds. The indicator light flashes 3 times to confirm that the mode selected has been memorised.
The mode selected applies to both channels (S1 and S2).
ASSOCIATING THE TRANSMITTER
Associating the first transmitter with an io receiver
- To activate association mode, consult the receiver instructions.
- Associate the transmitter: briefly press the PROG 1 button (for channel S1) or PROG 2 button (for channel S2) on the transmitter.
- The green light flashes on the transmitter.
- The receiver exits association mode.
- The transmitter is now associated with the receiver.
Associating a transmitter with an io receiver
- Set the receiver to association mode: press the PROG 1 or PROG 2 button on the transmitter for 2 seconds
- Associate the transmitter:
briefly press the PROG 1 button (for channel S1) or PROG 2 button (for channel S2) on the transmitter.
- The green light flashes on the transmitter.
- The receiver exits association mode.
- The transmitter is now associated with the receiver.
Associating a transmitter with a TaHoma (scenario)
- Click on the
![]() icon on the PC interface or TaHoma tablet and then on the configuration menu
icon on the PC interface or TaHoma tablet and then on the configuration menu ![]() .
. - Select the io-homecontrol thumbnail then click on "add".
- Select the final type of equipment, "controls".
- Then follow the instructions displayed on the screen.
 icon on the PC interface or TaHoma tablet and then on the configuration menu
  .
.INSTALLING THE TRANSMITTER
The transmitter must be installed in the switch housing.

If one of the wires is not connected, please ensure that it is insulated or leave rubber tube on.
USE CASE
| Light ON-OFF | Light variation | |||||||
| Mode 1 | Mode 2 | Mode 1 | ||||||
| Type of control | Channel S1 |  |  |  | ||||
| Channel S2 |  |  |  | |||||
| Actions | Short press: Double press: | Rocker: ON/OFF | Short press: Long press: Double press: | |||||
| Roller shutter | Exterior venetian blind | Scenario | ||||||
| Mode 3 | Mode 4 | Mode 1 | ||||||
| Type of control |  |  |  |  | ||||
| Actions | Press and hold: Up/Down (stops when released) | Rocker: Up/Down until end limit | Short press: Long press: | Short press: Start 1 (or 2) scenario(s) defined via TaHoma | ||||
DELETING THE TRANSMITTER
Deleting a transmitter from an io already associated
- Set the receiver to association mode.
- Briefly press the PROG 1 or PROG 2 button on the transmitter for the channel to be deleted (channel S1 or S2): the transmitter and receiver are no longer associated.
Deleting a transmitter via TaHoma
- Click on the
![]() icon on the PC interface or TaHoma tablet and then on the configuration menu
icon on the PC interface or TaHoma tablet and then on the configuration menu ![]() .
. - Select the io-homecontrol thumbnail then click on the control to be deleted.
- Click on "delete".
- Then follow the instructions displayed on the screen.
 icon on the PC interface or TaHoma tablet and then on the configuration menu
  .
.MISCELLANEOUS
Battery life
From 4 years (20 actions/day) to 7 years (2 actions/day).
Battery low information
- Via the transmitter:
When the transmitter battery falls below the critical threshold, the transmitter only sends a radio command every second activation of the push-button / switch.
Furthermore, the orange "battery low" LED is lit every time the button/switch is activated. - Via the TaHoma interface:
When the transmitter is associated with an io micro-module receiver, itself associated with TaHoma, a message appears close to the receiver icon when the transmitter battery is low.
The remaining battery life following this warning is approximately one month.
Replacing the battery
Replace the old battery with CR2430 battery, respecting the polarity as shown on the product.
Recycling
- We care about our environment. Do not dispose of the appliance with the household waste.
![]()
- Take it to the relevant collection point for recycling.
- Please separate the battery from other types of waste and recycle it via your local collection system.

TECHNICAL DATA
| Power supply | CR2430 battery: 3V  |
| Battery life | 3 years |
| Protection class | IP 20 |
| Dimensions | 35 x 43 x 8 mm |
| Radio frequencies Radio power | 868.70MHz - 869.20MHz e.r.p < 25 mW |
| Range in open space | 200 m |
| Range through two concrete walls | 20 m |
| Operating temperature | 0°C to +55°C |
| Humidity | 85% HR at 25°C |
CONFORMITY

Somfy hereby declares that the radio equipment covered by these instructions is in compliance with the requirements of the Radio Directive 2014/53/EU and the other essential requirements of the applicable European Directives.
The full text of the EU Declaration of Conformity is available at www.somfy.com/ce.
WARRANTY
This product is guaranteed for 3 years from the date of purchase.
SOMFY ACTIVITES SA
50, avenue du Nouveau Monde, F-74300 CLUSES
www.somfy.com
Copyright © 2018 SOMFY ACTIVITES SA, Société Anonyme. All rights reserved. Capital 35.000.000 Euros, RCS Annecy, 303.970.230 -06/2018.
Images are not contractually binding

Documents / Resources
References
Download manual
Here you can download full pdf version of manual, it may contain additional safety instructions, warranty information, FCC rules, etc.
Advertisement


Need help?
Do you have a question about the IZYMO Transmitter io and is the answer not in the manual?
Questions and answers