Advertisement
Quick Links
Read all instructions BEFORE assembly and USE of product.
KEEP INSTRUCTIONS FOR FUTURE USE.
Lea todas las instrucciones ANTES de armar y USAR el
producto. GUARDE LAS INSTRUCCIONES PARA USO FUTURO.
See back page for quick set up guide.
Vea la última página para la guía de instalación rápida.
Pack 'n Play
Sit 'N Grow
Playard
®
™
Corralito Pack 'n Play
Sit 'N Grow
®
™
Owner's Manual • Manual del Propietario
©2022 Graco NWL0001433585C 8/22
Advertisement

Related Manuals for Graco Pack 'n Play Sit 'N Grow


Summary of Contents for Graco Pack 'n Play Sit 'N Grow
- Page 1 See back page for quick set up guide. Vea la última página para la guía de instalación rápida. Pack 'n Play Sit 'N Grow Playard ® ™ Corralito Pack 'n Play Sit 'N Grow ® ™ Owner’s Manual • Manual del Propietario ©2022 Graco NWL0001433585C 8/22...
-
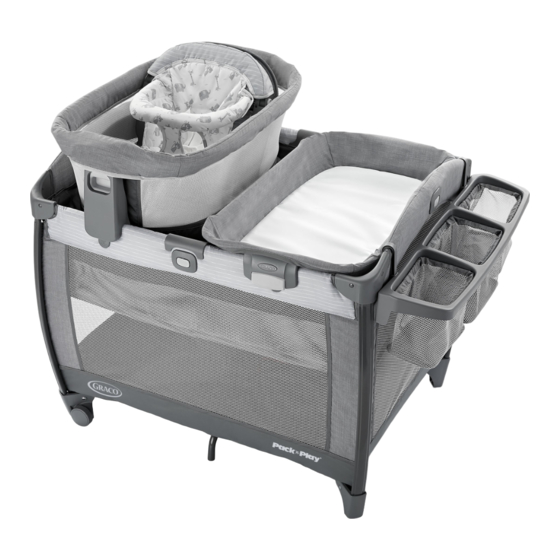
Page 2: Features • Características
1 WARNING • ADVERTENCIA Pages • Páginas 2 Features • Características Page • Página 2-A Parts List • Lista de piezas 3 Playard • Corralito 8-12 Pages • Páginas 3-A Playard Set Up • Armado del corralito 3-B To Fold • Para plegar 3-C To Cover •... - Page 3 Contact than 30 lb (14 kg), or is able to Graco at 1-800-345-4109 for climb out. replacement parts and • Do not modify playard or add instructions if needed. Never any attachments that are not substitute parts.
- Page 4 • If a sheet is used with the sides, the playard has flexible mattress pad, use only the one sides. provided by Graco that is As a result, the playard specifically designed to fit the mattress pad is specially dimensions of the mattress designed to prevent pad.
- Page 5 • No modifique el corralito ni durante el uso. De ser agregue otra pieza que no se necesario, comuníquese con mencione en el manual del Graco al 1-800-345-4109 para propietario, incluyendo un moisés obtener piezas de repuesto e adicional. instrucciones. Nunca sustituya las piezas.
- Page 6 • Si se usa una sábana con la almohadilla, use solamente la cierto largo y ancho, y tiene provista por Graco una que esté menos de una inch de pulgada precisamente para mantener específicamente diseñada para las dimensiones de lac los stándares de seguridad...
-
Page 7: Lista De Las Piezas
Parts List Lista de las piezas • This model may not include some Este modelo podría no incluir features shown below. Check algunas de las características que that you have all the parts for this se indican a continuación. model BEFORE assembling your Verifique que tenga todas las product. - Page 8 3-A Playard Set Up • Armado del corralito A. Playard Frame D. Mattress Pad •Armazón del • Colchón corralito 1. Disconnect straps holding mattress (D) around playard (A). Remove mattress (D) from around playard (A). 1. Desconecte las correas que sujetan el colchón (D) alrededor del corralito (A).
- Page 9 4. Hold one end of the unit up, and push the center of the floor down. CHECK top rails are locked by pushing down on them. 4. Levante un extremo de la unidad y empuje el centro del piso hacia abajo. VERIFIQUE que las barandas del cambiador estén aseguradas al empujarlas...
- Page 10 3-B To Fold • Para plegar 1. Release straps on bottom of playard. Pull mattress fully out of playard. 1. Libere las correas en el fondo del corralito. Saque completamente la almohadilla del colchón del corralito. 2. DO NOT unlock top rails yet. Center of floor must be at least halfway up before top rails will unlock.
- Page 11 3. Center of floor must be up. a. Lift up slightly on the top rail. b. Push in on the button located on the side of the top rail to release the two tubes. c. Push down. • If top rails do not unlatch, DO NOT FORCE.
- Page 12 5. Wrap mattress around playard. 5. Envuelva el colchón alrededor del corralito. 3-C To Cover • Para cubrir B. Carry Bag • Bolsa de transporte 1. Cover unit with handle out. 1. Cubra la unidad con la manija hacia afuera. 2.
- Page 13 • If a sheet is used with the mattress pad, use only the one provided by Graco that is specifically designed to fit the dimensions of the mattress pad. • Never place child in bassinet while any other accessory is attached.
- Page 14 • Si se usa una sábana con la almohadilla, use solamente la provista por Graco una que esté específicamente diseñada para las dimensiones de la almohadilla del colchón. • Nunca ponga al niño en el moisés mientras haya cualquier otro...
- Page 15 1. Release straps on bottom of playard. Pull mattress fully out of playard. 1. Libere las correas en el fondo del corralito. Saque completamente la almohadilla del colchón del corralito. 2. Slide 4 bassinet mounts over mounts in four corners of playard, and attach 2 clips over buttons on the long sides.
- Page 16 3. Insert tapered end of tube into end of opposite tube. Repeat with other set of tubes. CHECK: Tubes MUST be assembled before placing mattress pad in bassinet. 3. Inserte el extremo cónico del tubo en el extremo del tubo opuesto. Repita el procedimiento con el otro juego de tubos.
- Page 17 4-B Parent Organizer • Organizador para padres WARNING Always keep objects out of child’s reach. Remove this accessory when child is able to pull himself up in the playard. ADVERTENCIA Siempre mantenga los objetos fuera del alcance del niño. Quite este accesorio cuando el niño pueda apoyarse en el corralito.
- Page 18 4-C Changing Area • Cambiadores WARNING FALL HAZARD Children have suffered serious injuries after falling from changing area. Falls can happen quickly. • STAY within arms reach. • Use changing area only on this playard model. • ALWAYS secure this unit to the support frame by attaching to identified location.
- Page 19 ADVERTENCIA • El límite de peso para el cambiador es de 30 libras (14 kg). No use el cambiador como zona de almacenamiento adicional. • No use el mudador si está dañado o roto. Peligro de estrangulamiento: Nunca deje la mesa para cambiar al bebé...
- Page 20 F. Changer Ends • Extremos del cambiador 2. Insert tubes into opening in changer end (F). CHECK that buttons are visible in holes. Repeat on other changer end (F). 2. Introduzca los tubos en la abertura del extremo del cambiador (F). VERIFIQUE que los botones estén visibles en los orificios.
- Page 21 4. CHECK the changer is attached by grasping the sides/ends of the changing area and pulling upward. CHECK that changer fabric is properly attached to frame before use. Push down on changing area before each use. 4. VERIFIQUE que el cambiador esté...
- Page 22 4-D Accessory Use Modes •Modos de uso de los accesorios Look for these shapes on labels and in instruction manual for more information on each mode. Busque estas formas en las etiquetas y en el manual de instrucciones para obtener más información sobre cada modo. Support Frame Base platform/seat Armazón de...
- Page 23 Infant Floor Seat Pages • Páginas 43-46 • Asiento de piso para bebé Base platform/seat (open) Use ONLY with a child that is able to hold their head up unassisted(approximately 4 months of age). STOP using when the child can climb out or walk. Plataforma/asiento (abierto) Utilícelo SOLO con un niño que pueda sostener la cabeza sin asistencia aproximadamente 4 meses...
- Page 24 3. Assemble other tube into the head and foot end hubs (I). CHECK that buttons are visible in opening as shown. 3. Monte el otro tubo en los ejes de los extremos para la cabeza y para los pies (I). VERIFIQUE que los botones estén visibles en de las aperturas como se muestra.
- Page 25 To transition base platform/seat from seat to bassinet mode • Como cambiar la plataforma/el asiento de moisés al modo de asiento 1. Attach waist straps to harness buckle as shown. Tip: Before folding torso ring, pull waist straps and harness buckle up from seating area.
- Page 26 • In gaps between extra padding and side of the bassinet, and • On soft bedding. Use ONLY mattress pad provided by Graco. NEVER add a pillow, comforter, or another mattress for padding. • Bassinet can roll over on soft surfaces and suffocate child.
- Page 27 • DO NOT store the bassinet inside the playard. • DO NOT use bassinet as a co-sleeper in the bed. • The bassinet is designed for use only with this Graco playard or on the floor. • DO NOT attach bassinet to playard without playard bassinet securely attached.
- Page 28 ADVERTENCIA Use SOLAMENTE el colchón almohadilla proporcionado por Graco. NUNCA agregue una almohada, un edredón, juguetes o un colchón adicional como acolchado. • El moisés puede darse la vuelta si se coloca sobre superficies blandas y el niño puede asfixiarse. NUNCA ponga el portabebés sobre una cama, sofá...
- Page 29 ADVERTENCIA • El moisés fue diseñado para usar solamente con este corralito Graco o en el piso. • NO ponga el moisés en el corralito si el moisés del corralito no está sujetado de forma segura. • Mantenga siempre el moisés lejos de peligros en los alrededores que pudieran lesionar al niño.
- Page 30 2. Pull up on bassinet bottom at all 4 corners to ensure base platform/ seat is properly latched. 2. Tire hacia arriba de las 4 esquinas del fondo del moisés para asegurarse de que la plataforma/el asiento esté asegurado de manera apropiada.
- Page 31 2. CHECK the bassinet is attached by grasping the sides of the bassinet, and pulling upward. 2. VERIFIQUE que el moisés esté sujeto tirando de los laterales del moisés hacia arriba. 3. To remove, squeeze buttons upward on both sides of the bassinet handles and pull up as shown.
- Page 32 4-G Infant Floor Seat with Frame • Asiento de piso para bebé con armazón Support Frame + Base platform/seat (open) Armazón de soporte + plataforma/asiento (abierto) WARNING Failure to follow these warnings and the instructions could result in serious injury or death. •...
- Page 33 WARNING • NEVER place the product near a window where cords from blinds or drapes can strangle a child. • NEVER hang strings on or over the product. • NEVER place items with a string around a child’s neck, such as hood strings, pacifier cords, etc.
- Page 34 ADVERTENCIA • Guarde estas instrucciones para uso futuro. • NO utilice el producto si está dañado o roto. PELIGRO DE ESTRANGULAMIENTO: • Cuerdas y cordones pueden provocar estrangulación. Mantenga cuerdas y cordones lejos de su hijo. • NUNCA ubique el producto cerca de una ventana donde los cordones de persianas o cortinas puedan estrangular al niño.
- Page 35 2. Lift up mattress pad and locate seat back fold handle. 2. Levante la almohadilla del colchón y ubique la manija para plegar el respaldo. 3. Squeeze handle and rotate seat back up until it locks open. Keep children away from the product when transitioning product.
- Page 36 To Secure Child • Para asegurar al niño 1. Press button on buckle to release the waist straps. 1. Oprima el botón de la hebilla para liberar las correas de la cintura. 2. Pull waist straps and crotch strap out of seating area and place child in seat.
- Page 37 4-H Elevated Seat (Infant Seat with Frame on Playard) • Asiento elevado (asiento para bebé con armazón en el corralito) Base platform/seat (open) Plataforma/asiento (abierto) WARNING Failure to follow these warnings and the instructions could result in serious injury or death. FALL HAZARD: To help prevent falls, DO NOT use this product when the infant begins to push up on hands and knees or weighs over 20 lb (9 kg) (approximately 5 months of age), whichever comes first.
- Page 38 WARNING • The product is designed for use only with this Graco playard or on the floor. • DO NOT attach product to playard without playard bassinet securely attached. • Read all instructions before use of the product. • Keep instructions for future use.
- Page 39 • NO guarde el producto dentro del corralito. • El producto fue diseñado para utilizarse solamente con este corralito Graco o en el piso. • NO sujete el producto al corralito si el moisés del corralito no está sujetado de forma segura.
- Page 40 ALWAYS assemble/disassemble the elevated seat on a solid surface, OFF of the playard. Monte/desmonte SIEMPRE el asiento elevado sobre una superficie sólida, FUERA del corralito. 1. CHECK that seat back and torso ring are locked in upright positions. IF NOT, follow steps in 4-G Infant Floor Seat with Frame page 32.
- Page 41 3. CHECK the elevated seat is attached by grasping the sides of the elevated seat, and pulling upward. 3. VERIFIQUE que el asiento elevado esté sujetado tirando de los laterales del asiento elevado hacia arriba. 4. To remove, squeeze buttons upward on both sides of the elevated seat support frame end hub mounts and pull up as shown.
- Page 42 To Secure Child • Para asegurar al niño 1. Press button on buckle to release the waist straps. 1. Oprima el botón de la hebilla para liberar las correas de la cintura. 2. Pull waist straps and crotch strap out of seating area and place child in seat.
- Page 43 4-I Infant Floor Seat without Frame • Asiento para el piso para bebé sin armazón Base platform/seat (open) La plataforma/el asiento (abierto) WARNING FALL HAZARD: Infants have suffered skull fractures falling while in and from floor seats. • NEVER use as floor seat on an elevated surface. Use ONLY on the floor.
- Page 44 1. Push base platform/seat release buttons on both sides of support frame and lift base platform/seat out of support frame. 1. Empuje los botones para liberar la plataforma/el asiento en ambos lados del armazón de soporte y levante lla plataforma/ el asiento para sacarlo del armazón de soporte.
- Page 45 3. Squeeze handle and rotate seat back up until it locks open. Keep children away from the product when transitioning product. CHECK that seat back is locked by pushing on it. SNAP! 3. Oprima la manija y gire el ¡CRAC! respaldo del asiento hacia arriba hasta que encaje en posición abierta.
- Page 46 To Secure Child • Para asegurar al niño 1. Press button on buckle to release the waist straps. 1. Oprima el botón de la hebilla para liberar las correas de la cintura. 2. Pull waist straps and crotch strap out of seating area and place child in seat.
- Page 47 5-A Care and Maintenance • Cuidado y mantenimiento To Remove Mattress Pad • Para retirar la almohadilla del colchón 1. Disconnect 4 elastic loops from base platform/seat and pull mattress pad off of base platform/ seat as shown. 1. Desconecte los 4 bucles elásticos de la plataforma/el asiento y saque la almohadilla del colchón de la plataforma/el asiento como se...
- Page 48 To Remove Seat Pad • Para sacar la almohadilla del asiento 1. Insert waist straps through openings in seat pad. 1. Pase las correas de la cintura por las aberturas en la almohadilla del asiento 2. Unfasten snaps on seat pad from front of base platform/ seat.
- Page 49 DE VEZ EN CUANDO REVISE SU EL CORRALITO por si existieran partes gastadas, material roto o descosido. Reemplace o repare las partes que lo necesiten. Use sólo repuestos Graco®. • EL BOLSO PARA TRANSPORTAR: Puede ponerla en la lavadora con agua fria, en ciclo ropa delicada y colgar para secar. NO USE BLANQUEADOR.
- Page 50 1-800-345-4109 5-C Product Registration (USA) Registro del producto (EE.UU.) To register your Graco product from within the U.S.A. visit us online at www.gracobaby.com/productregistration or return registration card provided with your product. We currently do not accept product registrations from those living outside the United States of America.
- Page 51 Quick Fold Guide Guía de pliegue rápido 1. Pull red tab up to unlock. Stop when you hear it click. (See page 10) 1. Tire de la lengüeta roja hacia arriba para destrabar. Deje de tirarla cuando oiga un crac. (Consulte la página 10) 2.
- Page 52 Quick Set Up Guide Guía de configuración rápida SNAP! SNAP! SNAP! ¡CRAC! ¡CRAC! ¡CRAC! SNAP! ¡CRAC! 1. Pull up on all 4 sides, 1. Tire hacia arriba de and snap into place. los 4 costados y Do not push center of abróchelos en su lugar.
Need help?
Do you have a question about the Pack 'n Play Sit 'N Grow and is the answer not in the manual?
Questions and answers