Graco Pack ‘n Play Owner's Manual
Playard quick,portable napper
Hide thumbs
Also See for Pack ‘n Play:
- Owner's manual (54 pages) ,
- Instructions manual (104 pages) ,
- Owner's manual (44 pages)
Advertisement
Quick Links
Download this manual
See also:
Owner's Manual
Read all instructions BEFORE assembly and USE of product.
KEEP INSTRUCTIONS FOR FUTURE USE.
Lea todas las instrucciones ANTES de armar y USAR el
producto. GUARDE LAS INSTRUCCIONES PARA USAR EN EL
FUTURO.
See back page for quick set up guide.
Vea la última página para la guía de instalación rápida.
Pack 'n Play
Playard Quick
®
Connect™ Portable Napper
©2016 PD349462F 10/16
Advertisement

Related Manuals for Graco Pack ‘n Play


Summary of Contents for Graco Pack ‘n Play
- Page 1 Read all instructions BEFORE assembly and USE of product. KEEP INSTRUCTIONS FOR FUTURE USE. Lea todas las instrucciones ANTES de armar y USAR el producto. GUARDE LAS INSTRUCCIONES PARA USAR EN EL FUTURO. See back page for quick set up guide. Vea la última página para la guía de instalación rápida.
-
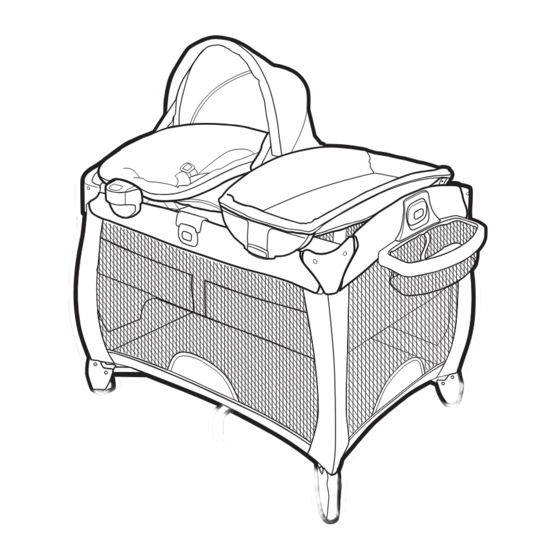
Page 2: Features • Características
1 WARNING • ADVERTENCIA Pages • Páginas 2 Features • Características Pages • Páginas 2-A Parts List • Lista de piezas 3 Assembly • Ensamblaje 8-14 Pages • Páginas 3-A Set Up • Armado del corralito 3-B Bassinet • Moises 15-18 4 Use •... - Page 3 30 lb (14 kg), or is able to before assembly and climb out. periodically during use. Contact • Do not modify playard or add Graco at 1-800-345-4109 for any attachments that are not replacement parts and listed in the owner’s manual, instructions if needed. Never including an add-on bassinet.
- Page 4 NEVER add a mattress, pillow, string around a child’s comforter or padding. Use ONLY neck, such as hood strings, mattress pad provided by Graco. pacifier cords, etc. Mattress dimension: 27”x 36” • NEVER attach strings to (68.5 cm x 91.4 cm).
- Page 5 De ser incluyendo un moisés adicional. necesario, comuníquese con Graco al 1-800-345-4109 para • El niño puede quedar atrapado obtener piezas de repuesto e y morir cuando se ponen instrucciones. Nunca sustituya fundas o redes improvisadas las piezas.
- Page 6 • Si se usa una sábana con la flexibles. Debido a esto, el colchón del corralito está almohadilla, use solamente la especialmente diseñado para que entregó Graco para prevenir la sofocación. El Corralitos Quick Connect o una colchón del corralito posee una específicamente diseñada base sólida, un cierto largo y...
- Page 7 Parts list Lista de las piezas • This model may not include some Este modelo podría no incluir features shown below. Check algunas de las características que that you have all the parts for this se indican a continuación. model BEFORE assembling your Verifique que tenga todas las product.
- Page 8 3-A Set Up • Installar 1. Disconnect straps holding mattress around playard. 1. Desconecte las correas que sujetan el colchón alrededor del corralito. 2. Remove mattress from around playard. 2. Saque el colchón del corralito. 3. Pull up on side rails in middle above push button until all four sides are locked.
- Page 9 4. When setting up, lock rails BEFORE lowering center. SNAP! Be sure top rails have become ¡CLIC! rigid. If not, pull up again until they are rigid. If top rails do not latch, lift the center of the floor higher. 4.
- Page 10 7. Put two tabs under mattress/ pad through button holes and fasten securely on bottom of unit. 7. Pase las dos lengüetas debajo del colchón por los ojales y sujételas en la parte inferior de la unidad. 8. Pull strap through bottom of SNAP! playard and wrap around tube ¡CLIC!
- Page 11 • If a sheet is used with the pad use only the one provided by Graco or one specifically designed to fit the dimensions of the bassinet.
- Page 12 • Si usa una sábana con la almohadilla, use solamente la provista por Graco o una específicamente diseñada según la dimensión de la cuna. • Nunca ponga al niño en la cuna si el moisés o cambiador está...
- Page 13 1. Release snap straps and hook and loop straps on bottom of playard. Pull mattress fully out of playard. 1. Libere las correas con broche y las correas de nudo y gancho y en el fondo del corralito. Saque el colchón del corralito.
- Page 14 3. Insert tapered end of tube into end of other tube with hole in it. Repeat with other set of tubes. CHECK: Tubes MUST be assembled before placing mattress/pad in bassinet. 3. Inserte el extremo cónico del tubo en el extremo del otro tubo con agujero.
- Page 15 4-A To Fold • Para Plegar 1. Release snap straps and hook and loop straps on bottom of playard. Pull mattress fully out of playard. 1. Libere las correas con broche y las correas de nudo y gancho y en el fondo del corralito.
- Page 16 3. Center of floor must be up. a. Lift up slightly on the top rail. b. Push in on the button located on the side of the top rail to release the two tubes. c. Push down. • If top rails do not unlatch, do not force.
- Page 17 4. DO NOT FORCE. If unit will not fold, look for a partially latched top rail. Squeeze the latch button to release the rail. 4. NO LA FUERCE. Si el corralito no se pliega totalmente, fíjese si los laterales están parcialmente doblados.
- Page 18 4-B To Cover • Para cubrir 1. Cover unit with handle out. 1. Cubra la unidad con la manija hacia fuera. 2. Zip together. 2. Cerrar con el cierre.
- Page 19 5-A Parent Organizer • Organizador para padres WARNING Always keep objects out of child’s reach. Remove this accessory when child is able to pull himself up in the playard. ADVERTENCIA Siempre mantenga los objetos fuera del alcance del niño. Quite este accesorio cuando el niño pueda apoyarse en el corralito.
- Page 20 • Always stay within arm’s reach of your child when using the changing table. Never leave child unattended. • The changing table is designed for use only with this Graco playard. Do not use on the floor, bed, counter or other surfaces.
- Page 21 Nunca deje a su hijo solo. • El mudador ha sido diseñado para usarlo con solamente esta el corralito Graco. No úselo en el piso, la cama, el tablero o otro superficie. Antes de cada uso asegúrese de que la mesa para cambiar al bebé...
- Page 22 1. Flip changer pad over so changer fabric is facing down. Slide tube through fabric as shown. 1. Dé la vuelta a la almohadilla del cambiador para que la tela del cambiador mire hacia abajo. Pase el tubo por la tela como se indica.
- Page 23 4. Insert tubes into openings on plastic housing at end of changer. CHECK that button is visible in hole. SNAP! 4. Inserte los tubos en las ¡CLIC! aberturas del armazón plástico en el extremo del cambiador. VERIFIQUE que el botón esté visible en el agujero.
- Page 24 6. Insert 3 tabs on both ends of changer into slots in plastic Underside of changer housing at ends of changer. Parte de abajo del cambiador 6. Inserte las 3 lengüetas de ambos extremos del cambiador en las ranuras del armazón plástico en los extremos del cambiador.
- Page 25 7. To attach changer to playard, line up lock logo on sides of changer with lock logo in one of the two attachment positions. Push changer onto playard rails. NOTE: Bassinet must be attached to playard when using changer. 7. Para sujetar el cambiador al SNAP! corralito, alinee el logotipo del ¡CLIC!
-
Page 26: Fall Hazard
5-C Portable Napper • Moisés portátil WARNING Prevent serious injury or death: Failure to follow these warnings and the instructions could result in serious injury or death. FALL HAZARD: • To prevent falls, stop using the product when infant: • Begins to wiggle out of position or turn over in the product or •... - Page 27 • To avoid suffocation, never use product inside bassinet unless it’s attached to the mounts on the playard frame in the identified locations. Never place product in the bottom of playard. • Always make sure product is securely attached to identified locations. •...
- Page 28 ADVERTENCIA Prevenga las lesiones serias o la muerte: Si no se obedecen estas advertencias y las instrucciones, podría resultar en lesiones graves o la muerte. PELIGRO DE CAÍDA: • Para prevenir caídas, deje de usar el producto cuando el bebé: •...
- Page 29 • Para evitar la asfixia, nunca use el producto en el interior del moisés a menos que esté sujetado a los montantes del armazón del corralito en los lugares identificados. Nunca ponga el producto en el fondo del corralito. • Asegúrese siempre de que el producto esté sujetado apretadamente a los lugares identificados.
- Page 30 WARNING ADVERTENCIA • To prevent serious injury or • Para prevenir serias lesiones death, DO NOT REMOVE o la muerte, NO SAQUE LA FOAM. ESPUMA. 1. Flip portable napper seat pad over so harness is facing down. 1. Dé la vuelta a la almohadilla del asiento del moisés portátil para que el arnés mire hacia abajo.
- Page 31 2. Attach portable napper legs by inserting ends of tube into SNAP! opening as shown. ¡CLIC! CHECK: Buttons should be inserted and visible in openings. 2. Sujete las patas del moisés portátil colocando los extremos del tubo en la abertura como se indica. VERIFIQUE: Los botones deben estar insertados y visibles en las aberturas.
- Page 32 3. Insert ends of other tube into openings in napper legs. CHECK: Buttons should be inserted and visible in openings. SNAP! 3. Inserte los extremos del otro ¡CLIC! tubo en las aberturas de las patas del moisés. VERIFIQUE: Los botones deben estar insertados y visibles en las aberturas.
- Page 33 4. Attach the canopy mounts to the sides as shown. 4. Sujete los montantes de la capota a los costados como se indica. 5. To attach portable napper to playard, line up lock logo on sides of napper with lock logo in one of the two attachment positions.
- Page 34 To Secure Child • Para asegurar al niño Use slide adjuster at waist for tighter adjustment. Use el ajustador deslizable en la cintura para ajustar el apriete.
- Page 35 To Remove Portable Napper • Cómo sacar el moisés portátil 1. To remove, press buttons on both sides of the seat handles and pull up as shown. 1. Para sacarlo, oprima los botones en ambos costados de las manijas del asiento y tire hacia arriba como se indica.
- Page 36 6-A Care and Maintenance • Cuidado y mantenimiento To Clean Napper • Limpieza del moisés 1. Press button on inside of leg housing tunnel and pull tube out of housing. Repeat on other ends of tubes. 1. Oprima el botón en el interior del túnel del armazón de las patas, y tire el tubo para sacarlo del armazón.
- Page 37 DE VEZ EN CUANDO REVISE SU EL CORRALITO por si existieran partes gastadas, material roto o descosido. Reemplace o repare las partes que lo necesiten. Use sólo repuestos Graco®. SI SU EL CORRALITO ES USADO EN LA PLAYA, debe limpiarlo y sacarle muy bien la arena, incluyendo las patas, antes de meterlo en el bolso cobertor.
- Page 38 1-800-345-4109 6-C Product Registration (USA) Registro del producto (EE.UU.) To register your Graco product from within the U.S.A. visit us online at www.gracobaby.com/productregistration or return registration card provided with your product. We currently do not accept product registrations from those living outside the United States of America.
- Page 39 Quick Fold Guide Guía Quick Fold 1. Pull red tab up to unlock. Center of floor must be at least halfway up before top rails will unlock. (See page 15) 1. Tire de lengüeta roja hacia arriba para desbloquear. El centro del piso debe estar levantado por lo menos hasta la mitad antes de destrabarse las barandas...
- Page 40 Quick Set Up Guide Guía de configuración rápida SNAP! SNAP! SNAP! ¡CLIC! ¡CLIC! ¡CLIC! SNAP! ¡CLIC! 1. Pull up on all 4 sides 1. Tire hacia arriba de and snap into place. los 4 costados y Do not push center of trábelos en su lugar.
Need help?
Do you have a question about the Pack ‘n Play and is the answer not in the manual?
Questions and answers