Table of Contents
Advertisement
Quick Links
Advertisement
Table of Contents

Related Manuals for Transcend DrivePro 110


Summary of Contents for Transcend DrivePro 110
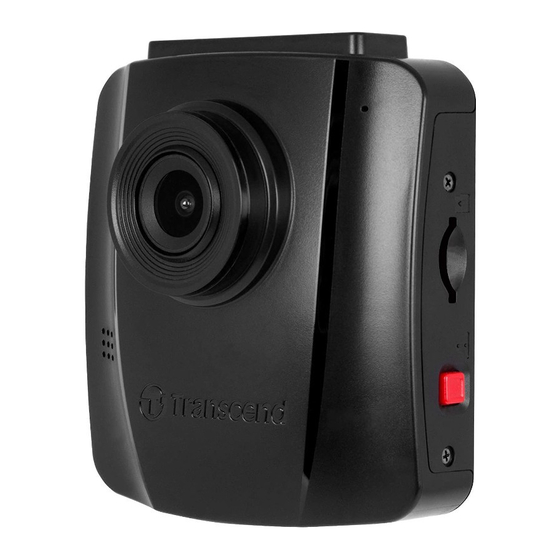
- Page 1 User’s Manual Dashcam DrivePro 110 2023/04 (Version 2.0)
-
Page 2: Table Of Contents
Table of Contents System Requirements ..............2 Package Contents ................2 Getting Started ................4 3-1 Overview ...........................4 3-2 Inserting a microSD Memory Card ..................4 3-3 Mounting the DrivePro .....................6 3-4 Connecting to Power .......................7 3-5 Function Buttons ......................8 3-6 LED Indicator ........................8 3-7 Setting the Date and Time ....................9 Recording Videos ................ -
Page 3: System Requirements
System Requirements System requirements for connecting the DrivePro to a desktop or a laptop with a working USB port and for using the DrivePro Toolbox: Windows ® 10 or later mac OS ® 10.11 or later Package Contents The DrivePro dashcam package includes the following items: ... - Page 4 Quick Start Guide Warranty Card...
-
Page 5: Getting Started
Settings button during recording, and select Format Card. Formatting will erase all data on the memory card. DrivePro 110 can only support FAT32 and exFAT file format, but not NTFS. Please select FAT32 for firmware update. - Page 6 2. To remove, push to eject the memory card out of the slot. WARNING Do not remove the memory card during shutdown to avoid damages to the memory card and loss of recorded videos The following table shows approximate recording time according to capacity (for reference only): Card Capacity (FAT32) Frame Rate...
-
Page 7: Mounting The Drivepro
3-3 Mounting the DrivePro 1. Insert the mount bracket into the top of the DrivePro, and slide sideways until you hear a click. 2. Thoroughly clean and dry the area of the windshield you intend to mount the DrivePro. If possible, mount it in the middle of the windshield and close to the height of the rear-view mirror for the best field of view. -
Page 8: Connecting To Power
3-4 Connecting to Power 1. Connect one end of the car lighter adapter to the DrivePro’s USB connector. 2. Connect the other end of the adapter to your car power outlet. 3. After the car engine is switched on, the DrivePro will automatically turn on and start recording. -
Page 9: Function Buttons
3-5 Function Buttons Mode Video Recording Power Browse Files Settings Take Photos Browse/Settings Back Down Video Playback Back Play/Pause Protected/Unprotected Delete View Photos Back Down Delete 1. Press and hold the button for 3 seconds to manually turn on/off the DrivePro in any mode. 2. -
Page 10: Setting The Date And Time
3-7 Setting the Date and Time Set the date and time first to ensure the recording time is right. 1. During video recording, press the Settings button 2. Use to select Date/Time, and press “OK.” 3. Use to adjust values, and press “OK” to move to the next block. 4. -
Page 11: Emergency Recording
4-2 Emergency Recording 30% of the storage space will be saved for emergency video files. Video files recorded in Emergency Recording mode are protected from being overwritten. To adjust the recording length, please go to the Settings menu. Manual Emergency Recording: During video recording, press the emergency button on the left-hand side of the DrivePro to activate Emergency Recording mode. -
Page 12: Browsing Photos And Playing Videos
Low Battery Please connect the DrivePro to the power supply immediately after the Low Battery warning pops up to avoid errors occurring with the system time. Please avoid using the built-in battery to record videos directly. Note Please fully charge the DrivePro before using. Browsing Photos and Playing Videos 5-1 Playing Videos / Browsing Photos 1. -
Page 13: Deleting Videos
4. Press to pause playback. Press again to resume playback. 5. Press to return to the video file list. 5-2 Deleting Videos . The message “Delete?” will pop up. 1. During the playback of a video file, press to select “Yes,” and press “OK” to delete the file. 2. -
Page 14: Settings
Settings In the Settings menu, you can adjust video resolution, recording time and G-Sensor sensitivity. You can also set the date/time, change the interface language, format the memory card, and upgrade firmware. 1. During video recording, press the Settings button , and press “OK.”... -
Page 15: Menu Options
6-1 Menu Options Camera Icon Feature Function / Option Set the resolution/quality for video recording. Note: Available options are displayed depending on your model. Resolution 1440P 30fps / 1080P 60fps / 1080P 30fps / 720P 60fps / 720P 30fps Adjust exposure composition value to lighten or darken the preview Exposure screen. - Page 16 1. To prevent data loss, it is recommended that you backup your data to another Upgrade location before upgrading the firmware. Firmware 2. Download the latest version from Transcend website. https://www.transcend-info.com/support/product/dashcam/drivepro-110 Cancel (default) / Confirm Reset all settings to their factory defaults.
-
Page 17: Firmware Upgrade
6-2 Firmware Upgrade 1. After downloading firmware from Transcend website, decompress it and then put the file in the “SYSTEM” folder of the microSD memory card. 2. Insert the microSD memory card that contains the latest firmware version into the card slot of the DrivePro. -
Page 18: Drivepro Toolbox Software
DrivePro without the need to install separate codecs. Download the installation files from: https://www.transcend-info.com/downloads. Install DrivePro Toolbox software on your desktop or laptop. Useful features available for the DrivePro 110 include: Features Description Sort videos by filename, recording date, or group, which allows users Video Sorting to search for recorded videos efficiently and to play them. - Page 19 WARNING DP110 package does not contain a USB cable. The DrivePro will display the following screen when connected to a computer: ® Microsoft Windows 10 or later ® No drivers are required for connecting the DrivePro to your desktop or laptop. Windows Operating Systems have built-in drivers to support your DrivePro.
- Page 20 ® macOS 10.11 or later No drivers are required. Plug your DrivePro into an available USB port directly, and your computer will automatically detect it. Proper removal of your DrivePro (from macOS): Drag-and-drop the Disk icon corresponding to your DrivePro into the trashcan, and then unplug your DrivePro from the USB port.
-
Page 21: Troubleshooting
DrivePro for repair. If you cannot find any ideal solution to your questions, please consult the store where you purchased the product or the service center, or contact the local Transcend branch office. You can also visit Transcend’s website for FAQ and Technical Support services. For any hardware issues, please refer to the DrivePro User’s Manual. -
Page 22: Safety Cautions
Do not use the DrivePro in an environment with strong magnetic fields or excessive vibration. Only use the car lighter adapter provided by Transcend. Other adapters may not be compatible with the DrivePro. Some vehicles have power outlets that remain active even when the engine is turned off. If your car is of this type, please unplug your dashcam from the car power outlet to avoid unnecessary power consumption and unexpected issues. -
Page 23: Specifications
Output DC 5V / 2 A BSMI, CE, EAC, FCC, KC, RCM, UKCA Certification Warranty 2 years In addition to the bundled microSD card, we recommend Transcend’s High Endurance microSD cards or MLC-based memory cards to ensure the best recording performance. Note ... -
Page 24: Recycling And Environmental Protection
13. EU Compliance Statement Transcend Information hereby declares that all CE marked Transcend products incorporating radio equipment functionality are in compliance with Directive 2014/53/EU. The full text of the EU declaration of conformity is available at the following internet address: https://www.transcend-info.com/eu_compliance... -
Page 25: Warranty Policy
Please find the warranty period of this product on its package. For details of Warranty Terms and Conditions Warranty Periods, please refer link below: https://www.transcend-info.com/warranty. 16. GNU General Public License (GPL) Disclosure Please visit https://www.transcend-info.com/Legal/?no=10 view more information open-source licensing.
Need help?
Do you have a question about the DrivePro 110 and is the answer not in the manual?
Questions and answers