Table of Contents
Advertisement
FOR FAX ADVANTAGE ASSISTANCE:
– CALL
1-800-HELP-FAX (1-800-435-7329)
– E-MAIL TO
consumerproducts@panasonic.com
for customers in the U.S.A. or Puerto Rico
– REFER TO
www.panasonic.com
for customers in the U.S.A. or Puerto Rico
Compact Plain Paper Fax
Operating Instructions
Model No.
Please read these Operating
Instructions before using the unit
and save for future reference.
This model is designed to be
used only in the U.S.A.
KX-FP151
Advertisement
Table of Contents

Related Manuals for Panasonic KX-FP151


Summary of Contents for Panasonic KX-FP151
-
Page 1: Operating Instructions
– REFER TO www.panasonic.com for customers in the U.S.A. or Puerto Rico Compact Plain Paper Fax Operating Instructions KX-FP151 Model No. Please read these Operating Instructions before using the unit and save for future reference. This model is designed to be... -
Page 2: Energy Star
Do not rub or use an eraser on the printed side of recording paper, as the print may smear. Energy Star As an ENERGY STAR Partner, Panasonic has determined that this product meets the ENERGY STAR guidelines for energy efficiency. -
Page 3: Safety Instructions
Important safety When using this unit, basic safety precautions should always be followed to reduce the risk of fire, electric shock, or personal injury. 1. Read and understand all instructions. 2. Follow all warnings and instructions marked on this unit. 3. -
Page 4: Table Of Contents
Table of Contents Initial Preparation Accessories Included accessories ........6 Accessory information . -
Page 5: Programmable Features
List of FCC requirements and information ....70 Information Limited PANASONIC Facsimile Products Limited Warranty ... . . 71 Warranty Servicenter Servicenter directory . -
Page 6: Accessories Included Accessories
– 50 meters (164 ' ) for continuous use of your unit. For best results, use genuine Panasonic replacement film Model No. KX-FA53 or KX-FA55. To install legal size recording paper, use a legal paper tray Model No. KX-FA50 (p. 12). -
Page 7: Help Button
Help function! You can print a quick reference for assistance as follows. HELP Press PRESS NAVI.[ Display: & SET Press until the desired item is displayed. 1. How to set the date, time, your logo and fax number. QUICK SET UP 2. -
Page 8: Finding The Controls
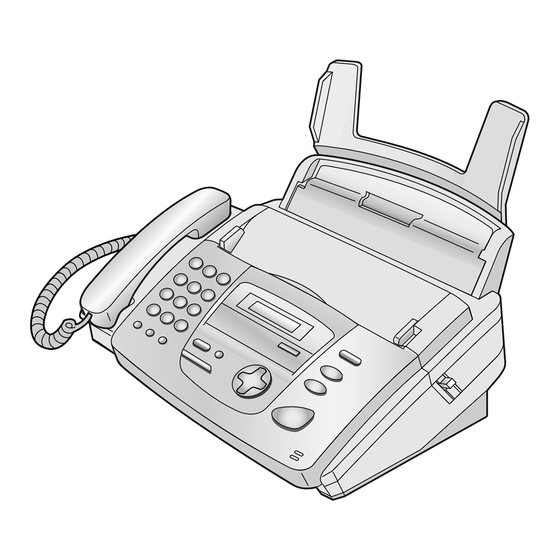
Finding the Controls Overview! Handset To make or answer calls Speaker (Left side of the unit) Front cover Note: The document will be ejected from the front of the unit. Install the unit on a desk or floor with a smooth surface and do not place anything in front of the unit. -
Page 9: Location
Location! To initiate or exit programming. Dial keypad To mute your voice to the other party during conversation. Press this button again to resume conversation. To redial the last number dialed. To insert a pause during dialing. To access special telephone services such as call waiting or transfers of extension calls. -
Page 10: Setup
Setup Ink film – installing / Install the included ink film or replace the used ink film with new one. The following ink films are available for replacement. Each roll prints about 150 letter-size pages. See page 6 for accessory information. Model No. - Page 11 For replacement only Remove the stoppers and tags from the new ink film. Find the “T” shaped gear (blue). Insert the blue core of the front ink film roll into the right slot of the unit ( “T” shaped gear (blue) into the left slot of the unit ( Insert the rear ink film roll ( Turn the “T”...
-
Page 12: Paper Tray
Setup Paper tray! Insert tabs on the paper tray into slits on the back of the unit. Note: Do not place the unit in areas where the paper tray may be obstructed by a wall, etc. To use legal size paper Please purchase a legal paper tray, Model No. -
Page 13: Recording Paper
Recording paper! Letter or legal size recording paper can be loaded. The unit can hold up to 50 sheets of 60 g/m 75 g/m (16 lb. to 20 lb.) paper or 30 sheets of 90 g/m If you use legal size paper, please install a legal paper tray, Model No. KX-FA50 (p. 12). For best results, only use inkjet paper such as Hammermill Jet Print. -
Page 14: Connections
Setup Connections! Connect the handset cord. Connect the telephone line cord. Connect the power cord. Power cord To a power outlet (120 V, 60 Hz) Power surge protector To a single telephone line jack (RJ11C) Line surge protector Caution: When you operate this product, the power outlet should be near the product and easily accessible. Note: For additional equipment protection, we recommend you use a surge protector. -
Page 15: Date And Time, Your Logo And Facsimile Telephone Number
You should program the date and time, your logo and facsimile telephone number. This information will be printed on each page transmitted from your unit. Your logo Example: FROM : Panasonic Fax Setting the date and time MENU Press SYSTEM SET UP Display: PRESS NAVI.[... -
Page 16: Setting Your Logo
Setup Setting your logo The logo can be your company, division or name. MENU Press SYSTEM SET UP Display: PRESS NAVI.[ Press until the following is displayed. YOUR LOGO Press LOGO= AAAAAAAAA Enter your logo, up to 30 characters, using the dial keypad. - Page 17 To select characters with the dial keypad Pressing the dial keys will select a character as shown below. Keys FLASH Hyphen button (To insert a hyphen.) Insert button (To insert one character or one space.) MUTE Delete button (To delete a character.) STOP key (To move the cursor to the right.) To enter another character using the same number key, move the cursor to the next space.
-
Page 18: Setting Your Facsimile Telephone Number
Setup Setting your facsimile telephone number MENU Press SYSTEM SET UP Display: PRESS NAVI.[ Press until the following is displayed. YOUR FAX NO. Press NO.= Enter your facsimile telephone number, up to 20 digits, using the dial keypad. NO.=1234567 Example: Press The next feature will be displayed. -
Page 19: Monitor Volume
Adjusting volumes! Ringer volume 4 levels (high/middle/low/off) are available. While the unit is idle, press If any documents are in the document entrance, you cannot adjust the ringer volume. Confirm that there are no documents in the entrance. To turn the ringer off: 1. -
Page 20: Navigator Directory
NAVIGATOR Directory Storing names and telephone numbers in the directory! For rapid access to frequently dialed numbers, the unit provides the NAVIGATOR directory (40 stations). For your convenience, the following station has been pre-programmed. HELP-FAX (1-800-435-7329): If you cannot correct a problem after trying the help function (p. -
Page 21: Editing And Erasing A Stored Station
Editing and erasing a stored Editing a stored station Press DIRECTORY[+ -] Display: Press until the desired station is displayed. Mary Example: 0123456 Mary EDIT:PRESS MENU MENU Press NAME=Mary EDIT= Press to select “EDIT”. NAME=Mary STORE:PRESS SET If you do not need to edit the name, skip to step 6. -
Page 22: Making A Phone Call Using The Directory
Making a phone call using the Before using this feature, program the desired names and telephone numbers into the directory (p. 20). Press DIRECTORY[+ -] Display: Press until the desired station is displayed. Lisa Example: 2233445 Lisa EDIT:PRESS MENU If the desired name has not been stored, press and dial the number STOP... -
Page 23: Caller Id
Caller ID service from your phone This unit is compatible with the Caller ID service offered by your local telephone company. To use this feature, you must subscribe to the Caller ID service. Set the following ring count settings to 2 or more rings beforehand. —FAX ring count (feature #06 on page 50) —TEL/FAX ring count (feature #78 on page 55) How Caller ID is displayed... -
Page 24: Viewing And Calling Back Using Caller Information
Viewing and calling back using caller information! You can easily view caller information and call back. Important: Calling back will not be possible in the following cases. —The telephone number includes data other than numbers (i.e. —The caller information does not include a telephone number. Press CALLER ID Example (2 new calls are received):... -
Page 25: Confirming Caller Information Using The Caller Id List
Confirming caller information using the Caller ID list! The unit will store the 30 most recent caller information. —To print manually, see page 69. —To print automatically after every 30 new calls, activate feature #26 (p. 52). Sample of a Caller ID list CALLER ID LIST NAME WENDY ROBERTS... -
Page 26: Storing Caller Information In The Directory
Caller ID Storing caller information in the Important: This feature is not available in the following cases. —The telephone number includes data other than numbers (i.e. —The caller information does not include a telephone number. Press CALLER ID 2 NEW CALLS Example: PRESS NAVI.[+ -] Press... -
Page 27: Voice Contact
You can talk to the other party after a fax message is completed. This will save the added expense and time of making another call. This feature only works when the other party’s fax machine is equipped with a voice contact feature. -
Page 28: Sending Faxes
Sending Faxes Sending a fax manually! Adjust the width of the document guides to the size of the document. Insert the document (up to 10 pages) FACE DOWN until a single beep is heard and the unit grabs the document. Display: PRESS NAVI.[+ -] If necessary, press... -
Page 29: Sending A Fax Using The Directory
Sending a fax using the Before using this feature, program the desired names and telephone numbers into the directory (p. 20). Adjust the width of the document guides to the size of the document. Insert the document (up to 10 pages) FACE DOWN until a single beep is heard and the unit grabs the document. -
Page 30: Documents You Can Send
Sending Faxes Documents you can Minimum size Maximum size 128 mm (5 " ) 216 mm ⁄ " ) Note: Remove clips, staples or other similar fasteners. Check that ink, paste or correction fluid has dried. Do not send the following types of documents. Use copies for fax transmission. —Chemically treated paper such as carbon or carbonless duplicating paper —Paper with printing on the opposite side that can be seen through the front (e.g. -
Page 31: Reports For Confirmation
Reports for confirmation! To confirm the communication results, the following reports are available. Sending report This report will provide you with a printed record of transmission results. To use this feature, activate feature #04 (p. 50). Sample of a sending report SENDING REPORT OTHER FACSIMILE START TIME... -
Page 32: One Time Broadcast Transmission
Sending Faxes One time broadcast This feature is useful for sending the same document to selected parties only once. Select the parties for each transmission. Insert the document FACE DOWN. If necessary, press select the desired resolution (p. 28). Press DIRECTORY[+ -] Display: Press... -
Page 33: Broadcast Transmission To Pre-Programmed Parties
Broadcast transmission to pre-programmed parties! This feature is useful for sending the same document often to selected parties (up to 20 stations). First program the stations, then see page 35 for transmission. Programming the stations in the broadcast memory MENU Press two times. - Page 34 Sending Faxes Adding a new station Press Confirm that there are no documents in the document entrance. DIRECTORY[+ -] Display: Press until the following is displayed. <BROADCAST> EDIT:PRESS MENU MENU Press BROADCAST ADD= Press to select “ADD”. Press until the desired station you want to add is displayed.
- Page 35 Sending the same document to pre-programmed parties Insert the document FACE DOWN. If necessary, press to select the desired resolution (p. 28). Press DIRECTORY[+ -] Display: Press until the following is displayed. <BROADCAST> SEND:PRESS SET Press The document will be fed into the unit and scanned into memory.
-
Page 36: Answering Machine
With answering machine AUTO ANSWER AUTO ANSWER External telephone answering machine (not included) You want to use the fax machine with an answering machine. Activating an answering machine (p. 42) Connect an external telephone answering machine and set the ring count of the answering machine to less than 4. -
Page 37: Voice Mail Service
D: Other triple ring (short-short- long rings) When the fax machine detects a call matching the selected Distinctive Ring pattern: The fax machine will activate the fax function. When the fax machine detects other ring patterns: The fax machine will operate based on the AUTO ANSWER setting. -
Page 38: Receiving A Fax Manually
Receiving Faxes mode! (answering all calls manually) Activating TEL mode If the arrow ( ) is shown on the right of the display, turn it off by pressing TEL MODE Display: Receiving a fax manually When the unit rings, lift the handset to answer the call. -
Page 39: Fax Only Mode (All Calls Are Received As Faxes)
If you have a telephone line just for faxes, we recommend the following setup. Example: One telephone line is used for phone calls and a separate telephone line for faxes. Only a fax machine is connected. AUTO ANSWER Line 1 – Phone calls Line 2 –... -
Page 40: Tel/Fax Mode
Use this mode when you are always near the fax machine, and want to receive faxes without the unit ringing. When a call is received, the fax machine will work as follows. To set TEL/FAX mode, see below. - Page 41 ** This feature may not function depending on the type of an extension telephone. If the fax machine activates the fax function, press fax machine in step 2 to talk with the calling party. TEL/FAX delayed ring count The number of rings generated before the fax machine answers depends on the setting of feature #78 on page 55.
-
Page 42: Setting Up The Fax Machine And An Answering Machine
Activate the answering machine. Set the receive mode of the fax machine to TEL mode (p. 38) or FAX ONLY mode (p. 39). If you set to FAX ONLY mode, set the ring count in FAX ONLY mode to “5 EXT.TAM”... -
Page 43: Using The Unit With An Answering Machine And Computer
Note: Every time the fax machine receives a document, a silent pause or fax tone may be recorded on the answering machine. Receiving a voice message and fax document in one call The caller can leave a voice message and send a fax document during the same call. -
Page 44: Extension Telephone
Extension telephone! If you use the fax machine with an extension telephone, you can receive fax documents using the extension telephone. You do not have to press Important: Use a touch tone telephone as the extension telephone and enter the fax activation code firmly. -
Page 45: Pager Call - When The Unit Receives A Fax
Pager call - when the unit receives a This feature allows your unit to call your pager when your unit receives a fax document. Press MENU SYSTEM SET UP Display: PRESS NAVI.[ Press , then FAX PAGER CALL MODE=OFF Press to select “ON”. -
Page 46: Copying Making A Copy
Copying Making a copy! The unit can make single or multiple copies (up to 40). Adjust the width of the document guides to the size of the document. Insert the document (up to 10 pages) FACE DOWN until a single beep is heard and the unit grabs the document. - Page 47 To enlarge a document 1. Press in step 3 on page 46. ZOOM 100%[+ -] Display: 2. Press to select “150%” or “200%”. The unit will only enlarge the center most part of the document, printing it on two pages. Example of a 150% enlarged copy Original document A B C D...
- Page 48 Copying To collate multiple copies The unit can collate multiple copies in the same order as the original document pages. 1. Press two times in step 3 on page 46. COLLATE OFF[+ -] Display: 2. Press repeatedly to select “COLLATE ON”. COLLATE ON [+ -] Example: Making two copies of a 4-page original document Collated pages...
-
Page 49: Programming
Programming! The unit provides various programming features. Program the desired settings by referring to the programming tables (p. 50–55). General programming method MENU Press SYSTEM SET UP Display: PRESS NAVI.[ Select the feature you wish to program. For basic features (p. 50, 51): Press until the desired feature is displayed. -
Page 50: Summary Basic Features
Features Summary Basic features! How to set menu options The following method of programming is applied except features #01, #02 and #03. For features #01, #02 and #03, refer to the programming table below. MENU 1. Press 2. Press until the desired feature is displayed. - Page 51 Code Display & Feature REMOTE TAM ACT. MODE=OFF [±] If you are using the unit with an answering machine, activate this feature, and set the remote activation ID to secure the remote operation for the answering machine. DIALING MODE MODE=TONE [±] If you cannot dial, change the setting depending on your...
-
Page 52: Advanced Features
Features Summary Advanced features! How to set menu options MENU 1. Press 2. Press until the following is displayed. ADVANCED MODE Press and press the desired feature is displayed. Programming table Code Display & Feature AUTO JOURNAL MODE=ON [±] To print the journal report automatically for fax communications. - Page 53 NORMAL “DARKER”: Used when the display contrast is too light. DARKER If the other party’s fax machine does not send a fax calling tone, select “ON”. The unit detects a silent pause and activates the fax function. If you use an answering machine...
-
Page 54: Advanced Features
Features Summary Advanced features How to set menu options MENU 1. Press 2. Press until the following is displayed. ADVANCED MODE Press and press the desired feature is displayed. Programming table (cont.) Code Display & Feature FAX ACTIVATION MODE=ON [±] If you use an extension telephone and wish to use it to receive a fax, activate this feature, and enter the... - Page 55 Code Display & Feature FAX PAGER CALL MODE=OFF [±] If you have a pager and wish to know when your unit receives a fax, activate this feature. CONNECTING TONE MODE=ON [±] If you often have trouble when sending a fax, this feature allows you to hear connecting tones: fax tone, ring back tone and busy tone.
-
Page 56: Error Messages Reports
The document was not fed into the unit properly. Reinsert the document and try again. — The other party’s fax machine is busy or has run out of recording paper. Try again. The document was not fed properly. Reinsert the document and try again. -
Page 57: Error Messages
Display! If the unit detects a problem, one or more of the following messages will appear on the display. Display message CALL SERVICE CALL SERVICE2 CHECK DOCUMENT CHECK MEMORY CHECK PAPER COVER OPEN CHECK FILM FAX IN MEMORY FAX MEMORY FULL DIRECTORY FULL MEMORY FULL For fax advantage assistance, call 1-800-435-7329. - Page 58 Cause & solution There is something wrong with the modem circuit. Contact our service personnel. The other party’s fax machine is busy or has run out of recording paper. Try again. A recording paper jam occurred. Clear the jammed paper (p. 64).
-
Page 59: When A Function Does Not Work, Check Here Before Requesting Help
When a function does not work, check here before requesting General Problem I cannot make and receive calls. I cannot make calls. The unit does not work. The unit does not ring. The unit displays the following message though the paper is inserted. -
Page 60: Fax – Receiving
The telephone line cord is connected to the EXT jack on the unit. Connect to the LINE jack (p. 14). The other party’s fax machine is busy or has run out of recording paper. Try again. The other party’s machine is not a facsimile. Check with the other party. - Page 61 Program the proper rate in feature #36 (p. 53). The other party placed the document in their fax machine the wrong way. Check with the other party. The glass or rollers are dirty. Clean them (p. 67).
-
Page 62: Using An Answering Machine
Change the code on the answering machine to another number which does not include “#”. Also change the code of the fax machine with feature #12 (p. 51). Your answering machine has run out of recording tape. -
Page 63: If A Power Failure Occurs
If a power failure The unit will not function. Fax transmission and reception will be interrupted. If delayed transmission of feature #25 (p. 52) is programmed and the start time has passed during a power failure, transmission will be attempted soon after power is restored. If fax documents are stored in memory, they will be lost. -
Page 64: Recording Paper Jam
Jams Recording paper If the unit does not eject any recording paper during fax reception or copying, the recording paper has jammed and the display will show the following message. PAPER1JAMMED Display: Remove the jammed paper as follows. Open the front cover by pulling up the center part. - Page 65 Turn the “T” shaped gear (blue) in the direction of the arrow. Make sure that the ink film is wrapped around the blue core at least once. Correct Incorrect The ink film is not wrapped Tight around the blue core. Blue core Close the back cover securely by pushing down on the dotted area at both ends (...
-
Page 66: Document Jams - Sending
Jams Document jams – If the unit does not release the document during feeding, remove the jammed document as follows. Open the front cover by pulling up the center part. Remove the jammed document carefully. Close the front cover securely. Note: Do not pull out the jammed paper forcibly before opening the front cover. -
Page 67: Document Feeder
Document feeder! If misfeeding occurs frequently or if dirty patterns or black bands appear on a transmitted document or on the original of a copied document, clean the document feeder. Disconnect the power cord and the telephone line cord. Open the front cover by pulling up the center part. -
Page 68: Thermal Head
Cleaning Thermal head! If dirty patterns or black or white bands appear on a copied or received document, check whether there is dust on the thermal head and clean the thermal head to remove the dust. Disconnect the power cord and the telephone line cord. -
Page 69: Printed Reports
Reference lists and You can print out the following lists and reports for your reference. Setup list: provides you with the current settings of the basic and advanced programming features (p. 50–55). Telephone number list: provides you with names and telephone numbers which are stored in the directory. -
Page 70: Fcc Information
FCC Information List of FCC requirements and If required by the telephone company, inform them of the following. FCC Registration No.: (found on the rear of the unit) Ringer Equivalence No.: (found on the rear of the unit) The particular telephone line to which the equipment is connected. -
Page 71: Panasonic Facsimile Products Limited Warranty
The warranty does not cover damages which occur in shipment, or failures which are caused by products not supplied by the warrantor such as non Panasonic ink film, toner cartridge or drum unit, or failures which result from accident, misuse, abuse, neglect, mishandling, faulty installation, misapplication,... -
Page 72: Servicenter Directory
3700 North 29 Avenue Suite 102 Hollywood, FL 33020 Matsushita Electric of Puerto Rico, Inc. Panasonic Sales Company / Factory Servicenter: Ave. 65 de Infantería, Km. 9.5, San Gabriel Industrial Park, Carolina, Puerto Rico 00985 Phone (787) 750-4300 Fax (787) 768-2910 MINNESOTA... -
Page 73: Specifications
Technical data about this Applicable Lines: Document Size: Effective Scanning Width: 208 mm (8 Recording Paper Size: Effective Printing Width: Transmission Time*: Scanning Density: Halftone Level: Scanner Type: Printer Type: Data Compression System: Modified Huffman (MH), Modified READ (MR) Modem Speed: Operating Environment: Dimensions (H x W x D): Mass (Weight):... -
Page 74: Index
Index! Accessories ....6 Advanced features ...52–55 Alert (Memory reception)(Feature #44) .54 AUTO ANSWER button . - Page 75 Receiving alert (Feature #44) ..54 Receiving setting ... . .36, 37 Recording paper ....13 Recording paper size .
- Page 76 Free replacement The Panasonic Fax Advantage Consumer Service Program. Panasonic knows that if your fax machine is not up and running, neither is your business. That’s why we created the Panasonic Fax Advantage Program. Included at no extra cost with the purchase of a new and...
Need help?
Do you have a question about the KX-FP151 and is the answer not in the manual?
Questions and answers