Table of Contents
Advertisement
Quick Links
BGMP-9141 IM Size: 148x210mm
Smaltimento corretto del prodotto
Questo simbolo indica che il prodotto non deve essere smaltito
insieme ai rifiuti domestici nei Paesi UE. Per evitare conseguenze
negative sull'ambiente o sulla salute umana causate dallo
smaltimento incontrollato dei rifiuti, riciclarlo responsabilmente
Manuale di istruzioni • Instruction manual
per promuovere il riutilizzo sostenibile delle risorse materiali.
Manual de instrucciones • Manuel d'instructions
Per smaltire l'apparecchio, portarlo presso gli appositi punti di
raccolta o contattare il rivenditore, che si farà carico del suo
Bedienungsanleitung • Manual de instruções
riciclaggio nel rispetto dell'ambiente.
BGMP-9141
Robot da cucina multifunzione FRYCOOK • Multifunction kitchen robot
FRYCOOK • Robot de cocina multifunción FRYCOOK • Robot de cuisine
multifonctions FRYCOOK • FRYCOOK Multifunktionale küchenmaschine •
Robô de cozinha multifunções FRYCOOK
Advertisement
Table of Contents

Related Manuals for Masterpro Carlo Gracco FRYCOOK BGMP-9141


Summary of Contents for Masterpro Carlo Gracco FRYCOOK BGMP-9141
- Page 1 BGMP-9141 IM Size: 148x210mm Smaltimento corretto del prodotto Questo simbolo indica che il prodotto non deve essere smaltito insieme ai rifiuti domestici nei Paesi UE. Per evitare conseguenze negative sull'ambiente o sulla salute umana causate dallo smaltimento incontrollato dei rifiuti, riciclarlo responsabilmente Manuale di istruzioni •...
- Page 2 GUIDA PER INIZIARE IMPOSTAZIONI DI COTTURA PREIMPOSTATE SENTI LA DIFFERENZA! PROGRAMMA COPERCHIO DA UTILIZZARE FUNZIONE FRYCOOK ha un design a doppio coperchio. Usa il coperchio della pentola a pressione per cucinare cibo sotto pressione, trattenendo succhi e sapore. Passare al coperchio per friggere ad aria, che crea un vortice di aria surriscaldata, per un finale croccante e dorato.
-
Page 3: Cottura A Pressione
COTTURA A PRESSIONE FRIGGITRICE AD ARIA PASSAGGIO 1 PASSAGGIO 1 L'unità viene fornita con il coperchio della pentola a pressione fissato Rimuovere il coperchio della pentola a pressione precedentemente alla base.Ruota la maniglia per aprire il coperchio. Rilasciare posizionato.Mettere l'interruttore di rilascio su Aperto. Rilasciare l'interruttore e ruotare il coperchio in senso orario. -
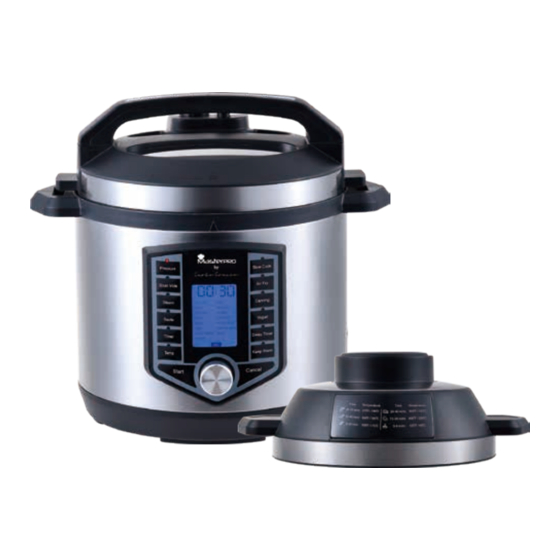
Page 4: Parti Ed Accessori
PARTI ED ACCESSORI ROBOT DA CUCINA FRYCOOK 12 IN 1 PER SAPERNE DI PIU’ COPERCHIO FRIGGITRICE AD COPERCHIO FRIGGITRICE AD Il Robot da Cucina permette di cucinare dei piatti deliziosi per tutta la famiglia. Prima dell’uso, è ARIA (CON VISTA DA SOTTO) ARIA (CON VISTA DA SOPRA) necessario leggere attentamente questo manuale, assicurandosi di aver compreso a fondo gli usi e le precauzioni relativi all’utilizzo di questo apparecchio. -
Page 5: Preparazione All'uso)
ancora soggetto a pressione - non forzare per aprire. Una volta che la pressione è stata rilasciata, MALFUNZIONAMENTO. Contattare il Servizio Clienti per assistenza. seguire le istruzioni per aprire il Coperchio. Aprire sempre il Coperchio portandolo lontano dal viso e •... - Page 6 Rilascio del Vapore deve essere fatto scattare una volta per rilasciare il vapore e poi lasciato andare per aprire il Coperchio. Se del vapore sta uscendo dalla Valvola di Rilascio della Pressione o la mano RILASCIO NATURALE E RILASCIO RAPIDO dell’utente è...
-
Page 7: Istruzioni Per L'uso
PARTI & ACCESSORI ISTRUZIONI PER L’ASSEMBLAGGIO ASSEMBLAGGIO VALVOLA DI RILASCIO DELLA PRESSIONE VISTA COPERCHIO DALL’ALTO PARTE INFERIORE COPERCHIO (SENZA COPERCHIO INTERNO) NOTA: Non cercare di montare o smontare la Valvola di Rilascio della Pressione quando il Robot da Perni di Fissaggio Cucina è... -
Page 8: Collegare Il Cavo Di Alimentazione)
3. Montare il Collettore di Condensa al lato del Robot inserendolo all’interno delle fessure (vedi Fig. A). NOTA: Il Collettore di Condensa potrebbe essere già montato. 4. Rimuovere il Coperchio. Assicurarsi che le guarnizioni del Coperchio Interno siano a posto. Posizionare la Guarnizione Esterna attorno al Coperchio Interno e la Guarnizione Centrale nella parte interna. -
Page 9: Programmi Di Cottura
PROGRAMMI DI COTTURA Manopola del Programma per selezionare la sotto-categoria. 10. Ruotare la Manopola del Programma a destra o a sinistra per scegliere tra le impostazioni di cottura LOW, MED, o HIGH; quindi premere la Manopola del Programma per selezionare quella TEMPO DI desiderata (vedi parte C). - Page 10 TEMPO DI TEMPO DI PROGRAMMA HIGH TEMPERATURA PROGRAMMA HIGH TEMPERATURA COTTURA COTTURA VERDURE 10 min. 1 ora. 2 ora. 10min.-3ore. 35–90° C (5° C) MANZO 4 ore. 6 ore. 10 ore. 1-12ore. 90–100° C (1° C) UOVA/CREMA 45 min. 1 ora. 2 ora.
- Page 11 TEMPI & TEMPERATURE CONSIGLIATI NOTA: Si consiglia di non mantenere il cibo a contatto con fonti di calore una volta completato il ciclo di cottura. TEMPE- TEMPO DI TEMPE- TEMPO DI CIBO CIBO ISTRUZIONI PER L’USO RATURA COTTURA RATURA COTTURA 1.
-
Page 12: Domande Frequenti
6. E’ possibile lasciare il Robot in funzione quando non si è in casa? modificare il tempo. Premere nuovamente la Manopola del Programma per iniziare il conto alla rovescia. Il Robot da Cucina possiede la funzione di avvio ritardato. Tuttavia, si sconsiglia di lasciare il Robot NOTA: Se non viene premuto il Tasto Yogurt, il Robot emetterà... -
Page 13: Risoluzione Problemi
RISOLUZIONE PROBLEMI ma per garantirne più a lungo il mantenimento si consiglia di lavarlo a mano con una spugna o un panno in acqua calda e con detersivo. Risciacquare e asciugare con un panno. Non utilizzare prodotti chimici o spugne abrasive. Problema Possibile Causa Soluzione... -
Page 14: Risoluzione Dei Problemi
RISOLUZIONE DEI PROBLEMI attraverso la Modalità Conserve. TEST INIZIALE CON ACQUA Codice Errore Causa Errore Soluzione Più è basso il contenuto acido dei cibi, maggiore è la possibilità di deterioramento e contaminazione. Cibi come la frutta possiedono un alto grado di acidità. Carne, latticini e pesce possiedono un basso grado di acidità... - Page 15 trattato nuovamente. In alternativa, conservare in frigo e consumare nel giro di qualche giorno. NOTA: Non stringere ulteriormente i tappi dei barattoli dopo il processo. Mentre i barattoli si raffreddano, il contenuto al loro interno si restringe, sigillando il tappo grazie alla formazione di un vuoto spinto.
-
Page 16: Start-Up Guide
START-UP GUIDE COOKING PRESETS HEAT, PRESURE PR WHY 2 LIDS? VERSION LID TO USE AIR FRYING Has a dual-lid design. Use the Pressure Cooker Lid to cook your food under pressure, locking in juices and flavour. Change to the Air Frying Lid, which creates a whirlwind of superheated air, for a crispy, crunchy finish. -
Page 17: Pressure Cooking
PRESSURE COOKING AIR FRYING STEP 1 STEP 1 The Unit comes with the Pressure Cooker Lid attached to the Base. Remove the existing pressure cooker lid. Turn the Release Switch to Turn the handle to open the lid. Release the Switch and twist the Lid Open. -
Page 18: Parts And Accessories
PARTS & ACCESSORIES POWER QUICK POT (STANDARD PANEL) GOOD TO KNOW AIR FRYING LID – UNDERSIDE AIR FRYING LID – TOP VIEW The One Touch Quick pot will provide you an ultimate delicious dishes around the dinner table with your families. Before you start, it’s very important that you read through this manual, ensuring that you are totally fully understand this appliance’s operation and precautions. -
Page 19: Features And Benefits
SAVE THESE INSTRUCTIONS – FOR HOUSEHOLD USE ONLY • Lid should rotate freely and any resistance indicates that the Lid is improperly placed or under pressure. • Always attach plug to appliance first, then plug cord into the wall outlet. To disconnect, turn any Collegare: Attaching the Power Cord control to “off,”... -
Page 20: Releasing Pressure
12. ANTI-TAMPER FLOAT VALVE GUARD: A screen on the Lid covers the Float Valve, so it cannot position and let go. There should not be any steam releasing from the Unit. be tampered with. HOW RAPID RELEASE WORKS AND WHEN TO USE IT B. - Page 21 PARTS & ACCESSORIES ASSEMBLY INSTRUCTIONS PRESSURE RELEASE VALVE ASSEMBLY LID-TOPVIEW LID-UNDERSIDE (WITHOUT INNER LID) NOTE: Do not attempt to assemble or disassemble the Pressure Release Valve when the Power Locking Pins Quick Pot is in use. Float Valve • Pull to remove the Pressure Release Valve (see Fig. ix). FIG.
- Page 22 4. Remove the Lid. Ensure the Inner Lid gaskets are in place. Place the Inner Lid Outer Gasket B. OPERATING INSTRUCTIONS around the outside of the Inner Lid and the Inner Lid Center Gasket in the center hole. Make sure the float valve and gasket are in place in the lid (see ASSEMBLY INSTRUCTIONS).
- Page 23 PRESET COOKING PROGRAMS manually cancelled by pressing the Cancel Button. NOTE: Foods kept at Keep Warm mode for longer than 6–8 hrs. may lose their flavor and texture and can be a food concern. NOTE: When using the Keep Warm setting, when the cooking cycle is complete, the screen will PRESET HIGH COOK TIME...
- Page 24 PRESET HIGH COOK TIME TEMP PRESET HIGH COOK TIME TEMP VEGETABLES 10 mins. 1 hr. 2 hr. 10mins.-3hrs. BEEF 4 hrs. 6 hrs. 10 hrs. 1-12hrs. 95–195° F (5° F)/35–90° C (5° C) 195–212° F (1° F)/90–100° C (1° C) EGG/CUSTARD 45 mins.
- Page 25 NOTE: Suggested not to keep food heated at the temperature beyond the completion of its cooking PRESSURE RELEASE VALVE ASSEMBLY cycle. OPERATING INSTRUCTIONS FOOD TEMP. TIME FOOD TEMP. TIME 1. Put seasoned food in a sealable bag(s). 2. Before sealing, you have to remove the air as much as possible. You may use a vacuum sealer for Beef Pork best results.
-
Page 26: Care And Cleaning
7. Can you put frozen foods in Unit without defrosting? Press the Program Dial again to start counting down. NOTE: If the Yogurt Button is not pressed, the Unit will beep continuously, and the One Touch Quick Sure! Remember to add an average of 10 extra mins. to the cooking time for frozen meals. Pot will stay in standby mode. -
Page 27: Troubleshooting
TROUBLESHOOTING THE YOGURT-MAKING PROCESS Symptom Possible Cause Solution Error Code Cause of Error Solution Cannot Open Lid DO NOT FORCE OPEN. Bottom sensor open Contact Customer Service* Lid Does Not Lock Inner Lid Rubber Gasket is not properly Reinstall Inner Lid Rubber Gasket. installed Bottom sensor short circuit Contact Customer Service*... -
Page 28: Pressure Canning
CONDUCT TEST RUN WITH WATER ONLY PRESSURE CANNING The lower the acid content in the food, the greater the potential for spoilage and contamination. 1. Select a pretested pressure canning recipe. Although ingredients may vary, foods will be generally Foods such as fruits are high in acid. Meats, dairy products, and sea foods have low acid levels (see processed as instructed in this manual. -
Page 29: Guía De Inicio
OPCIONES DE COCCIÓN PREDETERMINADAS GUÍA DE INICIO CALOR, PRESIÓN, ¿POR QUÉ 2 TAPAS? TAPA PARA CALOR FREÍDO POR AIRE El Taste Difference Food Genie posee un diseño de dos tapas. Use la tapa de la olla a presión para cocinar sus alimentos a presión y conservar los jugos y el sabor. Cambie a la tapa de la freidora de aire. -
Page 30: Cocción A Presión
COCCIÓN A PRESIÓN FREÍDO POR AIRE PASO 1 PASO 1 El aparato viene con una tapa de olla a presión enganchada en su Retire la tapa de la olla a presión. Gire el interruptor de liberación a la base. Gire el asa para abrir la tapa. Suelte el interruptor y gire la tapa posición de abierto. -
Page 31: Partes Y Accesorios
PARTES Y ACCESORIOS INSTRUCCIONES PARA FREÍR POR AIRE IMPORTANTE: TAPA DE LA FREIDORA DE AIRE TAPA DE LA FREIDORA DE AIRE Cualquier función puede cancelarse - PARTE INFERIOR - VISTA SUPERIOR inmediatamente presionando el botón de Pressure Slow Cook cancelar. Sous Vide Air Fry 1. -
Page 32: Medidas De Seguridad Importantes
12. Una vez que ha finalizado el ciclo de cocción, la pantalla mostrará un icono giratorio por 2 (consulte las INSTRUCCIONES DE USO en la pág. 16). minutos mientras que el ventilador enfría la freidora de aire. NO trate de retirar la tapa de la freidora 5. -
Page 33: Guide De Démarrage
GUIDE DE DÉMARRAGE POR SU CUENTA. Póngase en contacto con el servicio al cliente para que le asistan. 23. Para evitar el riesgo de explosión o lesiones, sustituya las juntas de goma (anillo dinámico de sellado) como recomienda el fabricante. POURQUOI 2 COUVERCLES ? 24. -
Page 34: Cuisson Sous Pression
CUISSON SOUS PRESSION PRÉRÉGLAGES DE CUISSON ÉTAPE 1 CHALEUR, PRESSION, COUVERCLE POUR UTILISER LA FRITURE À L'AIR L'appareil est livré avec le couvercle de l'autocuiseur fixé à la base. Tournez la poignée pour ouvrir le couvercle. Relâchez l'interrupteur et tournez le couvercle dans le sens des aiguilles d'une montre. Lorsque Cuisson sous PRESSION le repère de position est aligné... -
Page 35: Pièces Et Accessoires
FRITURE À L’AIR PIÈCES ET ACCESSOIRES ÉTAPE 1 COUVERCLE DE FRITURE À COUVERCLE DE FRITURE À Retirez le couvercle de l'autocuiseur existant. Tournez l’interrupteur de déverrouillage en position ouverte (OPEN). Relâchez l'interrupteur et L’AIR - VUE DU DESSOUS L’AIR - VUE DU DESSUS tournez le couvercle de l’autocuiseur dans le sens des aiguilles d'une montre. -
Page 36: Consignes Importantes De Sécurité
INSTRUCTIONS POUR LA FRITURE À L'AIR pendant que le ventilateur refroidit le couvercle de friture à l’air. N'essayez PAS de retirer le couvercle de friture à l’air avant que l'écran ne devienne bleu pour indiquer que le couvercle de friture à l’air a refroidi. IMPORTANT : Toute fonction peut être arrêtée immédiatement CONSEILS POUR LA FRITURE À... - Page 37 ne forcez pas pour l'ouvrir. Une fois la pression relâchée, suivez les instructions pour ouvrir le 21. N’utilisez pas cet appareil à l'extérieur. couvercle. Ouvrez toujours le couvercle loin du visage et du corps pour éviter les brûlures pouvant 22. N’utilisez pas cet appareil si le cordon ou la fiche est endommagé(e). être causées par l’émission de vapeur (voir INSTRUCTIONS D'UTILISATION, p.
- Page 38 ANLEITUNG ZUR INBETRIEBNAHME VOREINSTELLUNGEN ZUM GAREN WIESO 2 DECKEL? DRUCKGAREN UND DECKEN BEIM ERHITZEN Der Taste the Difference Food Genie verfügt über zwei Deckel. Verwenden Sie den Druckgardeckel HEISSLUFT-FRITTIEREN VERWENDEN um Lebensmittel unter Druck zu garen, für saftige und aromatische Ergebnisse. Wechseln Sie zum Frittierdeckel, der dank ultraerhitzter zirkulierender Luft für einen knusprigen Effekt sorgt.
- Page 39 HEIßLUFT-FRITTIEREN DAMPFGAREN SCHRITT 1 SCHRITT 1 Den aufgesetzten Druckgardeckel abnehmen. Zum Öffnen, den Nach dem Kauf ist der Druckgardeckel am Hauptgerät befestigt. Den Entriegelungshebel drehen. Hebel lösen und den Druckgardeckel in Deckel durch Eindrehen des Griffs öffnen. Hebel lösen und den den Uhrzeigersinn ziehen.
- Page 40 GERÄTETEILE & ZUBEHÖR ANLEITUNG ZUM HEIßLUFT-FRITTIEREN WICHTIG: FRITTIERDECKEL – FRITTIERDECKEL – ANSICHT Durch Drücken der Cancel-Taste kann jede UNTERSEITE VON OBEN Funktion mit sofortiger Wirkung abgebrochen Pressure Slow Cook werden. Sous Vide Air Fry 1. Lesen Sie die ANLEITUNG ZUR Kupplungskontakt Canning Steam...
-
Page 41: Wichtiger Sicherheitshinweis
Symbol angezeigt, während der Frittierdeckel abgekühlt. Versuchen Sie NICHT, den Frittierdeckel Druck - üben Sie keine Kraft aus, um das Gerät zu öffnen. Sobald der Druck entwichen ist, befolgen abzunehmen, bevor das Display blau leuchtet und Ihnen so anzeigt, dass der Frittierdeckel Sie die Hinweise zum Öffnen des Deckels. -
Page 42: Guia De Início Rápido
GUIA DE INÍCIO RÁPIDO 20. Niemals mit einem Verlängerungskabel benutzen. 21. Das Gerät nicht im Freien benutzen. 22. Nicht benutzen, wenn das Kabel oder der Stecker beschädigt sind. PORQUÊ 2 TAMPAS? Falls während dem Betrieb des Gerätes Störungen auftreten, das Netzkabel unverzüglich aus der O aparelho tem um design de tampa dupla. - Page 43 PREDEFINIÇÕES DE CONFEÇÃO COZINHAR COM PRESSÃO PASSO 1 TAMPA PARA USAR CALOR PRESSÃO PARA AIR FRY A unidade vem com a tampa da panela de pressão fixada na base. Rode a pega para abrir a tampa. Liberte o interruptor e rode a tampa no sentido dos ponteiros do relógio.
-
Page 44: Peças E Acessórios
FRITAR COM AIR FRY PEÇAS E ACESSÓRIOS PASSO 1 TAMPA AIR FRY - VISTA TAMPA AIR FRY - VISTA Retire a tampa da panela de pressão. Rode o interruptor de libertação para abrir. Liberte o interruptor e rode a tampa da panela de pressão INFERIOR SUPERIOR no sentido dos ponteiros do relógio. - Page 45 INSTRUÇÕES PARA COZINHAR COM AIR FRY DICAS PARA USAR O AIR FRY • Alimentos mais pequenos necessitam normalmente de um tempo de confeção menor do que os IMPORTANTE: alimentos de maior dimensão. Qualquer função pode ser parada imediatamente • Grandes quantidades de alimentos necessitam de mais tempo do que quantidades menores. premindo o botão de Cancelar.
- Page 46 7. Este aparelho cozinha sob pressão. Um uso inadequado pode dar origem a escaldões. ENTRE EM CONTACTO COM OS LÍQUIDOS SE A UNIDADE ESTIVER LIGADA E DENTRO Certifique-se de que a unidade está devidamente fechada antes da utilização e que a válvula de DESSES LÍQUIDOS.
Need help?
Do you have a question about the Carlo Gracco FRYCOOK BGMP-9141 and is the answer not in the manual?
Questions and answers