Table of Contents
Advertisement
Available languages
Available languages
Quick Links
Cod. 998956
12/2010
BABY TRIUM
BABY TRIUM DT
MANUALE D'USO E MANUTENZIONE
USE AND MAINTENANCE MANUAL
MANUEL D'UTILISATION ET D'ENTRETIEN
BEDIENUNGS-UND WARTUNGSANLEITUNG
MANUAL DE USO Y MANTENIMIENTO
Instrucciones originales
Istruzioni originali
Original instruction
Notices originales
Originalanleitung
Advertisement
Chapters
Table of Contents

Related Manuals for Checchi & Magli BABY TRIUM


Summary of Contents for Checchi & Magli BABY TRIUM
- Page 1 BABY TRIUM BABY TRIUM DT MANUALE D'USO E MANUTENZIONE USE AND MAINTENANCE MANUAL MANUEL D’UTILISATION ET D’ENTRETIEN BEDIENUNGS-UND WARTUNGSANLEITUNG MANUAL DE USO Y MANTENIMIENTO Istruzioni originali Original instruction Notices originales Originalanleitung Instrucciones originales Cod. 998956 12/2010...
- Page 3 Disimballo e montaggio ..........................16 Distanza interpianta ............................7 Documentazione allegata ..........................1 Elementi principali BABY TRIUM ........................3 Elementi principali BABY TRIUM DT (doppio telaio) ................4 Esclusione di responsabilità ..........................2 Glossario ................................2 Imballo ................................13 Inattività prolungata della macchina operatrice ................29 Inconvenienti, cause, rimedi ........................
-
Page 4: Table Of Contents
Schema punti di lubrificazione........................32 Scopo del manuale ............................1 Segnali di sicurezza e informazione ......................8 Sistemazione sedile ............................26 Sollevamento BABY TRIUM ......................... 14 Sollevamento BABY TRIUM DT........................15 Sostituzione catena ruote motrici ......................33 Sostituzione catena unità di trapianto ....................34 Sostituzione pignone ruote motrici ...................... - Page 5 INFORMAZIONI GENERALI Scopo del manuale Il manuale è stato realizzato dal costruttore per fornire le Pericolo - Attenzione informazioni necessarie e i criteri da seguire a tutti colo- ro che interagiscono con la trapiantatrice, nel proseguo Indica situazioni di grave pericolo che, se trascurate, del manuale denominata anche macchina operatrice.
- Page 6 INFORMAZIONI GENERALI Esclusione di responsabilità La macchina viene consegnata alle condizioni valide - l’inosservanza totale o parziale delle istruzioni d’uso e al momento dell’acquisto e specificate nel contratto di manutenzione vendita. - l’utilizzo di ricambi non originali o non specifici per il modello - Qualsiasi modifica non autorizzata dal costruttore farà...
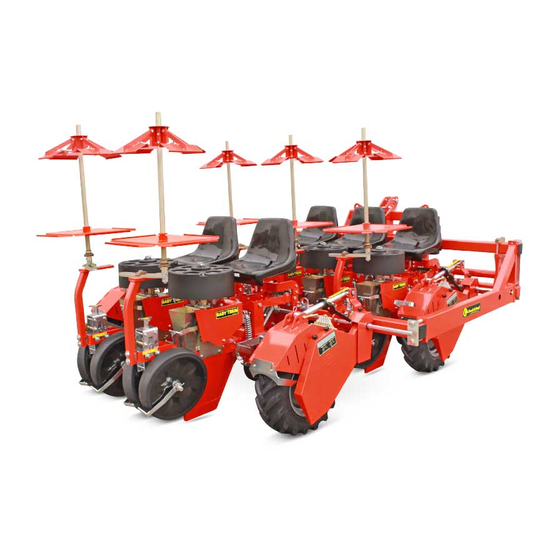
- Page 7 Gli organi mobili (distributore espulsore, ecc.) sono azio- con una interfila molto piccola. nati dalle ruote motrici della macchina operatrice (quan- Elementi principali BABY TRIUM L’illustrazione raffigura la macchina operatrice con due unità di trapianto. UN41 0160LG A) Struttura per il collegamento all’attacco a tre punti...
- Page 8 INFORMAZIONI TECNICHE Elementi principali BABY TRIUM DT (doppio telaio) L’illustrazione raffigura la macchina operatrice con tre unità di trapianto. UN41 0161LG A) Struttura per il collegamento all’attacco a tre punti Le ruote possono essere due motrici e due folli, tre mori- della trattrice (doppio telaio) ci e una folle oppure tutte e quattro motrici.
- Page 9 INFORMAZIONI TECNICHE Dimensioni d’ingombro (BABY TRIUM) L’illustrazione raffigura le dimensioni d’ingombro delle macchine operatrici. 1500 1500 2000 2500 BABY TRIUM/1 BABY TRIUM/2 BABY TRIUM/3 1500 3000 3500 BABY TRIUM/4 BABY TRIUM/5 1500 4000 BABY TRIUM/6 UN41 0162LG Caratteristiche tecniche (BABY TRIUM)
- Page 10 INFORMAZIONI TECNICHE Dimensioni d’ingombro (BABY TRIUM DT) L’illustrazione raffigura le dimensioni d’ingombro delle macchine operatrici. 2900 2900 2900 BABY TRIUM-DT/2 BABY TRIUM-DT/3 BABY TRIUM-DT/4 2900 2900 BABY TRIUM-DT/5 BABY TRIUM-DT/6 UN41 0163LG Caratteristiche tecniche (BABY TRIUM DT) Caratteristiche tecniche BABY TRIUM DT...
-
Page 11: Pendenze Ammissibili
Dichiara sotto la propria responsabilità che le macchine UNI EN ISO 12100-1, UNI EN ISO 12100-2 e UNI EN 13857 trapiantatrici in oggetto: relative alla sicurezza del macchinario. BABY TRIUM/1, BABY TRIUM/2, BABY TRIUM/3, BABY TRIUM/4, BABY TRIUM/5, BABY TRIUM/6, BABY Budrio TRIUM-DT/2, BABY TRIUM-DT/3, BABY TRIUM-DT/4, BABY TRIUM-DT/5, BABY TRIUM-DT/6 CHECCHI &... -
Page 12: Protezioni
INFORMAZIONI TECNICHE Protezioni L’illustrazione raffigura i carter di protezione (A - B - C - D - Pericolo - Attenzione E) installati su ogni ruota e su ogni unità operatrice. Non usare la macchina senza i carter di protezione. La macchina operatrice è dotata di protezioni degli or- gani di trasmissione per evitare infortuni causati dal con- tatto involontario con gli elementi in movimento. - Page 13 N) Targa informazione: agganciare la macchina opera- P) Targa interpianta (opzionale, 10-50): indica, in fun- trice nei punti indicati per sollevarla. zione dell’interpianta, il tipo di pignoni da montare. BABY TRIUM BABY TRIUM DT UN41 0165LG Lingua italiana Uso e manutenzione...
- Page 14 Kit vomere stretto TEXDRIVE BEST Kit vomere standard TRIUM Kit vomere medio TRIUM Prolunga distributore BABY TRIUM Dispositivo di posa manichetta d’irrigazione Skid (slitta costipatrice in combinazione alle ruote costipatrici per terreni soffici e aridi) Telaio sfilabile idraulicamente (3 file; larghezza cm 240 - 350) Versione a file abbinate inferiore a 50 cm - min 40 cm (es.: trapianti di pomodoro)
- Page 15 INFORMAZIONI TECNICHE Rumore L’impiego delle piantatrici non comporta un aumento si- Consultare il manuale del costruttore della trattrice per gnificativo del livello di pressione sonora della trattrice a valutare i dispositivi di protezione individuale adeguati cui viene collegata la piantatrice stessa. da adottare a protezione dell’udito.
- Page 16 INFORMAZIONI SULLA SICUREZZA Leggere attentamente questo manuale prima di pro- In caso di avaria, evitare di eseguire interventi di ripa- cedere alle operazioni di impiego, manutenzione o razione sul luogo se non si è sicuri di operare in am- altri interventi sulla macchina operatrice. biente idoneo e se non si dispone delle attrezzature adeguate;...
-
Page 17: Raccomandazioni Di Sicurezza Per La Movimentazione E Il Trasporto
Imballo I modelli BABY TRIUM-DT/5 e BABY TRIUM-DT/6 se Il tipo di imballo viene scelto in funzione del mezzo di non contenuti all’interno di un imballo, sono spediti se- trasporto prescelto ed al luogo di destinazione. - Page 18 I punti di presa per il sollevamento valgono per tutti i Le operazioni di sollevamento devono essere effettuate modelli di BABY TRIUM. con mezzi adeguati al carico da sollevare e da personale UN41 0138MF Procedere come descritto.
- Page 19 è macchina operatrice. mai perfettamente baricentrico. I modelli BABY TRIUM-DT/5 e BABY TRIUM-DT/6 de- Le operazioni di sollevamento devono essere effettuate vono essere sollevati sempre separatamente per evitare con mezzi adeguati al carico da sollevare e da personale...
- Page 20 8 L’illustrazione raffigura sommariamente lo schema di giorni dal ricevimento della macchina. montaggio della macchina operatrice divisa in due grup- BABY TRIUM-DT/5 BABY TRIUM-DT/6 UN41 0170LG L’illustrazione raffigura sommariamente lo schema di montaggio della macchina operatrice.
- Page 21 INFORMAZIONI SULLA MOVIMENTAZIONE E INSTALLAZIONE L’illustrazione raffigura sommariamente lo schema di montaggio della macchina operatrice. BABY TRIUM-DT/2 BABY TRIUM-DT/3 BABY TRIUM-DT/4 BABY TRIUM-DT/5 BABY TRIUM-DT/6 UN41 0172LG Lingua italiana Uso e manutenzione...
-
Page 22: Raccomandazioni Di Sicurezza Per Le Regolazioni
INFORMAZIONI SULLE REGOLAZIONI Raccomandazioni di sicurezza per le regolazioni Gli interventi di regolazione devono essere effettuati accensione rimossa e adottando tutti gli accorgimen- su terreno pianeggiante e compatto, con la trattrice ti necessari per operare in sicurezza. spenta, il freno di stazionamento tirato, la chiave di Regolazione distanza delle ruote costipatrici dal vomere Le ruote costipatrici (B) servono a rincalzare e compri- mere il terreno attorno alle piantine trapiantate. - Page 23 INFORMAZIONI SULLE REGOLAZIONI Regolazione della lamella scorrevole (Plant Control) La lamella scorrevole (Plant Control) arresta le piantine in verticale in attesa dell’espulsione. Regolare la lamella in basso per piante piccole e in alto per piante di dimensione maggiore. Procedere come descritto. 1) Allentare il dado (A).
-
Page 24: Regolazione Interfila
INFORMAZIONI SULLE REGOLAZIONI Regolazione raschietto ruotino Procedere come descritto. 1) Allentare le viti (A). 2) Mettere il raschietto (B) leggermente a contatto con la ruota costipatrice. 3) Stringere le viti (A). UN41 0179MG Regolazione interfila Pericolo - Attenzione Regolare la distanza delle unità di trapianto per ottene- re la distanza tra le file (distanze comprese nelle gamme Bloccare la macchina operatrice, sollevata da terra, previste, vedere relativamente al modello “Caratteristi-... -
Page 25: Regolazione Interpianta
INFORMAZIONI SULLE REGOLAZIONI Regolazione interpianta La distanza tra una pianta e quella successiva è determi- Per il montaggio dei pignoni vedere il paragarafo “Sosti- nata dal numero di denti dei pignoni installati. tuzione pignone ruote motrici” a pag. 33. Possono essere montati diversi pignoni al fine di ottene- Le tabelle indicano le possibili distanze tra una piantina re la distanza di interpianta richiesta. - Page 26 INFORMAZIONI SULLE REGOLAZIONI Regolazione della fase distributore-espulsore Quando la pianta cade nel vomere (C), l’espulsore (B) Se le condizioni consentono di trapiantare ad alta velo- deve essere in posizione arretrata per poi iniziare la spin- cità o a bassa velocità, è possibile mantenere la corretta ta di espulsione.
- Page 27 INFORMAZIONI SULLE REGOLAZIONI Regolazione del carico dell’unità di trapianto Il gruppo di regolazione viene solitamente montato in Il gruppo in posizione (B) consente di diminuire il peso posizione (A). alle ruote costipatrici. Il gruppo in posizione (A) consente di aumentare il peso alle ruote costipatrici.
- Page 28 INFORMAZIONI SULL’USO Raccomandazioni di sicurezza per l’uso Consentire l’uso della macchina solo a personale au- Non superare le pendenze massime ammissibili della torizzato, in buona salute, adeguatamente formato e trattrice con attrezzatura applicata (vedere manuale dotato di idonea patente di guida per la trattrice. d’uso della trattrice).
- Page 29 INFORMAZIONI SULL’USO Attacco e distacco della macchina operatrice dalla trattrice Pericolo - Attenzione Il collegamento della macchina operatrice alla trattrice è uno dei momenti più rischiosi poiché potrebbe ri- chiedere la necessità dell’intervento contemporaneo di più persone mediante manovre sincronizzate tra il conducente della trattrice e gli operatori a terra, che se concordate male, possono causare infortunio.
- Page 30 INFORMAZIONI SULL’USO Sistemazione sedile Una scorretta posizione di lavoro affatica l’operatore che potrebbe compiere operazioni non corrette, per cui, pri- ma dell’inizio del lavoro regolare e bloccare il sedile nella posizione di massimo comfort. Procedere come descritto. 1) Allentare le viti (A) e regolare in altezza il sedile. 2) Avvitare le viti (A) per bloccare il sedile nella posizio- ne appropriata.
- Page 31 INFORMAZIONI SULL’USO Modalità di trapianto La messa a dimora delle piantine deve essere effettuata Non operare su terreni molto soffici, molto compatti o su terreni preventivamente sminuzzati con erpici o zap- molto bagnati per non pregiudicare la buona qualità di patrici e leggermente compattati in superficie.
- Page 32 “Sollevamento BABY di aggancio (perni, viti, catene,ecc.). TRIUM” a pag.14 o “Sollevamento BABY TRIUM DT” a pag. Il punto di congiunzione delle rampe con il pianale crea un dosso pericoloso per cui si deve operare con estrema cautela in prossimità...
- Page 33 INFORMAZIONI SULL’USO Procedere come descritto. 4) Spegnere il motore e inserire il freno di stazionamen- 1) Avviare la trattrice e sollevare il massimo consentito 5) Ancorare l’insieme macchina operatrice-trattrice al la macchina operatrice. mezzo di trasporto con funi e bloccare le ruote con 2) Salire sul mezzo di trasporto dal posto di guida della cunei.
-
Page 34: Schema Punti Di Lubrificazione
INFORMAZIONI SULLA MANUTENZIONE Raccomandazioni per la manutenzione Gli interventi di manutenzione devono essere ef- di manutenzione ordinaria previsti nel manuale di fettuati su terreno pianeggiante, compatto, con la istruzioni. trattrice spenta, il freno di stazionamento tirato, la Per gli interventi straordinari (non compresi in que- chiave di accensione rimossa e adottando tutti gli ac- sto manuale) occorre disporre di un’officina azienda- corgimenti necessari per operare in sicurezza. - Page 35 INFORMAZIONI SULLA MANUTENZIONE Controllo pneumatici Verificare lo stato di usura dei pneumatici e se presenta- pneumatici (vedere “Caratteristiche tecniche”). no lacerazioni o segni d’invecchiamento devono essere Il controllo della pressione deve essere effettuato con il sostituiti. peso della macchina operatrice scaricato a terra e senza Controllare e se necessario ripristinare la pressione dei nessun peso a bordo (persone o cose).
- Page 36 INFORMAZIONI SULLA MANUTENZIONE Schema punti di lubrificazione Lubrificare gli organi raffigurati nei tempi e nei modi in- Usare grasso universale per autotrazione di macchinari dicati. agricoli e industriali, idrorepellente con punto di goccia Prima di effettuare la lubrificazione pulire accuratamen- 180°.
-
Page 37: Sostituzione Catena Ruote Motrici
INFORMAZIONI SULLE SOSTITUZIONI Raccomandazioni di sicurezza per le sostituzioni La sostituzione di componenti usurati o danneggiati le avente le caratteristiche indicate dalla legislazione deve essere effettuata con ricambi originali. vigente in materia (attrezzature adeguate, personale Per gli interventi straordinari (non compresi in que- idoneo, ecc.), altrimenti occorre rivolgersi ad officine sto manuale) occorre disporre di un’officina azienda- autorizzate. - Page 38 INFORMAZIONI SULLE SOSTITUZIONI Sostituzione catena unità di trapianto UN41-0191MG Procedere come descritto. 1) Svitare le viti (A) e rimuovere il carter (B). Montare la nuova catena sui pignoni e sul tendica- 2) Svitare le viti (G), i dadi (C) e rimuovere il carter (D). tena (F).
-
Page 39: Sostituzione Vomere
INFORMAZIONI SULLE SOSTITUZIONI Sostituzione vomere UN41 0194MG Procedere come descritto. 1) Rimuovere l’anello elastico (A). 5) Sorreggere il vomere e rimuovere la vite (C) e la ron- 2) Svitare il dado ad alette (B). della (E). 3) Alzare e tenere alzato il dispositivo di bloccaggio Per il montaggio effettuare le operazioni in ordine inver- (D). - Page 41 Adjusting the the small wheel scraper ....................20 Aim of the manual ............................1 Annexed documentation ..........................1 Assistance request procedure ........................1 BABY TRIUM DT (double frame) main parts .....................4 BABY TRIUM DT overall dimensions ......................6 BABY TRIUM DT technical characteristics ....................6 BABY TRIUM main parts ..........................3 BABY TRIUM overall dimensions ........................5...
- Page 42 Maintenance advice ............................30 Maintenance intervals schedule ....................... 30 Manufacturer and machine registration details ..................1 Night-time work or poor visibility conditions ..................28 Noise ................................... 11 Optional accessories ............................. 10 Overview ................................3 Packing ................................13 Permitted gradients ............................7 Planting depth adjustment ........................19 Planting procedure ............................
-
Page 43: Manufacturer And Machine Registration Details
GENERAL INFORMATION Aim of the manual This instruction manual is produced by the manufactur- Danger - Warning er to provide all those who have dealings with the plant- ing machine (which may also be referred to hereinafter This indicates seriously hazardous situations which, as the “work vehicle”) with all the necessary information if ignored, could put the health and safety of those and criteria to apply for its use. - Page 44 GENERAL INFORMATION Disclaimer notice The machine is delivered to the user under the condi- - total or partial failure to comply with the use and main- tions applicable at the time of purchase and specified in tenance instructions the sale agreement. - use of non-original spare parts or parts not designed specifically for the model concerned - Any alterations not authorised by the manufacturer...
- Page 45 The moving parts (dispenser, ejector, etc.) are driven main feature is planting with a very small row spacing. by the works vehicle’s driving wheels (when these are BABY TRIUM main parts The illustration shows the work vehicle with two planting units. UN41 0160LG...
- Page 46 TECHNICAL INFORMATION BABY TRIUM DT (double frame) main parts The illustration shows the work vehicle with three planting units. UN41 0161LG A) Structure for attaching to the three-point hitch on a There may be two driving wheels and two idlers, three...
- Page 47 TECHNICAL INFORMATION BABY TRIUM overall dimensions The illustration shows the work vehicles’ overall dimensions. 1500 1500 2000 2500 BABY TRIUM/1 BABY TRIUM/2 BABY TRIUM/3 1500 3000 3500 BABY TRIUM/4 BABY TRIUM/5 1500 4000 BABY TRIUM/6 UN41 0162LG BABY TRIUM technical characteristics...
- Page 48 TECHNICAL INFORMATION BABY TRIUM DT overall dimensions The illustration shows the work vehicles’ overall dimensions. 2900 2900 2900 BABY TRIUM-DT/2 BABY TRIUM-DT/3 BABY TRIUM-DT/4 2900 2900 BABY TRIUM-DT/5 BABY TRIUM-DT/6 UN41 0163LG BABY TRIUM DT technical characteristics BABY TRIUM DT technical characteristics...
- Page 49 UNI EN ISO 12100-1, UNI EN ISO 12100-2 and UNI planting machine in question, i.e. models: EN 13857, on machine safety. BABY TRIUM/1, BABY TRIUM/2, BABY TRIUM/3, BABY TRIUM/4, BABY TRIUM/5, BABY TRIUM/6, BABY Budrio TRIUM-DT/2, BABY TRIUM-DT/3, BABY TRIUM-DT/4, BABY TRIUM-DT/5, BABY TRIUM-DT/6 CHECCHI &...
- Page 50 TECHNICAL INFORMATION Guards The illustration shows the protective casings (A - B - C - D - Danger - Warning E) installed on each wheel and on each work unit. Never use the machine without the safety guards. The work vehicle is fitted with guards covering the trans- mission components to prevent accidental contact with the moving parts.
- Page 51 P) Plant spacing plate (10 - 50 option ): this shows the points shown to lift it. type of pinion to fit according to the plant spacing required. BABY TRIUM BABY TRIUM DT UN41 0165LG English language Use and maintenance...
-
Page 52: Optional Accessories
TEXDRIVE BEST narrow ploughshare kit TRIUM standard ploughshare kit TRIUM medium ploughshare kit BABY TRIUM dispenser extension Hosepipe laying device Skid (for compacting, used in conjunction with packing wheels for both spongy and dry soil) Hydraulically removable frame (3 rows, width: 240 cm - 350 cm) Paired row version, for row spacing below 50 cm, with min. - Page 53 TECHNICAL INFORMATION Noise The use of the planting machine does not mean a signifi- Check the tractor manufacturer’s manual to decide cant increase in the noise levels of the tractor to which which PPE to adopt for hearing protection. the planting machine is hitched. Residual risks During the design and construction stages, the manufac- turer has focused particular attention on safety aspects;...
- Page 54 SAFETY INFORMATION Read this manual carefully before proceeding with In the event of a failure, do not carry out any repairs any operations concerning use, maintenance or oth- on site unless you are certain that the area you are in er work on the work vehicle.
-
Page 55: Packing
Packing If the BABY TRIUM-DT/5 and BABY TRIUM-DT/6 mod- The type of packing is chosen according to the selected els do not fit into a single package, they will be shipped means of transport and the destination. - Page 56 Check the parcel weight stated on the packing itself. UN41 0077GF Lifting the BABY TRIUM in order to safeguard their own safety and that of the Danger - Warning other people involved in the operations.
- Page 57 The BABY TRIUM-DT/5 and BABY TRIUM-DT/6 models must always be hoisted separately to avoid damage to Lifting operations must be carried out using suitable the frame and possible injury to persons involved in the means for the load to be lifted, by authorised personnel operations.
- Page 58 The illustration provides a rough outline of the work ve- directly to the manufacturer within 8 days of receiving hicle assembly divided into two units. the machine. BABY TRIUM-DT/5 BABY TRIUM-DT/6 UN41 0170LG The illustration provides a rough outline of the work vehicle assembly.
- Page 59 SAFETY INFORMATION CONCERNING HANDLING AND INSTALLATION The illustration provides a rough outline of the work vehicle assembly. BABY TRIUM-DT/2 BABY TRIUM-DT/3 BABY TRIUM-DT/4 BABY TRIUM-DT/5 BABY TRIUM-DT/6 UN41 0172LG English language Use and maintenance...
- Page 60 ADJUSTMENT INFORMATION Safety advice concerning adjustments Maintenance and adjustment work must be carried ignition key removed, and adopting all the necessary out with the work vehicle on flat, compact ground, safety measures required to work safely. with the tractor engine off, parking brake engaged, Adjusting the spacing between the packing wheels and the ploughshare The packing wheels (B) are used to ridge and compact the soil around the planted seedlings.
-
Page 61: Planting Depth Adjustment
ADJUSTMENT INFORMATION Adjusting the plant control plate The plant control plate stops the seedlings falling down- wards before they are ejected. Move the plate down for smaller seedlings and up for taller seedlings. Proceed as outlined below. 1) Loosen the nut (A). 2) Adjust the plate (B) as required. - Page 62 ADJUSTMENT INFORMATION Adjusting the the small wheel scraper Proceed as outlined below. 1) Loosen the screws (A). 2) Position the scraper (B) so that it is just touching the packing wheel. 3) Tighten the screws (A). UN41 0179MG Adjusting the row spacing Danger - Warning Adjust the gap between the transplanting units to ob- tain the row spacing required (for distances envisaged,...
- Page 63 ADJUSTMENT INFORMATION Adjusting the plant spacing The gap between one plant and the next depends on To mount the pinions, see the section on “Replacing the the number of teeth on the pinions installed. driving wheels pinion“ on page 33. A series of pinions may be fitted to ensure the required The charts state the possible distances between one plant spacing is obtained.
- Page 64 ADJUSTMENT INFORMATION Adjusting the dispenser/ ejection timing When the plant falls into the ploughshare (C), the ejector If the conditions allow high- or low-speed planting, cor- (B) should be in the rear position and should then start rect timing between the dispenser and the ejector can pushing the plant to eject it.
- Page 65 ADJUSTMENT INFORMATION Adjusting the planting unit load The adjustment unit is usually mounted in position (A). Setting the unit to position (B) decreases the weight on the packing wheels. Setting the unit to position (A) increases the weight on the packing wheels. UN41 0182MG Proceed as outlined below.
- Page 66 INFORMATION FOR USE Safety advice concerning use This ensures the machine can only be used by fit and Do not exceed the permitted gradients established healthy personnel, who are suitably trained and au- for the tractor with the equipment mounted on it thorised, and hold the appropriate category driving (see tractor user manual).
- Page 67 INFORMATION FOR USE Hitching and unhitching the work vehicle to and from the tractor Danger - Warning Hitching the work vehicle up to the tractor is one of the riskiest moments as it could required the involvement of several people at once, carrying out synchronised manoeuvres between the tractor driver and the operators on the ground, which - if badly organised - could result in accidents.
- Page 68 INFORMATION FOR USE Seat positioning Poor work posture will tire the operator and could lead to mistakes being made; therefore, before starting work, adjust the seat and secure it in the position that offers maximum comfort. Proceed as outlined below. 1) Loosen the screws (A) and adjust the seat height.
-
Page 69: Planting Procedure
INFORMATION FOR USE Planting procedure The seedlings must be planted in soil which has been Do not work on extremely spongy spoil, or extremely finely tilled with a harrow or hoeing machine and lightly compact soil, nor on very wet ground, as these condi- compacted on the surface. - Page 70 See the strap-up points and lifting procedures in the sec- Position the ramps on the transport means and fix tions titled “Lifting the BABY TRIUM“ on page 14 or “Lift- them in a stable way to the truck bed using the fas- ing the BABY TRIUM DT”...
-
Page 71: Prolonged Disuse Of The Work Vehicle
INFORMATION FOR USE Proceed as outlined below. 4) Off the tractor engine and engage the parking brake. 1) Start the tractor and lift the work vehicle as far off the 5) Anchor the the tractor/work vehicle assembly to the ground as is permitted. means of transport with ropes and secure the wheels 2) Get into the means of transport from the tractor’s with wedges. - Page 72 MAINTENANCE INFORMATION Maintenance advice Maintenance work must be carried out with the work maintenance envisaged in the instruction manual. vehicle on flat, compact ground, with the tractor en- Special maintenance operations (non included in gine off, parking brake engaged, and ignition key re- this handbook) require a specialised workshop on moved, and adopting all the necessary safety meas- the premises which meets the requirements speci-...
- Page 73 MAINTENANCE INFORMATION Tyres check Check the tyres for wear and if they feature tears or signs nical characteristics”). of ageing, they must be replaced. The pressure must be checked with the weight of the Check tyres pressure and restore if necessary (see “Tech- work vehicle entirely on the ground and with nothing and nobody on the work vehicle.
- Page 74 MAINTENANCE INFORMATION Lubrication points diagram Lubricate the parts shown at the times and in the ways Use universal grease for traction in farming and industri- specified. al machinery, which is water-repellent with a 180° drop Before lubricating, clean the components concerned point.
-
Page 75: Replacing The Driving Wheels Chain
INFORMATION CONCERNING REPLACEMENTS Safety advice concerning replacements When replacing worn or damaged parts, original the premises which meets the requirements speci- spares must always be used. fied by the relative laws in force (appropriate equip- Special maintenance operations (non included in ment suitably trained staff etc.);... -
Page 76: Replacing The Planting Unit Chain
INFORMATION CONCERNING REPLACEMENTS Replacing the planting unit chain UN41-0191MG Proceed as outlined below. 1) Unscrew the screws (A) and remove the casing (B). 6) Fit the new chain on the pinions and on the chain 2) Unscrew the screws (G), the nuts (C) and remove the tensioners (F). -
Page 77: Replacing The Ploughshare
INFORMATION CONCERNING REPLACEMENTS Replacing the ploughshare UN41 0194MG Proceed as outlined below. 1) Remove the circlip (A). 5) Hold the ploughshare and remove the screw (C) and 2) Unscrew the wing nut (B). washer (E). 3) Lift and hold the clamping device (D). For the assembly, carry out the same operations as for 4) Push the ploughshare forwards and turn it so it is fac- disassembly but proceeding in reverse order. - Page 79 Attelage et dételage de la machine opératrice du tracteur ............25 Bruit ..................................11 Caractéristiques techniques (BABY TRIUM) .....................5 Caractéristiques techniques (BABY TRIUM DT) ..................6 Circulation sur la voie publique ........................ 29 Contrôle des pneus ............................31 Déballage et montage ..........................16 Déclaration de conformité...
- Page 80 Objectif du manuel ............................1 Pentes admises ..............................7 Période d’inactivité prolongée de la machine opératrice ............... 29 Principaux éléments BABY TRIUM .......................3 Principaux éléments BABY TRIUM DT (double châssis) ...............4 Problèmes, causes, solutions........................31 Protections ................................8 Recommandations pour la sécurité d’emploi ..................24 Recommandations pour l’entretien ......................
- Page 81 INFORMATIONS GENERALES Objectif du manuel Le manuel a été réalisé par le constructeur pour fournir les informations nécessaires et les critères à suivre à tous Danger - Attention ceux qui interagissent avec la repiqueuse, également dé- Indique des situations de grave danger qui, si on les nommée dans la suite du manuel machine opératrice.
- Page 82 INFORMATIONS GENERALES Exclusion de responsabilité La machine est livrée aux conditions en vigueur à l’achat - la non observation totale ou partielle des instructions et spécifiées sur le contrat de vente. d’utilisation et d’entretien - l’utilisation de pièces de rechange non originales ou - Toute modification non autorisée par le constructeur non spécifiques pour le modèle - l’usage impropre de la machine...
- Page 83 Les organes mobiles (distributeur, éjecteur, etc.) sont ac- les plants avec une distance très réduite entre les rangs. tionnés par les roues motrices de la machine opératrice Principaux éléments BABY TRIUM L’illustration représente la machine opératrice avec deux unités de repiquage. UN41 0160LG A) Structure pour le raccordement à...
- Page 84 INFORMATIONS TECHNIQUES Principaux éléments BABY TRIUM DT (double châssis) L’illustration représente la machine opératrice avec trois unités de repiquage. UN41 0161LG A) Structure pour le raccordement à l’attelage à trois Les roues peuvent être deux roues motrices et deux points du tracteur (double châssis)
- Page 85 INFORMATIONS TECHNIQUES Dimensions d’encombrement (BABY TRIUM) L’illustration représente les dimensions d’encombrement des machines opératrices. 1500 1500 2000 2500 BABY TRIUM/1 BABY TRIUM/2 BABY TRIUM/3 1500 3000 3500 BABY TRIUM/4 BABY TRIUM/5 1500 4000 BABY TRIUM/6 UN41 0162LG Caractéristiques techniques (BABY TRIUM) Caractéristiques techniques BABY TRIUM...
- Page 86 INFORMATIONS TECHNIQUES Dimensions d’encombrement (BABY TRIUM DT) L’illustration représente les dimensions d’encombrement des machines opératrices. 2900 2900 2900 BABY TRIUM-DT/2 BABY TRIUM-DT/3 BABY TRIUM-DT/4 2900 2900 BABY TRIUM-DT/5 BABY TRIUM-DT/6 UN41 0163LG Caractéristiques techniques (BABY TRIUM DT) Caractéristiques techniques BABY TRIUM DT...
- Page 87 Déclare, sous sa propre responsabilité, que les machines 12100-1, UNI EN ISO 12100-2 et UNI EN 13857 relatives à repiqueuses en question: la sécurité des machines. BABY TRIUM/1, BABY TRIUM/2, BABY TRIUM/3, BABY TRIUM/4, BABY TRIUM/5, BABY TRIUM/6, BABY Budrio TRIUM-DT/2, BABY TRIUM-DT/3, BABY TRIUM-DT/4, BABY TRIUM-DT/5, BABY TRIUM-DT/6 CHECCHI &...
- Page 88 INFORMATIONS TECHNIQUES Protections L’illustration représente les carters de protection (A - B - Danger - Attention C - D - E) installés sur chaque roue et sur chaque unité Ne pas utiliser la machine sans les carters de protec- opératrice. tion.
- Page 89 P) Plaque de distance entre les plants (option, 10 - 50): indiqués pour la soulever. indique, en fonction de la distance entre les plants, le type de pignons à monter. BABY TRIUM BABY TRIUM DT UN41 0165LG Langue française Utilisation et entretien...
- Page 90 Kit soc étroit TEXDRIVE BEST Kit soc standard TRIUM Kit soc moyen TRIUM Rallonge distributeur BABY TRIUM Dispositif de pose d’un tuyau d’irrigation Skid (glissière de compactage associée aux roues de compactage pour terrains meubles et arides) Châssis à extraction hydraulique (3 rangs; largeur 240 - 350 cm) Version à...
- Page 91 INFORMATIONS TECHNIQUES Bruit L’utilisation des planteuses n’entraîne aucune augmen- Consulter le manuel du constructeur du tracteur pour tation significative du niveau de pression sonore du trac- évaluer les dispositifs de protection de l’ouïe à adopter. teur auquel elles sont attelées. Risques résiduels En phase de conception et de construction, le construc- teur a veillé...
- Page 92 INFORMATIONS CONCERNANT LA SECURITE Lire attentivement ce manuel avant de procéder aux En cas de panne, éviter les interventions de répara- opérations d’utilisation, d’entretien ou à d’autres in- tion sur place si l’on n’est pas certain d’opérer dans terventions sur la machine opératrice. un milieu adéquat et si l’on ne dispose pas d’un équipement adéquat.
- Page 93 Emballage Si les modèles BABY TRIUM-DT/5 et BABY TRIUM-DT/6 Le type d’emballage est sélectionné en fonction du ne sont pas emballés, ils sont expédiés en deux colis. moyen de transport choisi et du lieu de destination.
- Page 94 Les opérations de levage doivent être effectuées avec Les points de prise pour le levage sont valables pour des moyens indiqués pour la charge à soulever et par tous les modèles de BABY TRIUM. UN41 0138MF Suivre la description. 2) Elinguer la machine opératrice d’après la figure.
- Page 95 L’illustration représente les points de levage de la ma- parfaitement barycentrique. chine opératrice. Les modèles BABY TRIUM-DT/5 e BABY TRIUM-DT/6 Les opérations de levage doivent être effectuées avec doivent être soulevés séparément pour éviter d’endom- des moyens indiqués pour la charge à soulever et par mager le châssis et de faire courir un risque d’accident...
- Page 96 8 jours à compter de la réception de la ma- montage de la machine opératrice subdivisée en deux chine. groupes. BABY TRIUM-DT/5 BABY TRIUM-DT/6 UN41 0170LG L’illustration représente sommairement le schéma de montage de la machine opératrice.
- Page 97 INFORMATIONS CONCERNANT LA MANUTENTION ET L’INSTALLATION L’illustration représente sommairement le schéma de montage de la machine opératrice. BABY TRIUM-DT/2 BABY TRIUM-DT/3 BABY TRIUM-DT/4 BABY TRIUM-DT/5 BABY TRIUM-DT/6 UN41 0172LG Langue française Utilisation et entretien...
- Page 98 INFORMATIONS CONCERNANT LES REGLAGES Recommandations relatives à la sécurité pour ce qui concerne les réglages Les interventions de réglage doivent être effectuées de contact retirée du tableau de bord; prendre tou- sur un terrain plat et compact; le moteur du tracteur tes les mesures nécessaires pour opérer en toute sé- doit être coupé, le frein de stationnement tiré, la clé...
- Page 99 INFORMATIONS CONCERNANT LES REGLAGES Réglage de la lamelle coulissante (Plant Control) La lamelle coulissante (Plant Control) arrête les plants en position verticale en attendant leur éjection. Régler la lamelle en bas pour les petits plants et en haut pour les plants ayant des dimensions supérieures. Suivre la description.
- Page 100 INFORMATIONS CONCERNANT LES REGLAGES Réglage du racloir du rouet Suivre la description. 1) Desserrer les vis (A). 2) Mettre le racloir (B) légèrement au contact de la roue tasseuse. 3) Serrer les vis (A). UN41 0179MG Réglage de la distance entre les rangées Danger - Attention Régler la distance des unités de repiquage pour obtenir la distance entre les rangs (distances comprises dans les...
- Page 101 INFORMATIONS CONCERNANT LES REGLAGES Réglage de la distance entre les plants La distance entre deux plants est déterminée par le nom- Pour le montage des pignons, voir le paragraphe “Rem- bre de dents des pignons installés. placement du pignon des roues motrices” à la page 33. On peut monter différentes séries de pignons pour obte- Les tableaux indiquent les distances possibles entre nir la distance nécessaire entre les plants.
- Page 102 INFORMATIONS CONCERNANT LES REGLAGES Réglage de la phase distributeur-éjecteur Quand le plant tombe dans le soc (C), l’éjecteur (B) doit Si les conditions permettent de repiquer à grande vitesse se trouver en arrière pour commencer la poussée d’éjec- ou à vitesse réduite, on peut maintenir la phase correcte tion.
- Page 103 INFORMATIONS CONCERNANT LES REGLAGES Réglage de la charge de l’unité de repiquage Le groupe de réglage est généralement monté dans la Le groupe dans la position (B) permet de réduire le poids position (A). des roues compacteuses. Le groupe dans la position (A) permet d’augmenter le poids des roues compacteuses.
- Page 104 INFORMATIONS CONCERNANT L’UTILISATION Recommandations pour la sécurité d’emploi Ne confier l’utilisation de la machine qu’à du person- Ne pas dépasser les pentes maximales admises pour nel autorisé, en bonne santé, dûment formé et muni le tracteur lorsque l’équipement est appliqué (voir du permis de conduire pour les tracteurs.
- Page 105 INFORMATIONS CONCERNANT L’UTILISATION Attelage et dételage de la machine opératrice du tracteur Danger - Attention Le raccordement de la machine opératrice au tracteur est l’un des moments les plus dangereux car il pourrait exiger l’intervention simultanée de plusieurs personnes accomplisant des manœuvres synchronisées entre le conducteur du tracteur et les opérateurs au sol, qui, si elles ont mal réglées, peuvent provoquer un accident.
- Page 106 INFORMATIONS CONCERNANT L’UTILISATION Réglage du siège Une position de travail incorrecte fatigue l’opérateur qui pourrait effectuer des opérations erronées; aussi, avant de commencer son travail, il doit régler et bloquer le siège dans la position de confort maximum. Suivre la description. 1) Desserrer les vis (A) et régler le siège en hauteur.
- Page 107 INFORMATIONS CONCERNANT L’UTILISATION Modalités de repiquage Repiquer les plants dans un terrain préalablement Ne pas opérer sur des terrains trop meubles, trop com- émietté à la herse ou avec une sarcleuse et légèrement pacts ou détrempés pour ne pas compromettre la bonne tassé...
- Page 108 Pour les points d’élingage et les modalités de levage, les bloquer de façon stable au plancher par l’inter- voir les paragraphes “Levage BABY TRIUM” à la page 14 médiaire de dispositifs d’accrochage (goujons, vis, ou “Levage BABY TRIUM DT” à la page 15.
- Page 109 INFORMATIONS CONCERNANT L’UTILISATION Suivre la description. 4) Couper le moteur et tirer le frein de stationnement. 5) Ancrer le groupe machine opératrice-tracteur au 1) Démarrer le tracteur et soulever la machine opéra- moyen de transpor avec des câbles et bloquer les trice au maximum admis.
- Page 110 INFORMATIONS CONCERNANT L’ENTRETIEN Recommandations pour l’entretien Les interventions d’entretien doivent être effectuées tretien ordinaire prévues dans le manuel d’instruc- sur un terrain plat et compact; le moteur du tracteur tions. doit être coupé, le frein de stationnement tiré, la clé Pour les interventions extraordinaires (ne figurant de contact retirée du tableau de bord;...
- Page 111 INFORMATIONS CONCERNANT L’ENTRETIEN Contrôle des pneus Vérifier l’état d’usure des pneus et la présence de déchi- (voir “Caractéristiques techniques”). Le contrôle de la rures ou de signes de vieillissement; le cas échéant, les pression doit être effectué avec le poids de la machine remplacer.
- Page 112 INFORMATIONS CONCERNANT L’ENTRETIEN Schéma des points de lubrification Lubrifier les organes illustrés en respectant les délais et Utiliser une graisse universelle pour moteurs de machi- les modalités indiqués. nes agricoles et industrielles, hydrofuge avec un point Avant d’effectuer la lubrification, nettoyer soigneuse- de goutte à...
- Page 113 INFORMATIONS CONCERNANT LES REMPLACEMENTS Recommandations relatives à la sécurité lors des remplacements Le remplacement des composants usés ou endom- à l’exploitation ayant les caractéristiques indiquées magés doit être effectué avec des pièces de rechange par la législation en vigueur en la matière (équipe- originales.
- Page 114 INFORMATIONS CONCERNANT LES REMPLACEMENTS Remplacement de la chaîne de l’unité de repiquage UN41-0191MG Suivre la description. 1) Dévisser les vis (A) et enlever le carter (B). 6) Monter la nouvelle chaîne sur les pignons et le ten- 2) Dévisser les vis (G), les écrous (C) et enlever le carter deur (F).
- Page 115 INFORMATIONS CONCERNANT LES REMPLACEMENTS Remplacement du soc UN41 0194MG Suivre la description. 1) Enlever l’anneau élastique (A). 5) Soutenir le soc et enlever la vis (C) et la rondelle (E). 2) Dévisser l’écrou à ailettes (B). Pour le montage, effectuer les opérations de démontage 3) Soulever le dispositif de blocage (D) et le maintenir dans l’ordre inverse.
- Page 117 7 INFORMATIONEN ZUR WARTUNG...................... 30 8 INFORMATIONEN ZU DEN ERSETZUNGEN..................33 ANALYTISCHES INHALTSVERZEICHNIS Abmessungen (BABY TRIUM) ........................5 Abmessungen (BABY TRIUM DT) .........................6 Abmessungen der Pflanze ..........................7 Allgemeine Beschreibung ..........................3 Anbringen und Ablösen der Arbeitsmaschine am Schlepper ............25 Anforderung von Kundendiensteingriffen ....................1 Arbeit bei Nacht oder bei schlechter Sicht ...................
- Page 118 Haftungsausschließung ..........................2 Hauptelemente BABY TRIUM ........................3 Hauptelemente BABY TRIUM DT (Doppelrahmen) ................4 Heben von BABY TRIUM ..........................14 Heben von BABY TRIUM DT ........................15 Informations- und Sicherheitssignale ......................8 Konformitätserklärung ............................7 Kontrolle der Reifen ............................31 Längere Nichtbenutzung der Arbeitsmaschine .................. 29 Pflanzenabstand ..............................7...
- Page 119 ALLGEMEINE INFORMATIONEN Zweck des Handbuches Das vorliegenden Handbuch wurde vom Hersteller verfasst, um die erforderlichen Informationen und die Gefahr - Achtung anzuwendenden Kriterien zu liefern, die alle befolgen Weist auf schwerwiegende Gefahrensituationen hin, müssen, die mit der Umpflanzmaschine umgehen, die die zu einem ernsthaften Risiko für die Gesundheit im weiteren Verlauf des Handbuches auch als Arbeits- und die Sicherheit von Personen führen, wenn sie...
- Page 120 ALLGEMEINE INFORMATIONEN Haftungsausschließung Die Maschine wird zu den Bedingungen geliefert, die - Unterlassungen bei der Wartung zum Zeitpunkt des Verkaufs gültig sind und im Kaufver- - die vollständige oder teilweise Nichtbeachtung der trag angegeben werden. Anweisungen zur Benutzung und Wartung - die Benutzung von Ersatzteilen von Drittanbietern - Sämtliche vom Hersteller nicht genehmigte Abände- oder von Ersatzteilen für andere Modelle...
- Page 121 Haupteigenschaft hergestellt, die Pflanzen mit einem Die beweglichen Organe (Distributor, Auswerfer usw.) sehr kleinen Reihenabstand zu setzen. werden von den Antriebsrädern der Arbeitsmaschine Hauptelemente BABY TRIUM Die Abbildung gibt die Arbeitsmaschine mit zwei Umpflanzeinheiten wieder. UN41 0160LG A) Struktur für die Anbringung am Dreipunktanschluss H) Furchenöffner...
- Page 122 TECHNISCHE INFORMATIONEN Hauptelemente BABY TRIUM DT (Doppelrahmen) Die Abbildung zeigt die Arbeitsmaschine mit drei Umpflanzeinheit. UN41 0161LG A) Konstruktion zur Verbindung der Zugmaschine an Bei den Rädern kann es sich zum zwei Antriebs- und den Dreipunkt-Anschluss (Doppelrahmen) zwei Leerlaufräder, drei Antriebs- und ein Leerlaufrad B) Rechtes Vorderrad oder vier Antriebsräder handeln.
- Page 123 2500 BABY TRIUM/1 BABY TRIUM/2 BABY TRIUM/3 1500 3000 3500 BABY TRIUM/4 BABY TRIUM/5 1500 4000 BABY TRIUM/6 UN41 0162LG Technische Eigenschaften (BABY TRIUM) Technische Eigenschaften BABY TRIUM BABY BABY BABY BABY BABY BABY TRIUM/1 TRIUM/2 TRIUM/3 TRIUM/4 TRIUM/5 TRIUM/6...
- Page 124 2900 2900 BABY TRIUM-DT/2 BABY TRIUM-DT/3 BABY TRIUM-DT/4 2900 2900 BABY TRIUM-DT/5 BABY TRIUM-DT/6 UN41 0163LG Technische Eigenschaften (BABY TRIUM DT) Technische Eigenschaften BABY TRIUM DT BABY TRIUM BABY TRIUM BABY TRIUM BABY TRIUM BABY TRIUM DT/2 DT/3 DT/4 DT/5...
- Page 125 Insbesondere wurden die folgenden Normen berück- schinen: sichtigt: UNI EN ISO 12100-1, UNI EN ISO 12100-2 und BABY TRIUM/1, BABY TRIUM/2, BABY TRIUM/3, BABY UNI EN 13857 zur Maschinensicherheit. TRIUM/4, BABY TRIUM/5, BABY TRIUM/6, BABY TRIUM-DT/2, BABY TRIUM-DT/3, BABY TRIUM-DT/4,...
- Page 126 TECHNISCHE INFORMATIONEN Schutzvorrichtungen tigten Kontakt mit den Elementen in Bewegung zu ver- Gefahr - Achtung meiden. Benutzen Sie die Maschine nie ohne Schutzvorrich- Die Abbildung zeigt die Schutzabdeckungen (A - B - C - tungen. D - E), die an jedem Rad und an jeder Arbeitsmaschine Die Arbeitsmaschine weist Schutzvorrichtungen für die installiert sind.
- Page 127 N) Hinweisschild: Schlagen Sie die Arbeitsmaschine an P) Schild Pflanzenabstand (option 10 - 50): zeigt den den angegebenen Stellen an, um sie zu heben. Typ des zu montierenden Ritzels in Abhängigkeit vom Pflanzenabstand an. BABY TRIUM BABY TRIUM DT UN41 0165LG Deutsche Sprache Gebrauch und Wartung...
- Page 128 Kit für schmale Pflugschar TEXDRIVE BEST Kit für Standard-Pflugschar TRIUM Kit für mittlere Pflugschar TRIUM Verlängerung für Distributor BABY TRIUM Vorrichtung zur Verlegung des Bewässerungsschlauchs Skid (Verdichterschlitten der Verdichterräder für weiche und trockene Böden) Hydraulisch ausfahrbarer Rahmen (3 Reihen; Breite 240 - 350 cm) Version für Reihen mit Abstand von weniger als 50 cm - min.
- Page 129 TECHNISCHE INFORMATIONEN Geräusch Der Einsatz der Umpflanzmaschine führt nicht zu ei- Bitte konsultieren Sie das Handbuch des Herstellers des nem bedeutsamen Anstieg des Schalldruckpegels des Schleppers zur Bewertung der Personenschutzvorrich- Schleppers, am dem die Umpflanzmaschine angebracht tungen, die für einen angemessenen Gehörschutz anzu- wird.
- Page 130 INFORMATIONEN ZUR SICHERHEIT Bitte lesen Sie das vorliegende Handbuch aufmerk- Vermeiden Sie bei Funktionsstörungen Reparatu- sam vor sämtlichen Eingriffen zur Benutzung und reingriffe vor Ort, falls die Arbeitsumgebung nicht Wartung oder sonstigen Eingriffen an der Arbeits- sicher ist und falls keine geeigneten Werkzeuge ver- maschine.
- Page 131 Maschine, auf der Verpackung sowie in der Ge- vorrichtung verfügen. brauchsanweisung angegeben werden. Verpackung Die Modelle BABY TRIUM-DT/5 und BABY TRIUM-DT/6 Der Typ der Verpackung wird in Abhängigkeit vom ge- werden, wenn sie nicht in einer Verpackung enthalten wählten Transportfahrzeug sowie vom Bestimmungsort sind, in zwei Kollis getrennt ausgeliefert.
- Page 132 Last angemessenen Hebevorrichtung an. Überprüfen Sie das Gewicht des Packstücks direkt auf der Verpackung. UN41 0077GF Heben von BABY TRIUM ausgeführt werden, um die eigene Sicherheit und die Gefahr - Achtung der bei den Arbeiten einbezogenen Personen zu ge- Achten Sie beim Heben auf die Schwingungen der währleisten.
- Page 133 Die Abbildung zeigt die Anschlagstellen der Arbeitsma- schine. Die Hubarbeiten müssen mit für die zu hebende Laste Die Modelle BABY TRIUM-DT/5 und BABY TRIUM-DT/6 geeigneten Mitteln und durch befugtes Fachpersonal müssen immer getrennt gehoben werden, um eine Be- ausgeführt werden, um die eigene Sicherheit und die schädigung des Rahmens und mögliche Unfälle der bei...
- Page 134 Erhalt der Maschine den Händler oder direkt den Die Abbildung zeigt zusammenfassend das Montage- Herstellern. schema der in zwei Baugruppen zerlegten Arbeitsma- schine. BABY TRIUM-DT/5 BABY TRIUM-DT/6 UN41 0170LG Die Abbildung zeigt zusammenfassend das Montageschema der Arbeitsmaschine. BABY TRIUM/1...
- Page 135 INFORMATIONEN ZUR BEWEGUNG UND ZUR INSTALLATION Die Abbildung zeigt zusammenfassend das Montageschema der Arbeitsmaschine. BABY TRIUM-DT/2 BABY TRIUM-DT/3 BABY TRIUM-DT/4 BABY TRIUM-DT/5 BABY TRIUM-DT/6 UN41 0172LG Deutsche Sprache Gebrauch und Wartung...
- Page 136 INFORMATIONEN ZU DEN EINSTELLUNGEN Sicherheitsempfehlungen für die Einstellungen Die Einstelleingriffe müssen auf ebenem und kom- Zündschlüssel ausgeführt werden; dabei müssen paktem Untergrund mit abgeschaltetem Schlepper, sämtliche Maßnahme angewendet werden, die zur angezogener Feststellbremse und abgezogenem Gewährleistung der Sicherheit erforderlich sind. Einstellung des Abstands der Verdichtungsräder zur Pflugschar Die Verdichtungsräder (B) dienen zum Umwälzen und Verdichten des Erdreiches um die umgepflanzten Pflan-...
- Page 137 INFORMATIONEN ZU DEN EINSTELLUNGEN Einstellung des Gleitmessers (Plant Control) Das Gleitmesser (Plant Control) hält die Pflanzen vor dem Auswerfen aufrecht. Regeln Sie das Messer unten bei kleinen Pflanzen und oben für Pflanzen mit größerer Höhe. Gehen Sie wie beschrieben vor. 1) Lösen Sie die Mutter (A).
- Page 138 INFORMATIONEN ZU DEN EINSTELLUNGEN Einstellung des Schabers des Rads Gehen Sie wie beschrieben vor. 1) Lösen Sie die Schrauben (A). 2) Bringen Sie den Schaber (B) in leichten Kontakt zum Verdichterrad. 3) Ziehen Sie die Schrauben (A) an. UN41 0179MG Einstellung des Reihenabstands Gefahr - Achtung Regeln Sie den Abstand der Pflanzvorrichtungen, um...
- Page 139 INFORMATIONEN ZU DEN EINSTELLUNGEN Einstellung des Pflanzenabstands Der Abstand zwischen einer Pflanze und der folgenden Zur Montage der Ritzel siehe im Abschnitt “Ersetzung wird durch die Anzahl der Zähne der installierten Ritzel des Ritzels der Verdichterräder” auf S. 33. bestimmt. Die Tabellen geben die möglichen Abstände zwischen Es können verschiedene Ritzelserien montiert werden, einer Pflanze und der folgenden in Abhängigkeit von...
- Page 140 INFORMATIONEN ZU DEN EINSTELLUNGEN Einstellung der Phase Distributor - Auswerfer Wenn die Pflanze in die Pflugschar (C) fällt, muss sich der Falls die Bedingungen das Umpflanzen mit hoher oder Auswerfer (B) in eingefahrener Position befinden, um niedriger Geschwindelt gestattet, ist es möglich, die Pha- den Auswurfschub zu beginnen.
- Page 141 INFORMATIONEN ZU DEN EINSTELLUNGEN Einstellung der Last der Umpflanzeinheit Die Regelvorrichtung wird gewöhnlich in Position (A) Die Baugruppe in Position (B) ermöglicht es, das Gewicht montiert. auf den Stampfrädern zu verringern. Die Baugruppe in Position (A) ermöglicht es, das Gewicht auf den Stampfrädern zu erhöhen.
- Page 142 INFORMATIONEN ZUR BENUTZUNG Sicherheitsempfehlungen zur Benutzung Gestatten Sie die Benutzung der Maschine aus- Überschreiten Sie nicht das max. zulässige Gefälle schließlich dazu befugtem Personal mit gutem Ge- des Schleppers mit angebrachter Ausrüstung (siehe sundheitszustand, angemessener Ausbildung sowie Benutzungshandbuch des Schleppers). Führerschein für den Schlepper.
- Page 143 INFORMATIONEN ZUR BENUTZUNG Anbringen und Ablösen der Arbeitsmaschine am Schlepper Gefahr - Achtung Das Anbringen der Arbeitsmaschine am Schlepper ist einer der gefährlichsten Momente, da gleichzeitig meh- rere Personen mit synchronisierten Manövern des Fahrers des Schleppers und der Bediener am Boden ausge- führt werden müssen, die bei schlechter Koordinierung zu Unfällen führen können.
- Page 144 INFORMATIONEN ZUR BENUTZUNG Einstellung des Sitzes Eine falsche Arbeitsposition ermüdet den Bediener, der falsche Operationen ausführen könnten; stellen Sie da- her vor Arbeitsbeginn den Sitz in die bequemste Posi- tion ein. Gehen Sie wie beschrieben vor. 1) Lösen Sie die Schrauben (A) und stellen Sie die Sitz- höhe ein.
- Page 145 INFORMATIONEN ZUR BENUTZUNG Umpflanzmodalität Das Umpflanzen muss in zuvor mit Eggen oder Fräsen Distributor und das Anschlagen zu fördern. gelockertem und an der Oberfläche leicht verdichtetem Arbeiten Sie nicht auf sehr weichem, sehr kompaktem Erdreich erfolgen. oder sehr feuchtem Boden, um die Qualität des Um- Laden Sie in den Distributor keine Pflanzen mit unvoll- pflanzens nicht zu beeinträchtigen.
- Page 146 (Zapfen, Schrauben, Ketten, usw.) stabil an der Lade- Heben siehe in den Abschnitten “Heben von BABY TRI- fläche. UM” auf S.14 oder “Heben von BABY TRIUM DT” auf S. 15. Die Verbindungsstelle der Rampen zur Ladefläche Befestigen Sie die Arbeitsmaschine auf dem Transport- lässt eine gefährliche Unebenheit entstehen, wes-...
- Page 147 INFORMATIONEN ZUR BENUTZUNG Gehen Sie wie beschrieben vor. 4) Schalten Sie den Motor aus und betätigen Sie die Feststellbremse. 1) Starten Sie den Schlepper und heben Sie die Arbeits- 5) Befestigen Sie die Gesamtheit von Arbeitsmaschine maschine so weit wie möglich an. und Schlepper auf dem Transportmittel mittels Sei- 2) Fahren Sie den Schlepper vom Fahrerstand aus auf len und arretieren Sie die Räder mit Keilen.
- Page 148 INFORMATIONEN ZUR WARTUNG Empfehlungen für die Wartung Die Wartungseingriffe müssen auf ebenem und kom- sungshandbuch beschrieben werden, können im Un- paktem Untergrund mit abgeschaltetem Schlepper, ternehmen durchgeführt werden. angezogener Feststellbremse und abgezogenem Für außerordentliche Eingriffe (die im vorliegenden Zündschlüssel ausgeführt werden; dabei müssen Handbuch nicht behandelt werden) ist eine Werk- sämtliche Maßnahme angewendet werden, die zur statt erforderlich, die den Bestimmungen der gel-...
- Page 149 INFORMATIONEN ZUR WARTUNG Kontrolle der Reifen Überprüfen Sie den Abnutzungszustand der Reifen; falls nenfalls wieder her (siehen “Technische Eigenschaften”). sie Risse oder Anzeichen von Alterung aufweisen, müs- Die Kontrolle des Reifendrucks muss mit auf dem Boden sen sie ersetzt werden. lastendem Gewicht der Arbeitsmaschine und ohne Ge- Kontrollieren Sie den Reifendruck stellen Sie ihn gegebe- wicht an Bord (Personen oder Sachen) vorgenommen...
- Page 150 INFORMATIONEN ZUR WARTUNG Plan der Schmierungspunkte Schmieren Sie die abgebildeten Organe unter Beach- aufgetragenen Schmiermittels zu vermeiden. tung der angegebenen Zeiten und Modalitäten. Verwenden Sie wasserabstoßendes Universalfett mit Nehmen Sie vor dem Schmieren eine sorgfältige Reini- einem Tropfpunkt von 180° für Landwirtschafts- und In- gung der betroffenen Komponenten und der Schmie- dustriemaschinen.
- Page 151 INFORMATIONEN ZU DEN ERSETZUNGEN Sicherheitsempfehlungen für die Ersetzungen Bei der Ersetzung von abgenutzten oder beschä- Handbuch nicht behandelt werden) ist eine Werk- digten Komponenten dürfen ausschließlich Origi- statt erforderlich, die den Bestimmungen der gel- nalersatzteile verwendet werden. tenden Gesetzgebung entspricht (angemessene Für außerordentliche Eingriffe (die im vorliegenden Ausrüstung, geeignetes Personal usw.);...
- Page 152 INFORMATIONEN ZU DEN ERSETZUNGEN Ersetzung der Kette der Umpflanzeinheit UN41-0191MG Gehen Sie wie beschrieben vor. Lösen Sie die Schrauben (A) und entfernen Sie die Montieren Sie die neue Kette auf den Ritzeln und Schutzverkleidung (B). auf den Kettenspannern (F). Lösen Sie die Schrauben (G), die Muttern (C) und Montieren Sie das Verbindungsglied (E).
- Page 153 INFORMATIONEN ZU DEN ERSETZUNGEN Ersetzung der Pflugschar UN41 0194MG Gehen Sie wie beschrieben vor. 1) Entfernen Sie den Elastikring (A). Sie sie nach unten. 2) Lösen Sie die Flügelmutter (B). 5) Stützen Sie die Pflugschar ab und entfernen Sie die 3) Heben Sie die Blockiervorrichtung (D) an und halten Schraube (C) sowie die Unterlegscheibe (E).
- Page 155 Dimensiones de la planta ..........................7 Distancia interplanta ............................7 Documentación suministrada adjunta ......................1 Elementos principales BABY TRIUM ......................3 Elementos principales BABY TRIUM DT (doble bastidor) ..............4 Elevación BABY TRIUM ..........................14 Elevación BABY TRIUM DT ........................... 15 Embalaje ................................13 Esquema puntos de lubricación ....................... 32 Exclusión de responsabilidad ........................2...
- Page 156 Modalidades a respetar para solicitar asistencia ...................1 Modalidades de ejecución del trasplante ..................... 27 Objeto del manual ............................1 Posicionamiento del asiento ........................26 Protecciones ................................8 Recomendaciones a observar para un uso seguro ................24 Recomendaciones de seguridad para efectuar las regulaciones ..........18 Recomendaciones de seguridad para efectuar las sustituciones ..........
- Page 157 INFORMACIONES GENERALES Objeto del manual El manual ha sido realizado por el fabricante para pro- porcionar las informaciones necesarias y los criterios a Peligro - Atención seguir a todas las personas que deben interactuar con Indica situaciones de grave peligro que, de no ser la trasplantadora, que a continuación en el manual tam- consideradas, pueden comportar riesgo serio para la bién será...
- Page 158 INFORMACIONES GENERALES Exclusión de responsabilidad La máquina se entrega en las condiciones válidas exis- - la falta de mantenimiento tentes en el momento de la compra que aparezcan es- - la inobservancia total o parcial de las instrucciones de pecificadas en el contrato de venta. uso y mantenimiento - el uso de recambios no originales o que no sean espe- - Cualquier modificación no autorizada por el fabrican-...
- Page 159 Los órganos móviles (distribuidor, expulsor, etc.) son ac- una interhilera muy pequeña. cionados por las ruedas motrices de la máquina opera- Elementos principales BABY TRIUM En la ilustración aparece la máquina operadora con dos unidades de trasplante. UN41 0160LG A) Estructura para el acoplamiento a la conexión de tres...
- Page 160 INFORMACIONES TECNICAS Elementos principales BABY TRIUM DT (doble bastidor) La ilustración presenta la máquina operadora con tres unidades de trasplante. UN41 0161LG A) Estructura para el acoplamiento a la conexión por Las ruedas pueden ser dos motrices y dos locas, tres mo- tres puntos del tractor (doble bastidor) trices y una loca, o bien cuatro ruedas motrices.
- Page 161 2500 BABY TRIUM/1 BABY TRIUM/2 BABY TRIUM/3 1500 3000 3500 BABY TRIUM/4 BABY TRIUM/5 1500 4000 BABY TRIUM/6 UN41 0162LG Características técnicas (BABY TRIUM) Características técnicas BABY TRIUM BABY BABY BABY BABY BABY BABY TRIUM/1 TRIUM/2 TRIUM/3 TRIUM/4 TRIUM/5 TRIUM/6 Potencia de tracción...
- Page 162 2900 2900 BABY TRIUM-DT/2 BABY TRIUM-DT/3 BABY TRIUM-DT/4 2900 2900 BABY TRIUM-DT/5 BABY TRIUM-DT/6 UN41 0163LG Características técnicas (BABY TRIUM DT) Características técnicas BABY TRIUM DT BABY TRIUM BABY TRIUM BABY TRIUM BABY TRIUM BABY TRIUM DT/2 DT/3 DT/4 DT/5 DT/6 Potencia de tracción requerida...
- Page 163 UNI EN ISO 12100-1, UNI EN ISO 12100-2 e UNI nas trasplantadoras: EN 13857 relativas a la seguridad de la maquinaria. BABY TRIUM/1, BABY TRIUM/2, BABY TRIUM/3, BABY TRIUM/4, BABY TRIUM/5, BABY TRIUM/6, BABY Budrio TRIUM-DT/2, BABY TRIUM-DT/3, BABY TRIUM-DT/4, BABY TRIUM-DT/5, BABY TRIUM-DT/6 CHECCHI &...
- Page 164 INFORMACIONES TECNICAS Protecciones En la ilustración aparecen los cárteres de protección (A - Peligro - Atención B - C - D - E) instalados en cada rueda y en cada unidad No usar la máquina sin sus cárteres de protección. operadora.
- Page 165 P) Placa distancia interplanta (opción 10 - 50): indica, dora en los puntos previstos para elevarla. en función de la distancia interplanta, el tipo de piño- nes a montar. BABY TRIUM BABY TRIUM DT UN41 0165LG Lengua español Uso y mantenimiento...
- Page 166 Repisa adicional portabandejas con 6 repisas Kit reja estrecha TEXDRIVE BEST Kit reja estándar TRIUM Kit reja media TRIUM Alargador distribuidor BABY TRIUM Dispositivo de colocación manguera de irrigación Skid (corredera apisonadora en combinación con las ruedas apisonadoras para terrenos blandos y áridos) Bastidor extraíble hidráulicamente (3 hileras;...
- Page 167 INFORMACIONES TECNICAS Ruido El uso de las plantadoras no comporta un aumento sig- Consultar el manual del fabricante del tractor para esta- nificativo del nivel de presión sonora del tractor al que se blecer cuáles son los dispositivos de protección indivi- conecta la plantadora.
- Page 168 INFORMACIONES SOBRE SEGURIDAD Léase atentamente este manual antes de ejecutar las En caso de avería, no ejecutar intervenciones de re- operaciones de uso o mantenimiento y otras inter- paración en el lugar mismo si no existe seguridad de venciones en la máquina operadora. operar en ambiente idóneo y no se dispone de las herramientas adecuadas;...
- Page 169 Embalaje Los modelos BABY TRIUM-DT/5 y BABY TRIUM-DT/6, si El tipo de embalaje se elige en función del medio de no se introducen en embalaje, se envían separados en transporte previsto y del lugar de destino.
- Page 170 Los puntos de toma para la elevación valen para todos los modelos de BABY TRIUM. Las operaciones de elevación deben ser efectuadas con medios adecuados para la carga a elevar y por personal UN41 0138MF Proceder de la manera indicada.
- Page 171 Los modelos BABY TRIUM-DT/5 y BABY TRIUM-DT/6 deben ser elevados siempre separadamente para evitar Las operaciones de elevación deben ser efectuadas con que se dañe el bastidor y causar posibles accidentes a las medios adecuados para la carga a elevar y por personal personas que participan en las operaciones.
- Page 172 BABY TRIUM-DT/5 BABY TRIUM-DT/6 UN41 0170LG La ilustración presenta sumariamente el esquema de montaje de la máquina operadora.
- Page 173 INFORMACIONES SOBRE DESPLAZAMIENTO E INSTALACION La ilustración presenta sumariamente el esquema de montaje de la máquina operadora. BABY TRIUM-DT/2 BABY TRIUM-DT/3 BABY TRIUM-DT/4 BABY TRIUM-DT/5 BABY TRIUM-DT/6 UN41 0172LG Lengua español Uso y mantenimiento...
- Page 174 INFORMACIONES SOBRE LAS REGULACIONES Recomendaciones de seguridad para efectuar las regulaciones Las intervenciones de regulación deben efectuarse do, la llave de encendido extraída y adoptando todas sobre terreno plano y compacto, con el motor del las medidas necesarias para garantizar la seguridad. tractor apagado, el freno de estacionamiento aplica- Regulación de distancia de las ruedas apisonadoras respecto de la reja Las ruedas apisonadoras (B) sirven para reforzar y com-...
- Page 175 INFORMACIONES SOBRE LAS REGULACIONES Regulación de la lámina corrediza (Plant Control) La lámina corrediza (Plant Control) detiene las plantas en posición vertical, a la espera de la expulsión. Regular la hoja abajo para plantas pequeñas y arriba para plantas de mayor tamaño. Proceder de la manera indicada.
- Page 176 INFORMACIONES SOBRE LAS REGULACIONES Regulación raspador de la ruedecilla Proceder de la manera indicada. 1) Aflojar los tornillos (A). 2) Poner el raspador (B) ligeramente en contacto con la rueda apisonadora. 3) Apretar los tornillos (A). UN41 0179MG Regulación interhilera Peligro - Atención Regular la distancia de las unidades de trasplante para establecer la distancia entre las filas (distancias incluidas...
- Page 177 INFORMACIONES SOBRE LAS REGULACIONES Regulación interplanta La distancia entre las plantas es determinada por el nú- Para el montaje de los piñones véase el apartado “Susti- mero de dientes de los piñones que están instalados. tución del piñón ruedas motrices” de pág. 33. Es posible instalar diferentes series de piñones a fin de Las tablas indican las posibles distancias entre las plan- obtener la distancia interplanta requerida en cada caso.
- Page 178 INFORMACIONES SOBRE LAS REGULACIONES Regulación de sincronización entre distribuidor y expulsor Al caer la planta sobre la reja (C), el expulsor (B) debe en- Si las condiciones permiten trasplantar a alta velocidad contrarse atrás para comenzar a continuación a aplicar el o a baja velocidad, regulando el distribuidor es posible empuje de expulsión.
- Page 179 INFORMACIONES SOBRE LAS REGULACIONES Regulación de carga de la unidad de trasplante Normalmente la unidad de regulación es montada en La unidad en posición (B) permite reducir el peso sobre posición (A). las ruedas apisonadoras. La unidad en posición (A) permite aumentar el peso so- bre las ruedas apisonadoras.
- Page 180 INFORMACIONES SOBRE EL USO Recomendaciones a observar para un uso seguro Permitir el uso de la máquina sólo a personal auto- No superar las inclinaciones del terreno máximas rizado, en buen estado de salud, adecuadamente permitidas para el tractor con apero aplicado (véase capacitado y poseedor de la respectiva licencia de el manual de uso del tractor).
- Page 181 INFORMACIONES SOBRE EL USO Conexión y desconexión de la máquina operadora al tractor Peligro - Atención El acoplamiento de la máquina operadora al tractor es una de las operaciones de mayor riesgo, ya que puede requerir la intervención simultánea de varias personas - con maniobras sincronizadas entre el conductor del tractor y los operadores en terreno - cuya eventual errónea descoordinación puede provocar accidentes.
- Page 182 INFORMACIONES SOBRE EL USO Posicionamiento del asiento Una posición incorrecta de trabajo provoca cansancio excesivo al operador, el que podría ejecutar operaciones incorrectas, por lo que es importante regular y fijar el asiento en la posición de máximo confort antes de co- menzar el trabajo.
- Page 183 INFORMACIONES SOBRE EL USO Modalidades de ejecución del trasplante La colocación de las plantas debe efectuarse sobre te- No operar sobre terrenos demasiado blandos, demasia- rrenos previamente desmenuzados con grada o azada y do compactos ni demasiado mojados ya que sobre ellos ligeramente compactados en su superficie.
- Page 184 Véanse los puntos de atadura y las modalidades de ele- fijarlas de modo estable a la plataforma mediante los vación en los apartados “Elevación BABY TRIUM” de pág. dispositivos de enganche (pernos, tornillos, cadenas, 14 o “Elevación BABY TRIUM DT” en pág. 15.
- Page 185 INFORMACIONES SOBRE EL USO Proceder de la manera indicada. 4) Apagar el motor y conectar el freno de aparcamien- 1) Activar el tractor y elevar la máquina operadora hasta 5) Anclar el conjunto máquina operadora-tractor al me- la altura máxima permitida. dio de transporte con cables y bloquear las ruedas 2) Subir al medio de transporte desde el puesto de con- con cuñas.
- Page 186 INFORMACIONES SOBRE EL MANTENIMIENTO Recomendaciones relativas al mantenimiento Las intervenciones de mantenimiento deben efec- aquellas del mantenimiento ordinario indicadas en tuarse sobre terreno plano y compacto, con el motor el manual de instrucciones. del tractor apagado, el freno de estacionamiento Para efectuar intervenciones extraordinarias (no aplicado, la llave de encendido extraída y adoptando señaladas en este manual), se debe disponer de un...
- Page 187 INFORMACIONES SOBRE EL MANTENIMIENTO Control de los neumáticos Controlar el nivel de desgaste de los neumáticos, los que neumáticos (ver “Características técnicas”). El control de deberán ser sustituidos en caso de presentar desgarros la presión debe efectuarse con el peso de la máquina o signos de envejecimiento.
- Page 188 INFORMACIONES SOBRE EL MANTENIMIENTO Esquema puntos de lubricación Lubricar los órganos ilustrados según frecuencias y con Usar grasa universal para vehículos y maquinarias agrí- modalidades indicadas. colas e industriales, hidrorrepelente y con punto de go- Antes de lubricar, limpiar cuidadosamente los compo- teo a 180°.
- Page 189 INFORMACIONES SOBRE LAS SUSTITUCIONES Recomendaciones de seguridad para efectuar las sustituciones La sustitución de componentes desgastados o daña- taller interno de la empresa con características con- dos debe efectuarse utilizando recambios originales. formes según las normas vigentes (equipos adecua- Para efectuar intervenciones extraordinarias (no dos, personal idóneo, etc.);...
- Page 190 INFORMACIONES SOBRE LAS SUSTITUCIONES Sustitución cadena unidad de trasplante UN41-0191MG Proceder de la manera indicada. 1) Desenroscar los tornillos (A) y desmontar el cárter 5) Retirar la cadena desde los piñones. (B). 6) Montar la cadena nueva en los piñones y en el tensor 2) Desenroscar los tornillos (G), las tuercas (C) y des- de cadena (F).
- Page 191 INFORMACIONES SOBRE LAS SUSTITUCIONES Sustitución de la reja UN41 0194MG Proceder de la manera indicada. 1) Desmontar el anillo elástico (A). 5) Sujetar la reja y quitar el tornillo (C) y la arandela (E). 2) Desenroscar la tuerca con aletas (B). Para efectuar el montaje deberán ejecutarse en orden 3) Alzar y mantener alzado el dispositivo de bloqueo y sentido inverso las precedentes operaciones de des-...
- Page 194 VIA GUIZZARDI, 38 40054 BUDRIO (BO) - ITALY TEL. (051) 80.02.53 - FAX (051) 69.20.611 www.checchiemagli.com info@checchiemagli.com...
Need help?
Do you have a question about the BABY TRIUM and is the answer not in the manual?
Questions and answers