Table of Contents
Advertisement
Advertisement
Table of Contents

Related Manuals for Checchi & Magli TEXDRIVE


Summary of Contents for Checchi & Magli TEXDRIVE
- Page 1 Checchi & Magli Owner's manual TRANSPLANTER TEXDRIVE TEXDRIVE-DT...
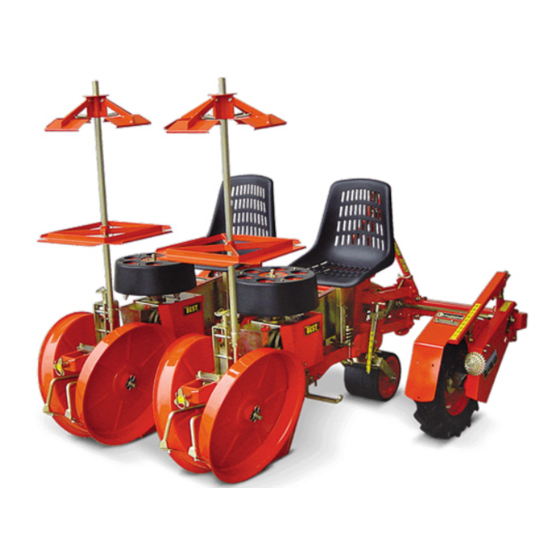
- Page 2 TEXDRIVE TEXDRIVE - DT 1 = Targhetta di identificazione 2 = Telaio 3 = Ruota di trasmissione 4 = Distributore 5 = Sedile 6 = Portavassoi 7 = Ruote di rincalzatura 8 = Telaio posteriore 1 = Plaque d’identification 2 = Châssis...
-
Page 3: Table Of Contents
TEXDRIVE TEXDRIVE - DT TABLE OF CONTENTS DECLARATION OF CONFORMITY ..........pag. GUARANTEE ................pag. PRELIMINARY NOTE ..............pag. TECHNICAL DATA ..............pag. WARNING AND DANGER SIGNS ..........pag. LIFTING ..................pag. TRANSPORT ................pag. REGULATIONS FOR SAFE USE AND THE PREVENTION OF ACCIDENTS........pag. -
Page 4: Declaration Of Conformity
TEXDRIVE/1 - 2 - 3 - 4 - 5 TEXDRIVE-DT/2 - 3 - 4 - 5 - 6 - 7 conform with the Essential Requirements for Safety and the Protection of Health set out in EEC Directive 89/392 and subsequent amendments. EN 292-1, EN 292-2 and EN 294 relating to safety of machinery were specifically followed. -
Page 5: Technical Data
TEXDRIVE TEXDRIVE - DT 4.0 - TECHNICAL DATA TEXDRIVE 1170 TEXDRIVE - DT FIG. 1 5.0 - WARNING AND DANGER SIGNS GREASE FIG. 2 Warning signs: 1 - Before starting work, read the instruction booklet carefully. 2 - Before carrying out any maintenance work, stop the machine and consult the use and maintenance manual. -
Page 6: Lifting
TEXDRIVE TEXDRIVE - DT 6.0 - LIFTING 6.1 - Check that the lifting gear, hooks, ropes, chains, etc., are of sufficient capacity for the task (see weight indicated on machine data plate and in the weights and measures table). 6.2 - Fix hooks, ropes, chains, etc., in the three positions shown in fig. 3. - Page 7 TEXDRIVE TEXDRIVE - DT 8.4 - Couple the machine only to a tractor of adequate power (see technical bulletin referring to the model in use), and with a lift unit which complies with standards specifically for tractors. Adhere to the maximum stipulated weight on the axle, and the total mobile weight.
-
Page 8: Coupling To The Tractor
TEXDRIVE TEXDRIVE - DT 9.0 - COUPLING TO THE TRACTOR 9.1 - The machine must be coupled to the tractor on flat ground. 9.2 - Check that the three-point linkages are of a compatible category. 9.3 - Bring the tractor up to the machine, taking care not to get between the two at this stage, and proceed with coupling only when the tractor is stationary. -
Page 9: Usable Plants
TEXDRIVE TEXDRIVE - DT 11.0 - USABLE PLANTS This transplanter has been produced for transplanting seedlings of vegetables, flowers, tobacco, nursery plants etc., with conical or pyramidal peat rootball; for best results observe the dimensions shown in fig. 7. It is advisable to use seedlings with a very moist rootball so as to accelerate drop times from the distributor and facilitate the plant in taking root. -
Page 10: Functions Of The Operator
TEXDRIVE TEXDRIVE - DT 15.0 - FUNCTIONS OF THE OPERATOR Pick up the plants from the trays and place them in the distributor (fig. 9.A). Do not place plants with only a partial or no rootball in the distributor, as these will fall through. -
Page 11: Phasing The Expeller
TEXDRIVE TEXDRIVE - DT 18.0 - PHASING THE EXPELLER When the plant descending from the drop tube reaches the ploughshare (fig. 9.C.), the expeller (fig. 9.B) must be in the retracted position, and must only then begin its outward pushing stroke. If, for any reason, high or low speed transplanting is permitted, the correct expulsion phasing can be maintained by adjusting the rapid phasing device (fig. -
Page 12: Distributor Half-Cup Opening
TEXDRIVE TEXDRIVE - DT 21.0 - DISTRIBUTOR HALF-CUP OPENING According to the type of plant and speed of rotation, the plants descending from the distributor (fig. 14) may hit the mouth of the dropping tube (fig. 14.A) sideways on, resulting in a drop which is not straight. -
Page 13: Drive Wheels
TEXDRIVE TEXDRIVE - DT 22.1 - INTER-ROW SPACING The diagrams (fig. 18 and fig. 19 at point 26.2) show respectively the distances which can be obtained with the standard or optional gear ratios (see point 26.2). To change the standard gears and obtain the distances indicated, observe the safety regulations, and proceed as follows: -Tighten the wheel depth adjustment device (fig. -
Page 14: Ridging Intensity
TEXDRIVE TEXDRIVE - DT 24.0 - RIDGING INTENSITY To increase the ridging intensity of the ground near the plant, proceed as follows: 24.1 - Lengthen the adjustable arm of the tractor’s third point (fig. 21.C) 24.2 - Tighten the adjustment device (fig. 21.A) to give more pressure to the spring (fig. -
Page 15: Accessories
TEXDRIVE TEXDRIVE - DT 26.0 - ACCESSORIES 26.1 - ROW MARKERS: fit as shown in (fig. 23) and adjust the point of the marker to the desired distance (fig. 23.A). Positioning on the ground and lifting are manual. Carry out these operations with the machine stationary and make certain that there is nobody in the area in question. - Page 16 TEXDRIVE TEXDRIVE - DT 26.3 - EXTRA SEAT Meets the possible need for two operators for each transplanting unit; only for row inter-spacing of more than 100 cm. Fit as shown in fig. 25. 26.4 - EXTRA ROTATING TRAY HOLDER KIT Using this kit, it is possible to have two rotating tray holders for each transplanting unit;...
-
Page 17: Maintenance
TEXDRIVE TEXDRIVE - DT 27.0 - MAINTENANCE The maintenance intervals listed below are guidelines for conditions of normal use. In the case of more demanding working conditions due to environment or seasonal factors, the frequency of maintenance operations must be increased accordingly. -
Page 18: Disposal
TEXDRIVE TEXDRIVE - DT 29.0 - DISPOSAL The machine consists of ferrous metals and rubber tyres. At the end of its working life it must be scrapped at an authorized waste disposal centre. 30.0 - SPARE PARTS Orders for spare parts must preferably be sent via an authorized dealer and accompanied by the following information: 30.1 - type, model and serial number shown on the affixed data plate (fig.
Need help?
Do you have a question about the TEXDRIVE and is the answer not in the manual?
Questions and answers