Advertisement
- 1 LOCATION OF CONTROLS
- 2 SPEAKER CONNECTION
- 3 POWER SUPPLY
- 4 SETTING TIME AND DATE
- 5 SETTING THE ALARM AND THE ALARM MODE
- 6 AUDIO CONTROLS
- 7 DISC OPERATION
- 8 BASIC OPERATION
- 9 RADIO
- 10 PLAY MODES (CD/MP3 ONLY)
- 11 CONNECTING AUXILIARY SOURCE
- 12 USING HEADPHONES / EARPHONES
- 13 MAINTENANCE
- 14 SPECIFICATION
- 15 MORE INFORMATION
- 16 Documents / Resources
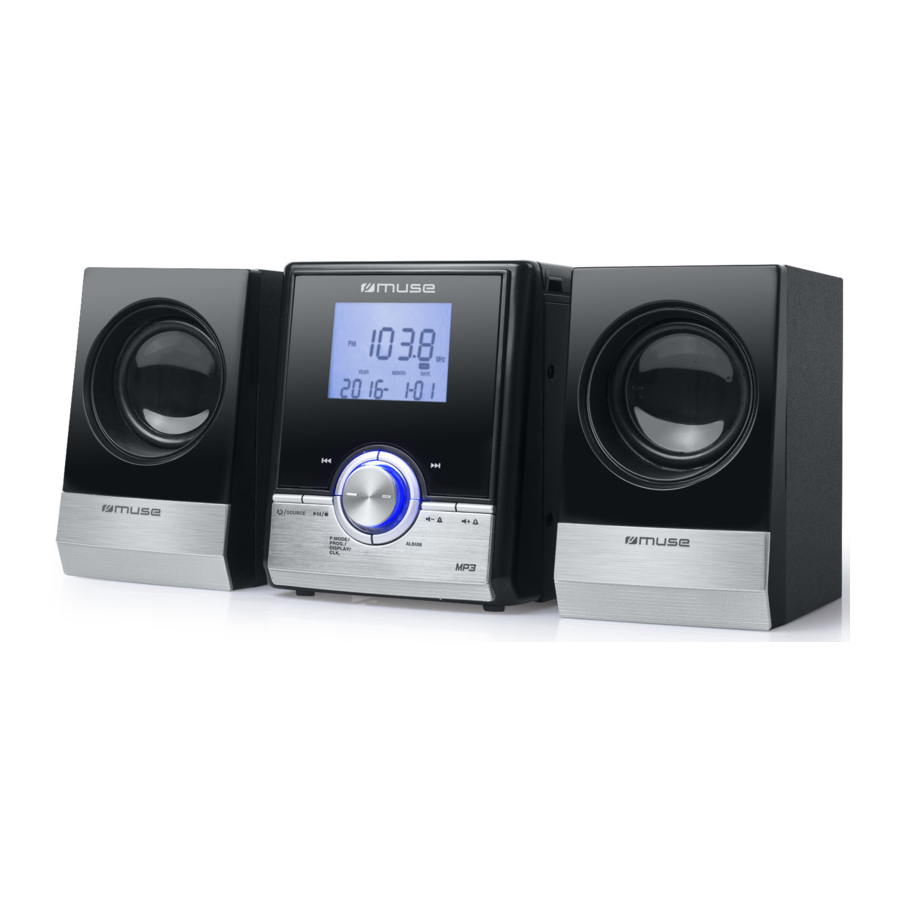
LOCATION OF CONTROLS

- LCD display
![]() / SOURCE button: To turn unit on/ off; To select function mode: FM, CD and AUX IN.
/ SOURCE button: To turn unit on/ off; To select function mode: FM, CD and AUX IN.![]() /
/ ![]() : Play/Pause; Stop playback
: Play/Pause; Stop playback- P.MODE / PROG. / DISPLAY / CLK. button: to adjust the playback mode; to program playback sequences; to display the clock time; to set the date and time
- Tuning Control
- ALBUM button: to select the desired folder; to adjust the sound effect
![]() : volume down; alarm 1
: volume down; alarm 1![]() : volume up; alarm 2
: volume up; alarm 2![]() ,
, ![]() buttons: Skip / search
buttons: Skip / search- Speaker box
- Right speaker jack
- FM antenna
- Left speaker jack
- Phones jack
- Aux in jack
- AC cord
- Speaker cord
- SNOOZE button
- Disc compartment
 / SOURCE button: To turn unit on/ off; To select function mode: FM, CD and AUX IN.
 /
/  : Play/Pause; Stop playback
 : volume down; alarm 1
 : volume up; alarm 2
 ,
,  buttons: Skip / search
SPEAKER CONNECTION
Plug the RIGHT / LEFT speakers' cord into the speaker input sockets at the rear of the unit.

POWER SUPPLY
This set operates on AC 230V ~ 50Hz.
Connect the power cord to a convenient AC wall outlet.
SETTING TIME AND DATE
- In standby mode, press and hold CLK to enter into date and time setting mode. The year digits flash.
- Press
![]() /
/ ![]() to set the year value. Press CLK to confirm and month digits flash.
to set the year value. Press CLK to confirm and month digits flash. - Repeat step 2 to consecutively perform the settings for month, date, time format (24 or 12 hour display), hours or minutes.
- The correct time is shown on display when finish date and time setting.
NOTE:
- In 12H clock format, be sure to observe the AM or PM indicator to set the hour correctly. If the PM indicator is on, the hour display is PM.
- The week will be set automatically.
SETTING THE ALARM AND THE ALARM MODE
- In standby mode, press and hold
![]() for a few seconds, the display blinks.
for a few seconds, the display blinks. - Press
![]() and / or
and / or ![]() to set the time of wake up.
to set the time of wake up. - Press
![]() then press
then press ![]() or
or ![]() to select the source of wake up FM, MP3 (disc) or Buzzer.
to select the source of wake up FM, MP3 (disc) or Buzzer. - Press
![]() to confirm, the alarm 1 indicator lights up.
to confirm, the alarm 1 indicator lights up.
 for a few seconds, the display blinks.
Note:
- Same procedure applies for alarm 2 with
![]() button.
button. - If you wake up with the radio, select your desired station, then long press
![]() button to turn off the radio before the alarm time reaches. For the station selecting, please refer to "RADIO".
button to turn off the radio before the alarm time reaches. For the station selecting, please refer to "RADIO". - The previous level of listening is stored; the volume of the alarm will be identical. If you wake up with the radio, do not forget to check the volume level.
- Make sure you have placed a CD disc in the CD compartment when you select the wake up source by CD. If the selected wake up source does not exist, the unit will wake up by buzzer when the alarm time reaches.
 button.
 button to turn off the radio before the alarm time reaches. For the station selecting, please refer to "RADIO".
Stopping the Alarm
- Alarm repetition
Press SNOOZE. The alarm stops and will sound again 9 minutes later. - Alarm stop
Press![]() . The alarm1 will sound again the next day at the same time.
. The alarm1 will sound again the next day at the same time. - Alarm Cancellation
In standby mode, press![]() to cancel the alarm1 permanently. The alarm1 indicator lights off.
to cancel the alarm1 permanently. The alarm1 indicator lights off.
Note: Same procedure applies for Alarm2 with![]() button.
button.
 button.
AUDIO CONTROLS
- Press
![]() button to turn on the unit.
button to turn on the unit. - Long press
![]() button on unit to turn off the unit.
button on unit to turn off the unit. - The function (FM / CD / AUX IN) is selected by pressing SOURCE button repeatedly.
 button to turn on the unit.
VOLUME
Press  /
/  button on unit to comfortable level. The volume level will be displayed for a few seconds.
EQ
Press and hold ALBUM button repeatedly to toggle among the different sound effects F (FLAT), C (CLASSIC), R (ROCK), P (POP) and J (JAZZ). The selection will show on display for few seconds.
DISC OPERATION
- Press
![]() button to turn on the unit.
button to turn on the unit. - Press SOURCE button to select CD function.
- Lift up the CD door.
- Place the CD with label side up inside the CD compartment and Close the CD compartment.
- Playback starts automatically.
 button to turn on the unit.
BASIC OPERATION
PLAY/PAUSE
To temporarily stop playing, press  button. To resume play, press this button again.
STOP
Long press  button on unit to cease to play.(Total number of tracks will show on display).
Select a track
- Press
![]() to skip forward to the next track or repeatedly to skip several tracks.
to skip forward to the next track or repeatedly to skip several tracks. - Press
![]() return to the beginning of the track, or press repeatedly to skip backwards several tracks.
return to the beginning of the track, or press repeatedly to skip backwards several tracks.
 to skip forward to the next track or repeatedly to skip several tracks.
 return to the beginning of the track, or press repeatedly to skip backwards several tracks.
Fast search backward/forward
Press and hold the  /
/  button. The disc will search at high speed in the forward or backward direction. Normal play will continue when you release the button.
Select a folder (mp3 only)
Press ALBUM to select the first track of next folder of your current disc.
Note: The MP3 icon lights up during playback for mp3 files.
RADIO
Listening to the radio
- Press
![]() button to turn on the unit.
button to turn on the unit. - Press SOURCE button to select FM Radio mode. "FM" appears on display.
- Tune to a desired station with tuning knob.
- Adjust the volume by
![]() or
or ![]() to the desired level.
to the desired level.
 button to turn on the unit.
 or
or  to the desired level.
Note:
- For a better reception in FM, extend the antenna.
- If a stereo broadcast is received, " STEREO " is displayed.
PLAY MODES (CD/MP3 ONLY)
Press the P. MODE button repeatedly to select different kinds of play mode with the following sequence.
For Audio CDs: Repeat one  Repeat All Random Normal
For MP3 Files: Repeat one Repeat Album Repeat All Random Normal
Repeat one – To repeat the track currently playing, the repeat indicator "  " will display.
Repeat All – To repeat all tracks, the repeat indicator " " and "ALL" will light up and stay lit.
Repeat Album – To repeat all tracks in the entire album/folder, the repeat indicator " "and "ALBUM" will light up and stay lit.
Random – all the tracks will be played in random, the "RAND" indicator will light up.
Normal – play the tracks in sequence, repeat indicator and "RAND" indicator will turn off.
Program playback (only CD / MP3 mode)
- In stop mode, press PROG. button. The display will show "P 01".
- Press ALBUM button to select desired folder and press
![]() /
/ ![]() to select a desired track.
to select a desired track. - Press PROG. button to confirm.
- Repeat above steps to program up to 20 tracks for CD and 99 tracks for MP3.
- Press
![]() to start program playback.
to start program playback. - Press and hold
![]() button once on unit to stop the program playback.
button once on unit to stop the program playback. - To cancel program playback, press and hold
![]() button twice on unit. "PROG" indicator will turn off.
button twice on unit. "PROG" indicator will turn off.
 to start program playback.
 button once on unit to stop the program playback.
 button twice on unit. "PROG" indicator will turn off.
CONNECTING AUXILIARY SOURCE
- Connect your auxiliary source (e.g. mp3 player) to the Aux in jack. (Cable not included).
- Press SOURCE repeatedly to select Aux in mode. The display will show "AU".
- Start playback from your auxiliary source.
- Adjust the volume to desired level.
- To stop playback, disconnect your auxiliary source from the Aux in jack.
USING HEADPHONES / EARPHONES
Maximum output voltage ≤150mV.
Wide Band Characteristic Voltage ≥ 75mV
HEADPHONE VOLUME WARNING
Connect earphones with the volume set low and increase it if required. Prolonged listening through some earphones at high volume settings can result in hearing damage. When headphones / earphones are connected, no sound will be emitted from the unit's speaker. Caution: Avoid listening to sound at levels which may be harmful to your ears.
To prevent possible hearing damage, do not listen at high volume levels for long periods.

MAINTENANCE
Cleaning

Disconnect the unit from the mains supply before cleaning.
- Use a soft, dry, clean cloth. Regularly dust the vents at the back or sides.
- Using solvents, abrasive or alcohol-based products risks damaging the appliance.
- If an object or liquid enters inside the appliance, unplug it immediately and have it checked by an authorized engineer.
Notes on disc
- Do not use irregular shape CDs (example: heart-shaped, octagonal ones). It may result in malfunctions.
- Do not place more than one disc in the disc compartment.
- Do not try to open the disc compartment during playing.
- Do not touch the lens. Doing so may cause malfunction.
- If there is a scratch, dirt or fingerprints on the disc, it may cause tracking error. Before playing, clean the disc with a cleaning cloth. Wipe the disc from the center out. Don't store discs in places with high temperatures or high humidity, they can become warped. After playing, store the disc in its case.
- CD-Rs or CD-RWs playback capability at this player may vary depending on quality of media, CD-Burner, speed of burning and application software.

- Before transporting the unit, remove the disc from the disc compartment.
SPECIFICATION
Power supply: AC 230V ![]() 50Hz
50Hz
Power consumption: 10W
Speaker: 4 ohms
FM: 87.5-108MHz
MORE INFORMATION

RISK OF ELECTRIC SHOCK
DO NOT OPEN
To reduce the risk of electric shock, do not remove the cover (or back). There are no user serviceable parts inside the unit. Refer all servicing to qualify personnel.
 The lightening flash with arrowhead symbol within the triangle is a warning sign alerting the user of "dangerous voltage" inside the unit.
 The exclamation point within the triangle is a warning sign alerting the user of important instructions accompanying the product.
The caution mark is located on back of the device

TO PREVENT FIRE OR SHOCK HAZARD, DO NOT EXPOSE THIS APPLIANCE TO RAIN OR MOISTURE.

Invisible laser radiation when open and interlocks defeated. Avoid exposure to beam.
This compact disc player is classified as a CLASS 1 LASER product. The CLASS 1 LASER PRODUCT marking is located on the back cabinet.

- The use of apparatus in moderate climates.
- The Marking plate is located at the back of the device.
- Make sure to have a minimum distance of 5cm around the unit for sufficient ventilation.
- Ensure that the ventilation openings are not covered with items such as newspapers, tablecloths, curtains, etc.
- No naked flame sources, such as lighted candles, should be placed on the apparatus.
- Do not expose this appliance to dripping or splashing water.
- Do not place objects filled with liquids, such as glass, vases on the device.
- Do not throw batteries into fire! Respect the environment when disposing of used batteries.
- Batteries should not be exposed to excessive heat such as sunshine, fire or other similar heat source.
- The power plug is used as a disconnect device and must be easily accessible. To be completely disconnected from the power, the plug of the appliance should be disconnected completely. The socket must not be obstructed and should be easily accessible during intended use.
- Under the influence of fast transient and / or electrostatic electric phenomenon, the product may malfunction and the user must perform a power reset of the device

If in the future, you need to get rid of this product, please note that Waste electrical products should not be disposed of with household waste. Recycling facilities exist. Check with your municipality or ask your dealer for advice. (Directive for Waste Electrical and Electronic Equipment)
Note: Design and specification are subject to change without notice.
NEW ONE S.A.S
10, Rue de la Mission, 25480 Ecole Valentin, France


Documents / ResourcesDownload manual
Here you can download full pdf version of manual, it may contain additional safety instructions, warranty information, FCC rules, etc.
Advertisement


Need help?
Do you have a question about the M-35 CM and is the answer not in the manual?
Questions and answers