Advertisement
Available languages
Available languages
Quick Links
Advertisement
Chapters

Related Manuals for Checchi & Magli TRIUM 1


Summary of Contents for Checchi & Magli TRIUM 1
- Page 1 Checchi & Magli COSTRUZIONE MACCHINE AGRICOLE Manuale uso e manutenzione TRAPIANTATRICE Manuel d'instructions et d'entretien REPIQUEUSE Owner's manual TRANSPLANTER Bedienungs-anleitung PFLANZENSETZMASCHINE Manual de uso y manutencion TRASPLANTADORA TRIUM...
- Page 2 Checchi & Magli Manuale uso e manutenzione TRAPIANTATRICE Manuel d'instructions et d'entretien REPIQUEUSE Owner's manual TRANSPLANTER Bedienungs-anleitung PFLANZENSETZMASCHINE Manual de uso y manutencion TRASPLANTADORA TRIUM...
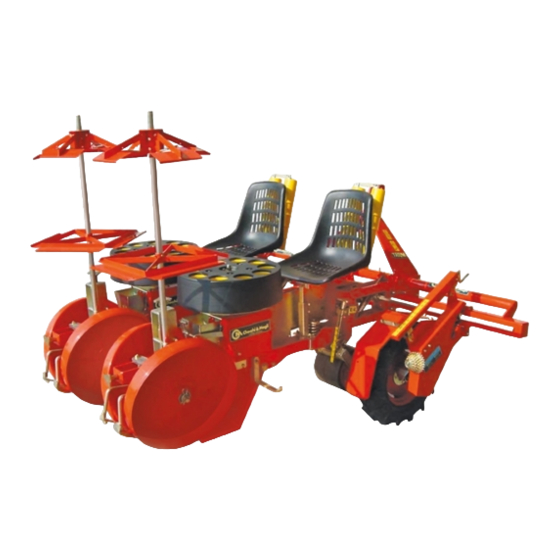
- Page 3 TRIUM 1 = Targhetta di identificazione 2 = Telaio 3 = Ruota di trasmissione 4 = Distributore 5 = Sedile 6 = Portavassoi 7 = Ruote di rincalzatura 8 = Parallelogramma 40054 BUDRIO BOLOGNA ITALIA TIPO ANNO DI FABBR. MATR.
-
Page 4: Table Of Contents
TRIUM INDICE 1.0 DICHIARAZIONE DI CONFORMITA’ ........... pag. 2.0 GARANZIA ................... pag. 3.0 PREMESSA ..................pag. 4.0 DATI TECNICI ..................pag. 5.0 SEGNALI DI AVVERTENZA E PERICOLO ......... pag. 6.0 SOLLEVAMENTO ................pag. 7.0 TRASPORTO ..................pag. 8.0 PRESCRIZIONI PER L’USO IN SICUREZZA E LA PREVENZIONE DEGLI INFORTUNI .......... -
Page 5: Dichiarazione Di Conformita
TRIUM 1.0 - DICHIARAZIONE DI CONFORMITA’ La Ditta CHECCHI & MAGLI s.r.l. Via Guizzardi n. 38 40054 - BUDRIO - BOLOGNA -ITALIA TEL. 051/800253 FAX. 051/6920611 dichiara sotto la propria responsabilità, che le macchine trapiantatrici in oggetto; TRIUM / 1 - 2 - 3 - 4 - 5 - 6 TRIUM DT/ 2 - 3 - 4 - 5 - 6 - 7 sono conformi ai Requisiti Essenziali di Sicurezza e di Tutela della Salute di cui alle direttiva CEE 89/392 , 98/37 EC e sue successive modificazioni. -
Page 6: Dati Tecnici
TRIUM 4.0 - DATI TECNICI FIG. 1 5.0 - SEGNALI DI AVVERTENZA E PERICOLO GREASE FIG. 2 Segnali avvertenza: 1 -Prima di iniziare ad operare leggere attentamente il libretto di istruzione. 2 -Prima di ogni operazione di manutenzione, arrestare la macchina e consultare il manuale uso e manutenzione. -
Page 7: Sollevamento
TRIUM 6.0 - SOLLEVAMENTO 6.1 - Verificare che il mezzo di sollevamento, ganci, funi, catene ecc.. abbiano la necessaria portata.(Vedi peso indicato sulla targhetta della macchina e in tabella pesi e misure). 6.2 - Fissare ganci, funi, catene, ecc.. nelle tre posizioni indicate dalla (fig.3) e con- trassegnate dal simbolo grafico "GANCIO". - Page 8 TRIUM 8.4 - Aggangiare la macchina solo ad un trattore di adeguata potenza (vedi scheda tecnica con riferimento al modello in uso), e con sollevatore conforme alle norme specifiche dei trattori. Rispettare il peso massimo previsto sull’asse, e il peso totale mobile. 8.5 - Durante le fasi di attacco e distacco della macchina, prestare massima atten- zione, al fine di evitare schiacciamenti.
-
Page 9: Aggancio Al Trattore
TRIUM 9.0 - AGGANCIO AL TRATTORE 9.1- L’applicazione della macchina al trattore deve avvenire in zona pianeggiante. 9.2- Verificare che gli attacchi a tre punti, siano di categoria compatibile. 9.3- Accostare il trattore alla macchina, evitando in questa fase di interporsi tra gli stessi, e procedere all’aggancio solo quando il trattore è... -
Page 10: Piante Utilizzabili
TRIUM 11.0- PIANTE UTILIZZABILI Questa trapiantatrice è stata realizzata per trapiantare piantine di orticole, floricole, tabacco, vivaio ecc.., radicate in zolletta di torba a forma conica, o piramidale , ed i migliori risultati si ottengono con le dimensioni indicate in (fig.7 ). Si consiglia di utilizzare piantine con zolla molto umida, per accelerare i tempi di caduta dal distri- butore, e per facilitarne l’attecchimento. -
Page 11: Funzioni Dell'operatore
TRIUM 15.0- FUNZIONI DELL’OPERATORE Prelevare le piante dai vassoi e depositarle nel distributore (fig. 9.A) Non depositare piante la cui zolla per motivi di estrazione o altro, risulti parziale o mancante, si creerebbe sicuramente una fallanza. Non inserire piante negli alveoli posteriori del distributore in quanto continuamente in fase di apertura e chiusura (vedi fig. -
Page 12: Fasatura Espulsore
TRIUM 18.0- FASATURA ESPULSORE Quando la pianta scendendo dal tubo di caduta arriva nel vomere (fig. 9.C) l’espulsore (fig. 9.B) deve essere in posizione arretrata, e solo allora iniziare la spinta verso l’esterno. Se per motivi contingenti è consentito trapiantare ad elevata velocità o per contro a bassa velocità, è... -
Page 13: Parallelogramma
TRIUM 21.0- PARALLELOGRAMMA Composto da: - DOPPIA ARTICOLAZIONE; favori- sce l'adattamento al terreno. - RUOTA FLEX; regolazione in altez- za a agendo sul volantino (fig. 14.H). É possibile variare il peso sulle ruo- te costipatrici intervenendo sulla molla reversibile (fig. 14.F) con il volantino (fig. -
Page 14: Raschiaruote
TRIUM 25.0- RASCHIARUOTE É possibile regolare l'altezza da terra agendo sulle viti (fig. 18.A) e ruotando il supporto (fig. 18.B). É possibile regolare la distanza dalle ruote agendo sulle viti (fig. 18.C). 26.0- DISTANZA DI TRAPIANTO INTERFILA: minimo cm 50 per versio- ne unico telaio (fig. -
Page 15: Ruote Di Trasmissione
TRIUM 26.1 - INTERPIANTA Gli schemi (fig.22) e (fig.26 punto 29.2) riportano rispettivamente le distanze ottenibili con i rapporti in dotazione, od optional (vedi punto 29.2). Per sostituire gli ingranaggi in dotazione e ottenere le distanze indicate, oltre a ri- spettare le prescrizioni di sicurezza, procedere come segue: -Avvitare il registro profondità... -
Page 16: Carreggiata Trattore
TRIUM 28.0- CARREGGIATA TRATTORE Le impronte che lasciano sul terreno le ruote del trattore, oltre che compattare, creano solitamente un abbassamento di tale superficie. Mantenere una distanza di trapianto dall’impronta non inferiore a cm. 10-12 (fig. 24) agendo sulla distanza interfila o sulla larghezza carreggiata trattore. - Page 17 TRIUM 29.2- KIT OPTIONAL DISTANZE INTERPIANTE Per ottenere le distanze interpiante indicate, applicare gli ingranaggi come da tabel- la (fig. 26) A = ingranaggio da applicare ad asse esagonale B = ingranaggio da applicare a ruota motrice C = ingranaggio da applicare all’unità di trapianto Eseguire tale intervento come descritto al punto 26.1 e sostituire l’ingranaggio (fig.
-
Page 18: Manutenzione
TRIUM 29.4- KIT PORTAVASSOI SUPPLEMENTARE Consente di avere due portavassoi girevoli ogni unità di trapianto, solo per interfila oltre cm.120. Applicare come (fig. 29) e prestare attenzione al maggiore ingombro laterale. 29.5- PROLUNGA DISTRIBUTORE (fig. 30.A) Consigliato per il trapianto di piante con apparato fogliare molto alto (cm. 13-20 circa). -
Page 19: Soste Stagionali
TRIUM 30.1- OGNI ORA LAVORATIVA Con l’apposito utensile in dotazione (fig. 31.G), togliere eventuali residui di terra o torba accumulatasi all’interno del distributore (fig. 31.A) e all’interno o esterno del vomere (fig.31.B). La mancata asportazione di terra o torba dall’interno del vomere, limita l’escursione dell’espulsore ed oltre a pregiudicare il buon funzionamento, causa danni meccanici gravi. -
Page 20: Smaltimento
TRIUM 32.0- SMALTIMENTO La macchina è composta da materiale ferroso e ruote gommate. Alla fine del ciclo operativo deve essere rottamata presso i rispettivi smaltitori auto- rizzati. 33.0- PARTI DI RICAMBIO Le ordinazioni delle parti di ricambio devono essere trasmesse preferibilmente tra- mite Concessionario di vendita e corredate dalle seguenti indicazioni: 33.1- tipo - modello e numero di matricola indicati nella targhetta applicata (fig. - Page 21 TRIUM 1 = Plaque d’identification 2 = Châssis 3 = Roue de transmission 4 = Distributeur 5 = Siège 6 = Support pour plants 7 = Roue rechausseuse 8 = Parallélogramme 40054 BUDRIO BOLOGNA ITALIA TIPO ANNO DI FABBR. MATR.
- Page 22 TRIUM SOMMARIE 1.0 DECLARATION DE CONFORMITE ............pag. 22 2.0 GARANTIE ....................pag. 22 3.0 INTRODUCTION ..................pag. 22 4.0 DONNEES TECHNIQUES ..............pag. 23 5.0 PANNEAUX D’AVERTISSEMENT ET DE DANGER ....... pag. 23 6.0 LEVAGE ....................pag. 24 7.0 TRANSPORT ..................pag. 24 8.0 PRESCRIPTION POUR L’USAGE EN TOUTE SECURITE ET LA PREVENTION CONTRE LES ACCIDENTS ........
-
Page 23: Declaration De Conformite
TRIUM 1.0 DECLARATION DE CONFORMITE La société CHECCHI & MAGLI s.r.l. Via Guizzardi n. 38 40054 BUDRIO - BOLOGNE - ITALIE TEL.: 051/800253 FAX : 051/6920611 déclare, sous sa responsabilité, que les repiqueuses en objet: TRIUM / 1 - 2 - 3 - 4 - 5 - 6 TRIUM DT/ 2 - 3 - 4 - 5 - 6 - 7 sont conformes aux Attributs Essentiels de Sécurité... -
Page 24: Donnees Techniques
TRIUM 4.0 DONNEES TECHNIQUES FIG. 1 5.0 PANNEAUX D’AVERTISSEMENT ET DE DANGER GREASE FIG. 2 Panneaux d’avertissement 1 - Avant de commencer le travail, lire attentivement le manuel d’instructions 2 - Avant toute opération d’entretien, arrêter la machine et consulter le manuel d’instructions et d’entretien Panneaux de danger 3 - Ne pas effectuer de déplacements sur le terrain de travail ni sur route avec... -
Page 25: Levage
TRIUM 6.0 LEVAGE 6.1 - Vérifier que le moyen de levage, les crochets, les câbles, les chaînes etc... soient de capacité de charge appropriée (voir poids indiqué sur la plaquette de la machine et sur le tableau des poids et des mesures). 6.2 - Fixer les crochets, les câbles, les chaînes, etc. - Page 26 TRIUM 8.4 - Atteler la machine à un tracteur de puissance appropriée (voir fiche technique avec référence au modèle utilisé) et avec élévateur conforme aux normes spécifiques des tracteurs. Respecter le poids maximum prévu sur l’axe et le poids total mobile. 8.5 - Pendant les phases d’attelage et de dételage de la machine, faire attention afin d’éviter les écrasements.
-
Page 27: Attelage Au Tracteur
TRIUM 9.0 ATTELAGE AU TRACTEUR 9.1 - L’attelage de la machine au tracteur doit s’effectuer sur un sol plat. 9.2 - Vérifier constamment que les attelages à trois points soient de catégorie compatible. 9.3 - Approcher le tracteur de la machine en évitant de s’interposer entre eux et procéder à... -
Page 28: Plants Utilisables
TRIUM 11.0 PLANTS UTILISABLES Cette repiqueuse a été réalisée pour repiquer les plants horticoles, floricoles, de tabac, pépinières etc... dans des mottes de tourbe coniques ou pyramidales et les meilleurs résultats ont été obtenus avec les dimensions indiquées sur la figure 7. Nous conseillons d’utiliser des plants à... -
Page 29: Fonctions De L'operateur
TRIUM 15.0 FONCTIONS DE L’OPERATEUR Prélever les plants des plateaux et les déposer dans le distributeur (fig. 9.A). Ne pas déposer les plants dont la motte, pour des raisons d’extraction ou autre, serait partielle ou absente. Ne pas insérer de plants dans les alvéoles postérieures du distributeur qui est continuellement en phase d’ouverture et de fermeture (voir fig. -
Page 30: Mise En Phase Expulseur
TRIUM 18.0 MISE EN PHASE EXPULSEUR Lorsque la plante, en descendant du tube de chute, arrive dans le soc (fig. 9.C), l’expulseur (fig. 9.B) doit être en position reculée et c’est alors que commence la poussée vers l’extérieur. Si pour des raisons contingentes, il est nécessaire de repiquer à... -
Page 31: Parallélogramme
TRIUM 21.0- PARALLÉLOGRAMME Composé de : - DOUBLE ARTICULATION ; favorise l’adaptation au terrain. - ROUE ARTICULÉE ; réglage en hauteur en agissant sur le volant à main (fig. 14.H). Il est possible de varier le poids sur les roues débrousailleuses en intervenant sur le ressort réversible (fig. -
Page 32: Râcleur De Roues
TRIUM 25.0- RÂCLEUR DE ROUES Il est possible de régler la hauteur à partir du sol en agissant sur les vis (fig. 18.A) et en tournant le support (fig. 18.B). Il est possible de régler la distance des roues en agissant sur les vis (fig. 18.C). 26.0- DISTANCE DE REPIQUAGE INTERLIGNE: minimum 50 cm pour version à... -
Page 33: Roues De Transmission
TRIUM 26.1 - DISTANCE ENTRE LES PLANTS Les schémas (fig. 22) et (fig. 26 point 29.2) présentent respectivement les distances pouvant être obtenues avec les rapports en dotation ou en option (voir point 29.2). Pour remplacer les engrenages en dotation et obtenir les distances indiquées, outre respecter les prescriptions de sécurité, procéder comme suit: - Visser le réglage de profondeur roue (fig. -
Page 34: Voie Tracteur
TRIUM 28.0 VOIE TRACTEUR Les traces laissées sur le terrain par les roues du tracteur, outre tasser, créent normalement un abaissement de la surface. Maintenir une distance de repiquage supérieure ou égale à 10-12 cm de la trace (fig. 24) en agissant sur la distance entre les lignes ou sur la largeur de la voie tracteur. - Page 35 TRIUM 29.2 - JEU OPTION DISTANCES ENTRE LES PLANTS Pour obtenir les distances entre les plants indiquées, appliquer les engrenages comme d’après le tableau (fig. 26). A = engrenage à appliquer à l’axe hexagonal B = engrenage à appliquer à la roue motrice C = engrenage à...
-
Page 36: Entretien
TRIUM 29.4- JEU SUPPLÉMENTAIRE DE SUPPORTS POUR PLATEAUX Permet d’avoir deux supports plants pivotants par unité de repiquage, seulement pour distance entre les lignes de plus de 120 cm. Appliquer comme d’après la figure 29 et faire attention à l’encombrement latéral majoré. -
Page 37: Pauses Saisonnieres
TRIUM 30.1 - A CHAQUE HEURE DE TRAVAIL Avec l’outil spécial en dotation (fig. 31.G), ôter les résidus de terre ou de tourbe s’étant accumulés dans le distributeur (fig. 31.A) et à l’intérieur ou à l’extérieur du soc (fig. 31.B). La non-élimination de la terre ou de la tourbe présentes à l’intérieur du soc limite l’excursion de l’expulseur et porte non seulement préjudice au fonctionnement correct de la machine mais également provoque de graves dommages mécaniques. -
Page 38: Mise A La Ferraille
TRIUM 32.0 MISE A LA FERRAILLE La machine se compose de matériaux ferreux et roues pneumatiques. A la fin du cycle opérationnel, elle doit être déposée chez un ferrailleur autorisé. 33.0 PIECES DE RECHANGE Les commandes de pièces de rechange doivent être transmises de préférence par l’intermédiaire du Concessionnaire de Vente et doivent porter les indications suivantes: 33.1 - type, modèle et numéro de matricule indiqués sur la plaquette appliquée (fig. - Page 39 TRIUM 1 = Identification plate 2 = Frame 3 = Drive wheel 4 = Distributor 5 = Seat 6 = Tray holder 7 = Ridging wheels 8 = Four-bar linkage 40054 BUDRIO BOLOGNA ITALIA TIPO ANNO DI FABBR. MATR.
- Page 40 TRIUM TABLE OF CONTENTS 1.0 DECLARATION OF CONFORMITY ............pag. 40 2.0 GUARANTEE ..................pag. 40 3.0 PRELIMINARY NOTE ................pag. 40 4.0 TECHNICAL DATA .................. pag. 41 5.0 WARNING AND DANGER SIGNS ............pag. 41 6.0 LIFTING ....................pag. 42 7.0 TRANSPORT ..................
-
Page 41: Declaration Of Conformity
TRIUM 1.0 - DECLARATION OF CONFORMITY The company CHECCHI & MAGLI s.r.l. Via Guizzardi n. 38 40054 - BUDRIO - BOLOGNA - ITALY TEL. 051/800253 FAX. 051/6920611 hereby declares under its own responsibility that the transplanters described in this manual; TRIUM / 1 - 2 - 3 - 4 - 5 - 6 TRIUM DT/ 2 - 3 - 4 - 5 - 6 - 7 conform with the Essential Requirements for Safety and the Protection of Health set... -
Page 42: Technical Data
TRIUM 4.0 - TECHNICAL DATA FIG. 1 5.0 - WARNING AND DANGER SIGNS GREASE FIG. 2 Warning signs: 1 - Before starting work, read the instruction booklet carefully. 2 - Before carrying out any maintenance work, stop the machine and consult the use and maintenance manual. -
Page 43: Lifting
TRIUM 6.0 - LIFTING 6.1 - Check that the lifting gear, hooks, ropes, chains, etc., are of sufficient capacity for the task (see weight indicated on machine data plate and in the weights and measures table). 6.2 - Fix hooks, ropes, chains, etc. in the three positions shown in (fig.3) and marked by the graphic symbol ‘HOOK’. - Page 44 TRIUM 8.4 - Couple the machine only to a tractor of adequate power (see technical bulletin referring to the model in use), and with a lift unit which complies with standards specifically for tractors. Adhere to the maximum stipulated weight on the axle, and the total mobile weight. 8.5 - When coupling and uncoupling the machine, pay maximum attention so as to avoid the risk of crushing.
-
Page 45: Coupling To The Tractor
TRIUM 9.0 - COUPLING TO THE TRACTOR 9.1 - The machine must be coupled to the tractor on flat ground. 9.2 - Check that the three-point linkages are of a compatible category. 9.3 - Bring the tractor up to the machine, taking care not to get between the two at this stage, and proceed with coupling only when the tractor is stationary. -
Page 46: Usable Plants
TRIUM 11.0 - USABLE PLANTS This transplanter has been produced for transplanting seedlings of vegetables, flowers, tobacco, nursery plants etc., with conical or pyramidal peat rootball; for best results observe the dimensions shown in fig. 7. It is advisable to use seedlings with a very moist rootball so as to accelerate drop times from the distributor and facilitate the plant in taking root. -
Page 47: Functions Of The Operator
TRIUM 15.0 - FUNCTIONS OF THE OPERATOR Pick up the plants from the trays and place them in the distributor (fig. 9.A). Do not place plants with only a partial or no rootball in the distributor, as these will fall through. -
Page 48: Phasing The Expeller
TRIUM 18.0 - PHASING THE EXPELLER When the plant descending from the drop tube reaches the ploughshare (fig. 9.C.), the expeller (fig. 9.B) must be in the retracted position, and must only then begin its outward pushing stroke. If, for any reason, high or low speed transplanting is permitted, the correct expulsion phasing can be maintained by adjusting the rapid phasing device (fig. -
Page 49: Parallelogram
TRIUM 21.0- PARALLELOGRAM It consists of: - DOBLE ARTICULATED JOINT; makes the adaptation to the ground easier. - FLEX WHEEL; adjustable in height through handwheel(fig. 14.H). It is possible to change the weight on the press wheels by adjusting both the reversible spring (fig. 14.F) using the hanswheel (fig. -
Page 50: Wheel Scraper
TRIUM 25.0- WHEEL SCRAPER It is possible to adjust the height from the ground by operating the screws (fig. 18.A) and turning the support (fig. 18.B). It is possible to adjust the distance from wheels by operating the screws(fig. 18.C). 26.0 - TRANSPLANT DISTANCE INTER-ROW: min. -
Page 51: Drive Wheels
TRIUM 26.1 - INTER-ROW SPACING The diagrams (fig. 22 and fig. 26 at point 29.2) show respectively the distances which can be obtained with the standard or optional gear ratios (see point 29.2). To change the standard gears and obtain the distances indicated, observe the safety regulations, and proceed as follows: -Tighten the wheel depth adjustment device (fig. -
Page 52: Tractor Gauge
TRIUM 28.0 - TRACTOR GAUGE The imprint left on the ground by the wheels of the tractor, as well as having a compacting effect, also usually lowers the surface of the ground. Keep a transplanting distance of not less than 10-12 cm from the imprint (fig. 24) by adjusting the inter-row spacing or the gauge of the tractor. - Page 53 TRIUM 29.2 - OPTIONAL KIT FOR INTER-PLANT SPACINGS To obtain the indicated distances between plants, fit the gears as shown in the table (fig. 26). A = gear to be fitted to the hexagonal axle B = gear to be fitted to the drive wheel C = gear to be fitted to the transplant unit Do this work as described in point 26.1 and change the gear (fig.
-
Page 54: Maintenance
TRIUM 29.4- EXTRA TRAY HOLDER KIT Using this kit, it is possible to have two rotating tray holders for each transplanting unit; only for row inter-spacing of more than 120 cm. Fit as shown in fig. 29 and pay attention to the increased lateral dimensions. 29.5 - DISTRIBUTOR EXTENSION (fig. -
Page 55: Seasonal Disuse
TRIUM 30.1 - EVERY HOUR OF WORK Using the tool supplied (fig. 31.G), remove any soil or peat which may have accumulated inside the distributor (fig. 31.A) and inside or outside the ploughshare (fig. 31.B). Failure to remove soil or peat from inside the ploughshare restricts the stroke of the expeller and in addition to prejudicing smooth running, causes serious mechanical damage. -
Page 56: Disposal
TRIUM 32.0 - DISPOSAL The machine consists of ferrous metals and rubber tyres. At the end of its working life it must be scrapped at an authorized waste disposal centre. 33.0 - SPARE PARTS Orders for spare parts must preferably be sent via an authorized dealer and accompanied by the following information: 33.1 - type, model and serial number shown on the affixed data plate (fig. - Page 57 TRIUM 1 = Typenschild 2 = Rahmen 3 = Antriebsrad 4 = Verteiler 5 = Sitz 6 = Träger 7 = Häufelräder 8 = Gelenkviereck 40054 BUDRIO BOLOGNA ITALIA TIPO ANNO DI FABBR. MATR.
- Page 58 TRIUM INHALT 1.0 KONFORMITÄTSERKLÄRUNG ............. Seite 58 2.0 GARANTIE ....................Seite 58 3.0 VORBEMERKUNG ................. Seite 58 4.0 TECHNISCHE DATEN ................Seite 59 5.0 HINWEIS- UND GEFAHRENSCHILDER ..........Seite 59 6.0 ANHEBUNG .................... Seite 60 7.0 TRANSPORT ..................Seite 60 8.0 VORSCHRIFTEN ZUR SICHERHEIT UND UNFALLVERHÜTUNG ..............
-
Page 59: Konformitätserklärung
TRIUM 1.0 KONFORMITÄTSERKLÄRUNG Die Firma CHECCHI & MAGLI s.r.l. Via Guizzardi n. 38 40054 BUDRIO - BOLOGNA - ITALIEN TEL. 051/800253 FAX 051/6920611 erklärt in voller Verantwortung, daß die Pflanzensetzmaschinen TRIUM / 1 - 2 - 3 - 4 - 5 - 6 TRIUM DT/ 2 - 3 - 4 - 5 - 6 - 7 den wesentlichen Anforderungen hinsichtlich Sicherheit und Gesundheitsschutz aus den Richtlinien CEE 89/392, 98/37 EC und nachfolgenden Änderungen entspricht. -
Page 60: Technische Daten
TRIUM 4.0 TECHNISCHE DATEN Abb. 1 5.0 HINWEIS- UND GEFAHRENSCHILDER GREASE Abb. 2 Hinweisschilder: 1 - Vor dem Beginn der Arbeiten sorgfältig dieses Handbuch durchlesen. 2 - Vor jeglicher Wartungsarbeit die Maschine abschalten und die Bedienungs- und Wartungsanleitungen konsultieren. Gefahrenschilder: 3 - Die Maschine nicht mit angehobenem Hebewerk und Bedienern an Bord auf dem Einsatzbereich oder auf der Straße fahren. -
Page 61: Anhebung
TRIUM 6.0 ANHEBUNG 6.1 - Sicherstellen, daß die Hebevorrichtung, Haken, Seile, Ketten etc. die erforderliche Tragfähigkeit aufweisen. (Siehe Gewichtsangabe auf dem Typenschild und in der Tabelle Gewichte und Maße). 6.2 - Haken, Seile, Ketten, etc. an den drei angegebenen Stellen befestigen, die auf der Abbildung 3 mit dem graphischen Symbol “HAKEN”... - Page 62 TRIUM 8.4 - Die Maschine nur an einen Traktor von angemessener Zugkraft (siehe technische Daten des jeweiligen Modells) und mit Hebewerk nach den einschlägigen Normen für Traktoren anhängen. Das Höchstgewicht der Achse und das bewegliche Gesamtgewicht einhalten. 8.5 - Während der An- und Abkupplung der Maschine mit äußerster Vorsicht vorgehen, um Quetschungen zu vermeiden.
-
Page 63: Ankupplung An Den Traktor
TRIUM 9.0 ANKUPPLUNG AN DEN TRAKTOR 9.1 - Die Ankupplung der Maschine an den Traktor muß auf ebenem Gelände erfolgen. 9.2 - Sicherstellen, daß die Drei-Punkt-Anschlüsse passend sind. 9.3 - Den Traktor neben die Maschine stellen. In dieser Phase nicht zwischen dieselben treten. -
Page 64: Setzbare Pflanzen
TRIUM 11.0 SETZBARE PFLANZEN Diese Pflanzensetzmaschine wurde zur Einpflanzung von Nutzgarten-, Blumen-, Gartenbau-, Tabakpflanzen etc. in Torfschollen mit Kegel- oder Pyramidenform entwickelt. Optimale Resultate lassen sich mit den in Abb. 7 angegebenen Abmessungen erzielen. wir empfehlen, Pflanzen mit sehr feuchter Scholle zu setzen, um den Herabfall aus dem Verteiler zu beschleunigen und die Wurzelfassung zu begünstigen. -
Page 65: Aufgaben Des Bedieners
TRIUM 15.0 AUFGABEN DES BEDIENERS Die Pflanzen aus den Trägern nehmen und in den Verteiler setzen (Abb. 9,A). Keine Pflanzen einsetzen, deren Scholle durch das Herausziehen oder aus einem anderen Grunde unvollständig ist oder fehlt; diese würden mit Sicherheit eingehen. Keine Pflanze in die hinteren Waben des Verteilers einfügen, da letztere sich ständig öffnen und schließen (siehe Abb. -
Page 66: Auswurf-Phasen
TRIUM 18.0 AUSWURF-PHASEN Wenn die Pflanze aus dem Fallrohr den Pflugschar erreicht (Abb. 9, C) muß der Auswerfer (Abb. 9,B) sich in hinterer Position befinden und erst in diesem Moment beginnen, nach außen zu drücken. Soll aus bestimmten Gründen sehr schnell oder sehr langsam gepflanzt werden, so kann die richtige Phaseneinstellung durch den Phasen-Schnellabgleicher (Abb. -
Page 67: Parallelogramm
TRIUM 21.0- PARALLELOGRAMM Bestehend aus: - DOPPELTEM GELENK; verbessert die Anpassung an den Boden. - RAD FLEX; Höheneinstellung durch Drehen am Handrad (Abb. 14.H). Das Gewicht auf den Stampfrädern kann über die reversible Feder (Abb. 14.F) mit dem Handrad (Abb. 14.G) und der Feder (Abb. -
Page 68: Radschaber
TRIUM 25.0- RADSCHABER Die Bodenhöhe kann über die Schrauben (Abb. 18.A) und die Drehung der Halterung (Abb. 18.B) eingestellt werden. Der Abstand von den Rädern kann über die Schrauben (Abb. 18.C) eingestellt werden. 26.0 SETZABSTAND REIHENABSTAND: mindestens 50 cm für Version mit einem Rahmen (Abb. -
Page 69: Antriebsräder
TRIUM 26.1 PFLANZABSTAND Die Zeichnungen (Abb. 22) und (Abb. 26, Punkt 29.2) zeigen jeweils die Abstände, die mit den serienmäßigen oder als Option lieferbaren Zahnrädern erzielbar sind (siehe Punkt 29.2). Zum Ersatz der mitgelieferten Zahnräder und zur Erzielung der angegebenen Abstände unter Einhaltung der Sicherheitsvorschriften folgendermaßen vorgehen: - Das Radtiefenregister (Abb. -
Page 70: Traktor-Fahrspur
TRIUM 28.0 TRAKTOR-FAHRSPUR Die Fahrspuren, die die Traktorräder auf dem Boden hinterlassen, verdichten diesen nicht nur, sondern bewirken auch eine Absenkung der Bodenfläche. Die Setzung muß in einem Abstand von mindenstens 10-12 cm von der Fahrspur erfolgen (Abb. 24), was durch Einstellung des Reihenabstands oder der Breite der Fahrspur des Traktors erzielbar ist. - Page 71 TRIUM 29.2 - ZUSÄTZLICHER PFLANZABSTÄNDE-SATZ Zur Erzielung der angegebenen Pflanzabstände die Zahnräder gemäß Tabelle (Abb. 26) anbringen. A = Zahnrad zur Montage an der Sechskantachse B = Zahnrad zur Montage am Antriebsrad C = Zahnrad zur Montage an der Setzeinheit. Die Montage erfolgt gemäß...
-
Page 72: Wartung
TRIUM 29.4- BAUSATZ ZUSÄTZLICHER TRÄGER Zur Anbringung eines zweiten Drehträgers je Setzeinheit, nur im Falle eines Reihenabstands über 120 cm. Gemäß Abb. 29 montieren, erhöhte Seitenabmessungen beachten. 29.5 - VERTEILERVERLÄNGERUNG (abb. 30.A) Empfohlenes Zusatzteil für die Setzung von Pflanzen mit sehr hohem Blattwerk (ca. 13-20 cm). -
Page 73: Einstellung Bei Nichtbenutzung
TRIUM 30.1 - JEDE BETRIEBSSTUNDE Mit dem mitgelieferten Werkzeug (Abb. 31.G) eventuelle Erd- oder Torfspuren entfernen, die sich im Verteiler (Abb. 31.A) oder innerhalb und außerhalb an der Pflugschar angesammelt haben (Abb. 31.B). Werden Erde und Torf nicht aus dem Pflugschar entfernt, so wird der Ausschlag des Auswerfers begrenzt. -
Page 74: Entsorgung
TRIUM 32.0 ENTSORGUNG Die Maschine besteht aus eisenhaltigem Material und gummibereiften Rädern. Soll die Maschine nicht mehr benutzt werden, so ist sie bei autorisierten Entsorgungsunternehmen zu verschrotten. 33.0 ERSATZTEILE Ersatzteilbestellungen sollten nach Möglichkeit über den Vertragshändler übermittelt werden und die folgenden Angaben enthalten: 33.1 - Typ, Modell, Kenn-Nummer gemäß... - Page 75 TRIUM 1 = Placa de identificación 2 = Bastidor 3 = Rueda de transmisión 4 = Distribuidor 5 = Asiento 6 = Portabandejas 7 = Ruedas de aporcar 8 = Paralelogramo 40054 BUDRIO BOLOGNA ITALIA TIPO ANNO DI FABBR. MATR.
- Page 76 TRIUM ÍNDICE 1.0 DECLARACIÓN DE CONFORMIDAD ............ pág. 76 2.0 GARANTÍA ....................pág. 76 3.0 OBSERVACIONES ................. pág. 76 4.0 DATOS TÉCNICOS ................. pág. 77 5.0 SEÑALES DE ADVERTENCIA Y PELIGRO ........... pág. 77 6.0 IZAJE DE LA MÁQUINA ................. pág. 78 7.0 TRANSPORTE ..................
-
Page 77: Declaración De Conformidad
TRIUM 1.0 - DECLARACIÓN DE CONFORMIDAD CHECCHI & MAGLI s.r.l. Via Guizzardi n. 38 40054 - BUDRIO - BOLONIA - ITALIA TEL. 051/800253 FAX 051/6920611 declara bajo su propia responsabilidad que las máquinas trasplantadoras en objeto: TRIUM / 1 - 2 - 3 - 4 - 5 - 6 TRIUM DT/ 2 - 3 - 4 - 5 - 6 - 7 son conformes a los Requisitos esenciales de seguridad y de protección de la salud indicados en la directiva CEE 89/392, 98/37 EC y sucesivas modificaciones. -
Page 78: Datos Técnicos
TRIUM 4.0 - DATOS TÉCNICOS FIG. 1 5.0 - SEÑALES DE ADVERTENCIA Y DE PELIGRO GREASE FIG. 2 Señales de advertencia 1 - Antes de comenzar el trabajo, leer atentamente el manual de instrucciones. 2 - Antes de cada operación de mantenimiento, parar la máquina y consultar el presente manual. -
Page 79: Izaje De La Máquina
TRIUM 6.0 - IZAJE 6.1 - Comprobar que los medios de izaje (ganchos, cabos, cadenas, etc.) tengan la capacidad necesaria. Leer el peso indicado en la placa de identificación y en la tabla de pesos y medidas. 6.2 - Fijar los ganchos, cabos, cadenas, etc.. en las tres posiciones indicadas por la (fig.3) e indicadas por el símbolo gráfico "GANCHO". - Page 80 TRIUM 8.4 - Enganchar la máquina únicamente a un tractor de potencia adecuada (ver la ficha técnica con referencia al modelo en uso) y que tenga un elevador conforme a las normas específicas sobre tractores. Respetar el peso máximo admisible sobre el eje y el peso móvil total. 8.5 - Durante las maniobras de enganche y desenganche del tractor, poner el máximo cuidado a fin de evitar aplastamientos.
-
Page 81: Enganche Al Tractor
TRIUM 9.0 - ENGANCHE AL TRACTOR 9.1 - Enganchar la máquina al tractor en una zona llana. 9.2 - Comprobar que los acoples de tres puntos sean de categoría compatible. 9.3 - Aproximar el tractor a la máquina, evitando interponerse entre ambos, y proceder al enganche solo cuando el tractor esté... -
Page 82: Plantas Utilizables
TRIUM 11.0 - PLANTAS UTILIZABLES Esta máquina ha sido concebida para trasplantar plantas hortícolas o de flores, tabaco, ejemplares de vivero, etc., enraizados en cepellón de turba cónico o piramidal. Los mejores resultados se consiguen con las dimensiones indicadas en la fig. 7. Se aconseja utilizar las plantas con el cepellón muy húmedo, para acelerar la caída desde el distribuidor y facilitar el arraigo. -
Page 83: Funciones Del Operador
TRIUM 15.0 - FUNCIONES DEL OPERADOR Retirar las plantas de las bandejas y depositarlas en el distribuidor (fig. 9.A). No colocar ninguna planta a la cual le total o parcialmente el cepellón, ya que sin dudas quedaría un espacio vacío. No introducir plantas en los alvéolos posteriores del distribuidor ya que están continuamente en fase de apertura y cierre (véase la fig. -
Page 84: Puesta En Fase Del Expulsor
TRIUM 18.0 - PUESTA EN FASE DEL EXPULSOR Cuando la planta sale del tubo de caída y llega a la reja (fig. 9.C), el expulsor (fig. 9.B) tiene que estar en una posición retrasada y solo entonces comenzar el empuje hacia fuera. -
Page 85: Paralelogramo
TRIUM 21.0- PARALELOGRAMO Está formado por: - DOBLE ARTICULACIÓN; facilita la adaptación al terreno. - RUEDA FLEX; ajuste de la altura, moviendo el volante (fig. 14.H). Se puede modificar el peso de las ruedas compresoras accionando el resorte reversible (fig. 14.F) con el volante (fig. -
Page 86: Raspador Para Ruedas
TRIUM 25.0- RASPADOR PARA RUEDAS Se puede ajustar la altura desde el suelo moviendo los tornillos (fig. 18.A) y girando el soporte (fig. 18.B). Se puede ajustar la distancia desde las ruedas moviendo los tornillos (fig. 18.C). 26.0- DISTANCIA DE FIG. -
Page 87: Ruedas De Transmisión
TRIUM 26.1 - DISTANCIA ENTRE PLANTAS Los esquemas de la fig. 22, y de la fig. 26 punto 29.2, ilustran respectivamente las distancias obtenibles con las relaciones de serie u opcionales (ver el punto 29.2). Para sustituir los engranajes que se entregan de serie y definir las distancias indicadas, además de respetar las prescripciones de seguridad, proceder como sigue: - Ajustar el registro de profundidad de la rueda (fig. -
Page 88: Ancho De Rodada Del Tractor
TRIUM 28.0 - ANCHO DE RODADA DEL TRACTOR Las huellas que dejan en el terreno las ruedas del tractor, además de compactar la superficie, producen habitualmente un descenso de la misma. Mantener una distancia no inferior a 10-12 cm entre el trasplante y la huella (fig. 24). Para ello, modificar la distancia entre hileras o el ancho de rodada del tractor. - Page 89 TRIUM 29.2 - KIT OPCIONAL PARA DEFINIR LA DISTANCIA ENTRE PLANTAS Para conseguir las distancias entre plantas indicadas, aplicar los engranajes con arreglo a la tabla de la fig. 26. A = engranaje para aplicar al eje hexagonal B = engranaje para aplicar a la rueda motriz C = engranaje para aplicar a la unidad de trasplante Ejecutar esta operación como está...
-
Page 90: Mantenimiento
TRIUM 29.4- KIT DE PORTABANDEJAS SUPLEMENTARIO Permite disponer de dos portabandejas giratorios por cada unidad de trasplante (solo para distancias entre hileras superiores a 120 cm). Aplicar como se muestra en la (fig. 29) y tener en cuenta el aumento de las dimensiones laterales. -
Page 91: Períodos De Inactividad
TRIUM 30.1 - CADA HORA DE TRABAJO Con la herramienta especial que se entrega de serie (fig. 31.G), quitar los residuos de tierra o de turba acumulados dentro del distribuidor (fig. 31.A) y dentro o fuera de la reja (fig. 31.B). La tierra (o turba) acumulada dentro de la reja limita la carrera del expulsor y, además de comprometer su funcionamiento, causa daños mecánicos graves. -
Page 92: Desguace
TRIUM 32.0 - DESGUACE La máquina está compuesta de material ferroso y ruedas engomadas. Al final de su vida útil se la debe hacer desguazar en un centro autorizado. 33.0 - PARTES DE RECAMBIO Se aconseja elevar los pedidos de recambios a través del Concesionario de ventas, indicando los siguientes datos: 33.1 - Tipo, modelo y número de matrícula indicados en la placa de identificación de la máquina (fig. - Page 93 TRIUM NOTE...
-
Page 94: Catalogo Ricambi
TRIUM CATALOGO RICAMBI CATALOGUE PIECES DE RECHANGE SPARE PARTS CATALOGUE ERSATZTEILVERZEICHNIS PARTES DE RECAMBIO... - Page 113 TRIUM NOTE...
- Page 114 TECNOLOGIE PER ORTICULTURA TECHNOLOGIES POUR HORTICULTURE VEGETABLE GROWING TECHNOLOGY TECHNOLOGIEN FÜR DEN GARTENBAU TECNOLOGIAS PARA HORTICULTURA Checchi & Magli VIA GUIZZARDI, 38 40054 BUDRIO (BO) - ITALY TEL. (051) 80.02.53 - FAX (051) 69.20.611 www.checchiemagli.com info@checchiemagli.com...
Need help?
Do you have a question about the TRIUM 1 and is the answer not in the manual?
Questions and answers