
Related Manuals for Denver DAB-38


Summary of Contents for Denver DAB-38
-
Page 1: Instruction Manual
Instruction manual DAB+/DAB FM Radio DENVER DAB-38 COPYRIGHT DENVER ELECTRONICS A/S www.denver-electronics.com www.facebook.com/denverelectronics ENG-1... -
Page 2: Important Safety Information
IMPORTANT SAFETY INFORMATION is required when the apparatus has been damaged CAUTION! in any way, such as the power-supply cord or plug is RISK OF ELECTRIC SHOCK damaged, liquid has been spilled or objects have fallen DO NOT OPEN into the apparatus, the apparatus has been exposed to TO REDUCE THE RISK OF ELECTRIC SHOCK rain or moisture, does not operate normally, or has been DO NOT REMOVE COVER (OR BACK) -
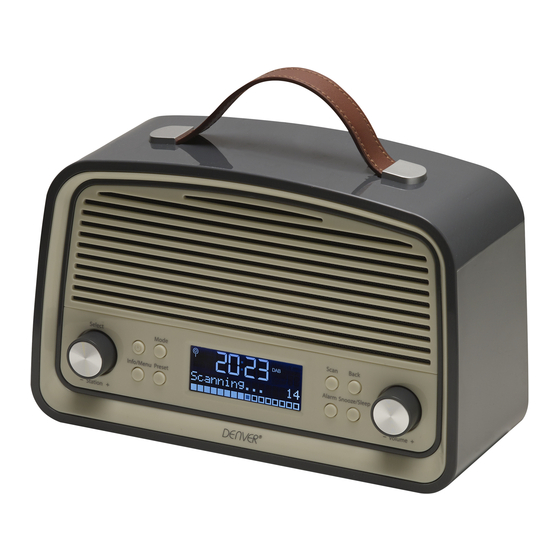
Page 3: Controls And Connections
PRELIMINARIES LOCATION Place the unit on dry stable surface away from heat and damp and where it is unlikely to fall or be knocked over. GETTING STARTED DAB/FM AERIAL Before using your radio for DAB or FM reception, always fully extend the telescopic aerial. The telescopic aerial has a swivel base to enable it to be adjusted to du erent positions for the clearest sound. - Page 4 POWER CONTROL STANDBY CONTROL Switching the radio on: • Press the button to switch on the radio. The radio will re-tune to the last station playing. Setting the radio to Standby: • Press the button to set the radio to Standby. The time and date will be displayed.
-
Page 5: Adjusting The Volume
ADJUSTING THE VOLUME To adjust the volume: • Turn the Volume Control clockwise to increase or anti-clockwise to decrease the volume. The volume level will be displayed on a bargraph. DAB/FM BANDS Your radio can also receive FM band radio stations. To change between the DAB and FM bands: •... -
Page 6: Aux Input
AUX INPUT The AUX IN input may be used to connect sound sources with a Line or Headphone analogue output to play through your unit. These may include - • Personal audio players • Personal computers or laptops Connecting to the AUX IN jack •... -
Page 7: Dab Settings Menu
DAB SETTINGS MENU DAB SETTINGS MENU A complete map of the menu is shown on the next page. To enter the DAB Settings Menu • Set to DAB mode. hold the Info/Menu button. • Press and The menu will be displayed. •... -
Page 8: Using The Alarms
USING THE ALARMS SETTING THE ALARMS ALARM SETTING SEQUENCE You can set two completely separate alarm times (ALARM Alarm 1 and ALARM 2) and activate either or both of them to Set the alarm hours, then minutes wake you with radio or a buzzer. You can also pre-set the station preset and volume settings that the alarms will wake you with. -
Page 9: Sleep Function
• Daily - The alarm will sound every day. • Weekdays - The alarm will sound on weekdays, but not at weekends. • Weekends - The alarm will sound on weekends, but not on weekdays. • Once - The alarm will sound only once. If this setting has been chosen, an extra option is added for you to set the date that you want the alarm to sound. -
Page 10: Factory Reset
The Sleep time will be displayed and music will continue to play for the time you selected, then the unit will set to Standby. HEADPHONES There is a headphone output socket on the back panel of the radio. If headphones are connected to this socket for private listening, the speakers will cut out automatically. - Page 11 ALL RIGHTS RESERVED, COPYRIGHT DENVER ELECTRONICS A/S Electric and electronic equipment contains materials, components and substances that can be hazardous to your health and the environment, if the waste material (discarded electric and electronic equipment) is not handled correctly. Electric and electronic equipment is marked with the crossed out trash can symbol, seen below. This symbol signi es that electric and electronic equipment should not be disposed of with other household waste, but should be disposed of separately.
Need help?
Do you have a question about the DAB-38 and is the answer not in the manual?
Questions and answers