Ozito SDL-5000U - Cordless Screwdriver Torch 3.6V Manual
- Original instructions manual (10 pages)
Advertisement
SPECIFICATIONS
Voltage: 3.6V
Chuck Size: 6.35mm Magnetic
No Load Speed: 180/min
Torque Settings: 9
MaxTorque: 3.5Nm
Battery: 1.5Ah Li-ion
Charge Time: 3 - 5Hours
Weight (tool only): 0.4kg
WHAT'S IN THE BOX

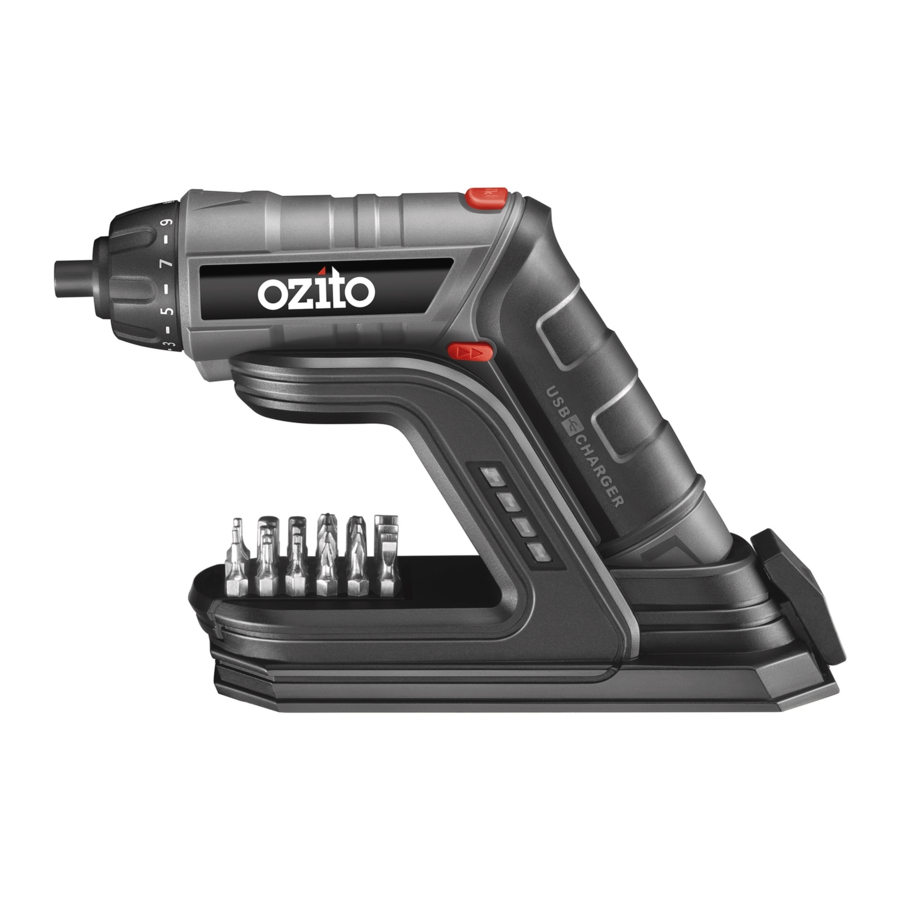
KNOW YOUR PRODUCT
CORDLESS SCREWDRIVER / TORCH

- Bit Holder
- Torque Collar
- LED Work Light
- Forward / Reverse Lever
- Handle Lock Button
- Rotating Rear Handle
- On / Off Trigger
- USB Charging Point
- Charge Indicator
- Torch On/Off Switch
- Torch LED
ACCESSORIES

- Drill Bit Storage
- Docking Station
- Charge Check Indicator
- USB Charger Compartment
- Clear Case Lock
- USB Charging Cable
- CRV Bits x 24
SETUP & PREPARATION
CHARGING
Charging the Screwdriver / Torch
- Remove the USB charging adaptor from the base of the docking station.

- Plug the USB charging cable into a USB portable charge pack (not included) or USB port.

- Plug the charging jack into the charging point on the screwdriver.

- The charge indicator will illuminate red indicating the battery is charging.

- The charge indicator will illuminate green once the tool is completely charged.


DOCKING STATION
Charging with the Docking Station
The docking station allows neat and tidy storage of the screwdriver bits, while ensuring your screwdriver is always charged and ready to go.
- Remove the USB charging adaptor from the base of docking station.

- Plug the USB charging cable into a USB portable charge pack (not included) or USB port.

- Plug the charging jack into the charging point on the docking station.

- Place the screwdriver / torch onto the docking station to allow the tool to charge.

- The docking station indicator lights illuminate in sequence, indicating the tool is charging.

- When the tool is completely charged, all 4 indicator lights will illuminate.


CHANGING DRIVER BITS
Inserting Driver Bits
- Insert the CRV bit directly into the magnetic bit holder.

- Pull gently on the CRV bit to ensure it is properly secured.


Removing Driver Bits
- Pull the CRV bit out of the magnetic bit holder to remove.


OPERATION
CONTROLS
On/Off Trigger
- To start driving, squeeze the on/off trigger.

- To stop driving, release the on/off trigger.


Forward / Reverse Lever

- Push the forward/reverse lever left, for forward rotation.
- For reverse rotation push the lever to the right of the tool.
Adjusting the Torque
Align the arrow at the top of the tool with the desired setting by rotating the torque collar.

Note: A higher number will result in higher torque or twisting action.
Note: To avoid damaging screw heads, start with a low torque setting and increase until the screw head is flush with the work piece.
Screwdriving LED Worklight
The screwdriver features a worklight that will help brighten the work area. This light will automatically turn on once the on/off trigger is pressed.

Using the Torch Function
- To turn the torch on, press torch on/off switch into the on position.

- To turn the torch off, press torch on/off switch into the off position.


SWIVEL HANDLE
The screwdriver / torch features a rotating handle to suit a range of applications. You can operate the screwdriver of torch in either handle position.
In-line Position
- Hold the handle locking button down.

- Rotate the handle clockwise until it clicks into position.


Angled Position
- Hold the handle locking button down.

- Rotate the handle anti-clockwise until it clicks into position.


SCREWDRIVING
- Select the desired handle position.

- Check the forward/reverse lever is in the desired setting.

- Hold the screwdriver firmly and place the bit on the screw to be fastened.

- Squeeze the on/off trigger to start the screwdriver.

- Fasten the screw into the work piece.


Note: Do not force the screwdriver or apply side pressure to elongate the hole. Let the screwdriver do the work.
TROUBLESHOOTING
On/Off Trigger is Locked
Ensure that the forward / reverse lever is in the correct position; pressed left for forwards direction, pressed right for backwards direction. If it is in between the two settings the on/off trigger will be locked.
LED Torch is Not Working
The tools battery may be depleted. Charge the tool using the USB charger provided.
The Handle Is Not Rotating
Ensure you are holding the handle lock button down while rotating the handle.
Ensure you are rotating the handle in the correction direction. Clockwise rotation into in-line position or anti-clockwise for angled position.
Tool is Not Charging When Placed Onto The Docking Station
Ensure that you have connected the docking station to a suitable USB port using the USB charging cable provided.
Ensure the tool is correctly seated in the docking station.
MAINTENANCE
- When not in use, the screwdriver should be stored in a dry, frost free location, keep out of children's reach.
- Keep ventilation slots of the screwdriver clean at all times and prevent any debris from entering.
- If the housing of the screwdriver requires cleaning, do not use solvents but cloth only.
- Blow out the ventilation slots with compressed air periodically.
Note: Ozito Industries will not be responsible for any damage or injuries caused by repair of the screwdriver by an unauthorised person or by mishandling of the tool.
SPARE PARTS
Spare parts can be ordered from the Special Orders Desk at your local Bunnings Warehouse or Homebase store.
For further information, or any parts visit www.ozito-diy.co.uk or contact Ozito Customer Service:
Great Britain: 0151 294 4488
Ireland: 1850 882711
E-mail: enquires@ozito-diy.co.uk

Documents / ResourcesDownload manual
Here you can download full pdf version of manual, it may contain additional safety instructions, warranty information, FCC rules, etc.
Download Ozito SDL-5000U - Cordless Screwdriver Torch 3.6V Manual
Advertisement


Need help?
Do you have a question about the SDL-5000U and is the answer not in the manual?
Questions and answers