Table of Contents
Advertisement
Quick Links
User's Guide for the LMP90100 Evaluation Board with Sensor
AFE Software
Table of Contents
1.0. INTRODUCTION ........................................................................................................ 2
2.0. EQUIPMENT ............................................................................................................... 2
2.1. CONNECTION DIAGRAM .......................................................................................... 2
2.2. BOARD ASSEMBLY .................................................................................................... 4
3.0. EXAMPLE #1: QUICK START - DC READING ........................................................ 5
4.0. EXAMPLE #2: SHORTED INPUT AND CALIBRATION TEST ............................... 10
5.0. EXAMPLE #3 - 3-WIRE RTD APPLICATION .......................................................... 15
6.0. EXAMPLE #4: THERMOCOUPLE AND LM94022 APPLICATION ........................ 21
7.0. POWERING THE LMP90100EB ............................................................................... 31
8.0. EVALUATING THE LMP90100 WITHOUT THE SPIO-4 BOARD. ........................ 31
9.0. INSTALLING THE LMP90100 SENSOR AFE SOFTWARE ..................................... 32
10.0. SCHEMATIC ........................................................................................................... 36
11.0. LAYOUT .................................................................................................................. 37
12.0. BOM ......................................................................................................................... 39
August 2012
LMP90100 EVB User's Guide
LMP90100EVB User's Guide
User's Guide
August 2012
1
Advertisement
Table of Contents

Related Manuals for Texas Instruments LMP90100


Summary of Contents for Texas Instruments LMP90100
-
Page 1: Table Of Contents
5.0. EXAMPLE #3 - 3-WIRE RTD APPLICATION ............15 6.0. EXAMPLE #4: THERMOCOUPLE AND LM94022 APPLICATION ......21 7.0. POWERING THE LMP90100EB ................31 8.0. EVALUATING THE LMP90100 WITHOUT THE SPIO-4 BOARD......31 9.0. INSTALLING THE LMP90100 SENSOR AFE SOFTWARE ........32 10.0. SCHEMATIC ......................36 11.0. -
Page 2: Introduction
(SPIO-4 board) to a PC via USB and running the Sensor AFE software. The data capture board will generate the SPI signals to communicate to and capture data from the LMP90100. The user will also have the option to evaluate the LMP90100 without using the SPIO-4 board or the Sensor AFE software. - Page 3 Figure 1 – Connection Diagram March 2009 SNAU028A...
-
Page 4: Board Assembly
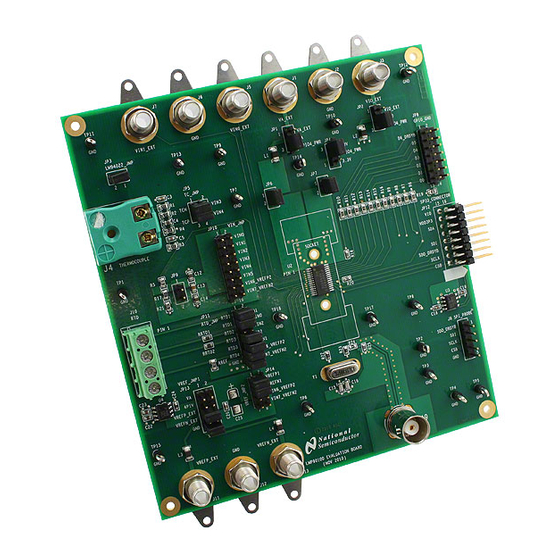
2.2. Board Assembly The schematic of the evaluation board can be seen in section 10. Figure 2 – LMP90100 Evaluation Board Assembly LMP90100 EVB User’s Guide August 2012... -
Page 5: Example #1: Quick Start - Dc Reading
The following procedures show a quick method to assemble the LMP90100EB and perform a quick DC voltage reading. LMP90100 EB Jumper Connections 1. The jumpers for this example application can be seen in Figure 3 and Table 1. Jumpers not shown can be left unpopulated. - Page 6 Connect VREFN1 source to the LMP90100 Table 1 - Jumpers for DC Measurement B. Installing/Opening the Software - follow section 9.0 to install and open the LMP90100 Sensor AFE software. C. Connecting and Powering the Boards – these steps have to be done in this order.
- Page 7 Follow the step-by-step instructions under the “HelpBar” mini-tab (left hand side of the GUI) to configure the LMP90100 for this example. These step-by-step instructions are discussed in details below, and the recommended configuration should look similar to the figure below.
- Page 8 7. Step 7: Set Calibration - click on the “No Calibration” block to enable or disable calibration. Refer to the LMP90100 datasheet to more information on the LMP90100’s background calibration types and modes. 8. Step 8: Int/Ext CLK? – click on the “CLK MUX” block and make sure the internal clock is selected.
- Page 9 Figure 7 - Results for Example #1 - DC Reading March 2009 SNAU028A...
-
Page 10: Example #2: Shorted Input And Calibration Test
4.0. Example #2: Shorted Input and Calibration Test This example demonstrates LMP90100’s ability to calibrate for offset error. A. LMP90100 EB Jumper Connections 1. Connect the LMP90100EB jumpers like the jumpers shown in the figure and table below. Jumpers not mentioned can be left unconnected. - Page 11 9. Figure 9 - Recommended LMP90100 Configuration for the Shorted Input and Calibration Test 1. Step 1: Select a Sensor - select “DC” “DC” since the input source is a DC voltage...
- Page 12 6. Step 6: Set Buffer – click on the “BUFF” block to include or exclude the buffer from the signal path. 7. Step 7: Set Calibration - the purpose of this example is to show how the LMP90100 removes the offset error using background calibration. Initially, disable the calibration by selecting “000: No Calibration”...
- Page 13 2. Click on the “Run” button again to view the output voltage results. A mean output reading closer to 0V should be plotted similar to Figure 12. This decrease in the mean output reading demonstrates the LMP90100 offset calibration feature. March 2009...
- Page 14 Figure 12 - Results for Shorted Input Test with Calibration LMP90100 EVB User’s Guide August 2012...
-
Page 15: Example #3 - 3-Wire Rtd Application
5.0. Example #3 - 3-wire RTD Application A 3-wire RTD has a typical configuration shown in Figure 13. This section will explain how to configure the LMP90100EB and software tool to evaluate a 3-wire RTD. Figure 13 - 3-Wire RTD Configuration A. - Page 16 JP2: VIO_EXT P2-P3 Source VIO with the 5.0V from the SPIO-4 board. P2-P3 Get 5.0V from the SPIO-4 board P1-P2 Connect VA supply to the LMP90100 P1-P2 Connect VIO supply to the LMP90100 JP11: RTD_JMP P1-P2 Connect IB1 to the RTD...
- Page 17 E. Configuring the LMP90100 Using the Sensor AFE Software Follow the step-by-step instructions under the “HelpBar” mini-tab (left hand side of the GUI) to configure the LMP90100 for this example. These step-by-step instructions are discussed in details below, and the recommended configuration should look similar to Figure 16.
- Page 18 Figure 16 - Recommended LMP90100 Configuration for a PT-100 RTD 1. Step 1: Select a Sensor - select “RTD” “PRTF-10-2-100-1/4-6-E”. 2. Step 2: Configure Inputs – click on the “INPUT MUX” block to set “VINP = 000: VIN0” “VINN = 001: VIN1”. Click on the “Eval. Board Settings” button located next to the block diagram.
- Page 19 7. Step 7: Set Calibration - click on the “No Calibration” block to enable or disable calibration. Refer to the LMP90100 datasheet to more information on the LMP90100’s background calibration types and modes. (For this exercise, the calibration can be OFF).
- Page 20 Figure 18 – Reading of Room Temperature Using the 3-Wire RTD LMP90100 EVB User’s Guide August 2012...
-
Page 21: Example #4: Thermocouple And Lm94022 Application
The LM94022 is placed underneath the thermocouple connector J4 on the LMP90100 evaluation board. The technique to calculate for Thot using the CJC method can be found in the LMP90100 datasheet. The Sensor AFE software does have the ability to display the relative thermocouple temperature using a Type K look-up-table (http://www.intech.co.nz/products/temperature/typek.html). - Page 22 Figure 20 – Thermocouple and Temperature Sensor Schematic C. LMP90100EB Jumper Connections: 1. The figure and table below show the LMP90100 evaluation board jumper settings for this thermocouple application. The jumpers not mentioned can be left unconnected. 2. The SPIO-4 board is properly setup out of the box (no assembly required).
- Page 23 Table 4 – LMP90100EB Jumpers for the RTD Application D. Installing/Opening the Software – skip this step if it’s already done. If not, follow section 9.0 to install and open the LMP90100 Sensor AFE software. E. Connecting and Powering the Boards 1.
- Page 24 F. Connect a K type thermocouple to J4. Note that the thermocouple’s positive input (TCP) = VIN4 and negative input (TCN) = VIN3. G. Configuring the LMP90100 for the LM94022 Using the Sensor AFE Software Follow the step-by-step instructions under the “HelpBar” mini-tab (left hand side of the GUI) to configure the LMP90100 for the LM94022 IC sensor.
- Page 25 7. Step 7: Set Calibration - click on the “No Calibration” block to enable or disable calibration. Refer to the LMP90100 datasheet to more information on the LMP90100’s background calibration types and modes. The calibration can be OFF for this example.
- Page 26 7. Step 7: Set Calibration - click on the “No Calibration” block to enable or disable calibration. Refer to the LMP90100 datasheet to more information on the LMP90100’s background calibration types and modes. In this example, the calibration can be OFF.
- Page 27 9. Step 9: Performance - click on the “Performance” mini-tab. This tab displays the Estimated Device Performance base on the block diagram that you’ve configured, as well as the Measured System Performance if you’ve connected a board and ran the LMP90100. F. Capturing Data 1.
- Page 28 Figure 26 – Sensor Window 8. In the “Measurement” tab, choose the “Output Format” as “Output Voltage (V)”, and click “Run” to capture the thermocouple relative voltage. Figure 27 – Thermocouple Voltage Relative Reading LMP90100 EVB User’s Guide August 2012...
- Page 29 9. In the “Output Format” field, choose to Display “Rel. Temp (C)”. This shows the relative temperature of the thermocouple. This reading is not factoring in the cold junction compensation. Figure 28 – Thermocouple Relative Temperature Reading 10. In the “Output Format” field, choose to Display “Abs. Temp (C)”. This uses the “T_board”...
- Page 30 Figure 29 – Thermocouple Absolute Temperature Reading LMP90100 EVB User’s Guide August 2012...
-
Page 31: Powering The Lmp90100Eb
LMP90100. Without the SPIO-4 board, the Sensor AFE software for the LMP90100 cannot be used to capture and analyze data from the LMP90100EB. If the SPIO-4 board is not available but LMP90100 evaluation is desirable, then connect your own SPI signals to J8 of the LMP90100EB as seen below. -
Page 32: Installing The Lmp90100 Sensor Afe Software
9.0. Installing the LMP90100 Sensor AFE Software Each Sensor AFE product will have its own software. To access the Sensor AFE software for LMP90100, follow the steps below. 1. Getting the Zip Files a. You can find the latest downloadable Sensor AFE software at www.ti.com/sensorafe... - Page 33 Figure 32 – Choose to “install from a list or specific location (Advanced)” Figure 33 – Find the driver in the “NSC_USB_v1.0.8.0” folder (it should be located in the unzipped folder) March 2009 SNAU028A...
- Page 34 Figure 34 – Waiting for the computer to install the driver LMP90100 EVB User’s Guide August 2012...
- Page 35 Figure 35 – Installation is complete 3. Open the un-zipped folder and click on “lmp90100.exe” to start the software. If you don’t have the boards, you’ll get an error message. Ignore that error message and click “Ok” to continue. March 2009...
-
Page 36: Schematic
VIN7_VREFN2 100 uH VREFN1 TP17 0.1 uF 0.1 uF VREFN_EXT 100 uH Title LMP90100 Customer Ev aluation Board Size Document Number 600496 Date: Wednesday , Nov ember 23, 2011 Sheet Figure 36 - LMP90100EB Schematic LMP90100 EVB User’s Guide August 2012... -
Page 37: Layout
11.0. Layout Figure 37 - Layout – Top Layer March 2009 SNAU028A... - Page 38 Figure 38 - Layout 3rd Layer LMP90100 EVB User’s Guide August 2012...
-
Page 39: Bom
12.0. BOM Item Quantity Reference Value Description Source Source Part # C1,C7,C10,C22,C24 1.0 uF CAP CER 1.0UF 10V Y5V 0603 Digikey 490-1585-1-ND C2,C8,C11,C18,C19,C20, 0.1 uF CAP CER .1UF 0603 Digikey 490-4779-1-ND C21,C23,C29,C30 C3,C5,C17,C26 10nF CAP CER 10000PF 50V 10% X7R 0603 Digikey 490-1512-1-ND C4,C12,C14... - Page 40 LMP90100 LMP90100 LMP90100 24C02 EEPROM EEPROM 256x8 Mouser 579-24C02CSN LM4140C-4.1 4.1 V Voltage Reference LM4140C-4.1 3.57 MHz CRYSTAL 3.579545 MHZ 18PF 49US Digikey XC1707-ND BUMPON HEMISPHERE .44X.20 BLACK Digikey SJ5003-0-ND Table 5 - BOM LMP90100 EVB User’s Guide August 2012...
- Page 42 EVALUATION BOARD/KIT/MODULE (EVM) ADDITIONAL TERMS Texas Instruments (TI) provides the enclosed Evaluation Board/Kit/Module (EVM) under the following conditions: The user assumes all responsibility and liability for proper and safe handling of the goods. Further, the user indemnifies TI from all claims arising from the handling or use of the goods.
- Page 43 This equipment has been tested and found to comply with the limits for a Class A digital device, pursuant to part 15 of the FCC Rules. These limits are designed to provide reasonable protection against harmful interference when the equipment is operated in a commercial environment. This equipment generates, uses, and can radiate radio frequency energy and, if not installed and used in accordance with the instruction manual, may cause harmful interference to radio communications.
- Page 44 Please note that if you could not follow the instructions above, you will be subject to penalties of Radio Law of Japan. Texas Instruments Japan Limited (address) 24-1, Nishi-Shinjuku 6 chome, Shinjuku-ku, Tokyo, Japan http://www.tij.co.jp...
- Page 45 FDA Class III or similar classification, then you must specifically notify TI of such intent and enter into a separate Assurance and Indemnity Agreement. Mailing Address: Texas Instruments, Post Office Box 655303, Dallas, Texas 75265 Copyright © 2012, Texas Instruments Incorporated...
- Page 46 IMPORTANT NOTICE Texas Instruments Incorporated and its subsidiaries (TI) reserve the right to make corrections, enhancements, improvements and other changes to its semiconductor products and services per JESD46C and to discontinue any product or service per JESD48B. Buyers should obtain the latest relevant information before placing orders and should verify that such information is current and complete. All semiconductor products (also referred to herein as “components”) are sold subject to TI’s terms and conditions of sale supplied at the time...
Need help?
Do you have a question about the LMP90100 and is the answer not in the manual?
Questions and answers