
Related Manuals for OHIOSTEEL 4222V2


Summary of Contents for OHIOSTEEL 4222V2
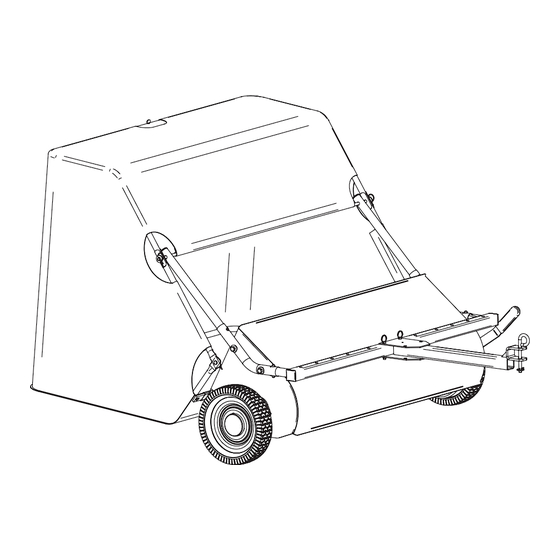
- Page 1 SCAN HERE VIDEO ASSEMBLY GUIDE 4222V2 22 cu ft LAWN SWEEPER U.S. Patent No. 7,610,646 READ AND FOLLOW ALL SAFETY RULES AND OPERATING INSTRUCTIONS BEFORE USING THIS EQUIPMENT 6004082 - REV C - 03/23...
-
Page 2: Safety Rules
Safety Rules This is the safety alert symbol. It is used to alert you to potential personal injury hazards. Obey all safety messages that follow this symbol to avoid possible injury or death. Read and understand all safety rules and operating instructions before using this tractor attachment. -
Page 3: Warranty
Paint that is worn or faded due to normal use or exposure. To arrange for product repair visit ohiosteel.com/customer-support and fill out the warranty repair form. You can also call 1-800-652-2321, ext. 212 to speak to our Customer Service Team This warranty gives you specific legal rights, and you may also have other rights which may vary from state to state. -
Page 4: Tools Required For Assembly
Carton Contents (x1) 6 (x2) 7 (x4) 10 (x4) 11 (x1) 8 (x4) 9 (x4) 12 & 49 (x7) 13 (x1) 14 (x1) 15 (x1) 38 (x1) 40 (x2) 39 (x2) 37 (x2) 41 (x2) 42 (x1) 43 (x1) 44 (x1) 45 (x2) 50 (x1) 48 (x2) - Page 5 Assembly Instructions Attach Hitch Mount Tubes (6) to Sweeper Assembly and tighten hardware. DO NOT OVERTIGHTEN. Attach Hitch Cross Tube Assembly (13) by depressing snap buttons and inserting into Hitch Mount Tubes (34). Install Hitch Assembly (14) using tethered quick release pins in desired position on Hitch Cross Tube Assembly (13).
- Page 6 Assembly Instructions First remove factory hand tightened nuts from studs. Use nuts to attach Height Adjustment Handle (15) Using a 9/16" Open End Box Wrench. Shown Installed: Insert Bottom Frame Tubes (39) into Center Frame Tube (41) and snap into position. (Note that snap buttons are oriented up) Snap Button...
- Page 7 Assembly Instructions Unroll and flatten hopper bag (38) from shipping state. Then, slide Hopper Stop Bar (42) into pocket of Hopper Bag as shown. First, place bottom frame assembly into bottom of Hopper Bag (38). Second, Install Clevis Pins (46) through Hopper Bag (38), Hopper Stop Bar (42), and Bottom Frame Tubes (39) then secure with Hairpins(49).
- Page 8 Assembly Instructions First, Place top frame assembly into Hopper Bag (38). Second, Install Clevis Pins (45) through Top Frame Tubes (40) and Bottom Frame Tubes (39) and secure with Hairpins (49). Snap Button Down Slide Hopper Pivot Rod (43) through Top Frame Tube (40) and Connecting Tube (37), then through pocket of Hopper Bag (38), and then through both Connecting Tube (37) and Top Frame Tube (40) on other side.
- Page 9 Assembly Instructions Unscrew Thumb Screw from Tension Tube Assembly (44). Next, Hold Hopper Bag (38) open and carefully insert Tension Tube Assembly (44) through opening in Hopper Bag and into hole in bottom Center Frame Tube (41). Pull top Center Frame Tube over tension tube and align holes.
- Page 10 Assembly Instructions Insert Connecting Tubes (37) into Hitch Mount Tubes (6) and secure with Quick-Release Pins (48). Install Hitch Pin (11) and secure with Hairpin(12). Tie Dump Rope (50) securely around exposed section of Center Frame Tube(41). Do NOT fasten rope to any part of your body or clothing.
- Page 11 Operating Instructions Before Using Lawn Sweeper: Read all Safety Rules found on page 1. How to Sweep Lawn: Remove large debris from lawn. Do not sweep if conditions are too wet or muddy. Attach Lawn Sweeper to tractor using supplied hitch pin. The reversable hitch allows the Lawn Sweeper to accomodate varying tractor hitch heights by fliping over;...
- Page 12 Operating Instructions How to Adjust Brush Height: Place one hand on adjustment lever and use other hand to pull outward on plunger. Move handle downwards to lower the brush height or upwards to raise the brush height. Align the plunger with the nearest hole and release to select height setting. Offset Sweeping: Remove both pins from drawbar.
- Page 13 Operating Instructions Storing Lawn Sweeper: Empty hopper bag and thoroughly clean Lawn Sweeper before storing. Store Lawn Sweeper away from excessive heat to prevent damage. Brushes must not contact ground during storage to prevent damage. Remove quick-release pins to separate hopper bag from Lawn Sweeper. Carefully remove tension tube and collapse hopper bag for compact storage.
-
Page 14: Repair Parts
3000539-ZC 1/4" -20 X 1-1/4" BOLT 6003957-B2 HEIGHT ADJ. HANDLE 307321 42" SPIRAL BRUSH 307241 WHEEL CAP 6000222-ZC SNAP BUTTON 300081-ZC COTTER PIN, 1/8" X 1-1/2" 3000618-ZB NYLOCK NUT, 3/8-16 UNC 3000721-ZC WASHER, 3/4" SAE ohiosteel.com/partsstore OHIO STEEL INDUSTRIES 1-800-652-2321... - Page 15 CLEVIS PIN, 1/4" X 1-1/4" BOTTOM FRAME TUBE 3/8" USS FLAT WASHER 6004344 TOP FRAME TUBE QUICK-RELEASE PIN 6004133-B2 CENTER FRAME TUBE HAIRPIN TENSION TUBE ASSEMBLY 307361 DUMP ROPE 307051-B2 HOPPER PIVOT ROD 6000208-ZC SNAP BUTTON 307061-B2 HOPPER STOP BAR ohiosteel.com/partstore OHIO STEEL INDUSTRIES1-800-652-2321...
- Page 16 Proudly designed and Manufactured in the U.S.A from tested in Columbus, Ohio domestic and imported components 16504 42222 MODEL # 4222V2...
Need help?
Do you have a question about the 4222V2 and is the answer not in the manual?
Questions and answers
How do I replace the adjustment handle attachment bolt on a model 4222V2 ohio steel lawn sweeper