Table of Contents
Advertisement
B Y
BasementSentry.com
B Y
Zoeller® is a registered trademark of Zoeller
Zoeller® is a registered trademark of Zoeller
Co. All Rights Reserved.
Co. All Rights Reserved.
BasementSentry.com
ATTACH YOUR RECEIPT HERE
Purchase Date
Questions, problems, missing parts? Before returning to your retailer, call our customer
service department at 1-800-584-8089, 7:30 a.m. - 5:00 p.m., EST, Monday - Friday.
HIGH PERFORMANCE
HIGH PERFORMANCE
SUMP PUMP COMBO
1
© 2020. All rights reserved.
SUMP PUMP
COMBO
MODEL STBC201Q
MODEL #STBC201
Español p. 23
PN 156409 A SW1505 A
Advertisement
Table of Contents

Subscribe to Our Youtube Channel
Related Manuals for Zoeller BASEMENT SENTRY STBC201Q


Summary of Contents for Zoeller BASEMENT SENTRY STBC201Q
- Page 1 SUMP PUMP COMBO SUMP PUMP COMBO MODEL STBC201Q BasementSentry.com MODEL #STBC201 Zoeller® is a registered trademark of Zoeller Zoeller® is a registered trademark of Zoeller Co. All Rights Reserved. Co. All Rights Reserved. Español p. 23 BasementSentry.com ATTACH YOUR RECEIPT HERE...
-
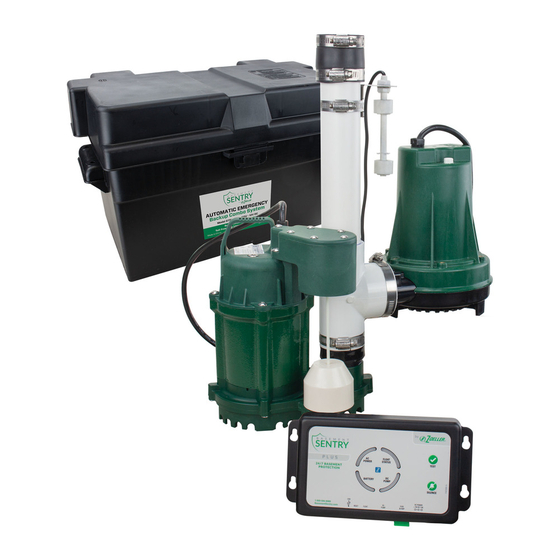
Page 2: Package Contents
PACKAGE CONTENTS DESCRIPTION QUANTITY Primary/backup pump and pipe assembly (Includes a high-capacity primary pump, back-up pump, controller, alarm system, battery charger, PVC pipe with fi ttings, inline check valve) Battery box Controller AC wall adapter SAFETY INFORMATION Please read and understand this entire manual before attempting to assemble, operate, or install the product. - Page 3 SAFETY INFORMATION SAFETY INFORMATION WARNING WARNING • • ELECTRICAL SHOCK ALERT. ELECTRICAL SHOCK ALERT. Do not disassemble the motor housing. The motor has NO repairable internal parts and disassembly may Do not disassemble the motor housing. The motor has NO repairable internal parts and disassembly may cause dangerous electrical wiring issues.
-
Page 4: General Pump Information
PREPARATION Estimated Installation Time: 1-2 hours Materials required for assembly: Basement Sentry brand deep cycle battery 1-1/2-in. Schedule 40 PVC pipe and fittings, PVC primer and glue, Phillips screw driver, hand saw SPECIFICATIONS PERFORMANCE IN GALLONS PER MINUTE PUMP 0 FT. 5 FT. -
Page 5: Installation Instructions
115 V GFCI outlet INSTALLATION INSTRUCTIONS NOTE: Install the battery backup system when the primary pump is not needed. Read instructions and prepare all supplies before beginning installation. Disconnect power to primary sump and remove from sump basin. NOTE:; Before gluing any fi ttings, dry fi t all connections to verify proper fi t. - Page 6 INSTALLATION INSTRUCTIONS 4. Place the battery inside the battery box and connect To controller the leads from the controller to the battery terminals. Connect positive (+) lead to positive terminal on the battery and black negative (-) lead to the negative battery terminal.
- Page 7 INSTALLATION INSTRUCTIONS Reconnect power to the primary sump pump. GFCI Outlet FLOAT POWER STATUS TEST 24/7 BASEMENT PROTECTION BATTERY PUMP SILENCE 1-800-584-8089 DC POWER BasementSentry.com RESET FLOAT PUMP FUSE 30 AMP + 15V DC 1.6A BASEMENT SENTRY CONTROLLER FUNCTIONS There are two buttons on the front of the controller. 1.
- Page 8 BASEMENT SENTRY LED LIGHT FUNCTIONS FLOAT FLOAT FLOAT FLOAT POWER STATUS POWER POWER STATUS STATUS POWER STATUS BATTERY BATTERY BATTERY BATTERY PUMP PUMP PUMP PUMP PUMP PUMP PUMP PUMP CONNECTING THE CONTROLLER TO Z CONTROL ® By connecting the controller to the Z Control Cloud There are two ways to connect the Basement Sentry ®...
- Page 9 CONNECTING THE CONTROLLER TO Z CONTROL ® Option 1 - Use the Mobile App (iOS and Android) (Continued) These instructions provide an overview of what the app will do. You may find additional steps needed. 1. Open the app and sign in to your account, or create an account using the link at the bottom.
- Page 10 CONNECTING THE CONTROLLER TO Z CONTROL ® Use the Mobile App (iOS and Android) (Continued) 4. Once a location is created, you will need to add a device. To add a device, choose the desired location Touch + name and then touch the “+” to start adding a device. to add a Allow access to the camera so you can scan the data device...
- Page 11 CONNECTING THE CONTROLLER TO Z CONTROL ® Use the Mobile App (iOS and Android) (Continued) 7. You can now return to the Z Control app to find your new ® device set up in the location you previously selected. You can always change a device to a different location in your account.
- Page 12 CONNECTING THE CONTROLLER TO Z CONTROL ® Option 2 - Use your mobile device or computer to connect directly to the Basement Sentry controller Instead of using a mobile device and the Z Control • Band steering may need to be temporarily turned ®...
- Page 13 CONNECTING THE CONTROLLER TO Z CONTROL ® Connecting with your mobile device or computer (Continued) 2. Standing near the controller, use your phone, tablet, or computer to look for the Basement Sentry controller SSID in your WiFi settings. It will look similar to “ZCTL_Fit_xxxx” where “xxxx”...
- Page 14 CONNECTING THE CONTROLLER TO Z CONTROL ® Connecting with your mobile device or computer (Continued) 4. Once the controller LED is solid, log in to your account (or create one) at zcontrolcloud.com. Click WiFi Scan button Available WiFi will show here. Choose the one you want.
-
Page 15: Start-Up And Operation
CONNECTING THE CONTROLLER TO Z CONTROL ® Firmware Updates The Basement Sentry controller is capable of OTA, turn off while the update is being installed. After up or over-the-air firmware updates. It’s possible that to one minute, the controller will restart and return the controller could perform an update immediately if to normal operation. - Page 16 START-UP AND OPERATION 2. Check the controller. The system light should be green when the unit is plugged into a 115V outlet. P L U S FLOAT FLOAT POWER POWER STATUS STATUS TEST 24/7 BASEMENT 24/7 BASEMENT PROTECTION PROTECTION All lights BATTERY BATTERY PUMP...
- Page 17 START-UP AND OPERATION 5. Lift the lower (operational) float on the backup pump float switch. After one second, the backup pump will run and the alarm will sound. Be sure the inlet of the backup pump is above the inlet of the primary pump. Press ‘Silence’...
- Page 18 START-UP AND OPERATION 8. Push the ‘Silence’ button when the pump is running to turn off the alarm. The pump will continue to run for an additional ten seconds after the float has been lowered or until the controller senses water is being pumped.
-
Page 19: Care And Maintenance
CARE AND MAINTENANCE WARNING: Always disconnect pump from power source before handling. At least every three months inspect and test operation: 1.. Check to be sure green ‘system ready’ light is on (indicates AC power is on and there are no alarm conditions) 2. - Page 20 BATTERY This backup system requires a good quality, 12V battery in order to provide maximum pumping time when needed. A Basement Sentry brand battery is recommended. Otherwise, use an AGM deep-cycle 12 volt 105 amp-hour marine battery or larger. Wet cell batteries contain acid and precautions must be taken when handling.
-
Page 21: Troubleshooting
TROUBLESHOOTING DANGER RISK OF ELECTRIC SHOCK. Always disconnect power source before attempting to install, service, or maintain the pump. Never handle a pump with wet hands or when standing on wet or damp surface or in water. Fatal electrical shock could occur. PROBLEM POSSIBLE CAUSE CORRECTIVE ACTION... -
Page 22: Warranty
WARRANTY This product is warranted for three years from the date of purchase. Subject to the conditions hereinafter set forth, the manufacturer will repair or replace to the original consumer any portion of the product which proves defective due to defective materials or workmanship. To obtain warranty service, contact the dealer from whom the product was purchased.
Need help?
Do you have a question about the BASEMENT SENTRY STBC201Q and is the answer not in the manual?
Questions and answers