Table of Contents
Advertisement
Available languages
Available languages
Quick Links
本文件含美的集团保密信息,禁止任何人未
经授权以任何形式使用(包含不限于全部或
部分地泄露 、 复制或散发)
A
技术要求:
1.该手册印刷颜色均为黑色 : PANTONE BLACK C
2.纸张规格
3.如果供应商的排版需要加空白页,请加在封底之前
4. 需要符合 QMWD-J03.092-2021 产品说明书技术条件;
5. 说明书纸张材料、装订用书钉、印刷油墨及光油,须符合欧盟 REACH 法规、
PAHs 指令及 RoHS 指令等环保指令要求 , 详见 QMWD-J15.001 洗碗机公司
产品及零部件绿色 设计通则。
B
封底按要求印刷物料条码,
红色字和框不用印刷
C
标记
处数 分区
D
编
制
审 核
审 定
批 准
1
1
为
145X210MM
更改文件号 签 名
校对
性能
排版
日期
用户手册
MDW 10E4(7714N)
MIDEA (意大利)
日 期
阶 段 标 记
0
0
REV.
数
量
重
1
共
1
张
第
2
671003150
比 例
80G双胶
1:1
量
佛山市顺德区美的
洗涤电器制造有限公司
1
张
2
A
B
C
0
D
D
Advertisement
Chapters
Table of Contents

Related Manuals for Midea MDW 10E4 S


Summary of Contents for Midea MDW 10E4 S
- Page 1 4. 需要符合 QMWD-J03.092-2021 产品说明书技术条件; 5. 说明书纸张材料、装订用书钉、印刷油墨及光油,须符合欧盟 REACH 法规、 PAHs 指令及 RoHS 指令等环保指令要求 , 详见 QMWD-J15.001 洗碗机公司 产品及零部件绿色 设计通则。 封底按要求印刷物料条码, 红色字和框不用印刷 用户手册 671003150 MDW 10E4(7714N) MIDEA (意大利) 标记 处数 分区 更改文件号 签 名 日 期 阶 段 标 记 比 例 80G双胶 校对...
- Page 2 Lavastoviglie MANUALE UTENTE MDW 10E4 S Avvertenze: Prima di utilizzare questo prodotto, leggere attentamente questo manuale e conservarlo per riferimento futuro. La progettazione e le specifiche sono soggette a modifiche senza preavviso per il miglioramento del prodotto. Consultare il rivenditore o il produttore per maggiori dettagli.
-
Page 3: Table Of Contents
LETTERA DI RINGRAZIAMENTO Grazie per aver scelto Midea! Prima di utilizzare il nuovo prodotto Midea, leggere attentamente questo manuale per assicurarsi di sapere come utilizzare le caratteristiche e le funzioni offerte dal nuovo apparecchio in modo sicuro. INDICE LETTERA DI RINGRAZIAMENTO... -
Page 4: Istruzioni Di Sicurezza
ISTRUZIONI DI SICUREZZA Destinazione d'uso • Le seguenti linee guida sulla sicurezza hanno lo scopo di prevenire rischi imprevisti o danni derivanti da un funzionamento non sicuro o non corretto dell'apparecchio. Si prega di controllare l'imballaggio e l'apparecchio all'arrivo per assicurarsi che tutto sia intatto per garantire un funzionamento sicuro. - Page 5 Attenzione La parola segnale indica un pericolo con un basso grado di rischio che, se non evitato, può provocare lesioni lievi o moderate. Attenzione La parola segnale indica informazioni importanti (ad es. danni alle cose), ma non pericolo. Attenersi alle istruzioni Questo simbolo indica che un tecnico dell'assistenza deve utilizzare e mantenere questo apparecchio solo in conformità...
- Page 6 PERICOLO: rischio di incendio/materiali infiammabili • Quando si utilizza la lavastoviglie, seguire le precauzioni elencate di seguito: • L'installazione e la riparazione possono essere eseguite solo da un tecnico qualificato. • Questo apparecchio è destinato a essere utilizzato in ambienti domestici e simili, come ad esempio: - aree cucina per il personale di negozi, aziende e altri ambienti di lavoro;...
- Page 7 • Questo apparecchio è destinato esclusivamente all'uso domestico interno. Per evitare il rischio di scosse elettriche, non immergere l'apparecchio, il cavo o la spina in acqua o altri liquidi. • Prima di procedere alla pulizia e alla manutenzione dell'apparecchio, staccare la spina. Utilizzare un panno morbido inumidito con sapone neutro, quindi utilizzare un panno asciutto per pulirlo nuovamente.
- Page 8 • Non mettere in funzione la lavastoviglie se tutti i pannelli dell'involucro non sono correttamente posizionati. • Aprire lo sportello con molta cautela se la lavastoviglie è in funzione, perché c'è il rischio che l'acqua fuoriesca. • Non appoggiare oggetti pesanti sullo sportello quando questo è...
- Page 9 • Non manomettere i comandi. • L'apparecchio deve essere collegato alla valvola principale dell'acqua utilizzando nuovi set di tubi flessibili. I vecchi set non devono essere riutilizzati. • Per risparmiare energia, in modalità standby l'apparecchio si spegne automaticamente dopo 15 minuti senza che l'utente debba intervenire.
-
Page 10: Specifiche
SPECIFICHE Altezza (A) 815 mm Larghezza (L) 448 mm Profondità (D1) 550 mm (con lo sportello chiuso) Profondità (D2) 1150 mm (con lo sportello aperto 90°) - Page 11 Scheda informativa del prodotto (EN60436) Nome del fornitore o marchio commerciale: Midea Indirizzo del fornitore ( ): Midea Italia S.r.l. a socio unico viale Luigi Bodio 29/37 201 58 Milano, Italia Identificativo del modello: MDW 10E4 S Parametri generali del prodotto:...
-
Page 12: Panoramica Del Prodotto
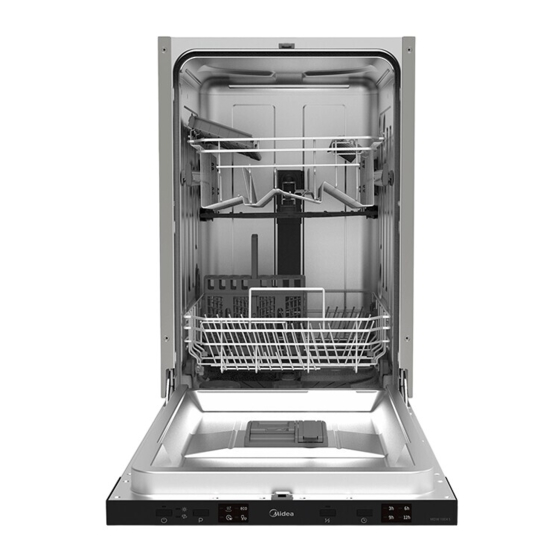
PANORAMICA DEL PRODOTTO Prodotto IMPORTANTE Per ottenere le migliori prestazioni dalla lavastoviglie, leggere tutte le istruzioni per l'uso prima di utilizzarla per la prima volta. Tubo interno Braccio spruzzo inferiore Contenitore sale Gruppo filtro Dispenser Braccio spruzzo Cestello Cestello superiore bicchieri posate Cestello posate... -
Page 13: Guida Di Avvio Rapido
GUIDA DI AVVIO RAPIDO Per informazioni dettagliate sulle modalità di funzionamento, leggere il contenuto delle istruzioni per l’uso. 1. Installare la lavastoviglie. 2. Rimuovere i residui più 3. Caricare I cestelli. grossi dalle stoviglie. Evitare il pre-sciacquo. Interno Esterno 4. Riempire il dispenser con il 5. -
Page 14: Installazione Del Prodotto
INSTALLAZIONE DEL PRODOTTO ATTENZIONE Pericolo di scosse elettriche Scollegare l'alimentazione elettrica prima di installare la lavastoviglie. La mancata osservanza di questa precauzione potrebbe causare morte o scosse elettriche. Attenzione L'installazione delle tubature e delle apparecchiature elettriche deve essere effettuata da professionisti. Informazioni sul collegamento elettrico ATTENZIONE Per la sicurezza personale:... - Page 15 Informazioni sul tubo di alimentazione di sicurezza Il tubo di alimentazione di sicurezza è costituito da una doppia parete. Il sistema garantisce il suo intervento bloccando il flusso d'acqua in caso di rottura del tubo di alimentazione e quando l'intercapedine tra il tubo di alimentazione stesso e il tubo corrugato esterno è...
- Page 16 Come scaricare l'acqua in eccesso dai tubi flessibili Se il collegamento al tubo di scarico è posizionato più in alto di 1000 mm, è possibile che l'acqua in eccesso rimanga nel tubo di scarico. Sarà necessario scaricare l'acqua in eccesso dal tubo in una bacinella o in un contenitore adatto, tenuto all'esterno e più basso del lavello.
- Page 17 2. Se la lavastoviglie è installata nell'angolo del mobile, deve esserci un po' di spazio quando si apre lo sportello. Lavastoviglie Mobile A seconda della posizione della presa elettrica, potrebbe Sportello essere necessario praticare un foro sul lato opposto del della mobile.
- Page 18 Modello completamente integrato Installare il gancio sul pannello decorativo e inserire il gancio nella fessura dello sportello esterno della lavastoviglie (vedere la figura A). Dopo aver posizionato il pannello, fissarlo sullo sportello esterno con viti e bulloni (vedere la figura B). 1.
- Page 19 9. La lavastoviglie deve essere fissata in posizione. Esistono due modi per farlo: A. Piano di lavoro normale: Inserire il gancio di installazione nella fessura del piano laterale e fissarlo al piano di lavoro con le viti. B. Piano di lavoro in marmo o granito: Fissare il lato con le viti. Fase 5.
-
Page 20: Istruzioni Per Il Funzionamento
ISTRUZIONI PER IL FUNZIONAMENTO Pannello di controllo Descrizione • Premere questo pulsante per accendere la Accensione lavastoviglie. • Selezionare il programma di lavaggio appropriato; Programma l'indicatore del programma selezionato si accende. Quando si devono lavare circa o meno della ● metà... - Page 21 Programmi La tabella seguente mostra quali sono i programmi migliori in base ai livelli di residui di cibo presenti e alla quantità di detersivo necessaria. Mostra inoltre varie informazioni sui programmi. I valori di consumo e la durata del programma sono solo indicativi, tranne che per il programma ECO.
- Page 22 Preparazione e caricamento dei piatti Considerare l'acquisto di utensili identificati come resistenti alla lavastoviglie. Per articoli particolari, selezionare un programma con la temperatura più bassa possibile. Per evitare danni, non tirare fuori dalla lavastoviglie bicchieri e posate subito dopo la fine del programma.
- Page 23 Rimozione dei piatti Per evitare che l'acqua goccioli dal cestello superiore a quello inferiore, si consiglia di svuotare prima il cestello inferiore e poi quello superiore. ATTENZIONE Gli oggetti saranno caldi! Per evitare danni, non estrarre bicchieri e posate dalla lavastoviglie per circa 15 minuti dopo la fine del programma.
- Page 24 CARICAMENTO DEI CESTELLI SECONDO LA NORMA EN60436: Caricare la lavastoviglie al massimo della sua capacità contribuisce al risparmio di energia e di acqua. 1. Cestello superiore: Numero Oggetto Tazze Piattini Bicchieri Tazze Ciotole da dessert Ciotole di vetro Numero Oggetto Piatti da dessert 2.
- Page 25 3. Portaposate: 4. Cestello per posate: Numero Oggetto Cucchiai da minestra Forchette Coltelli 4 4 4 Cucchiai da tè Cucchiaini da dessert Informazioni per i test di comparabilità secondo la norma EN60436 Cucchiai da portata Capacità: 10 coperti Forchetta da portata Posizione del cestello superiore: posizione inferiore Mestolo da sugo...
- Page 26 Suggerimenti per il caricamento del cestello Regolazione cestello superiore l'altezza del cestello superiore può essere facilmente regolata per sistemare i piatti più grandi nel cestello superiore o inferiore. per regolare l'altezza del cestello superiore, procedere come segue: 1.estrarre il cestello superiore 2.rimuovere il cestello superiore posizione inferiore 3.riattaccare il cestello superiore con le...
- Page 27 Caricamento del sale nell'addolcitore NOTA Se il modello non è dotato di addolcitore d'acqua, è possibile saltare questa sezione. Utilizzare sempre il sale per lavastoviglie. La durezza dell'acqua varia da luogo a luogo. Se si utilizza acqua dura nella lavastoviglie, si formano depositi sulle stoviglie e sugli utensili. L'apparecchio è...
- Page 28 Addolcitore d'acqua L'addolcitore deve essere impostato manualmente, utilizzando il selettore della durezza dell'acqua. L'addolcitore d'acqua è progettato per rimuovere dall'acqua i minerali e i sali che potrebbero avere un effetto negativo o nocivo sul funzionamento dell'apparecchio. Più minerali ci sono, più l'acqua è dura. L'addolcitore deve essere regolato in base alla durezza dell'acqua della zona.
- Page 29 Funzione del brillantante e del detersivo Il brillantante viene rilasciato durante il risciacquo finale per evitare che l'acqua formi gocce sulle stoviglie, che possono lasciare macchie e aloni. Inoltre, migliora l'asciugatura consentendo all'acqua di rotolare via dalle stoviglie. La lavastoviglie è progettata per l'uso di brillantanti liquidi.
- Page 30 Riempimento del serbatoio del brillantante 2. . Versare con cautela il brillantante n 1. Rimuovere il tappo del serbatoio d dosatore, evitando che trabocchi. brillantante ruotandolo in senso antiorario. 3. . Chiudere il tappo del serbatoio d brillantante ruotandolo in senso orario.
- Page 31 Riempimento del dosatore di detersivo 2. Aggiungere il detersivo nella cavità 1. Premere il fermo di sblocco sul più grande (A) per il lavaggio dosatore di detersivo per aprire il principale. Per i carichi di lavaggio più coperchio. sporchi, aggiungere un po' di deter- sivo anche nella cavità...
- Page 32 Avvio di un programma 1. Estrarre il cestello inferiore e quello superiore, caricare le stoviglie e spingerle indietro. Si consiglia di caricare prima il cestello inferiore e poi quello superiore. 2. Versare il detersivo. 3. Inserire la spina nella presa di corrente. Per l'alimentazione elettrica fare riferimento all'ultima pagina "Scheda prodotto".
-
Page 33: Pulizia E Manutenzione
PULIZIA E MANUTENZIONE Manutenzione esterna Lo sportello e la guarnizione dello sportello Pulire regolarmente le guarnizioni dello sportello con un panno morbido e umido per rimuovere i depositi di cibo. Durante il caricamento della lavastoviglie, i residui di cibo e bevande possono gocciolare sui lati dello sportello della lavastoviglie. Queste superfici si trovano all'esterno dell'armadio di lavaggio e non sono accessibili all'acqua dei bracci spruzzatori. - Page 34 3. resti di cibo più grandi possono essere 4. Rimontare i filtri nell'ordine inverso puliti sciacquando il filtro sotto l'acqua rispetto allo smontaggio, sostituire corrente. Per una pulizia più accurata, l'inserto del filtro e ruotare in senso utilizzare uno spazzolino morbido. orario fino alla freccia di chiusura.
- Page 35 Cura della lavastoviglie Prevenzione del gelo In inverno, adottare misure di protezione dal gelo per la lavastoviglie. Dopo ogni ciclo di lavaggio, operare come segue: 1. Interrompere l'alimentazione elettrica della lavastoviglie alla fonte di alimentazione. 2. Chiudere l'alimentazione dell'acqua e scollegare il tubo di ingresso dell'acqua dalla valvola dell'acqua.
-
Page 36: Risoluzione Dei Problemi
RISOLUZIONE DEI PROBLEMI Prima di chiamare il servizio di assistenza La lettura delle tabelle riportate nelle pagine seguenti può consentire di evitare una chiamata all'assistenza. Problema Soluzione Possibile causa • Fusibile bruciato o Sostituire il fusibile/ripristinare l'interruttore. Rimuovere eventuali altri interruzione del circuito. - Page 37 Possibile causa Soluzione Problema • Gli articoli interessati non Evitare di lavare in lavastoviglie sono resistenti alla oggetti non resistenti alla corrosione. corrosione. • Un programma non è stato Eseguire sempre un programma di eseguito dopo l'aggiunta lavaggio senza stoviglie dopo aver di sale per lavastoviglie.
- Page 38 Problema Possibile causa Soluzione • Gli utensili in alluminio Utilizzare un detersivo abrasivo Macchie nere o hanno sfregato contro le delicato per eliminare questi segni. grigie sulle stoviglie stoviglie. • I piatti bloccano il Ricaricare correttamente le stoviglie. Detersivo lasciato dosatore di detersivo nel dosatore •...
- Page 39 CODICI DI ERRORE In caso di malfunzionamento, la lavastoviglie visualizza un codice di errore. La tabella seguente mostra i possibili codici di errore e le relative cause. Problema Possibile causa Soluzione • Tempo di aspirazione I rubinetti non si aprono, l'ingresso più...
-
Page 40: Marchi, Diritti D'autore Edichiarazione Legale
DICHIARAZIONE LEGALE logo, marchi denominativi, nome commerciale, immagine commerciale e tutte le loro versioni sono beni di valore di Midea Group e/o delle sue affiliate ("Midea"), a cui Midea possiede marchi, diritti d'autore e altri diritti di proprietà intellettuale, e tutto l'avviamento derivante dall'utilizzo di qualsiasi parte di un marchio Midea. -
Page 41: Smaltimento E Riciclo
SMALTIMENTO E RICICLO Istruzioni importanti per l'ambiente Conformità alla direttiva RAEE e smaltimento del prodotto Waster: Questo prodotto è conforme alla direttiva EU 2012/19/EU. Questo prodotto reca un simbolo di classificazione per apparecchiature elettriche ed elettroniche di scarto (RAEE). Questo simbolo indica che il prodotto non deve essere smaltito con altri rifiuti domestici alla fine della sua vita utile. -
Page 42: Trattamento Dei Dati
Spazio economico europeo. Ulteriori informazioni sono disponibili su richiesta. Puoi contattare il nostro Responsabile della protezione dei dati all'indirizzo MideaDPO@midea.com. Per esercitare i tuoi diritti, come il diritto di opporti al trattamento dei tuoi dati personali per scopi di marketing diretto, ti preghiamo di contattarci tramite MideaDPO@midea.com. - Page 44 Dish Washer USER MANUAL MDW 10E4 S Warning notices: Before using this product, please read this manual carefully and keep it for future reference. The design and specifications are subject to change without prior notice for product improvement. Consult with your dealer or manufacturer for details.
-
Page 45: Thank You Letter
THANK YOU LETTER Thank you for choosing Midea! Before using your new Midea product, please read this manual thoroughly to ensure that you know how to operate the features and CONTENTS THANK YOU LETTER SAFETY INSTRUCTIONS SPECIFICATIONS PRODUCT OVERVIEW QUICK START GUIDE... -
Page 46: Safety Instructions
SAFETY INSTRUCTIONS Intended Use The following safety guidelines are intended to ● prevent unforeseen risks or damage from unsafe or incorrect operation of the appliance. Please check the packaging and appliance on arrival to make sure everything is intact to ensure safe operation. - Page 47 Caution The signal word indicates a hazard with a low degree of risk which, if not avoided, may result in minor or moderate injury. Attention The signal word indicates important information (e.g. damage to property), but not danger. Observe instructions This symbol indicates that a service technician should only operate and maintain this appliance in accordance with the...
- Page 48 DANGER: Risk of Fire/Flammable materials When using your dishwasher, follow the precautions ● ● listed below: Installation and repair can only be carried out by a ● qualified technician. This appliance is intended to be used in household ● and similar applications such as: -staff kitchen areas in shops, offices and other working environments;...
- Page 49 To protect against the risk of electrical shock, do not immerse the unit, cord or plug in water or other liquid. Please unplug before cleaning and maintenance the ● appliance. Use a soft cloth moisten with mild soap, and then use a dry cloth to wipe it again. If the supply cord is damaged, it must be replaced by ●...
- Page 50 operating, there is a risk of water squirting out. Do not place any heavy objects on or stand on the ● door when it is open. The appliance could tip forward. When loading items to be washed: ● 1) Locate sharp items so that they are not likely to damage the door seal;...
- Page 51 To save energy, in stand by mode, the appliance will ● switch of automatically after 15 minutes without any user interaction. The maximum number of place settings to be ● washed is 10. The maximum permissible inlet water pressure is ●...
-
Page 52: Specifications
SPECIFICATIONS Height (H) 815 mm Width (W) 448 mm Depth (D1) 550 mm (with the door closed) Depth (D2) 1150 mm (with the door opened 90°) - Page 53 Product information sheet (EN60436) Supplier's name or trade mark: Midea Midea Italia S.r.l. a socio unico viale Luigi Bodio 29/37 201 58 Milano, Italia Supplier's address ( ): Model identifier: MDW 10E4 S General product parameters: Parameter Parameter Value Value...
-
Page 54: Product Overview
PRODUCT OVERVIEW Product IMPORTRANT To get the best performance from your dishwasher, read all operating instructions before using it for the first time. Inner pipe Lower spray arm Salt container Filter assembly Dispenser Cutlery rack Upper spray Cup rack Cutlery basket Upper basket Lower basket NOTE... -
Page 55: Quick Start Guide
QUICK START GUIDE Please read the corresponding content in the instruction manual for detailed operating method. 1.Install the dishwasher 2. Remove larger residue 3. Load the baskets. from dishes. Avoid pre-rinsing. Inside Outside 4. Fill the dispenser with 5. Select a suitable program detergent and rinse aid. -
Page 56: Product Installation
PRODUCT INSTALLATION WARNING Electrical Shock Hazard Disconnect electrical power before installing dishwasher. Failure to do so could result in death or electrical shock. Attention The installation of the pipes and electrical equipments should be done by professionals. About Power Connection WARNING For personal safety: Do not use an extension cord or an adapter plug with this appliance. - Page 57 About the safety supply hose The safety supply hose consists of the double walls. The system guarantees its intervention by blocking the flow of water in case of the supply hose breaking and when the air space between the supply hose itself and the outer corrugated hose is full of water.
- Page 58 How to drain excess water from hoses If the connection to the drain pipe is positioned higher than 1000 mm, excess water may remain in the drain hose. It will be necessary to drain excess water from the hose into a bowl or suitable container that is held outside and lower than the sink. Water outlet Connect the water drain hose.
- Page 59 2. If dishwasher is installed at the corner of the cabinet, there should be some space when the door is opened. Dishwasher Cabinet Depending on where your electrical outlet is, you may need tocut a hole in the opposite cabinet side. Door of dishwasher Minimum space...
- Page 60 Fully-integrated model Install the hook on the aesthetic panel and put the hook into the slot of the outer door of dishwasher (see figure A). After positioning of the panel, fix the panel onto the outer door by screws and bolts (See figure B). 1.Take away the four short screws 2.Pin up the four long screws Step 3.
- Page 61 9. The dishwasher must be secured in place. There are two ways to do this: A. Normal work surface: Put the installation hook into the slot of the side plane and secure it to the work surface with the screws. B.
-
Page 62: Operation Instructions
OPERATION INSTRUCTIONS Control Panel Description Power No.1 Press this button to turn on your dishwasher. ● Select the appropriate washing program, the ● Program No.2 selected program indicator will be lit. When you have about or less than half of full place ●... - Page 63 Programmes The table below shows which programs are best for the levels of food residue on them and how much detergent is needed. It also show various information about the programs. Consumption values and program duration are only indicative except for the ECO program.
- Page 64 Preparing And Loading Dishes Consider buying utensils which are identified as dishwasher-proof. For particular items, select a program with the lowest possible temperature. To prevent damage, do not take glass and cutlery out of the dishwasher immediately after the program has ended. For washing the following cutlery/dishes Are not suitable Cutlery with wooden, horn china or mother-of-pearl handles...
- Page 65 Removing the dishes To prevent water dripping from the upper basket into the lower basket, we recommend that you empty the lower basket first, followed by the upper basket. WARNING Items will be hot! To prevent damage, do not take glass and cutlery out of the dishwasher for around 15 minutes after the program has ended.
- Page 66 LOADING THE BASKETS ACCORDING TO EN60436: Loading the dishwasher to its full capacity will contribute to energy and water savings. 1.Upper basket: Number Item Cups Saucers Glasses Mugs Dessert bowls Glass bowl 2.Lower basket: Number Item Dessert plates Dinner plates Soup plates Melamine dessert plates Melamine bowl...
- Page 67 3.Cutlery rack: NOTE Please place the light flat wares on the shelf. The maximum loading weight is 1.5kg. 4.Cutlery basket: Number Item Soup spoons Forks Knives 4 4 4 Tea spoons Dessert spoons Information for comparability tests in accordance with EN60436 Serving spoons Capacity: 10 place settings Serving fork...
- Page 68 Basket Loading Tips Adjusting the upper basket The height of the upper basket can be easily adjusted to accommodate taller dishes in either the upper or lower basket. To adjust the height of the upper rack, follow these steps: 1. Pull out the upper basket. 2.
- Page 69 Loading The Salt Into The Softener NOTE If your model does not have any water softener, you may skip this section. Always use salt intended for dishwasher use. The hardness of the water varies from place to place. If hard water is used in the dishwasher, deposits will form on the dishes and utensils.
- Page 70 Water Softener The water softener must be set manually, using the water hardness dial. The water softener is designed to remove minerals and salts from the water, which would have a detrimental or adverse effect on the operation of the appliance. The more minerals there are, the harder your water is.
- Page 71 Function Of The Rinse Aid And Detergent The rinse aid is released during the final rinse to prevent water from forming droplets on your dishes, which can leave spots and streaks. It also improves drying by allowing water to roll off the dishes. Your dishwasher is designed to use liquid rinse aids. WARNING Only use branded rinse aid for dishwasher.
- Page 72 Filling The Rinse Aid Reservoir 1. Remove the rinse aid reservoir cap 2. Carefully pour in the rinse aid into by rotating it counterclockwise. the dispenser, whilst avoiding it to overflow. 3. Close the rinse aid reservoir cap by rotating it clockwise. Adjusting the rinse aid reservoir Adjust lever(Rinse) Turn the rinse aid indicator dial to a number.
- Page 73 Filling The Detergent Dispenser 1. Press the release latch on the 2. Add detergent into the larger cavity detergent dispenser to open (A) for main wash. For more heavily the cover. soiled wash loads, also add some detergent into the smaller cavity (B) for release during pre-wash.
- Page 74 Starting A Program 1. Draw out the lower and upper basket, load the dishes and push them back. It is commended to load the lower basket first, then the upper one. 2. Pour in the detergent. 3. Insert the plug into the socket. The power supply refer to last page ”Product fiche”. Make sure that the water supply is turned on to full pressure.
-
Page 75: Cleaning And Maintenance
CLEANING AND MAINTENANCE External Care The door and the door seal Clean the door seals regularly with a soft damp cloth to remove food deposits.When the dishwasher is being loaded, food and drink residues may drip onto the sides of the dishwasher door. - Page 76 3. Larger food remnants can be 4. Reassemble the filters in the reverse cleaned by rinsing the filter under order of the disassembly, replace the running water. For a more thorough filter insert, and rotate clockwise to clean, use a soft cleaning brush. the close arrow.
- Page 77 Caring For The Dishwasher Frost precaution Please take frost protection measures on the dishwasher in winter. Every time after washing cycles, please operate as follows: 1. Cut off the electrical power to the dishwasher at the supply source. 2. Turn off the water supply and disconnect the water inlet pipe from the water valve. 3.
-
Page 78: Troubleshooting
TROUBLESHOOTING Before Calling For Service Reviewing the charts on the following pages may save you from calling for service. Problem Possible reason Solution Fuse blown, or the Replace fuse or reset circuit breaker. ● circuit break tripped. Remove any other appliances sharing the same circuit with the dishwasher. - Page 79 Problem Possible reason Solution The affected items Avoid washing items that are not ● are not corrosion resistant. corrosion resistant in the dishwasher. A program Always run a wash program ● was not run after without any crockery after adding dishwasher salt was salt.
- Page 80 Problem Possible reason Solution Aluminium utensils Use a mild abrasive cleaner to Black or grey ● have rubbed against eliminate those marks. marks on dishes dishes Dishes block Re-loading the dishes properly. Detergent left in ● detergent dispenser dispenser Improper loading Use gloves if detergent residue can ●...
- Page 81 ERROR CODES If there is a malfunction the dishwasher will display an error code. The following table shows possible error codes and their causes. Problem Possible reason Solution Longer inlet time. Faucets is not opened, or water The Rapid light ●...
-
Page 82: Trademarks, Copyrights And Legal Statement
Midea may constitute trademark infringement or unfair competition in violation of relevant laws. This manual is created by Midea and Midea reserves all copyrights thereof. No entity or individual may use, duplicate, modify, distribute in whole or in part this manual, or bundle or sell with other products without the prior written consent of Midea. -
Page 83: Disposal And Recycling
DISPOSAL AND RECYCLING Important instructions for environment Compliance with the WEEE Directive and Disposing of the Waster Product: This product complies with EU WEEE Directive (2012/19/EU). This product bears a classification symbol for waster electrical and electronic equipment (WEEE). This symbol indicates that this product shall not be disposed with other household wastes at the end of its service life. -
Page 84: Data Protection Notice
European Economic Area. Further information are provided on request. You can contact our Data Protection MideaDPO@midea.com. To exercise your rights such as right to object your personal date being processed for direct marketing purposes, please contact us via MideaDPO@midea.com. To find further information, please follow the QR Code. - Page 85 00000000000000 此红框内丝印此用户手册对应的14位物料编码 红色框不需印刷 字体为Gotham-Book 8pt 位置大小严格按图纸操作...
Need help?
Do you have a question about the MDW 10E4 S and is the answer not in the manual?
Questions and answers