Roche cobas Urisys 1100 Owner's Manual
Hide thumbs
Also See for cobas Urisys 1100:
- Operator's manual (94 pages) ,
- Operator's manual (66 pages) ,
- Quick reference manual (2 pages)
Table of Contents
Advertisement
Quick Links
Advertisement
Table of Contents

Subscribe to Our Youtube Channel
Related Manuals for Roche cobas Urisys 1100


Summary of Contents for Roche cobas Urisys 1100
- Page 1 Urisys 1100 ® Operator’s Manual...
- Page 3 Symbols and Abbreviations The packaging material, the identification plate on the instrument and the manual may contain the following symbols or abbreviations: Please consult instructions for use Caution (refer to accompanying documents). Please refer to safety-related notes in the manual accompanying this instrument.
-
Page 5: Table Of Contents
Table of Contents Introduction System Description Measuring Principle Components and Functions Software Overview Menu Structure (Flowchart) Menu Functions Results Table Changing the Range Limits Installation Operator ID Authentication Calibration Quality control (QC) Reading Test Strips Overview Normal Mode (for Single Readings) Patient Report Fast Mode (for Serial Readings) Strip Measurement Error... -
Page 7: Introduction
Test ® from Roche Diagnostics. It reads the strips under standard ized conditions, saves the results to memory and outputs them via its own inbuilt printer and/or serial interface. COBAS, LIFE NEEDS ANSWERS, URISYS, URISYS 1100, COMBUR-TEST, CHEMSTRIP and REFLOTRON are trademarks of Roche. -
Page 8: System Description
2. System Description Measuring Principle The test strip is placed on a sliding test strip tray, and a stepping motor moves it under the reading head, which remains stationary. The ana lyzer reads the reference pad, followed by each of the test pads on the strip. The reading head contains LEDs that emit light at various wavelengths. -
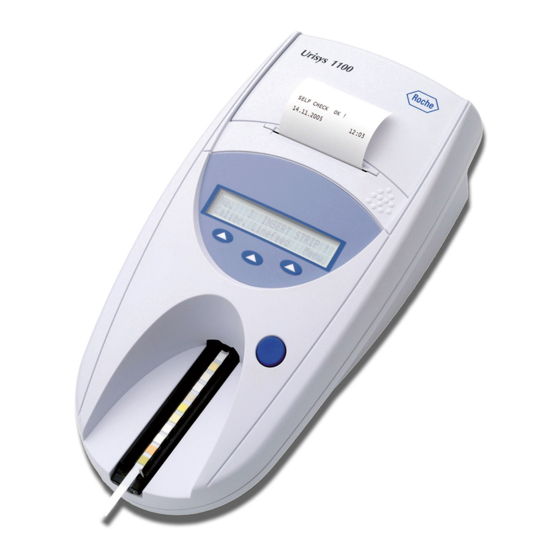
Page 9: Components And Functions
Components and Functions Component Function 1 Printer cover Flips up for insertion of printer paper 2 Display/keypad LCD display and three function keys for menu-driven operation and interfacing with the user 3 Test strip tray Holds and anchors the strip 4 START button •... -
Page 10: Menu Structure (Flowchart)
Menu Structure (Flowchart) Pressing the START button confirms the setting, closes the submenu, and resumes Ready-to-Measure status. SW > = 5 .7 (International Version) SELF CHECK Op.ID=ON OPERATOR: ……. Enter new Op.ID! PASSWORD: Op.ID=OFF Enter password! AUTH.=OFF PASSWORD=O.K. No.: … INSERT STRIP ! Ready-to-Measure Status Calibr. - Page 11 Menu Structure (continued) Pressing the START button confirms the setting, closes the submenu, and resumes Ready-to-Measure status. SW > = 5 .7 (International Version) SETUP 1 Modes Setup2 Strip STRIP SETTINGS SETUP 2 Units Limits Date/Time Par. Setup3 UNITS: CONV Single Combined DD.MM.YYYY...
-
Page 12: Menu Functions
Menu Functions Self Check: During Self Check at power-on, the analyzer automatically checks that the program chip, the test strip tray transport mechanism, the printer connection and optical system are all OK. The test strip tray type is checked (see Section 4) to ensure that it correctly matches the strip type selected in the menu. - Page 13 Units: Options are: • Conventional units (mg/dL) • SI units (mmol/L) • Arbitrary units (1+, 2+, 3+, 4+) Either single units or combined units (conventional/arbitrary or SI/arbitrary) can be selected. The operator selects a unit in which the results are to be stored, printed and/or transferred to a computer. After a new unit has been selected, the repeat printout (activated by “Print Results”) and all following printouts and/or data transfer (activated by “Send Results”) will be in the newly chosen unit.
-
Page 14: Results Table
Results Table The Urisys 1100 system prints the results in the following gradation of concentration: Parameter Conventional Units SI Units (SI) Arbitrary Units (Conv.) (Arbitrary) SG (Specific Gravity) 1.000 1.000 1.000 1.005 1.005 1.005 1.010 1.010 1.010 1.015 1.015 1.015 1.020 1.020 1.020... -
Page 15: Changing The Range Limits
Changed range limits apply only to the test strip type for which the changes are made. CAUTION: The correctness of results obtained after the user has altered the ranges or reflectance values is not warranted by Roche Diagnostics. The user is responsible for validating the consistency of results after changes have been made. - Page 16 CAUTION: To ensure your readings are always accurate, do not set up the Urisys 1100 system in close proximity to devices that create high-frequency fields, as they may interfere and produce false results. Such devices include, for instance, walkie-talkies, mobile telephones, microwave ovens and diathermic equipment.
- Page 17 “Self Check OK” is executed with date and time; this happens whenever the instrument is switched on. If an error occurs, consult the Operator’ s Manual or contact your local Roche Diagnostics service representative. (6) Upon first use of the analyzer, the message “REPEAT CALIBRATION” appears after a successful self check. Press the “No”...
-
Page 18: Operator Id
Operator ID The Urisys 1100 software allows the activation/deactivation of the operator identification code, containing up to 12 alphanumeric characters. The Operator ID and Authentication mode can be activated in Setup 3. ATTENTION: Please ensure that you have a barcode reader and/or an AT/PC keyboard prior to activation, as you will need one for this function. -
Page 19: Calibration
5. Calibration The Urisys 1100 system is calibrated before leaving the factory. When installed, it must be recalibrated with Control-Test M calibration strips before the first samples are read, and thereafter every seven days. Control-Test M calibration strips consist of a grey plastic material that is standardized to give constant, defined reflectance readings. The purpose of calibrating the analyzer is to compensate for aging effects that influence the optical system and the grey reference pad in the test strip tray. - Page 20 CAUTION: Regular calibration is necessary to ensure the quality of the results obtained. Roche Diagnostics cannot warrant the correctness of results if the system is not calibrated regularly. ATTENTION: You can recalibrate the system at any time, even if a week has not elapsed since the last...
-
Page 21: Quality Control (Qc)
6. Quality control (QC) Quality control (QC) measurements ensure the proper functioning of the analyzer. A QC material for which the results are known is measured and the results are then compared against the defined ranges for these known results. Use commercially available urine controls, or other suitable control material. -
Page 22: Normal Mode (For Single Readings)
Normal Mode (for Single Readings) BIOHAZARD: Always wear protective gloves when handling and disposing of samples of human origin. The Urisys 1100 system is ready to read when the display shows a sample number and “INSERT STRIP !”. ATTENTION: To ensure that urinalysis is carried out correctly, read the package insert included with the test strips. - Page 23 4. Press the START button (see Figure 13). An acknowledging beep sounds. After warming up time, the test strip tray advances slightly, the retaining bar closes, and the grey reference pad on the test strip tray is read (see Figure 14). Figure 13 Figure 14 ATTENTION: Ensure that the retaining bar is locked into place and...
-
Page 24: Patient Report
Patient Report The patient report is printed out together with the sequence number, device ID, operator ID, date and time. The patient’ s name will also appear on the print out if entered prior to measurement (see Section 7.6). Test results which diverge from negative or normal values are flagged with an asterisk before the parameter concerned. -
Page 25: Entering Patient Id, Operator Id And Authentication Password
Entering Patient ID, Operator ID and Authentication Password Patient ID When the analyzer is ready to measure (“INSERT STRIP !” displayed), you may enter a Patient ID not exceeding 13 characters in length against the currently shown sequence number by means of a barcode reader or AT/PC keyboard (see Section 10.2). -
Page 26: Data Transmission To A Pc Or Host Computer
Data Transmission to a PC or Host Computer In unidirectional mode, the results are transmitted immediately together with the sequence number, Patient ID (if entered), date and time. In bidirectional mode, transmission can only be accomplished by using the “Send” function when “MEMORY” is displayed. -
Page 27: Cleaning And Maintenance
8. Cleaning and Maintenance The Urisys 1100 system is designed for maintenance-free operation. Protect the instrument from extremes of temperature and high atmospheric humidity (see Section 11), and keep it out of bright light (direct sunlight, spot lamps, etc.). Maintain hygiene by keeping the exterior parts and surfaces of the instrument clean. For cleaning we recommend applying a commercial cleaning agent or disinfectant (preferably 70 % alcohol) with a moist cloth. - Page 28 At the end of each working day 1. Switch off the instrument. 2. Pull the test strip tray out of the instrument. Figure 19 CAUTION: Be careful not to touch the grey reference pad (A). Contamination of the reference pad may impair the quality of the results obtained.
-
Page 29: Error Messages And Troubleshooting
Error messages are shown in the display but are not printed out. Following 5 minutes of inactivity, the analyzer switches to Standby mode. The error message is displayed again when the START button is pressed. In the event that the instrument is defective, contact your local Roche Diagnostics representative. E1 REFERENCE PAD ERROR... - Page 30 E8 TRAY POSITION ERROR ! Cause: The positioning hole in the test strip tray (see Figure 24) is soiled or still wet after cleaning; the retaining bar is open while the test strip tray is advancing or the retaining bar mechanism is fouled with urinary deposit and blocked.
- Page 31 Action: Replace the instrument. Cause: The analyzer is less than 5 years old and all troubleshooting steps failed. Action: Contact your local Roche Diagnostics representative for support. NO PRINTOUT Causes: “Printer: Off” has been selected, or the analyzer is operating in “Fast Mode”...
-
Page 32: Connecting To Other Devices
This is not an RS 232 type interface. On request, Roche Diagnostics can supply a suitable standard data cable (see also Section 13). The connected PC must satisfy the requirements with regard to electrical safety laid down in EN 60950. -
Page 33: Technical Information And Notices
If a barcode reader and an external keyboard have to be connected a data cable CAB 322 IBM AT/XT DIN is needed. For questions regarding the operation of the Urisys 1100 system with barcode readers, please contact your local Roche Diagnostics representative. -
Page 34: Safety Notices
11.2 Safety Notices This analyzer was designed and manufactured to comply with the following international regulations “Safety requirements for electrical equipment for measurement, control and laboratory use” and left the factory in a safe condition. In order to keep the instrument in a perfect and safe condition, it is up to the user to observe all instructions and warnings included in this manual. -
Page 35: Contact Information
12. Contact Information For all questions about the Urisys 1100 analyzer that are not answered in this operator’ s manual, contact your Roche representative. To find your Roche contact details 1. Visit our website at www.roche.com. 2. Choose Roche Worldwide at the top of the page. -
Page 36: Alphabetical Index
14. Alphabetical Index Section Section Acoustic signal (beep) Operating parts Barcode reader 10.2 Parameters in patient report, setup Basic settings Pat. Id. entry Beep (acoustic signal) Patient identification Positioning hole Positioning of test strip Power supply 4., 11.1 Cable configuration 10.1 Printer, setting Calibration... - Page 37 Roche Diagnostics GmbH Sandhofer Strasse 116 68305 Mannheim Germany www.roche-diagnostics.com...
Need help?
Do you have a question about the cobas Urisys 1100 and is the answer not in the manual?
Questions and answers