Roche cobas h 232 Operator's Manual
Hide thumbs
Also See for cobas h 232:
- Operator's manual (2 pages) ,
- Quick reference manual (4 pages) ,
- Manual (12 pages)
Table of Contents
Advertisement
Advertisement
Table of Contents

Related Manuals for Roche cobas h 232


Summary of Contents for Roche cobas h 232
- Page 1 232 System Operator’s Manual...
- Page 2 Indicates important health or safety information Manufacturer This product fulfills the requirements of the European Directive 98/79/EC for in vitro diagnostic medical devices The user is fully responsible for the installation, use and upkeep of the cobas h 232 meter. Manual version Revision date Changes Version 2.0...
-
Page 3: Table Of Contents
Table of Content Introduction The cobas h 232 Meter ......................5 Test Principle ..........................6 Contents of the Pack ........................ 6 Safety Information and Additional Information..............8 Safety Information ........................9 Disposal of the System ......................9 General Care..........................10 Laser Scanner ........................... - Page 4 Table of Content Performing a Test Sample Material........................84 Preparing to Test..........................85 Code Chip........................... 85 Inserting the Code Chip ....................... 86 Switching on the Meter ......................87 Test Steps (Overview)......................88 Logging In ..........................89 Performing a Test..........................92 Inserting a Test Strip ......................
-
Page 5: Introduction
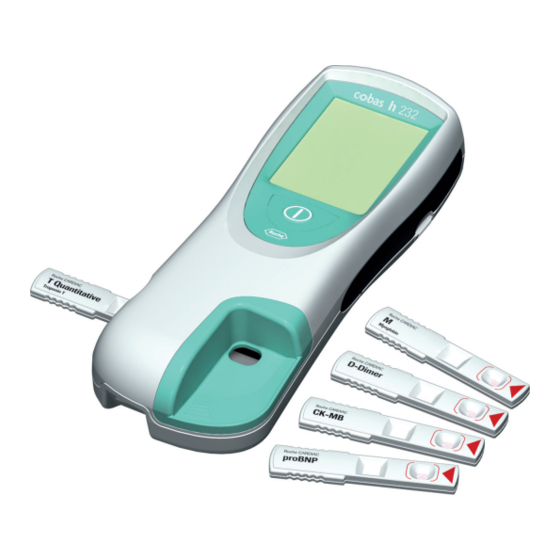
Readings may be carried out directly where the blood samples are taken. Therefore, the cobas h 232 meter is ideal for use at the point of care in emergency rooms, intensive care units and stationary ambulances, as well as by cardiologists and general practitioners. The cobas h 232 meter is rapid and easy to operate: Insert an unused strip in the meter and apply the sample. -
Page 6: Test Principle
Two lines (signal and control line) in the detection zone of the test strip indicate whether the analyte to be determined is present in the sample material. These lines are detected by the cobas h 232 meter with the help of an LED (lighting the detection zone) and a camera sensor (imaging the detection zone). - Page 7 +70°C Made in Germany For USA: USA Distributor Roche Diagnostics COBAS and COBAS H are trademarks of Roche. Indianapolis, IN -25°C Caution (consult accompanying documents). Refer to safety-related notes in the manual accompanying this instrument. Temperature limitation (Store at)
-
Page 8: Safety Information And Additional Information
Safety Information and Additional Information This section explains how safety-related messages and information related to the proper han- dling of the system are presented in the cobas h 232 Operator’s Manual. Please read these passages carefully. The safety alert symbol by itself (without a signal word) is used to pro- mote awareness to hazards which are generic or to direct the reader to related safety information. -
Page 9: Safety Information
There is a potential risk of infection. Healthcare professionals using the WARNING cobas h 232 meter to perform tests on more than one patient must be aware that any object coming into contact with human blood is a poten- tial source of infection. -
Page 10: General Care
Do not use the system in direct sunlight. Direct sunlight may reduce the life expectancy and functionality of the screen. Note: To ensure that your cobas h 232 meter functions properly, please observe the operat- ing and storage conditions as given in the chapter “Product Specifications”, starting on... -
Page 11: Overview Of The Meter And Its Accessories
Overview of the Meter and its Accessories Overview of the Meter and its Accessories Meter CLASS I LASER PRODUCT Complies with 21 CFR 1040.10 and 1040.11 except for deviations pursuant to Laser Notice No. 50, dated July 26, 2001 Touchscreen Barcode scanner (Laser) Shows results, information, icons and Using the integrated barcode scanner... - Page 12 Overview of the Meter and its Accessories Test strip guide Contacts for Handheld Base Unit Insert the test strip here. Used for power supply and/or charging the handheld battery pack, when the Reset button meter is docked in the Handheld Base Use this button to reset the meter in case Unit.
-
Page 13: Test Strip
Overview of the Meter and its Accessories Test Strip Test area Barcode This area is evaluated by the meter via the Assigns the strip to the corresponding camera. code chip. The barcode is automatically read by the meter, when the strip is Application area inserted into the test strip guide. -
Page 14: Handheld Base Unit
Extension piece The switch sets the mode of operation for For cobas h 232 meter. the Handheld Base Unit. Note: The Handheld Base Unit can be ordered separately. For detailled information on usage and configuration please consult the user’s manual of the Handheld Base Unit. -
Page 15: Overview Of The Buttons And Icons Used On Screen
Overview of the Buttons and Icons used on Screen Overview of the Buttons and Icons used on Screen The buttons and icons that appear during normal operation are shown here, along with a general explanation. Error messages and the description of the icons linked to them are provided in a separate chapter. - Page 16 Overview of the Buttons and Icons used on Screen Button/Icon Meaning Insert code chip Open sample application cover for cleaning Battery status: • If the handheld battery pack still has its full charge, all segments are lit • Individual segments disappear one by one as the handheld bat- tery pack becomes weaker •...
-
Page 17: Putting The Meter Into Operation
Putting the Meter into Operation Putting the Meter into Operation Before using the meter for the first time, carry out the following steps: Connect the handheld power supply If present, insert the handheld battery pack for recharging (see page 19) Set the current date and time as well as the appropriate display format (see chapter “Meter Setup”... -
Page 18: Power Supply
Putting the Meter into Operation Power Supply The meter can be operated with either the handheld power supply provided, the (optional) Hand- held Base Unit or the (optional) handheld battery pack. It is advisable to insert the handheld bat- tery pack even when you use the handheld power supply. This ensures that you do not lose the date and time settings (in case of a power outage or if the local power supply is shut off). -
Page 19: Inserting The Handheld Battery Pack
Putting the Meter into Operation Inserting the Handheld Battery Pack 1 With the meter turned off, hold it so that the tab on the handheld battery pack points upward. 2 Gently press the tab on the battery com- partment cover towards the center of the meter and tilt the cover to the side. - Page 20 Note: If the settings for date and time have not yet been set or if they have been lost (because the meter was without power for more than ten minutes), your cobas h 232 meter automati- cally switches to Setup mode when power is restored. You must enter the date and time, then the meter automatically switches to the Main Menu.
-
Page 21: Turning The Meter On And Off
Putting the Meter into Operation Turning the Meter On and Off 1 Turn the meter on by pressing the On/Off button for longer than 5 seconds. Note: You can also turn on the meter directly by connecting the handheld power supply. 2 To turn the meter off after use, press the button for longer than 2 seconds. - Page 22 Putting the Meter into Operation...
-
Page 23: Meter Setup
Meter Setup Meter Setup Note: If you switch on the meter for the first time, or the meter has been without power for more than 10 minutes, you must set the date and time. In this case the meter takes you directly to the Setup mode, where you set date and time. -
Page 24: Settings Summary
Meter Setup Settings Summary The diagram below gives an overview of the setup areas that can be accessed on the meter. Setup Basics Contrast Language Date/Time Sound Auto Off Data Handling Connection Result Memory ID Setup Operator ID Patient ID Administrator ID Lockout Operator... - Page 25 Meter Setup Group Subgroup Setting Values * Basics Contrast 0 – 10 (5*) Language Dansk Deutsch English (GB) English (US) * Español Français Italiano Nederlands Norsk Português Svenska An installable language Date/Time Date 01/01/2007 * Time 12:00 am * Date formats Day.Month.Year (31.12.2006) Month/Day/Year (12/31/2006) * Year-Month-Day (2006-12-31)
- Page 26 Meter Setup Group Subgroup Setting Values * Data Handling Connection Off * Computer Printer Result memory Display mode All results * Last result Result storage No results deletion * mode Delete oldest result ID Setup Administrator ID Blank (off) * Operator ID None * Optional...
- Page 27 Meter Setup Group Subgroup Setting Values * Lockout Operator Lockout (only if “Operator ID” No * option is enabled) Daily Weekly Monthly Every 3 months Every 6 months Yearly QC Settings New Lot Lockout No * QC Lockout No * Daily Weekly Monthly...
- Page 28 Meter Setup Group Subgroup Setting Values * Optional screens Start Info Enable Disable * Result Login Enable Disable * Result Confirmation Enable Disable * Comment Result Enable Disable * * Settings that are in the meter when it leaves the factory are labelled with an asterisk (*).
-
Page 29: Basics Setup
Meter Setup Basics Setup The Basics setup area contains the basic options for changing the user interface. Contrast To make it easier to read the screen, use the Contrast menu to change the brightness of the screen and the displayed elements. 1 From the Main Menu, touch Setup. - Page 30 Meter Setup 4 Touch to change the contrast in a range from 0 to 10. Select Contrast ■ Contrast “0” makes the screen very dark. ■ Contrast “10” makes the screen very light. 5 Touch to save this setting, or: Contrast: (0-10) Touch...
-
Page 31: Language
Nederlands (Dutch) Sound ■ Norsk (Norwegian) Auto Off ■ Português (Portuguese) ■ Svenska (Swedish) 09:15 am Direct from the plant, upon request, or (later) by the authorised Roche Diagnostics service: ■ An optional language can be installed at a later time. - Page 32 Meter Setup 4 Touch to display the lan- guage of choice on the screen. Select Language If the arrow is just an outline , you Français have reached the end of the list in the repec- Italiano tive direction. Nederlands 5 Touch the button to select the language of choice.
-
Page 33: Setting The Date
Meter Setup Setting the Date Use this menu to set the date of the meter. 1 From the Main Menu, touch Setup. 11/24/2009 Main Menu Patient Test 2 From the Setup menu, touch Basics. QC Test 3 From the Setup-Basics menu, touch Date/Time. - Page 34 Meter Setup 4 From the Setup-Date/Time menu, touch Setup - Date/Time Date to set the date. Date Set Date 5 Touch to set the year, then Time 2009 the month, then the day. Year: Date/Time Format 6 Touch to save this setting, or: Month: Touch to exit this menu without...
-
Page 35: Setting The Time
Meter Setup Setting the Time Use this menu to set the time of the meter. 1 From the Main Menu, touch Setup. 11/24/2009 Main Menu Patient Test 2 From the Setup menu, touch Basics. QC Test 3 From the Setup-Basics menu, touch Date/Time. - Page 36 Meter Setup 4 From the Date/Time menu, touch Time to Setup - Date/Time set the time. Date Set Time 5 Touch to set the hours, then Time the minutes. Hour: Date/Time Format 6 Touch to save this setting, or: Minutes: Touch to exit this menu without saving any changes.
-
Page 37: Setting The Display Options For Date And Time
Meter Setup Setting the Display Options for Date and Time Select your preferred format for the date and time display. 1 From the Main Menu, touch Setup. 11/24/2009 Main Menu Patient Test 2 From the Setup menu, touch Basics. QC Test 3 From the Basics menu, touch Date/Time. - Page 38 Meter Setup Setup - Date/Time 4 From the Setup-Date/Time menu screen, Date touch Date/Time Format to set the dis- Select Date Format play format. Time Date: DD.MM.YYYY Date/Time Format The current settings are highlighted (white MM/DD/YYYY type on a black background). You can select one of the following display formats for the YYYY-MM-DD date:...
-
Page 39: Sound
Meter Setup Sound It is possible to activate or deactivate a beep sound for the following circumstances: If activated, the meter beeps, when ■ it is switched on ■ it detects a test strip ■ pre-heating of the test strip is complete and you need to apply a sample ■... - Page 40 Meter Setup 1 From the Main Menu, touch Setup. Main Menu 11/24/2009 Patient Test 2 From the Setup menu, touch Basics. QC Test 3 From the Setup-Basics menu, touch Sound. Memory Setup Setup Basics 09:15 am Data Handling ID Setup Lockout Optional Screens Setup - Basics...
- Page 41 Meter Setup Setup - Sound 4 From the Setup-Sound menu, touch Volume Volume to set the volume level. Select Volume Key Click The current setting is highlighted (white type on a black background). You may select from the following options: Medium ■...
-
Page 42: Auto Off
Meter Setup Auto Off You can set up your meter so that it turns itself off automatically if it has not been used (no but- tons pressed or tests run) for a period of time you select. Use this feature to save power and extend the use of the charge of the rechargeable battery pack. - Page 43 Meter Setup You may select from the following options: Set Auto Off Time ■ Off (meter never turns itself off) ■ Time until meter turns itself off: 1…10, 15, 20, 25, 30, 40, 50, 60 minutes Minutes: 4 Touch to select the time of choice in minutes or to turn the feature off.
-
Page 44: Data Handling Setup
Meter Setup Data Handling Setup Connection In the Select Connection menu you can configure the data exchange with external devices. The meter can be connected either to a computer or a printer. Computer The meter can connect with a computer or host system, e.g., the cobas IT 1000 PoC data management system. - Page 45 Meter Setup 1 From the Main Menu, touch Setup. Main Menu 11/24/2009 Patient Test 2 From the Setup menu, touch Data Handling. QC Test 3 From the Data Handling menu, touch Memory Connection. Setup Setup Basics 09:15 am Data Handling ID Setup Lockout Optional Screens...
- Page 46 Meter Setup 4 Touch Computer. Your selection is now highlighted. Select Connection 5 Touch to save this setting, or: Computer Touch to exit this menu without Printer saving any changes. The display automatically returns to the previous screen. 09:15 am Note: Enabling the connection to a computer disables the connection to a printer (and vice versa).
-
Page 47: Printer
Meter Setup Printer The meter can directly connect with a printer via an infrared interface. It is not necessary to use the Handheld Base Unit for this purpose. The option to print is displayed in a test result as well as directly after a test and when calling up stored results. - Page 48 Meter Setup 4 Touch Printer. Your selection is now high- lighted. Select Connection 5 Touch to save this setting, or: Computer Touch to exit this menu without Printer saving any changes. The display automatically returns to the previous screen. 09:15 am Note: Enabling the connection to a printer disables the connection to a computer (and vice versa).
-
Page 49: Result Memory
Meter Setup Result Memory The settings for the result memory affect the Result Display Mode and the Result Storage Mode (see page 51) of test results. All results recorded by the meter (patient results and quality controls) are stored automatically. Use the Sel. - Page 50 Meter Setup Setup - Result Memory 4 From the Setup-Result Memory menu, Result Display Mode touch Result Display Mode to select your display mode. Sel. Res. Display Mode Result Storage Mode The current setting is highlighted (white type All Results on a black background).
- Page 51 Meter Setup The Sel. Res. Storage Mode menu tells the meter what to do when the memory is full. Note: The meter memory can store a maximum of 500 samples, 500 liquid controls, and 200 instrument quality controls. In case of a full memory, you can choose between: ■...
-
Page 52: Id Setup Setting
Meter Setup ID Setup Setting Use the ID Setup (ID = identification) menu to enter settings for user and patient management. These settings are optional. The meter can be operated without these settings. There are three types of identification used with the meter: ■... -
Page 53: Administrator Id
If you forget the Administrator ID, the meter setup may be unlocked via the external data man- agement system (e.g. cobas IT 1000). If you don’t use such a system and need to reset the Administrator ID, contact your local Roche Diagnostics customer support and service center. - Page 54 Meter Setup If an Administrator ID has not been set up yet: 1 From the Main Menu, touch Setup. Main Menu 11/24/2009 Patient Test 2 From the Setup menu, touch ID Setup. QC Test 3 From the Setup-ID Setup menu, touch Administrator ID.
- Page 55 4 Using the onscreen keypad, enter the Enter Administrator ID ****| Administrator ID of choice (or the pass- word provided by Roche Diagnostics). The ID should include up to 20 characters and/or letters of choice. Pay close atten- tion to the buttons you press, because the...
- Page 56 Meter Setup 9 Enter the Administrator ID again (the Repeat Administrator ID ****| onscreen keypad is automatically dis- played again) to confirm the first entry. If you touch , the Administrator ID is set. If you touch , the Administrator ID is not set and is therefore inactive.
- Page 57 Meter Setup Changing an existing Administrator ID: 1 From the Main Menu, touch Setup. 11/24/2009 Main Menu Patient Test 2 From the Setup menu, touch ID Setup. QC Test 3 Using the onscreen keypad, enter the valid Administrator ID. Memory Setup The ID Setup is displayed.
- Page 58 Meter Setup Disabling an existing Administrator ID: 1 From the Main Menu, touch Setup. 11/24/2009 Main Menu Patient Test 2 From the Setup menu, touch ID Setup. QC Test 3 Using the onscreen keypad, enter the valid Administrator ID. Memory Setup The ID Setup is displayed.
-
Page 59: Operator Id
Meter Setup Operator ID In the default setting, the meter is not set up for use with Operator IDs. You have several (more or less restrictive) options for setting up Operator IDs, which are summarised below. Operator List Option 1 Option 2 Result After switching on, the meter... - Page 60 Meter Setup Without a list, operators can log in directly by entering their operator name. This setup menu allows you to select whether or not an operator login is possible or required. 1 From the Main Menu, touch Setup. 11/24/2009 Main Menu Patient Test 2 From the Setup menu, touch ID Setup.
- Page 61 Meter Setup 6 Select the form for input of the Operator Operator ID You may select from the following options: Alphanum. Numeric ■ Alphanumeric (letters and numbers, e.g., “J. Doe 3378”) ■ Numeric (numbers only, e.g., “3387”) Max. Length: ■ Indicate the maximum number of charac- ters (1 …...
- Page 62 Meter Setup In order to limit the operator group, an Operator list must be created on the PC/host system. With an Operator list being transferred to the meter, the Operator ID options are different from the options in “standalone” mode. 1 From the Main Menu, touch Setup.
-
Page 63: Patient
Meter Setup Patient Patient IDs help you to assign stored measurements to individual patients. If you create a patient list externally, this list may even serve as a “To-Do list”, containing the information about which patients need to be tested. The available options are outlined below. Patient List Option 1 Option 2... - Page 64 Meter Setup 1 From the Main Menu, touch Setup. Main Menu 11/24/2009 Patient Test 2 From the Setup menu, touch ID Setup. QC Test 3 From the Setup-ID Setup menu, touch Patient ID. Memory Setup You may select from the following options: ■...
- Page 65 Meter Setup 6 Select the form for input of the Patient ID before each test. Operator ID You may select from the following options: Alphanum. ■ Numeric Alphanumeric (letters and numbers, e.g., “J. Doe 3378”) ■ Numeric (numbers only, e.g., “3387”) Max.
-
Page 66: Lockout Setup
Meter Setup Lockout Setup The Lockout menu contains the options for quality control tests that the operator is required to perform at specified intervals or based on specific triggers. This is a list of the available lockout options: ■ Operator Lockout ■... -
Page 67: Operator Lockout
Meter Setup Operator Lockout To perform a test with the meter, the individual steps must be performed properly. Quality control tests can be performed on a regular basis by every operator to ensure these steps are performed properly. By activating the operator lockout, operators are required to perform regular quality control tests. - Page 68 Meter Setup 4 Select the time interval of choice in which the required quality control tests must be carried out. You may select from the following options: ■ No (deactivated) ■ Daily ■ Weekly ■ Monthly ■ Every 3 or 6 months ■...
- Page 69 Meter Setup 8 Quality control tests may include one or Setup - QC Settings No of Levels two levels. Select the number of levels which must be performed (not applicable, One Level if you selected No). Two Levels 9 Touch to save this setting, or: Touch to exit this menu without saving...
-
Page 70: Quality Control (Qc) Settings
Meter Setup Quality Control (QC) Settings QC Settings define that operator-independent quality control tests must be run on a regular basis. Lockouts may be triggerd by selectable time periods, and lockouts may be triggered by certain events. The QC Settings menu contains the following options: ■... - Page 71 Meter Setup 1 From the Main Menu, touch Setup. Main Menu 11/24/2009 Patient Test 2 From the Setup menu, touch Lockout. QC Test 3 From the Setup-Lockouts menu, touch QC Settings. Memory Setup Setup Basics Data Handling 09:15 am ID Setup Lockout Optional Screens Setup - Lockout...
-
Page 72: New Lot Lockout
Meter Setup New Lot Lockout See page 71 on how to access the Setup-QC Settings menu. 1 Touch New Lot Lockout to activate qual- Setup - QC Settings New Lot Lockout ity control when changing the test strip lot. New Lot Lockout 2 Touch the button with the setting of choice Enable QC Lockout... -
Page 73: Quality Control (Qc) Lockout
Meter Setup Quality Control (QC) Lockout A QC Lockout requires a quality control test to be performed. You may also set the number of levels for this test. You may select from the following options: ■ ■ Daily ■ Weekly ■... -
Page 74: Instrument Quality Control (Iqc) Lockout
Meter Setup Instrument Quality Control (IQC) Lockout An IQC Lockout also requires a quality control test with dedicated IQC test strips to be per- formed. You may select from the following options: ■ ■ Daily ■ Weekly ■ Monthly All enabled QC Lockouts, if the time period has elapsed, are activated at 8:00 a.m. (presetting, time can be changed in a PC/host system). -
Page 75: Qc Result Format
Meter Setup QC Result Format The QC Result format defines the kind of information that is displayed in a QC result screen. You may select from the following options: ■ Display without a value, but with text “Pass” or “Fail” ■... -
Page 76: Reset Test Parameters
Meter Setup Reset Test Parameters There may be cases which make it necessary to delete the test parameters which are stored in the meter. Such a case could be, e.g., a lockout for a test strip lot, which is no longer available. Do not try to use this method for bypassing lockouts in general (that’s what STAT tests are for), because after resetting the test parameters the meter is set to a QC lockout state (if configured). -
Page 77: Cleaning Lockout
Meter Setup Cleaning Lockout Under normal handling conditions, your meter will not be exposed to significant dirt or contami- nation. However, circumstances might require regular checks of the test strip guide and (when necessary) cleaning of the meter. The Cleaning Lockout allows operators to specify time intervals for cleaning. -
Page 78: Stat Test Configuration
Meter Setup STAT Test Configuration Quality control tests ensure consistent quality and accurate measurements. In emergency situa- tions, however, it may be necessary to perform a test without delay. To override an active lockout for a test parameter, lot or operator, you can allow for STAT Tests (STAT = Short TurnAround Time). - Page 79 Meter Setup 1 From the Main Menu, touch Setup. Main Menu 11/24/2009 Patient Test 2 From the Setup menu, touch Lockout. QC Test 3 From the Setup-Lockout menu, touch STAT Test Config. Memory Setup 4 Touch Enable to allow STAT Tests or: Touch Disable to prohibit STAT Tests.
-
Page 80: Optional Screens Setup
Meter Setup Optional Screens Setup In this screen, you can customise display formats and test procedures. You can choose to display additional information and select from options for managing the result display. 1 From the Main Menu, touch Setup. Main Menu 11/24/2009 Patient Test 2 From the Setup menu, touch Optional... - Page 81 Meter Setup The additional status information is displayed after switching on the meter or after logging off as an operator. This includes information about current lockouts, the number of results not trans- ferred (to the host system) and the time since the last data transfer. 3 Touch Start Info.
- Page 82 Meter Setup In some circumstances, it may be useful for operators to confirm the validity of their results. To do so, an option can be enabled that prompts operators to confirm the results of every test. 9 Touch Confirm Results. Setup - Optional Screens Res.
-
Page 83: Performing A Test
Note: The Roche CARDIAC family includes several meters. Always make sure that the dis- posables (e.g. test strips) are made for use with the cobas h 232 meter. Some assays might require a minimum software version, please ensure that your software version on the cobas h 232 fits to your assay as mentioned in the corresponding package insert. -
Page 84: Sample Material
Sample Material Heparinised venous whole blood is used as sample material. For each test with the cobas h 232 meter, you need a quantity of exactly 150 µL. Follow the appropriate infection control guidelines in force in your facility. ■... -
Page 85: Preparing To Test
Performing a Test Preparing to Test 1 Prepare the required test strips (shown here: Roche CARDIAC T Quantitative for testing Troponin T). 2 Make sure that the code chip supplied with these test strips is also at hand. Code Chip The code chip provides the meter with important information on the manufacturer-specific parameters of the respective test strip lots. -
Page 86: Inserting The Code Chip
Performing a Test Note: Roche recommends to keep the code chip in the meter to protect the contacts from becoming dirty. Note: Once the test strip lot is used up, dispose of the old code chip promptly to prevent mix- ups. -
Page 87: Switching On The Meter
Performing a Test Switching on the Meter 1 Turn the meter on by pressing the On/Off button for longer than 5 seconds. Note: You can also turn on the meter directly by connecting the handheld power supply. 2 To turn the meter off after use, press the button for longer than 2 seconds. -
Page 88: Test Steps (Overview)
Performing a Test Test Steps (Overview) The following illustration shows the steps performed during testing. The steps you actively per- form are displayed with a dark background. Depending on the configuration, the individual steps shown here may include additional actions (e.g., entering a password). Some steps may be dif- ferent, working with or without Operator IDs and Patient IDs. -
Page 89: Logging In
Performing a Test Logging In The initial steps until the Main Menu is displayed depend on the configuration and are performed as follows: Without operator login required 3 Wait until the main menu is displayed. Main Menu 11/24/2009 Patient Test QC Test Memory Setup... - Page 90 Performing a Test With operator login (list available) 3 If an operator list exists, wait until this list Select Operator ID is displayed. ADAMS, JOHN 4 Touch to scroll through the CHAPLIN,CHARLES list. Select the operator of choice by HEIDENREICH, GERTRUDE touching the corresponding button.
- Page 91 Performing a Test 5 Enter the password. Password ****| 6 Touch to confirm your entry, or: Touch , to display the operator pick list again. 7 Wait until the main menu is displayed. When the tests are completed or another Main Menu 11/24/2009 operator wants to perform additional...
-
Page 92: Performing A Test
Performing a Test Performing a Test 1 Check the charge level of the handheld Main Menu 11/24/2009 battery pack. If there are no bars left in the Patient Test battery icon, you cannot perform any more tests. QC Test Memory 2 Check that the date and time are correct. - Page 93 Performing a Test Without patient list 3 Touch Patient Test. 4 If you selected the Patient ID as optional, Enter Patient ID PID111SCHULZM457 you can enter a Patient ID using the onscreen keypad. If you selected the Patient ID as required, you must enter the Patient ID using the onscreen keypad.
- Page 94 Performing a Test With patient list 3 Touch Patient Test. Note: Patient lists can only be created on a PC/host system and must be transferred to the meter. Lists cannot be created on the meter. 4 Touch to scroll through the Select Patient ID list.
- Page 95 Performing a Test Select Patient ID The Patient ID can also be entered via barcode PID001GERTA123 (meters with a barcode scanner only). Touch Anders, Gert Scan and hold either PID001BERNDH123 Bernd, Hans ■ a card with the barcode approx. 10 cm PID001CHAPLINC123 Chaplin, Charlene from the scanner or...
-
Page 96: Inserting A Test Strip
Performing a Test Inserting a Test Strip 1 The test strip icon prompts you to insert a Pat. Test - Ins. Strip Pat: PID111SCHULZM457 test strip. Remove the test strip from its SCHULZ, MANFRED JONES, TOM foil pouch. 2 Hold the test strip so that the application Insert Strip and test area is facing up. - Page 97 Performing a Test Pat. Test - Ins. Chip If you use a new test strip lot, you must insert the corresponding code chip once. See “Code Chip” on page 85. Par: proBNP Depending on the meter setting, you may also Insert Code Chip be required to run a quality control test at this...
- Page 98 Performing a Test 4 Using the Roche CARDIAC pipette, draw exactly 150 µL (to the blue mark on the pipette) heparinised blood from the blood collection vial. Make sure the sample con- tains no air bubbles. For ordering information on Roche CARDIAC pipettes see page 133.
- Page 99 Performing a Test Pat. Test - Processing The hourglass icon appears and spins until Pat: SCHULZ, MANFRED the sample has been detected and the actual JONES, TOM measurement begins. The time remaining for Par: proBNP Code: PB1234 the test is displayed. Note: The time of the measurement depends on the test parameters.
- Page 100 Performing a Test Pat. Test - Result The test result is shown and stored automati- Pat: PID111SCHULZM457 cally. SCHULZ, MANFRED JONES, TOM Par: proBNP Code: PB1234 When interpreting your result, please read the 01/25/2009 10:17 test strip package insert carefully. pg/ml In this display, you can scroll through addi- tional results for this patient or return to the...
-
Page 101: Displaying, Confirming Or Adding Comments To Results
Performing a Test Displaying, Confirming or Adding Comments to Results As described in the chapter “Optional Screens Setup” starting on page 80, there are many options for displaying results that can be activated: If the new Operator Login is required to display the result: 1 Touch the button for operator login. - Page 102 Performing a Test Pat. Test - Confirm. If the test result requires a confirmation: Pat: PID111SCHULZM457 SCHULZ, MANFRED ■ When the result is displayed, touch the JONES, TOM Par: proBNP Code: PB1234 button to select the confirmation of 01/25/2009 10:17 choice.
- Page 103 Performing a Test Pat. Test - Comment If you want to add a comment to a test result: New Strip Lot 1 Select a predefined comment from the list Doctor Notified (available only if transferred from host/ PC) or Repeated Test 2 Touch Custom to enter your own com- Asymptomatic ment using the onscreen keypad.
-
Page 104: Stat Tests
Performing a Test STAT Tests STAT tests are a limited number of tests that can be performed in emergency situations, see page 78. If the meter is configured for performing STAT tests, you are given the chance to per- form the test when notified of a required quality control test. 1 To perform the measurement without Pat. -
Page 105: Quality Control
A check of the expiry date and lot information on the test strip using the information from the code chip. ■ Configurable, prescribed quality control tests using Roche CARDIAC IQC test strips for internal functionality tests. ■ Definable, prescribed quality control tests using Roche CARDIAC Control materials for the available test parameters. -
Page 106: Performing A Quality Control Test
Quality Control Performing a Quality Control Test Quality Control (QC) 1 Turn the meter on by pressing the On/Off button for longer than 5 seconds. Note: You can also turn on the meter directly by connecting the handheld power supply. 2 To turn the meter off after use, press the button for longer than 2 seconds. - Page 107 Quality Control 4 Touch QC Test. Main Menu 11/24/2009 5 In the QC Status screen, touch Patient Test continue with the quality control test. QC Test - QC Status QC Test QC Status 6 The test strip icon now prompts you to Memory insert a test strip.
- Page 108 Quality Control If you use a new test strip lot and have not inserted the code chip yet, you must do so now. Otherwise you cannot perform a quality control test. As with the test strips, a code chip is also pro- QC Test - Sel.
- Page 109 Quality Control 10 If the control material box contains more QC Test - Sel. QC Level than one level, select the level of choice Par: proBNP, Code PB1234 LOT PBC014 for this measurement. JONES, TOM Level 1 Level 2 Level 3 09:15 am The thermometer icon shows that the test QC Test - Warming Up...
- Page 110 Quality Control 11 Using the pipette, draw up the dissolved contents of the vial. 12 Apply the sample (exactly 150 µL) to the application area of the test strip. Note: Always place the meter on a level, vibration-free surface while applying the sample until the necessary sample has been absorbed completely by the test strip.
- Page 111 Quality Control QC Test - Measuring The hourglass icon appears and spins until Par: proBNP, Code PB1234 the sample has been detected and the actual LOT PBC014 Level JONES, TOM measurement begins. The time remaining for the test is displayed. Note: The time of the measurement depends 10:20 on the test parameters.
-
Page 112: Instrument Quality Control (Iqc)
18 Clean the meter if this becomes neces- sary (see “Cleaning” on page 123). Instrument Quality Control (IQC) 1 Prepare the required IQC test strips (shown here: Roche CARDIAC IQC high). 2 Make sure that the code chip supplied with these test strips is also at hand. - Page 113 Quality Control The first steps in this quality control test are identical to the procedure described before, see page 106. The following description therefore starts at the main menu. 3 Touch QC Test. 11/24/2009 Main Menu Patient Test 4 Touch in the QC Status screen to con- tinue with quality control test.
- Page 114 Quality Control QC Test - Measuring The hourglass icon is displayed and the (inter- Par: nal) measurement begins. LOT 226 437-02, Level 1 JONES, TOM 09:15 am QC Test - Result The result of this IQC quality control test is Par: indicated with Pass or Fail.
-
Page 115: Memory
Memory Memory The meter has a 500-value memory for saving results (patient tests and quality control tests sep- arately) together with the time, date and if applicable, comments. In addition, the memory can store up to 200 code chip records (100 test strip lots and 100 control material lots). Viewing Test Results 1 Turn the meter on by pressing the On/Off button... - Page 116 Memory From the Main Menu you have access to all stored test results, sorted by selectable criteria: ■ Patient History ■ All Results ■ QC Results (Quality Control) ■ IQC Results (Instrument Quality Control) ■ Maintenance History 4 Touch Memory. 11/24/2009 Memory Main Menu...
-
Page 117: Patient History
Memory Patient History This memory area contains a list of all patients, sorted by Patient ID number. From here, you can call up results for any individual patient. 1 Touch to display the entry of Pat. History - Select ID choice on the screen. -
Page 118: All Results
Memory All Results This memory area contains a list of all tests, sorted chronologically. From here, you can call up results for specific times. 1 Touch to display the entry of All Results choice on the screen. Doe, John 08/15 10:52 Trop-T 2 Touch the patient name whose result you Smith, Adam 08/15 10:11 proBNP... -
Page 119: Quality Control (Qc) Results
Memory Quality Control (QC) Results This memory area contains all test parameter-specific quality control tests (QC, starting on page 106) that were run, sorted chronologically. The most recent results are at the top of the list. 1 Touch to display the entry of QC Results choice on the screen. -
Page 120: Instrument Quality Control (Iqc) Results
Memory Instrument Quality Control (IQC) Results This memory area contains all instrument quality control tests (IQC, starting on page 112) that were run, sorted chronologically. The most recent results are at the top of the list. 1 Touch to display the entry of IQC Results choice on the screen. -
Page 121: Maintenance History
Memory Maintenance History Maintenance History actually is a list of comments. Whenever routine maintenance or service is done for the meter, this event can be stored in form of a comment. You may use predefined comments (only if transferred from a PC/host system) or enter a custom comment. 1 Touch to display the entry of Maintenance History... -
Page 122: Data Downloads
(see error 17 on page 131). For more information on downloading results to a cobas IT 1000 data management system, please call your local Roche Diagnostics customer support and service center (see page 136). -
Page 123: Cleaning
Cleaning Cleaning Cleaning the Plastic Housing Clean the meter whenever it becomes dirty. You can also use the device-specific “Cleaning Lock- out” function (see page 77) to ensure regular checks are performed. Turn off the meter before cleaning it, unplug the power supply unit and remove the handheld battery pack. Use gloves when cleaning the meter.. -
Page 124: Cleaning After Contamination Due To Mispipetting
Cleaning Basic sequence of steps for cleaning ■ First remove any blood and other dirt using water or soapy water. ■ Then disinfect the meter. Cleaning after Contamination due to Mispipetting For detailed cleaning instructions (“how to clean…”) for the individual components of the meter, see the following pages. -
Page 125: Cleaning The Sampling Area
Cleaning Cleaning the Sampling Area 1 If required, remove the meter from the Handheld Base Unit and place it horizon- tally on a table. 2 Remove the sample application cover by pulling it forward horizontally (in the direction of the arrow). In case of significant dirt or contamina- tion, you can rinse the sample application cover (separately from the meter) under... -
Page 126: Cleaning The Test Strip Guide
Cleaning Cleaning the Test Strip Guide 1 Clean the easily accessible and visible pipetting field area of the test strip guide with a moistened cotton bud or tis- sue. Then dry the test strip guide with a fresh tissue. Adhere to the following: ■... -
Page 127: Troubleshooting
Find the displayed message or condition in the troubleshooting table. ■ Take the action suggested under the column headed Description/Solution. If the problem persists, please contact your local Roche Diagnostics customer support and serv- ice center (see page 136). All error messages are marked with an icon , indicating the severity of the error. - Page 128 Troubleshooting Error Description/Solution Error 4: Meter too warm or too cold Error Solution Turn the meter off and unplug the power supply unit. Make sure that the ambient temperature falls within acceptable limits (+18-32°C) and wait for a few minutes until the meter has reached ambient tem- perature.
- Page 129 Error 8: Maximum number of tests (soon) reached Error Solution Please call your local Roche Diagnostics customer support and Max. 2 meas. left service center. Error 9: Barcode cannot The barcode on the test strip or the barcode containing the operator be read ID/patient ID cannot be read.
- Page 130 Troubleshooting Error Description/Solution Error 12: Code chip Code chip is missing or cannot be read. Error Solution ■ Insert the missing code chip. ■ Remove the code chip and re-insert it. Error 13: Test strip The test strip is beyond its expiration date. Error Solution ■...
- Page 131 Remove the test strip and repeat the test using a new test strip, or move meter out of the direct light and repeat the test. If the error recurs repeatedly, please call your local Roche Diagnos- tics customer support and service center Error 17: Communication with host system or printer failed.
- Page 132 Description/Solution Error 20: Memory test The memory contains corrupted data. (Maintenance) Error Solution The meter has a fault. Please call your local Roche Diagnostics Maintenance customer support and service center. Error 21: Memory test The memory contains corrupted data. (Setup)
-
Page 133: Further Information
10 tests for quantitative detection of cardiac 04877772190 (Troponin T) Troponin T Roche CARDIAC Control Troponin T Control set for use with Roche CARDIAC T 04890515190 Quantitative (control set for 2 x 6 quality control checks, level 1/2 and code chip) Roche CARDIAC M... -
Page 134: Product Limitations
Further Information Item Description cobas h 232 Standard version without scanner 04901126190 cobas h 232 with scanner Patient/Operator ID can be scanned from a 04901142190 barcode cobas h 232 Operator’s Manual Printed manual (English) 04880889001 cobas h 232 Manual CD Contains Operator’s Manuals and Quick Refer-... -
Page 135: Product Specifications
Product Specifications Product Specifications Operating Conditions and Technical Data Temperature range 18-32 °C Relative humidity 10-85% (no condensation) Maximum altitude 4000 m Position Operate the meter on a level, vibration-free surface while applying the sample until the necessary sample has been absorbed completely by the test strip Measuring range Depends on test parameters... -
Page 136: Sample Material
Roche Diagnostics GmbH Diagnostics Division Global Systems Support (GSS) 9, Will Scarlet Road / Ferndale Sandhofer Straße 116 P.O. Box 1927 68305 Mannheim Randburg 2125 Tel. (0621) 759-0 Telephone +27 -11 504-4600 Fax (0621) 759-2890 © 2009 Roche Diagnostics. All rights reserved. -
Page 137: Index
Cleaning agents ........123 Infrared interface ..........12 Housing - outside ........ 125 IQC lockout ............74 Test strip guide ........126 Cleaning lockout ..........77 cobas h 232 Language ............31–32 Contents of the pack .......6 Laser ..............11 Introduction ..........5 Lockout ............66–79 Operating conditions ...... - Page 138 Sound ..........39–41 Result deletion (automatic) ......51 Start info ............ 81 Result login ..........81, 101 STAT test ........... 78 Result memory ......49–51, 115–122 Time ............. 35–36 Roche - How to contact ......136 New lot lockout ..........72...
- Page 139 Index Safety Protection against infection ....9 User qualification ........9 Sample application cover ......11 Sample material ........84, 136 Scan (button) ..........90, 95 Self-test (switching on the meter) ..... 87 Sound ............39–41 Specifications ..........135 Start info .............. 81 STAT Test ............
- Page 140 ROCHE CARDIAC, COBAS, COBAS H and IQC are trademarks of Roche. Roche Diagnostics GmbH Sandhofer Strasse 116 68305 Mannheim Germany www.roche.com...
Need help?
Do you have a question about the cobas h 232 and is the answer not in the manual?
Questions and answers
can filtered water be used to mix liquid controls