Table of Contents
Advertisement
Quick Links
Advertisement
Table of Contents

Related Manuals for AEG CCE84543FB


Summary of Contents for AEG CCE84543FB
- Page 1 EN User Manual | Hob CCE84543FB...
-
Page 2: Table Of Contents
FOR PERFECT RESULTS Thank you for choosing this AEG product. We have created it to give you impeccable performance for many years, with innovative technologies that help make life simpler – features you might not find on ordinary appliances. Please spend a few minutes reading to get the very best from it. - Page 3 installation or usage. Always keep the instructions in a safe and accessible location for future reference. 1.1 Children and vulnerable people safety • This appliance can be used by children aged from 8 years and above and persons with reduced physical, sensory or mental capabilities or lack of experience and knowledge if they have been given supervision or instruction concerning the use of the appliance in a safe way and understand the...
- Page 4 • WARNING: Unattended cooking on a hob with fat or oil can be dangerous and may result in fire. • Never use water to extinguish the cooking fire. Switch off the appliance and cover flames with e.g. a fire blanket or lid. •...
-
Page 5: Safety Instructions
• When the appliance operates with other appliances the maximum vacuum generated in the room should not exceed 0.04 mbar. • Clean the hood filter regularly and remove grease deposits from the appliance to prevent the risk of fire. • If the supply cord is damaged, it must be replaced by the manufacturer, an authorized Service or similarly qualified persons in order to avoid a hazard. - Page 6 • If the appliance is installed above a cable. Contact our Authorised Service drawer: Centre or an electrician to change a – Do not store any small pieces or damaged mains cable. sheets of paper that could be pulled in, •...
- Page 7 induction cooking zones when the • Cookware made of cast iron or with a appliance is in operation. damaged bottom can cause scratches on • When you place food into hot oil, it may the glass / glass ceramic. Always lift these splash.
-
Page 8: Installation
3. INSTALLATION 3.4 Assembly WARNING! Refer to the installation booklet for detailed Refer to Safety chapters. information on how to assemble your hob. Follow the hob connection diagram and the 3.1 Before the installation window switch connection diagram (if Before you install the hob, write down the applicable) presented in the installation information below from the rating plate. - Page 9 Do not drill or solder the wire ends. It is forbidden. Find the video tutorial "How to install your AEG Extractor Hob 80 cm" by typing out the CAUTION! full name indicated in the graphic below. Do not connect the cable without cable end sleeve.
-
Page 10: Product Description
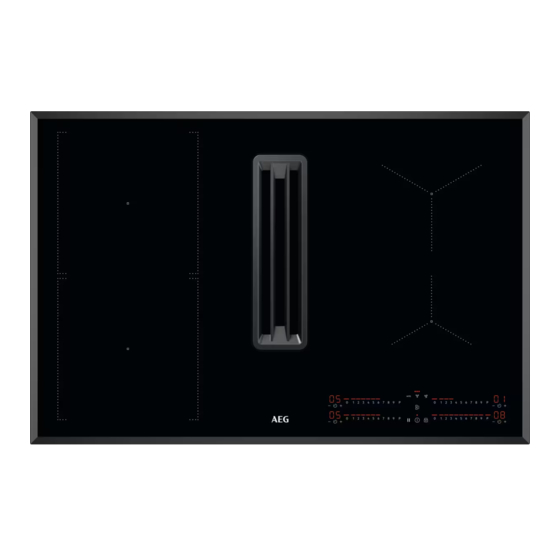
One-phase connection - 220 - 240 V~ Two-phase connection - 400 V 2 ~ N Green - yellow Green - yellow Blue and blue Blue and blue Black and brown Black Brown 4. PRODUCT DESCRIPTION 4.1 Product overview Grid Cabinet back wall fitting Filter Tube Filter housing... - Page 11 4.2 Cooking surface layout Induction cooking zone Control panel Hood 4.3 Control panel layout 1 12 Use the sensor fields to operate the appliance. The displays, indicators and sounds tell which functions operate. Sensor Function Description field On / Off To activate and deactivate the appliance.
-
Page 12: Before First Use
Sensor Function Description field Control bar To set a heat setting. PowerBoost To activate the function. Lock / Child Safety Device To lock / unlock the control panel. 4.4 Display indicators Indicator Description There is a malfunction. + digit The hood filter needs regenerating. OptiHeat Control (3 step Residual heat indicator): continue cooking / keep warm / resid‐... - Page 13 6.2 Pot detection 6.4 Heat setting This feature indicates the presence of cookware on the hob and deactivates the cooking zones if no cookware is detected during a cooking session. If you put cookware on a cooking zone before you select a heat setting, the indicator above 0 on the control bar appears.
- Page 14 - residual heat. To deactivate the function: press . The remaining time counts back to 00. The indicator may also appear: • for the neighbouring cooking zones even if 6.8 Power management you are not using them, • when hot cookware is placed on cold If multiple zones are active and the cooking zone, consumed power exceeds the limitation of the...
- Page 15 A signal sounds and an indicator above the AUTO symbol appears. 3. Place cookware on the hob and select a The function automatically adjusts the fan heat setting level. Increase or decrease speed level based on the selected heat the heat setting level as needed. setting level of the hob.
-
Page 16: Additional Functions
When the function operates, the indicator above AUTO appears. Once the cycle is Sym‐ Setting Possible options over, the fan switches off automatically. To deactivate the function while it is Auto Breeze On / Off (--) running: Alarm / error histo‐ The list of recent alarms / errors. - Page 17 7.4 Child Safety Device Heat setting The hob deactivates This function prevents an accidental after operation of the hob and the hood. 1 - 2 6 hours To activate the function: press . Do not 3 - 4 5 hours set any heat setting / hood setting.
-
Page 18: Hints And Tips
8. HINTS AND TIPS WARNING! Refer to Safety chapters. Refer to "Technical data". 8.1 Cookware Steam Vented Lids To further optimize the cooking sessions alongside the hood you can use the special Steam Vented Lids with your cookware. The For induction cooking zones a strong lids are designed to direct the steam electro-magnetic field creates the heat in produced inside the pot towards the hood,... - Page 19 depends on the heat setting level and the is not proportional to the increase of the length of the cooking operation. consumption of power. It means that a cooking zone with the medium heat setting 8.4 Examples of cooking uses less than a half of its power. applications The correlation between the heat setting of a The data in the table is for guidance only.
-
Page 20: Care And Cleaning
9. CARE AND CLEANING To open the water tank, slide the latches out WARNING! and open them one by one. Refer to Safety chapters. 9.1 General information • Clean the hob after each use. • Always use cookware with a clean base. •... - Page 21 filter every 10-20 hours, or more frequently, if needed. • Regenerate the filter only when the notification is on. The maximum number of regeneration cycles is 7. After that time, the filter needs to be replaced with a new one. The hob has a built-in counter with a notification that reminds you about regenerating the filter.
-
Page 22: Troubleshooting
2. Dry the filter in the oven for 20-30 min at 2. Put the filter in the oven set to 80-110 °C 70 °C. Place the filter on the middle wire for 60 min. Place the filter on the middle shelf. - Page 23 Problem Possible cause Remedy The hob deactivates. You put something on the sensor Remove the object from the sensor field. field Residual heat indicator does not The zone is not hot because it oper‐ If the zone operated sufficiently long to come on.
-
Page 24: Technical Data
Make sure, you operated the hob correctly. If not the servicing by a service 11. TECHNICAL DATA 11.1 Rating plate Model CCE84543FB PNC 949 597 970 00 Typ 66 D4A 01 AA 220 - 240 V / 400 V 2N, 50 Hz Induction 7.35 kW... -
Page 25: Energy Efficiency
12. ENERGY EFFICIENCY 12.1 Product Information for hob according to EU and UK Ecodesign Regulations Model identification CCE84543FB Type of hob Built-In Hob Number of cooking zones Heating technology Induction Diameter of circular cooking zones (Ø) Right front 14.5 cm Right rear 18.0 cm... - Page 26 Fluid Dynamic Efficiency class Lighting Efficiency - LEhood lux/W Lighting Efficiency Class Grease Filtering Efficiency - GFEhood 85.1 Grease Filtering Efficiency class Minimum Air Flow in normal use 260.0 m3/h Maximum Air Flow in normal use 500.0 m3/h Air Flow at intensive/boost setting 630.0 m3/h A-weighted Sound Power Emissions at minimum speed...
-
Page 27: Environmental Concerns
13. ENVIRONMENTAL CONCERNS appliances marked with the symbol with Recycle materials with the symbol . Put the the household waste. Return the product to packaging in relevant containers to recycle it. your local recycling facility or contact your Help protect the environment and human municipal office. - Page 28 867378093-B-102023...
Need help?
Do you have a question about the CCE84543FB and is the answer not in the manual?
Questions and answers