Table of Contents
Advertisement
Quick Links
Advertisement
Table of Contents

Subscribe to Our Youtube Channel
Related Manuals for AEG CDE84751FB


Summary of Contents for AEG CDE84751FB
- Page 1 CDE84751FB User Manual USER MANUAL...
-
Page 2: Table Of Contents
12. ENVIRONMENTAL CONCERNS..............25 FOR PERFECT RESULTS Thank you for choosing this AEG product. We have created it to give you impeccable performance for many years, with innovative technologies that help make life simpler – features you might not find on ordinary appliances. Please spend a few minutes reading to get the very best from it. - Page 3 ENGLISH of incorrect installation or usage. Always keep the instructions in a safe and accessible location for future reference. 1.1 Children and vulnerable people safety This appliance can be used by children aged from 8 • years and above and persons with reduced physical, sensory or mental capabilities or lack of experience and knowledge if they have been given supervision or instruction concerning the use of the appliance in a...
- Page 4 WARNING: Unattended cooking on a hob with fat or • oil can be dangerous and may result in fire. Never use water to extinguish the cooking fire. Switch • off the appliance and cover flames with e.g. a fire blanket or lid.
-
Page 5: Safety Instructions
ENGLISH When the appliance operates with other appliances • the maximum vacuum generated in the room should not exceed 0.04 mbar. Clean the hood filter regularly and remove grease • deposits from the appliance to prevent the risk of fire. If the supply cord is damaged, it must be replaced by •... - Page 6 • If the appliance is installed above a appliance or hot cookware, when you drawer: connect the appliance to a socket. – Do not store any small pieces or • Do not use multi-plug adapters and sheets of paper that could be extension cables.
- Page 7 ENGLISH • Do not operate the appliance with wet • Do not cover the inlet of the integrated hands or when it has contact with hood with cookware. water. • Do not open the bottom lid when the • Do not use the appliance as a work integrated hood or the appliance surface or as a storage surface.
-
Page 8: Installation
• Disconnect the appliance from the • Cut off the mains electrical cable mains supply. close to the appliance and dispose of 3. INSTALLATION 3.5 Assembly WARNING! Refer to Safety chapters. Refer to the installation booklet for detailed information on how to assemble 3.1 Before the installation... - Page 9 ENGLISH Find the video tutorial "How to install your AEG Extractor Hob" by typing out the full name indicated in the graphic below. max.R5 min.55 www.youtube.com/electrolux www.youtube.com/aeg min.55 min.4 How to install your AEG Extractor Hob min. 1500 Filter housing assembly...
-
Page 10: Product Description
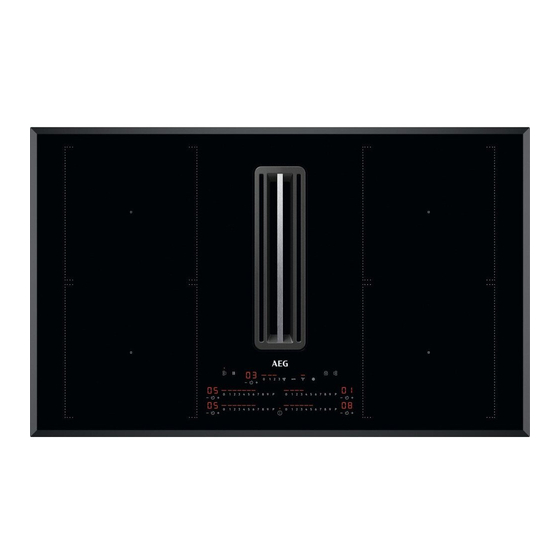
4. PRODUCT DESCRIPTION 4.1 Product overview Grid Cabinet back wall fitting Filter Tube Filter housing Adapter Tube 4.2 Cooking surface layout Induction cooking zone Control panel Hood... - Page 11 ENGLISH 4.3 Control panel layout Use the sensor fields to operate the appliance. The displays, indicators and sounds tell which functions operate. Sen‐ Function Description field ON / OFF To activate and deactivate the appliance. Timer To set the function. To increase or decrease the time.
-
Page 12: Daily Use
Sen‐ Function Description field Lock / Child Safety Device To lock / unlock the control panel. PowerBoost To activate the function. Hob control bar To set a heat setting. 4.4 Display indicators Indicator Description There is a malfunction. + digit OptiHeat Control (3 step Residual heat indicator): continue cooking / keep warm / residual heat. - Page 13 ENGLISH To deactivate the function: change the To deactivate the function: select the heat setting. cooking zone with and press . The remaining time counts back to 00. 5.5 OptiHeat Control (3 step The timer finishes counting down, a Residual heat indicator) signal sounds and 00 blinks.
- Page 14 When you use the hob for the first time, manually, if necessary. the function is usually activated by • The hood extractor is always available default. as an electrical load. You can activate the function while the...
- Page 15 ENGLISH Automatic modes - fan speed levels Hood Residual heat level (hob is Residual heat level (hob Boiling Frying mode off) is on) The function can operate uninterrupted If you deactivate the hob for a maximum of 10 minutes. After that while AUTO is running, the time the fan speed setting automatically function will be remembered...
-
Page 16: Additional Functions
Sym‐ Setting Possible op‐ front timer. tions To exit the menu: press Alarm / error The list of recent OffSound Control history alarms / errors. You can activate / deactivate the sounds To enter user settings: press and hold in the Menu >... -
Page 17: Hints And Tips
ENGLISH The heat setting is lowered to 1. The To deactivate the function: press speed of the hood fan decreases to 1. Do not set any heat setting / hood 2. To deactivate the function: press setting. Press and hold for 3 seconds, until the indicator above the symbol The previous heat setting / fan speed... - Page 18 • not correct: aluminium, copper, brass, glass, ceramic, porcelain. Cookware is suitable for an induction hob if: • water boils very quickly on a zone set to the highest heat setting. • a magnet pulls on to the bottom of the cookware.
-
Page 19: Care And Cleaning
ENGLISH Heat setting Use to: Time Hints (min) Keep cooked food warm. as nec‐ Put a lid on the cookware. essary 1 - 2 Hollandaise sauce, melt: but‐ 5 - 25 Mix from time to time. ter, chocolate, gelatine. 1 - 2 Solidify: fluffy omelettes, baked 10 - 40 Cook with a lid on. - Page 20 • Always use cookware with a clean WARNING! base. Make sure you do not let • Scratches or dark stains on the water get inside the hood. surface have no effect on how the hob operates. If water or other liquids spill inside the •...
-
Page 21: Troubleshooting
ENGLISH without dishes in the same load. Only the plastic parts can be cleaned using detergents. 4. Fix the filter and filter housing back in place when they are fully dried. 5. Reset the counter. Resetting the counter when the filter indicator is on: 1. - Page 22 Problem Possible cause Remedy You do not set the heat set‐ Activate the hob again and set ting for 60 seconds. the heat setting in less than 60 seconds. You touched 2 or more sen‐ Touch only one sensor field.
- Page 23 ENGLISH Problem Possible cause Remedy The cookware is unsuitable. Use cookware suitable for in‐ duction hobs. Refer to "Hints and tips". The diameter of the bottom Use cookware with correct di‐ of the cookware is too small mensions. Refer to "Technical for the zone.
-
Page 24: Technical Data
Make sure, you operated the hob correctly. If not the 10. TECHNICAL DATA 10.1 Rating plate Model CDE84751FB PNC 949 597 957 00 Typ 66 D4A 01 AA 220 - 240 V / 400 V 2N 50 Hz Induction 7.35 kW... -
Page 25: Environmental Concerns
ENGLISH Length (L) and width (W) of non circular Left front L 22.3 cm cooking zone W 22.0 cm Length (L) and width (W) of non circular Left rear L 22.3 cm cooking zone W 22.0 cm Length (L) and width (W) of non circular Right front L 22.3 cm cooking zone... - Page 28 www.aeg.com/shop...
Need help?
Do you have a question about the CDE84751FB and is the answer not in the manual?
Questions and answers