
Subscribe to Our Youtube Channel
Related Manuals for Idmed Algiscan


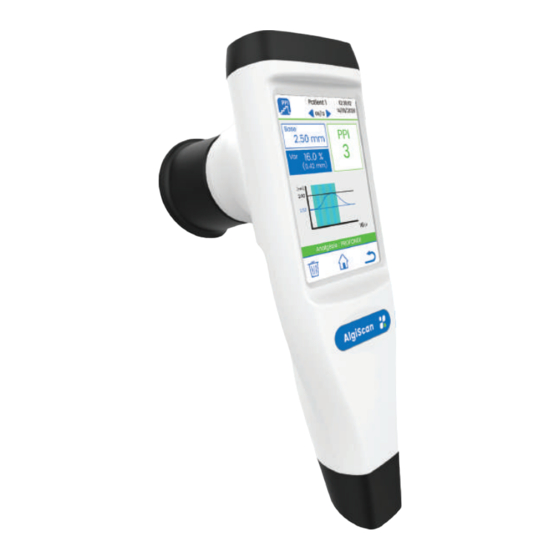
Summary of Contents for Idmed Algiscan
- Page 1 USER MANUAL USER MANUAL AlgiScan Version 3.2 - EN Last update 2021/04/19 Ref: ALG-IFU_EN User Manual AlgiScan...
- Page 2 User Manual AlgiScan...
-
Page 3: Table Of Contents
About this manual ....................5 Indications of use ....................5 Expected performance ..................5 Clinical Benefits ..................... 5 Important information about the use of AlgiScan ....... 6 I Safety measures ....................6 I.1 Warnings ............................7 I.2 Caution ............................8 I.3 Explanation of symbols ......................10 II General description .................. - Page 4 V Appendix 1 ......................32 Troubleshooting ..........................32 VI Appendix 2 ......................33 End of life equipment / Recycling ..................33 Specification and warranty ..................... 33 Environment ............................. 33 Technical specifications ......................34 VII Appendix 3 : accessories ................37 User Manual AlgiScan...
-
Page 5: About This Manual
The use of AlgiScan allows to adjust the sedation dosage without replacing the usual practice (clinical or pharmacological). Two parts of the Algiscan may be in contact with the patient: the stimulation cable via the appropriate electrodes and the eyecup. -
Page 6: Important Information About The Use Of Algiscan
• A NOTE provides useful information about a function or procedure. EXPLANATION OF SYMBOLS The symbols that may appear on the AlgiScan display are compiled and explained at the end of this chapter. Any serious incident occurring in connection with the device must be notified to the manu- facturer and to the competent authority of the Member State or country in which the user and the patient are established. -
Page 7: Warnings
Explosion risk: do not use the AlgiScan in a flammable atmosphere or in places where flammable anaesthetic products may accumulate. The AlgiScan is not designed to operate in the environment of a SCANNER, M.R.I. or any other appliance creating powerful magnetic fields. -
Page 8: Caution
Do not position the electrodes on either side of the heart. The use of the AlgiScan should not result in any significant pressure of its eyecup on the patient’s face but only putting it in contact. If too much pressure is applied, light marks or red patches may appear on the skin in the contact area due to pressure points. - Page 9 10 per hour. The AlgiScan’s users must take care not to be in contact with any other electrical appliances when using the AlgiScan.
-
Page 10: Explanation Of Symbols
FCC regulation FCC ID part 15 YYYY Manufacturing date, Bluetooth module compliant with Japanese regulation Manufacturer Symbols on AlgiScan screen Main button Home button Settings menu Previous step Confirmation of the record- Delete measurements or file ing of the measurement... - Page 11 Add new patient’s file patient records Battery Charge level Battery Charge level (full) (intermediary) Battery Charge level Mode selection (empty) AlgiScan ready for taking Measurement impossible a measurement « Tetanus» mode « Flash » mode « PPI » mode « PRD » mode ©...
-
Page 12: General Description
The AlgiScan is designed in such a way that all controls are accessible with a simple touch of a given area of the AlgiScan screen. This area is called the symbol or icon. The touch screen is designed to work even if the operator is wearing gloves for the examination. -
Page 13: General Use
Before use, the practitioner must clean this part. For more information on cleaning, please refer to the chapter “CLEANING and DISINFECTION”. This eyecup is the only part in contact with the patient. The eyecup is to be placed on the AlgiScan by simply pushing it onto the black lens. -
Page 14: Turning The Device On/Off
Setting the time on the AlgiScan The AlgiScan contains a clock that is set at the factory. The operator can update the date and time of the AlgiScan. To access the time setting and date change menu proceed as follows: •... -
Page 15: Using The Algiscan
Transport Mode The operator can set the AlgiScan to “transport mode.” This mode switches off the unit for transport or storage. It prevents the unit from switching on every time a motion is detected. -
Page 16: Taking A Measurement
The patient’s pupil should be centered on the screen and totally in green color. Only the pupil will be colored in the image displayed by the AlgiScan. If this is not the case, reposition or position differently the AlgiScan. -
Page 17: Measurement Protocols
The default protocol is shown on the right side of the screen. Before starting recording the AlgiScan must be positioned on the patient and must detect the pupil correctly for at least 2 seconds to leave time to the pupil to adapt its size with the darkness. -
Page 18: Selecting The Measurement Protocol
The Light Flash protocol is used to check the efficiency of the pupillary light reflex. The AlgiScan stimulates the patient’s pupil with a light flash. This lighting or light Flash has a duration of 1 second. Its strength is fixed at 320 Lux. The overall duration of the test is 4 seconds. -
Page 19: Prd" Mode
Then the AlgiScan emits a beep indicating the start of the measurement. During this time, the AlgiScan should not be moved or the patient should close their eyelids. If this is the case, a new measurement must be taken. - Page 20 In the example above, the user has selected a 60 mA electrical stimulation. The user returns to the measurement screen by pressing the following symbol The AlgiScan indicates continuously the level of conduction of the patient’s electrodes. Verification of the level of Patient 1 conduction of the electrodes.
-
Page 21: Ppi " Mode
13%. When the pupil size variation is over 13% the stimulation is stopped and AlgiScan calculates the PPI score. Each stage of electrical stimuli has a duration of 1s with stages at 10, 20, 30, 40, 50 and 60 mA. -
Page 22: Connection And Positioning Of The Stimulation Electrodes
A final beep indicates the end of the stimulation. During this time interval, it is essential that the AlgiScan is not moved and that the patient does not close his eye. If this does happen, a new measurement must be performed. - Page 23 Before touching the electrodes, always make sure that the AlgiScan is not in a stimulation phase. First, connect the electrode cable to the AlgiScan by pushing in the end of the cable equipped with the connector in. The proximal electrode should be connected to the red clip. The distal electrode should be connected to the black clip.
-
Page 24: Display Of The Results
It should be noted that if the electrodes are in contact with each other or if the cable is damaged causing a short circuit, the AlgiScan displays an electrode symbol in grey with a red line symbolising an inter-electrode connection. - Page 25 Reactivity : VERY GOOD interpretation Example of a result: light stimulation mode Following the values measured, the AlgiScan displays a comment concerning the intensity of the pupillary light reflex (here the comment is “Reactivity: very good”; it is highlighted in green).
-
Page 26: Results In The "Tetanus" Mode
Baseline diameter of the pupil (blue horizontal line) o Maximum variation in pupil size (black horizontal line) • The baseline diameter before stimulation (baseline in mm) • The percentage pupil’s variation obtained (Var. in %) (Var. %=((Max.-Min.)/Min.*100) User Manual AlgiScan... -
Page 27: Results In "Prd" Mode
Sensitivity: VERY WEAK Example of a result: “Tetanus” mode with a current of 60mA After the values measured the AlgiScan displays a comment about the intensity of the dilatation reflex (here the comment is “Very Weak”; it is highlighted in green). -
Page 28: Results In The "Ppi" Mode
Sensibility : VERY STRONG Example of a result: “PRD” After the values measured the AlgiScan displays a comment about the intensity of the dilatation reflex (here the comment is “Very Strong”; it is highlighted in red). The comment displayed and its highlighting colour is obtained via the quantitative and qualitative scale of the dilatation reflex explained below. -
Page 29: Review Saved Files / Trend Charts
The measurement’s folder or patient’s file enables to save a set of measurements of the same patient in a single file. By scanning the patient identification barcode, the AlgiScan is positioned on the patient’s file desired. The patient folder can be selected manually with the “Patient” menu icon Once positioned in the «registration folder»... -
Page 30: Preventive Maintenance, Cleaning And Disinfection
• Check the light stimulation • Check the values of the electrical stimulations • Battery replacement The lifetime of the AlgiScan, under the required conditions of use and maintenance, is 5 years (2 years for accessories). Caution: Only technicians trained by IDMED are authorised to carry out repairs or maintenance operations. -
Page 31: Cleaning And Disinfection
The AlgiScan, its parts and accessories are non-sterile. In no circumstances should the AlgiScan be sterilized. The surface of the AlgiScan has to be cleaned with a lint-free cloth moistened with a quaternary ammonium disinfectant, 70% isopropyl alcohol or a cold decontamination solution... -
Page 32: Troubleshooting
The eyecup, the only part in contact with the patient, will be removed from the AlgiScan and cleaned in the same way as the AlgiScan and then put back in place on the clean AlgiScan. It can also be cleaned by autoclaving (maximum temperature 135°C). The eyecup can withstand 50 autoclave washing cycles. -
Page 33: End Of Life Equipment / Recycling
Explosion risk: do not use the AlgiScan in a flammable atmosphere or in places where flammable anaesthetic products could concentrate. The AlgiScan is not designed to operate in the environment of a SCANNER, M.RI or any other appliance creating powerful magnetic fields. -
Page 34: Technical Specifications
Harmonics IEC 61000-3-2 Class B AlgiScan must used professional healthcare facility environment Voltage fluctuations Class A The AlgiScan can be connected to the public mains and flicker IEC 61000-3-3 Compliant network EMC Immunity Professional healthcare Basic EMC facility Compliance... - Page 35 In bursts frequency frequency that case, the AlgiScan will maintain the safety of the patient and the user. Mains power quality should be that of Surges ± 0,5 kV, ± 1 kV ± 0,5 kV, ± 1 kV...
- Page 36 Power Supply • 3,7V DC Lithium-Ion battery 2900 mAh or above (with in-built thermal and short-circuit protection), autonomy approx. one week in normal use (20 measurements per day). • IDMED STA-W2 charging base: - Qi standards compliant 5W min ...
-
Page 37: Appendix 3 : Accessories
VII Appendix 3 : accessories The AlgiScan (reference: ALG-MU) can be supplied with a number of accessories. Here is the list of the accessories with their names and IDMED references. Medical accessories of the AlgiScan Reference Description STA-W2 Wireless charging station for AlgiScan... - Page 38 User Manual AlgiScan...
- Page 39 User Manual AlgiScan...
Need help?
Do you have a question about the Algiscan and is the answer not in the manual?
Questions and answers