Table of Contents
Advertisement
Quick Links
ORDER # ____________
S/N:___________________
MAC: ____________________
3.5E/3.5E XR
4.4E/4.4E XR
AND
WHOLE HOUSE FAN
INSTALLATION AND OPERATION MANUAL
© ALL RIGHTS RESERVED | AIRSCAPE INC.
Congratulations on your AirScape Whole House Fan purchase. This fan is designed to
provide you with quiet, natural, energy-efficient cooling for many years.
Please take a few minutes to read over this manual to make sure you are prepared for the
installation. The building owner/occupant should read the "Theory of Operation" insert so that
the 3.5e/4.4e WHF will be correctly located to maximize effectiveness and efficiency of
operation. Attic venting recommendations and calculations are also included in that insert.
If you (or your installer) have any questions regarding the installation, operation, or
maintenance of this fan, please call 1.866.448.4187 or email experts@airscapefans.com.
Airscape 3.5e/4.4e WHF Installation Manual 07/14
Page 1
Advertisement
Table of Contents

Subscribe to Our Youtube Channel
Related Manuals for AirScape 3.5E


Summary of Contents for AirScape 3.5E
- Page 1 Please take a few minutes to read over this manual to make sure you are prepared for the installation. The building owner/occupant should read the "Theory of Operation" insert so that the 3.5e/4.4e WHF will be correctly located to maximize effectiveness and efficiency of operation. Attic venting recommendations and calculations are also included in that insert.
-
Page 2: What's Included
NOT for use in kitchens. • NEVER force open the damper doors. Always use the yellow clutch releases located on • the actuators before attempting to manually open or close damper doors. Airscape 3.5e/4.4e WHF Installation Manual 07/14 Page 2... - Page 3 We recommend installing wireless remotes before putting the unit in the attic – see page 12 All part identification labels (A through E) will be facing the interior of the damper box. Once assembled, you should not see any of the labels. Airscape 3.5e/4.4e WHF Installation Manual 07/14 Page 3...
- Page 4 3. Attach the bottom seams of side panels to the base using the provided screws (5 per side). Do not over torque. NOTE: We recommended using a manual flat head screwdriver instead of a cordless screwdriver to avoid over-tightening & stripping. Airscape 3.5e/4.4e WHF Installation Manual 07/14 Page 4...
- Page 5 5. Attach the bottom seam of back panel to the base using 5 of the provided screws. 6. Insert 2 plastic rivets along each side seam. Press rivets in by hand, then use a hammer to completely set each rivet shaft as shown below. Airscape 3.5e/4.4e WHF Installation Manual 07/14 Page 5...
- Page 6 9. Using the provided 2 inch wide foil tape, firmly tape along the bottom seam and all 4 side seams on the interior of the unit. Make sure tape is securely attached and will not interfere with the operation of the damper doors when they open. Airscape 3.5e/4.4e WHF Installation Manual 07/14 Page 6...
- Page 7 Attach the collar using the 12 provided collar screws. Use the remaining 2 inch foil tape to tape around the outside of the upper seam of the box and around the base of the damper collar. Airscape 3.5e/4.4e WHF Installation Manual 07/14 Page 7...
- Page 8 INSTALLATION – CARPENTRY The 3.5e/4.4e WHF has been designed to fit a 22½" x 26½" wall or ceiling opening, which corresponds to 24” on-center (O/C) framing. With a few extra steps, the 3.5e/4.4e WHF can be installed in situations with 16" O/C framing.
- Page 9 Cut the opening with a drywall cutter. The opening should be 22½" x 26½". Position the 3.5e/4.4e WHF damper enclosure on top of the joists. Rotate the enclosure as required so that there is easy access to the electrical box and so that the damper doors are centered over the opening (this can be checked from below by depressing the yellow clutch releases located on the side of the actuators and opening the damper doors manually).
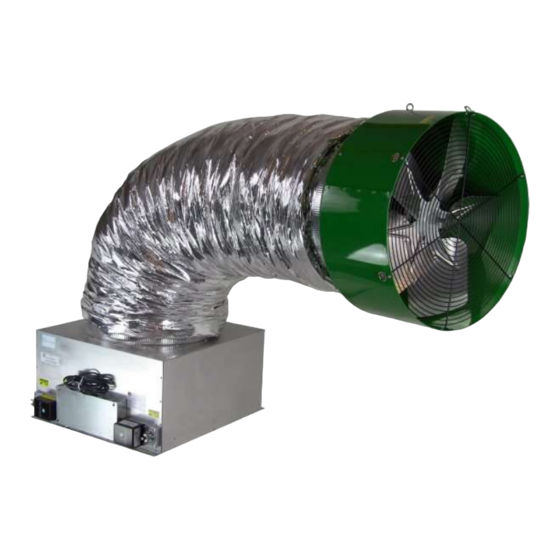
- Page 10 The duct can be supported under the bend if desired using extra chain wrapped with a protective material. Airscape 3.5e/4.4e WHF Installation Manual 07/14 Page 10...
- Page 11 Duct to Damper and Duct to Fan Connections Fully Installed View Airscape 3.5e/4.4e WHF Installation Manual 07/14 Page 11...
-
Page 12: Installation & Wiring
Visit our blog: blog.airscapefans.com and type “web control” into the search field. Email experts@airscapefans.com or call AirScape at 866-448-4187 for additional questions. WIRELESS REMOTE (see remote manual for complete instructions) Step 1: Plug the blue CAT5 cable into the remote receiver and into the blue RMT port on the electrical box. -
Page 13: Start-Up And Operation
60 seconds. Use the arrow up and down buttons to increase or decrease speed. Both the 4.4e and the 3.5e WHFs have 7 speed settings. Always turn the fan on using the UP button. Use the up and down arrows to change •... -
Page 14: Unit Specifications
XR - R-49 insulated damper doors Warranty: 3 year parts warranty. 1 year controls warranty *Due to our continual product improvement efforts, performance ratings and specifications are subject to change without notice. Airscape 3.5e/4.4e WHF Installation Manual 07/14 Page 14...
Need help?
Do you have a question about the 3.5E and is the answer not in the manual?
Questions and answers