Chapters
Table of Contents

Related Manuals for Smart Lock YL-73


Summary of Contents for Smart Lock YL-73
- Page 1 YL-73 Smart Lock Cylinder User's Manual English / Deutsche Thank you for choosing YL-73 smart lock cylinder Please read the manual carefully before using it Please keep user's manual properly for future reference...
-
Page 2: Table Of Contents
CATALOGUE 1. Included in the box................2 2. Product features ..................2 3. Technical specification .................4 4. Installation instructions..............4 5. Restoring factory settings..............6 6. User settings ..................6 7. Troubleshooting ...................9 8. Daily maintenance................13 9. Warranty Card ...................13... -
Page 3: Included In The Box
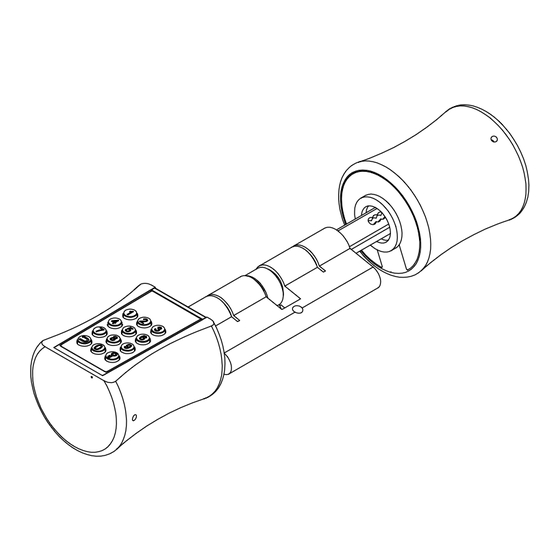
1. Included in the box Description Quantity Smart lock cylinder YL-73 (Fingerprint +Phone App+ keypad password) Magnetic key Hexagon screwdriver User manual 2. Product features... - Page 4 Product Features: Open With: Support Fingerprint, Phone App, Keypad Password, Mechanical key. App: eSmartLock , support Android and iOS phone. Wrong Password Locked: Entering the wrong Password 5 times in 1 min, the system will automatically lock for 3 mins to prevent random Password. Fingerprint Algorithm: Aadopting fingerprint algorithm to eliminate false fingerprints and residual fingerprints.
-
Page 5: Technical Specification
3.Technical Specification specification Item Model YL-73 Basic function Fingerprints, Phone App, Keypad Password, Mechanical Keys Type of finger print sensor Semiconductor module Fingerprint capacity 100 fingerprints App user 1 Administrators and 500+ authorized users False recognition rate <0.001% Rejection rate <1%... - Page 6 4.2 Product installation drawing ① 1. Install 3 pcs AAA alkaline batteries with the correct positive and negative electrodes (Figure①). 2. Insert the smart cylinder from outside and adjust the position properly (Figure②). 3. Install the screw through the fixed core screw hole on the side of the cylinder (Figure ③).
-
Page 7: Restoring Factory Settings
5.Restoring factory settings Fingerprint pattern 5.1 Factory default The factory default is set to user experience mode, correct correct correct correct Password (123456) and any fingerprint can unlocked. Notes: wrong wrong wrong wrong wrong 1.First time use, please bind the app first. 2. - Page 8 2.In order to use BT properly it needs to obtain location permission for Android phone 6.1.4 Add Smart Lock 1. When to add smart lock to the App. It should keep smart lock in working status. Touch the fingerprint/touch sensor of smart lock and blue light flashes 2.
- Page 9 Fig. 4 6.1.5 Connect Smart Lock 1. When to connect smart lock to the App. It should keep smart lock in working status. Touch the touch sensor of smart lock and blue light flashes 2. BT connection: When blue light is flashing, click "Connect" on the main interface of APP.
-
Page 10: Troubleshooting
Fig. 9 6.1.7 Unlock Method 1. APP connect with smart lock: Please read "E. Connect smart lock” instruction. 2. Unlock by Admin account: Click the "Unlock" button to unlock the smart lock directly (Fig. 10). 3. Unlock by authorized accountt: <a>... - Page 11 6.1.8 Unlock Record 1. APP connect with smart lock: Please read "E. Connect smart lock” instruction 2. Check unlock record: <a> Click "BT unlock record" to check record of user, unlock time, unlock method, etc. (Fig. 13) <b> Click “Fingerprint unlock Record”. It can check record of the unlock user (Fig. 14) Fig.
- Page 12 Fig. 15 Fig. 16 Fig. 17 Fig. 18 Fig. 19 6.1.11 Modify fingerprint Enter to modify the fingerprint name (Fig. 19), after inputting the fingerprint name, click "Modify", the modification is successful. 6.1.12 Delete fingerprint 1.The icon “ ” in the upper right corner deletes the fingerprint. 2.
- Page 13 6.2 Keypad menu management settings 6.2.1 Registering the administrator user 1. Press the number key to wake up the system and press " ", then press " ", enter the administrator's password set on the App (read 6.1 App setting), and press " "...
-
Page 14: Daily Maintenance
2. Press "3" and then press " ". Delete all normal users' fingerprint and Password. 3.Press " "to exit the system. 6.2.5 Vacation mode 1. Press the number key to wake up the system and press " ", then press " ", enter the administrator's keypad password and press "... - Page 15 4.If the fingerprint sensing area has dirt or dust, it may affect the normal use, clean it with a soft cloth. 5.When entering a fingerprint, pleas press appropriately with your fingers, do not press too hard. 6.Please do not hit or scratch the shell with hard objects to protect the surface coating. 7.Please do not use the liquid containing alcohol, gasoline, thinner to clean the lock.
- Page 16 KATALOG 1. In der Box enthalten................16 2. Produktmerkmale ................16 3. Technische Spezifikation..............18 4. Installationsanweisungen..............18 5. Werkseinstellungen wiederherstellen..........20 6. Benutzereinstellungen................20 7. Fehlerbehebung.................28 8. Tägliche Wartung................29 9. Garantiekarte..................30...
-
Page 17: In Der Box Enthalten
1. In der Box enthalten Nummer Beschreibung Quantität Schließzylinder YL-73 (Fingerabdruck + Phone App + Tastaturpasswort) Magnetschlüssel sechseck schraubenzieher Benutzerhandbuch 2. Produktmerkmale Hinterer Griff Das Schloss wählt Zifferntastatur Festes Schraubenloch Fixiertes Kern schraubenloch Festes Schraubenloch Front griff aus Edelstahl... - Page 18 Produktmerkmale: Falsches Passwort gesperrt: Wenn Sie das falsche Passwort 5 Mal in 1 Minute eingeben, wird das System automatisch für 3 Minuten gesperrt, um ein zufälliges Passwort zu verhindern. Fingerabdruckalgorithmus: Ein Fingerabdruckalgorithmus wird verwendet, um falsche Fingerabdrücke und verbleibende Fingerabdrücke zu eliminieren. Weckmodus: Wecken per Fingerabdrucksensor oder Tastatur.
-
Page 19: Technische Spezifikation
3. Technische Spezifikation spezifikation Artikel Nummer Modell YL-73 Entsperrmodus Fingerabdrücke, Telefon-App, Tastaturpasswort, mechanische Schlüssel Art des Fingerabdrucksensors Halbleiter modul Fingerabdruckkapazität 100 fingerabdrücke Falsche Erkennungsrate <0.001% Ablehnungsrate <1% Kontrastgeschwindigkeit 1:N<7s Fingerabdrück Taste 12 Taste, kapazitive Touch-Taste, LED-Hintergrundbeleuchtung Passwortkapazität 32 Sätze von 6-stelligen Passwörtern... - Page 20 4.2 Zeichnung zur Produktinstallation drinnen ① draußen 1. Legen Sie 3 AAA-Alkalibatterien mit den korrekten positiven und negativen Elektroden ein (Abb ①). 2. Setzen Sie den Zylinder von außen ein und passen Sie die Position ordnungsgemäß an (Abb ②). 3. Installieren Sie die Schraube durch das feststehende Kernloch auf der Zylinderseite (Abb ③).
-
Page 21: Werkseinstellungen Wiederherstellen
5. Werkseinstellungen wiederherstellen Fingerprint pattern 5.1 Werkseinstellung Die Werkseinstellung ist auf den correct correct correct correct Benutzererfahrungsmodus eingestellt,Passwort (123456) und jeder Fingerabdruck können entsperrt werden. wrong wrong wrong wrong wrong Hinweis: 1. Bei erstmaliger Verwendung binden Sie bitte zuerst die App. 2. - Page 22 bei der App „eSmartLock“ an, um das Konto zu registrieren und zu binden, und registrieren Sie dann das Tastaturpasswort des Administrators über die App. Wenn das Tastaturpasswort oder der Administrator-Fingerabdruck des Administrators im Werksmodus registriert ist, kann die App nicht verwendet werden. * Um die App-Funktion wiederherzustellen, muss der Werksmodus wiederhergestellt und neu gebunden werden.
- Page 23 Abb. 5 Abb. 6 6.1.5 Smart Lock verbinden 1. Wann soll das Smart Lock mit der App verbunden werden? Es sollte Smart Lock im Arbeitsstatus halten. Berühren Sie den Berührungssensor des Smart Lock und blaues Licht blinkt. 2. BT-Verbindung: Wenn das blaue Licht blinkt, klicken Sie auf der Hauptschnittstelle der APP auf "Verbinden".
- Page 24 Abb. 8 Abb. 9 6.1.7 Entsperrmethode 1. APP mit Smart Lock verbinden: Bitte lesen Sie die Anleitung „E. Smart Lock verbinden“. 2. Durch Admin-Konto entsperren: Klicken Sie auf die Schaltfläche „Entsperren“, um das Smart Lock direkt zu entsperren (Abb. 10).
- Page 25 Abb. 11 Abb. 12 6.1.8 Datensatz entsperren 1. APP mit Smart Lock verbinden: Bitte lesen Sie die Anleitung „E. Connect Smart Lock“ 2. Überprüfen Sie den Entsperrdatensatz: <a> Klicken Sie auf "BT-Entsperrdatensatz", um die Aufzeichnung des Benutzers, die Entsperrzeit, die Entsperrmethode usw. zu überprüfen (Abb. 13) <b>...
- Page 26 Kontrollleuchte leuchtet und das Smart Lock ist entsperrt. B. Fingerabdruck registrieren: 1. APP mit Smart Lock verbinden: Bitte lesen Sie die Anleitung „E. Smart Lock verbinden“. 2. Rufen Sie die Benutzerverwaltung auf:Klicken Sie nach dem Aufwecken des Smart Locks auf "Benutzerverwaltung", um die Schnittstelle zum Hinzufügen von...
- Page 27 Benutzer zu löschen. 6.1.12 Zurücksetzen 1. Setzen Sie das Smart Lock zurück: Smart Lock aufheben: Klicken Sie auf "Smart Lock aufheben". Administrator (Abb.10), Autorisierter Benutzer (Abb. 11), Alle Benutzer werden gelöscht und die Werkseinstellungen werden wiederhergestellt. 2. Setzen Sie die Fingerabdruck-Einstellung durch den Administrator-Fingerabdruck zurück:...
- Page 28 6.2 Verwaltungseinstellungen des Tastaturmenüs 6.2.1 Registrieren des Administratorbenutzers 1. Drücken Sie die Zifferntaste, um das System zu aktivieren, und drücken Sie " ", Drücken Sie dann " ", geben Sie das in der App festgelegte Administratorpasswort ein (siehe 6.1 App-Einstellung) und drücken Sie zur Bestätigung die Taste " ".
-
Page 29: Fehlerbehebung
3. Drücken Sie zum ersten Mal den Fingerabdruck. 4. Drücken Sie den Fingerabdruck ein zweites Mal. 5. Drücken Sie zum dritten Mal auf den Fingerabdruck und die Registrierung des Fingerabdrucks ist erfolgreich. 6.Der allgemeine Benutzerfingerabdruck wurde erfolgreich registriert, drücken Sie "... -
Page 30: Tägliche Wartung
B.Bitte bestätigen Sie, dass die Fingerabdrücke richtig im Erfassungsbereich platziert sind. 3. Der Schließzylinder funktioniert nicht: A. Überprüfen Sie, ob die Batterie erschöpft ist. 4.Der Schließzylinder wurde erfolgreich entriegelt, aber die Tür öffnete sich nicht. A. Dieses Produkt ist ein Schließzylinder. Nach dem Entriegeln müssen Sie den Griff drehen, um die Tür zu öffnen. -
Page 31: Garantiekarte
Garantiekarte Produktmodell: Fabriknr.: Uberprufen durch: Kaufdatum: Kaufort: Kundenname: Kundentelefon Nr.: Kundenadresse: Aufzeichnungen reparieren Unterschrift Fehlerursache Reparaturdatum Reparatur durch das Wartungspersonal...
Need help?
Do you have a question about the YL-73 and is the answer not in the manual?
Questions and answers