Teradek BOLT 6 User Manual
Hide thumbs
Also See for BOLT 6:
- User manual (133 pages) ,
- Quick start manual (11 pages) ,
- Quick start manual (10 pages)
Table of Contents
Advertisement
Advertisement
Table of Contents

Related Manuals for Teradek BOLT 6


Summary of Contents for Teradek BOLT 6
- Page 1 © 2022 Teradek, LLC. All rights reserved.
-
Page 2: Table Of Contents
Bolt 6 XT Quick Start Guide ........................4 Bolt 6 LT Quick Start Guide ......................... 18 Bolt 6 LT-HDMI Quick Start Guide ....................... 31 Bolt 6 Monitor Module Quick Start Guide ..................42 Physical Properties Bolt 6 XT System ..........................51 Bolt 6 LT System .......................... - Page 3 Device Placement ..........................82 Antenna Orientation ..........................84 Additional Information Regulatory Information ........................85 Bolt 6 U-NII-5 (6GHz) support by region .................... 92 Frequencies by Region ........................94 Technical Specifications Bolt 6 XT System ..........................94 Bolt 6 LT System ..........................98 Bolt 6 LT HDMI System ........................
-
Page 4: Bolt 6 Xt Quick Start Guide
Teradek User Manual Bolt 6 XT Quick Start Guide The Bolt 6 XT Set is a real-time wireless video transmission system that supports 4K video with Teradek’s patented Zero-Delay technology, now with less interference using the newly opened 6GHz wireless frequency. Bolt 6 XT can send and receive color-accurate, True-HDR videos in under 0.001 seconds using the set’s included Bolt 6 XT video Transmitter and Receiver. - Page 5 Teradek User Manual Table of Contents...
- Page 6 Additional Information BOLT APP OTHER RESOURCES What's Included • Bolt 6 XT Transmitter and Receiver • Lightstand Adapter 3/8in • Hot Shoe Adaptor • (Bit 118) 2pin Conn. to PowerTap - 18in Cable • Ultra Thin HDMI Male Type A (Full) - HDMI Male Type A (Full) 18in Cable •...
- Page 7 Teradek User Manual Physical Properties Power and Connect 1. Connect your power source to the transmitter and receiver using the included A/C adapter. If both devices are equipped with battery plate accessories, attach a compatible battery (Gold or V mount).
- Page 8 Teradek User Manual 1. Using the Menu Joystick, navigate to the Pair menu on both the transmitter and the receiver front panel. 2. Select Pair to begin the pairing process. The transmitter will begin scanning for a receiver within range and automatically pair to the receiver.
- Page 9 • Check the power cable for shorts and proper grounding. 12G-SDI Input/Output Cables Bolt 6 XT units require the use of 12G-SDI cables to reliably transport 12G video signals, and are included as a standard item. Ensure that your cables are rated for compatibility with your camera's output.
- Page 10 WITH DUAL MOUNT Depending on the model, Bolt 6 XT devices are equipped with a dual mount battery plate that allows you to attach your device to either the back of a camera, monitor, or Bolt Panel Antenna.
- Page 11 TX/RX Configuration Menus Wireless Settings Switch TX (RX Only) - Bolt 6 receivers can pair with up to four transmitters at a time. Switch TX allows you to quickly switch from one paired transmitter's camera feed to another paired transmitter. This feature is especially useful in multi-camera situations when you need to switch to a different camera's view mid-shoot, without having to perform the pairing process every time.
- Page 12 Bolt Panel Antenna while in Broadcast Mode. NOTE: Bolt 6 XT 750 and 1500 receivers will not link to a Bolt 6 XT MAX transmitter in Broadcast Mode, even if they were previously paired. You must use a Bolt 6 XT MAX receiver. Otherwise, the receiver's OLED will display Broadcast Not Supported.
- Page 13 Teradek User Manual ◦ 3D LUT Mode - Select whether the look is applied to the entire video output (Full Screen) or half (Split Screen). Video OSD Settings (RX Only) - Choose when to display the OSD. ◦ Never show - Disable OSD.
- Page 14 To unlock, press and hold the menu joystick upwards for five seconds or until the display reads "KEYPAD UNLOCKED." HDMI (RX only) - Bolt 6 supports all HDMI output modes. You can select from one of the following options: ◦ Auto ◦...
- Page 15 Teradek User Manual Bolt App Use the Bolt App to remotely manage and monitor every parameter of Bolt 6 including pairing, frequency selection, and 3D LUTs. CONNECT VIA BLUETOOTH 1. Download the Bolt App. 2. Enable Bluetooth on your iOS or Android device.
- Page 16 Teradek User Manual ◦ Quality ◦ Temperature ◦ Camera Recording ◦ Region ◦ Bandwidth ◦ OSD name Receiver Status Display • Settings (Descriptions listed in Receiver Menu section) - Tap the settings button on the top-right corner of the display to customize the receiver’s various settings such as the output format, audio, display, and OSD.
- Page 17 Teradek User Manual ◦ Current Frequency ◦ Range ◦ Quality ◦ Temperature ◦ Camera Recording ◦ Bandwidth ◦ Region ◦ Video Output ◦ OSD name Other Resources • USER MANUAL: https://guide.teradek.com/m/112641 • FIRMWARE UPGRADE: https://teradek.com/pages/downloads#bolt6 Bolt 6 Page 17...
-
Page 18: Bolt 6 Lt Quick Start Guide
Teradek User Manual Bolt 6 LT Quick Start Guide The Bolt 6 LT Set is a real-time wireless video transmission system that supports 4K video with Teradek’s patented Zero-Delay technology, now with less interference using the newly opened 6GHz wireless frequency. Bolt 6 LT can send and receive color-accurate, True-HDR videos in under 0.001 seconds using the set’s included Bolt 6 LT video Transmitter and Receiver. - Page 19 Teradek User Manual Table of Contents...
- Page 20 Additional Information BOLT APP OTHER RESOURCES What's Included • Bolt 6 LT Transmitter and Receiver • Hot Shoe Adaptor • Lightstand Adapter 1/4-20in • (Bit 118) 2pin Conn. to PowerTap - 18in Cable • (Bit 718) 2pin Conn. to 2pin Conn. (Alexa) 18in Cable •...
- Page 21 Teradek User Manual Physical Properties Power and Connect 1. Connect your power source to the transmitter and receiver using the included A/C adapter. If both devices are equipped with battery plate accessories, attach a compatible battery (Gold or V mount).
- Page 22 Teradek User Manual 1. Using the Menu Joystick, navigate to the Pair menu on both the transmitter and the receiver front panel. 2. Select Pair to begin the pairing process. The transmitter will begin scanning for a receiver within range and automatically pair to the receiver.
- Page 23 Teradek User Manual Power Cables 2-Pin Power Connector Bolt devices use a locking 2-pin power connector similar to the 0B 302 series LEMO connector. * Pin 1 is closest to the red dot on the connector. Input Voltage: 6-28V DC...
- Page 24 TX/RX Configuration Menus Wireless Configuration Switch TX (RX Only) - Bolt 6 receivers can pair with up to four transmitters at a time. Switch TX allows you to quickly switch from one paired transmitter's camera feed to another paired transmitter. This feature is especially useful in multi-camera situations when you need to switch to a different camera's view mid-shoot, without having to perform the pairing process every time.
- Page 25 Bolt Panel Antenna while in Broadcast Mode. NOTE: Bolt 6 LT 750 and 1500 receivers will not link to a Bolt 6 LT MAX transmitter in Broadcast Mode, even if they were previously paired. You must use a Bolt 6 LT MAX receiver. Otherwise, the transmitter's OLED will display Broadcast Not Supported.
- Page 26 Teradek User Manual ◦ 3D LUT Presets - Select a specific look from the list of 3D LUT presets. ◦ 3D LUT Mode - Select whether the look is applied to the entire video output (Full Screen) or half (Split Screen).
- Page 27 Teradek User Manual HDMI (RX only) - Bolt 6 supports all HDMI output modes. You can select from one of the following options: ◦ Auto ◦ RGB 8bit ◦ RGB 10bit ◦ YCbCR 4:4:4 8bit ◦ YCbCR 4:4:4 10bit ◦ YCbCR 4:2:2 10bit ◦...
- Page 28 Teradek User Manual Bolt App Use the Bolt App to remotely manage and monitor every parameter of Bolt 6 including pairing, frequency selection, and 3D LUTs. CONNECT VIA BLUETOOTH 1. Download the Bolt App. 2. Enable Bluetooth on your iOS or Android device.
- Page 29 Teradek User Manual ◦ Temperature ◦ Camera Recording ◦ Region ◦ Bandwidth ◦ OSD name Receiver Status Display • Settings (Descriptions listed in Receiver Menu section) - Tap the settings button on the top-right corner of the display to customize the receiver’s various settings such as the output format, audio, display, and OSD.
- Page 30 Teradek User Manual ◦ Range ◦ Quality ◦ Temperature ◦ Camera Recording ◦ Bandwidth ◦ Region ◦ OSD name Other Resources • USER MANUAL: https://guide.teradek.com/m/112641 • FIRMWARE UPGRADE: https://teradek.com/pages/downloads#bolt6 Bolt 6 Page 30...
-
Page 31: Bolt 6 Lt-Hdmi Quick Start Guide
Teradek User Manual Bolt 6 LT-HDMI Quick Start Guide The Bolt 6 LT HDMI Set is a real-time wireless video transmission system that supports 4K video with Teradek’s patented Zero-Delay technology, now with less interference using the newly opened 6GHz wireless frequency. Bolt 6 LT can send and receive color-accurate, True-HDR videos in under 0.001 seconds. - Page 32 Teradek User Manual Table of Contents...
- Page 33 BOLT APP OTHER RESOURCES What's Included • Bolt 6 LT-HDMI Transmitter and Receiver • 1x Hot Shoe Adaptor • 1x (Bit 118) 2pin Conn. to PowerTap - 18in Cable • 2x Ultra Thin HDMI Male Type A (Full) - HDMI Male Type A (Full) 18in Cable •...
- Page 34 Teradek User Manual Physical Properties Power and Connect 1. Connect your power source to the transmitter and receiver using the included A/C adapter. If the receiver is equipped with a battery plate, attach a compatible battery (Gold or V mount).
- Page 35 Teradek User Manual 1. Using the Menu Joystick, navigate to the Pair menu on both the transmitter and the receiver front panel. 2. Select Pair to begin the pairing process. The transmitter will begin scanning for a receiver within range and automatically pair to the receiver.
- Page 36 Teradek User Manual Power Cables 2-Pin Power Connector Bolt devices use a locking 2-pin power connector similar to the 0B 302 series LEMO connector. * Pin 1 is closest to the red dot on the connector. Input Voltage: 6-28V DC...
- Page 37 Teradek User Manual Mounting Bolt 6 LT devices have a 1/4”-20 threaded hole and two M3 threaded holes on the bottom for mounting the included light stand adapter or any other mounting accessory. CAUTION: DO NOT OVERTIGHTEN SCREWS INSERTED INTO THE THREADED HOLES. Doing ...
- Page 38 Teradek User Manual environments. NOTE: By default, Bolt 6 LT-HDMI will select the lowest available frequency from the Frequencies list if one has not been selected beforehand. Select Bandwidth - Choose between 20MHz and 40MHz bandwidth options Select Frequency - Select which frequency to use (determined by Fixed Frequency Mode selection).
- Page 39 Teradek User Manual Bolt App Use the Bolt App to remotely manage and monitor every parameter of Bolt 6 including pairing, frequency selection, and 3D LUTs. CONNECT VIA BLUETOOTH 1. Download the Bolt App. 2. Enable Bluetooth on your iOS or Android device.
- Page 40 Teradek User Manual ◦ Region ◦ Bandwidth ◦ OSD name Receiver Status Display • Settings (Descriptions listed in Receiver Menu section) - Tap the settings button on the top-right corner of the display to customize the receiver’s various settings such as the output format, audio, display, and OSD.
- Page 41 Teradek User Manual Other Resources • USER MANUAL: https://guide.teradek.com/m/112641 • FIRMWARE UPGRADE: https://teradek.com/pages/downloads#bolt6 Bolt 6 Page 41...
-
Page 42: Bolt 6 Monitor Module Quick Start Guide
Teradek User Manual Bolt 6 Monitor Module Quick Start Guide The Bolt 6 Monitor Module (TX or RX) is a real-time wireless video transmitter that supports 4K video with Teradek’s patented Zero-Delay technology, now with less interference using the newly opened 6GHz wireless frequency. - Page 43 Teradek User Manual Table of Contents...
-
Page 44: Physical Properties
Teradek User Manual PHYSICAL PROPERTIES POWER AND CONNECT PAIRING ◦ Pairing via Smart 7 Monitor ◦ Pairing via Bolt App BOLT APP Transmitter Status Display ◦ Receiver Status Display ◦ MODULE CONFIGURATION MENUS ◦ TX Module Configuration ◦ RX Module Configuration... - Page 45 8. Turn the system on by pressing and holding down the monitor’s power button. Pairing Before use, Bolt 6 Monitor Modules need to be paired with a Bolt 6 transmitter or receiver using SmallHD Smart 7’s user interface or the Bolt App. NOTE: Before starting any pairing process, ensure that both the transmitter, receiver, and monitor have the latest firmware version and have Bluetooth enabled.
- Page 46 5. Select SmallHD Monitor, then tap the Pair! button. The Bolt App will indicate when the pairing process is completed. Bolt App Use the Bolt App to remotely manage and monitor every parameter of the Bolt 6 Monitor Module including pairing, frequency selection, and 3D LUTs. CONNECT VIA BLUETOOTH 1.
- Page 47 Teradek User Manual Transmitter Status Display • Settings (Descriptions listed in the Transmitter Menu section) - Tap the settings button on the top right corner of the screen to customize the transmitter’s various settings. • Status - Displays the current status of: ◦...
- Page 48 Teradek User Manual Receiver Status Display • Settings (Descriptions listed in Receiver Menu section) - Tap the settings button on the top-right corner of the display to customize the receiver’s various settings such as the output format, audio, display, and OSD.
- Page 49 Teradek User Manual Module Configuration Menus Bolt 6 Monitor Modules can be configured using the Smart 7 Monitor's built-in interface. Once connected, tap the TERADEK BOLT 4K tab. TX Module Configuration Paired Receivers - This screen displays all paired receivers (if any), and allows you to pair or unpair additional receivers with the TX module.
- Page 50 Teradek User Manual Built-In Transmitter (TX) Configuration ◦ Rename transmitter (TX) - Rename the transmitter so that it’s easier to identify among other Bolt systems that are present. ◦ Video quality - Select a video quality setting to modify or balance the range and reliability of the signal.
-
Page 51: Bolt 6 Xt System
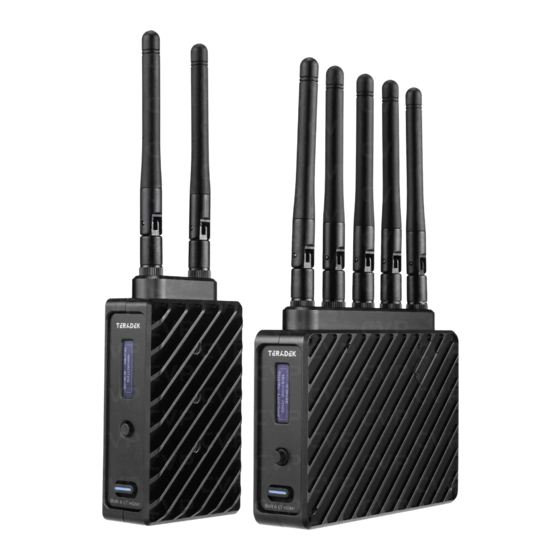
• Fan Mode - Turn the internal fan OFF or ON or enable the fan to remain OFF DURING RECORDING. Other Resources • USER MANUAL: https://guide.teradek.com/m/112641 • FIRMWARE UPGRADE: https://teradek.com/pages/downloads#bolt6 Bolt 6 XT System A: RP-SMA connectors G: USB-C port B: 6-28V DC power input H: OLED display C: 5-Pin USB port I: Menu joystick Bolt 6... - Page 52 Teradek User Manual D: HDMI input J: Power switch E: 12G-SDI output K: HDMI output F: 12G-SDI input Bolt 6 Page 52...
-
Page 53: Bolt 6 Lt System
Teradek User Manual Bolt 6 LT System A: RP-SMA connectors F: OLED display B: 6-28V DC power input G: Menu joystick C: HDMI input H: Power switch D: 3G-SDI output I: USB port (not shown) E: 3G-SDI input J: HDMI output... -
Page 54: Bolt 6 Lt-Hdmi
Teradek User Manual Bolt 6 LT-HDMI A: RP-SMA connectors F: OLED display B: 6-28V DC power input G: USB-C port C: 5-pin USB port H: Menu joystick D: HDMI output I: Power switch E: HDMI input Bolt 6 Page 54... -
Page 55: Bolt 6 Monitor Module (Tx/Rx)
Teradek User Manual Bolt 6 Monitor Module (TX/RX) A. RP-SMA connectors E. Micro USB B. AUX input F: HDMI input/output C. 6-18V DC input G: P-Tap input D: Compression pins Device Operation • Keep the transmitter and receiver at close range for 60 seconds after powering on the devices. This allows them to scan for and select the best wireless frequency. -
Page 56: Power And Connect
4. Move the power switches on both the transmitter and receiver to the ON position. Bolt 6 Monitor Modules 1. Remove the battery plate from the back. 2. TX Module - Detach the cover plate from the back of the Bolt 4K Monitor Module to expose the JST connector. - Page 57 Teradek User Manual Bolt 6 Page 57...
-
Page 58: Power Cables
12G-SDI Input/Output Cables (Bolt 6 XT) Bolt 6 XT units require the use of 12G-SDI cables to reliably transport 12G video signals, and are included as a standard item. Ensure that your cables are rated for compatibility with your camera's output. -
Page 59: Transmitter Menu
Teradek User Manual is not covered under warranty. To prevent the inputs from being damaged, best practice is to plug in the power cable first, THEN connect the video cable from the camera before powering on the TX unit. Transmitter Menu... -
Page 60: Receiver Menu
Receiver Menu Wireless Configuration Bolt 6 contains several wireless configuration options that allow the system to work at its best in different environments. The system is designed to work adequately using its default, automatic settings, but they may not be ideal for all situations. This section details all available wireless configuration options for the transmitter and receiver. - Page 61 Bolt Panel Antenna while in Broadcast Mode. NOTE: Bolt 6 XT/LT 750 and 1500 receivers will not link to a Bolt 6 XT/LT MAX transmitter in Broadcast Mode, even if they were previously paired. You must use a Bolt 6 MAX receiver. Otherwise, the receiver's OLED will display Broadcast Not Supported.
- Page 62 Teradek User Manual NOTE: By default, Bolt 6 will select the lowest available frequency from the Frequencies list if one has not been selected beforehand. Select Bandwidth The Bandwidth menu lets you choose between 40MHz (default) and 20MHz operating modes. Ensure that both the transmitter and receiver are set to the same bandwidth with a resolution of up to 1080p60.
- Page 63 Teradek User Manual Bolt 6 Page 63...
-
Page 64: Wireless Configuration Recommendations
Teradek User Manual Wireless Configuration Recommendations Bolt 6 can be used in many different situations that require you to configure the wireless settings to provide the optimal video transmission quality possible. The following table (TX Video Quality Descriptions) describes the Video Quality modes available on the TX. The table below (Recommended... - Page 65 Teradek User Manual WIRELESS SETTINGS USER SCENARIOS Band Broadcast Mode Fixed Frequency Bandwidth Video Quality (TX) Longest Range Enabled w/ Longer Distance 5GHz Optional 40MHz (No interference) Panel Antenna Mode Long Range Longer Distance 6GHz Enabled Optional 40MHz (Busy RF)
-
Page 66: Pairing And Unpairing
Teradek User Manual Pairing and Unpairing Bolt 6 devices purchased as a set (TX and RX) are paired by default, requiring no additional configuration. Bolt 6 devices purchased separately need to be paired using the device's front panel (OLED) menu, Bolt Manager, or the Bolt App. To pair your transmitter with multiple receivers, you will need to use either Bolt Manager or the Bolt App. - Page 67 2. Scroll back up and tap to select the TERADEK BOLT 4K option, then tap Pair new receiver. 3. Enable Pairing on the Bolt 6 receiver(s)or by selecting Pair on the front panel menu. The Monitor Module will begin scanning for receivers to automatically pair with. Note: You can pair the transmitter with up to six receivers at one time.
- Page 68 2. Open Bolt Manager, select the Pairing tab, then tap the Unpair All button. Switch TX (RX only) Bolt 6 receivers can pair with up to four transmitters at a time. Switch TX allows you to quickly switch from one paired transmitter's camera feed to another paired transmitter. This feature is especially useful in multi-camera situations when you need to switch to a different camera's view mid-shoot, without having to perform the pairing process every time.
-
Page 69: Video Settings Configuration
• Off after 10 sec • No Burnin Prevention HDMI/SDI Output (Bolt 6 XT Receiver) You can choose to match the video source’s resolution (Same As Input) or choose from the resolutions list. If using the receiver with a recorder or monitor that is sensitive to video signal changes, select Continuous Output to ensure the signal stays constant even if the link is interrupted. - Page 70 ◦ 480i (NTSC) ◦ 576i (PAL) 3D LUT Settings (Bolt 6 XT/LT Receiver) The 3D LUT settings menu contains specific looks that can be applied to your video output that either match or simulate how the video will appear after editing, along with options for how they are overlayed on your video output (Full or Split-screen).
-
Page 71: Tools
Teradek User Manual Tools SDI EYE PATTERN (TX) The SDI Eye Pattern provides a graphical display of the SDI signal coming from the camera to the transmitter, and is useful in determining the amount of interference present, or if the SDI cable is damaged. - Page 72 Teradek User Manual Frequencies are represented by bars; the higher the bar, the more congested that frequency is. Bars without a dot (1) indicate the frequency is not as saturated and can be used. Bars with a dot (2) indicate the frequency is too saturated to connect to.
-
Page 73: Advanced Settings
HDMI (RX only) Bolt 6 supports all HDMI output modes. You can select from one of the following options: • Auto • RGB 8bit •... - Page 74 • Use Bluetooth PIN - Enables the use of a PIN for authentication when using the Bolt App. • Change PIN - Press the Menu joystick towards the right to change the Bluetooth PIN NOTE: Bluetooth is disabled by default. To configure your Bolt 6 devices via the Bolt App, you must first enable Bluetooth.
-
Page 75: Info
Teradek User Manual Info DEVICE INFO Reset all configurable options to their factory defaults. FIRMWARE VERSIONS Displays the current firmware versions for all device components. REGULATORY Displays all compliance certifications relating to radio frequencies used by the TX and RX to communicate. -
Page 76: Bolt Manager
Teradek User Manual Bolt Manager With Bolt Manager, you can configure all of your Bolt 6 devices at once. Available as software for Windows and Mac, Bolt Manager allows you to pair multiple receivers to your transmitter, select frequencies, load 3D LUTs, and perform firmware upgrades. - Page 77 Color processing allows users to apply 3D LUTs directly to the receiver’s video output or to add, remove, and modify up to 16 LUTs stored in Bolt 6’s memory. Live LUT - Click Load and browse for a 3D LUT file to apply to the video output. The following file formats are supported: •...
- Page 78 Teradek releases firmware updates periodically that add new features, improve performance, and fix vulnerabilities. To update Bolt 6, you’ll need to load a firmware package into Bolt Manager. • Load from Web - If you have an Internet connection, click Load from Web to download the latest firmware package from Teradek’s servers.
-
Page 79: Bolt App
The Advanced screen also allows users to select which components to upgrade. Bolt App Use the Bolt App to remotely manage and monitor every parameter of Bolt 6 including pairing, frequency selection, and 3D LUTs. Connect via Bluetooth 1. - Page 80 Teradek User Manual Transmitter Status Display ▪ Settings (Descriptions listed on Transmitter Display Operation section) - Tap the settings button on the top right corner of the screen to customize the transmitter’s various settings. ▪ Spectrum Analyzer - Detects congestion in the area and determines which frequencies are available to use.
- Page 81 Teradek User Manual Receiver Status Display ▪ Settings (Descriptions listed on Receiver Display/OSD Operation section) - Tap the settings button on the top-right corner of the display to customize the receiver’s various settings such as the output format, audio, display, and OSD.
-
Page 82: Device Placement
With Dual Mount Depending on the model, Bolt 6 XT/LT devices are equipped with a dual mount battery plate that allows you to attach your device to either the back of a camera, monitor, or Bolt Panel Antenna. - Page 83 Teradek User Manual Bolt 6 Page 83...
-
Page 84: Antenna Orientation
Vertical and Horizontal Antennas Vertical (V) antennas are included as a standard item with your Bolt 6, offering good performance in a wide variety of short-to-medium range situations when quick setup and flexibility are key. V antennas are ideal for achieving diversity indoors. -
Page 85: Regulatory Information
Operating the product without regulatory approval is illegal. Any changes or modifications to the product not expressly approved by Teradek could void the user's authority to operate the equipment and its regulatory approvals. Please make sure you use the latest revision of this document which is available at teradek.com. - Page 86 • Please avoid electrostatic discharge from the antenna ports for proper operation WARNING Bolt 6 devices contain sensitive electronic components that can be damaged by electrostatic discharge (ESD). When handling, care must be taken so that the device is not damaged. Damage due to inappropriate handling is not covered by the warranty.
- Page 87 Teradek User Manual AMN41012 HD Video Transmitter 7680A-AMN41012 VQSAMN41012 AMN42012 HD Video Receiver 7680A-AMN41012 VQSAMN41012 2832 BT Module 4492A-2832 HSW2832 RF EXPOSURE The product complies with internationally recognized standards covering human exposure to electromagnetic fields from radio devices. To satisfy local RF exposure regulation requirements, the transmitting product must operate with a minimum separation distance of 20 cm or more from a person’s body.
- Page 88 Teradek User Manual Les présent émetteur radios 7680A-AMN41012 (HD Transmitter), 7680A-AMN42012 (HD Receiver), and 4492A-2832 (BT Module) ont été approuvé par Industrie Canada pour fonctionner avec les types d'antenne énumérés ci-dessous et ayant un gain admissible maximal et l'impédance requise pour chaque type d'antenne.
- Page 89 Teradek User Manual This equipment complies with Part 15 of the FCC rules. Operation is subject to the following two conditions: 1. This device may not cause harmful interference, and 2. This device must accept any interference received, including interference that may cause undesired operation.
- Page 90 EC DECLARATION OF CONFORMITY This equipment may be operated in all EU countries with the following restrictions: • 5.15-5.35GHz frequencies for indoor use only Teradek hereby declares that this Radio Transmitter is in compliance with the essential requirements Bolt 6 Page 90...
- Page 91 SUPPORT RESOURCES In addition to this Reference Guide, you can find more information on Bolt 4K devices' features and operation by visiting www.teradek.com. If you are unable to find what you need online, please contact Teradek’s support staff. E-mail: support@teradek.com | Phone: (888) 941-2111 ext. 2 (available M-F 7am-6pm PST) DISCLAIMER This manual is intended for user information only.
-
Page 92: Bolt 6 U-Nii-5 (6Ghz) Support By Region
As different regions approve U-NII-5 for unlicensed operation, Teradek will release firmware updates to enable the additional frequencies. Note that we sometimes refer to U- NII-5 frequencies as “6GHz” to make it simpler to understand Bolt 4K (5GHz only) vs. Bolt 6 operation (5GHz and 6GHz). - Page 93 (6GHz) frequencies allows Bolt 6 to operate with minimal interference as very few other products support these frequencies. To configure Bolt 6 for 6GHz operation simply switch TX and RX units to the 6GHz band in the wireless settings menu. This can be done via the app or OLED display.
-
Page 94: Frequencies By Region
Teradek User Manual Frequencies by Region NOTE: Pairing the TX and RX is required after a different region is selected. Bolt 6 XT System BOLT 6 XT SYSTEM BOLT 6 XT TRANSMITTER BOLT 6 XT RECEIVER VIDEO 1x 12G-SDI SMPTE 2082-1 standard/75 Video Inputs Ω... - Page 95 Teradek User Manual SDI: YCbCr 4:2:2, 10-bit SDI: YCbCr 4:2:2, 10-bit Color Sampling HDMI: RGB/YCbCr; 4:4:4/4:2:2/4:2:0; 8/ HDMI: RGB/YCbCr; 4:4:4/4:2:2/4:2:0; 8/ 10-bit 10-bit <0.001sec (without format Delay (TX to RX) conversions) 4Kp23.98/24/25/29.97/30/50/59.94/60 1080p23.98/24/25/29.97/30/50/59.94/60 1080psf23.98/24/25/29.97/30 Supported 1080i50/59.94/60 Resolutions 720p50/59.94/60 480p59.94/576p50 (via HDMI ports only)
- Page 96 Teradek User Manual Embedded SDI/HDMI Audio Input Audio Input (2 Channel) Embedded SDI/HDMI Audio Output Audio Output (2 Channel) PHYSICAL ATTRIBUTES Dimensions 5.2” x 3.6” x 1.1” (132 x 91 x 27mm) 4.4” x 5.5” x 1.1” (112 x 139 x 27mm) Weight 12.1oz (344g)
- Page 97 Teradek User Manual RF Power 23 dBm EIRP (max power) 21 dBm EIRP (max power) MAX: 5x External 2dBi antennas, 2x MAX: 4x External 2dBi antennas, H-V antennas 750/1500: 5x External Antennas 2x H-V antennas 750/1500: 4x External 2dBi antennas...
-
Page 98: Bolt 6 Lt System
Teradek User Manual Bolt 6 LT System BOLT 6 LT SYSTEM BOLT 6 LT TRANSMITTER BOLT 6 LT TRANSMITTER VIDEO 1x 3G-SDI SMPTE 424M standard/75 Ω Video Inputs (BNC x 1), 1x HDMI 1.4b Type-A receptacle 1x 3G-SDI SMPTE 424M standard/75 Ω... - Page 99 Teradek User Manual outputs) VIDEO PROCESSING Video Visually lossless Compression Test Pattern Generator Spectrum Analyzer AUDIO Audio 48kHz 24-bit PCM 48kHz 24-bit PCM Compression Embedded SDI/HDMI Audio Input Audio Input (2 channel) Embedded SDI/HDMI Audio Input Audio Output (2 channel)
- Page 100 Teradek User Manual Compatibility NETWORK DFS Frequencies: DFS Frequencies: 5.270 ~ 5.670 GHz 5.270 ~ 5.670 GHz Wireless Non-DFS Frequencies: Non-DFS Frequencies: 5.190 ~ 5.230 GHz, 5.755 ~ 5.795 GHz, 5.190 ~ 5.230 GHz, 5.755 ~ 5.795 GHz, and 5.945 ~ 6.425GHz and 5.945 ~ 6.425GHz...
- Page 101 Teradek User Manual None, optional Sony/Canon dual None, optional Gold or V mount battery Battery battery plate plate Nominal Power 9 Watts 11 Watts Consumption Operating 32~104°F (0~40°C) 32~104°F (0~40°C) Temperature GENERAL Multiple mounting options with M3 and Multiple mounting options with 3/ Mounting 1/4-20”...
-
Page 102: Bolt 6 Lt Hdmi System
Teradek User Manual Bolt 6 LT HDMI System BOLT 6 LT-HDMI SYSTEM BOLT 4K LT-HDMI TRANSMITTER BOLT 4K LT-HDMI RECEIVER VIDEO Video Inputs 1x HDMI 1.4b Type-A receptacle Video Outputs 1x HDMI 1.4b Type-A receptacle 1x HDMI 1.4b Type-A receptacle... - Page 103 Teradek User Manual Spectrum Analyzer Color Correction AUDIO Audio 48kHz 24-bit PCM 48kHz 24-bit PCM Compression Embedded HDMI Audio Input (2 Audio Input channel) Embedded HDMI Audio Input Audio Output (2 channel) PHYSICAL ATTRIBUTES Dimensions 2.4” x 4.1” x 1.3” (60 x 103 x 33mm) 4.8”...
- Page 104 Teradek User Manual Non-DFS Frequencies: Non-DFS Frequencies: 5.190 ~ 5.230 GHz, 5.755 ~ 5.795 GHz, 5.190 ~ 5.230 GHz, 5.755 ~ 5.795 and 5.945 ~ 6.425GHz GHz, and 5.945 ~ 6.425GHz Bluetooth 2.4GHz 2.4GHz RF Channel Auto, Manual Auto, Manual...
- Page 105 Teradek User Manual Multiple mounting options with M3 and Multiple mounting options with 3/ Mounting 1/4-20” holes 8”x16 and 1/4-20” holes Bolt 6 Page 105...
-
Page 106: Bolt 6 Monitor Module
Teradek User Manual Bolt 6 Monitor Module BOLT 6 MONITOR MODULE (TX/RX) VIDEO Video Input/Output 1x HDMI 1.4b Type-A receptacle, feeds into Smart 7 HDMI input v SDI: YCbCr 4:2:2 Color Sampling 10-bit/HDMI: RGB 4:4:4, 8-bit Delay (TX to RX) <0.001sec (without format conversions) - Page 107 Teradek User Manual Construction Milled aluminum (chassis), regulation-compliant PCB INTERFACES Configuration Interface SmallHD Monitor UI Switches Desktop App Mobile App Bolt App (iOS and Android) SmallHD Monitor UI, USB Interface Functionality 2x 5-pin Locking Connector CCU (Host) Bluetooth Compatibility Via SmallHD Monitor...
- Page 108 Teradek User Manual Power Input 2-Pin locking connector 6-18 VDC TX Module: None, optional Sony/Canon dual battery plate Battery RX Module: None, optional Gold or V mount battery plate Nominal Power Consumption 6 Watts Operating Temperature 32~104°F (0~40°C) GENERAL Mounting Mounts in between SmallHD Smart 7 monitor and battery plate.
-
Page 109: Bolt Panel Antenna V.4
Teradek User Manual Bolt Panel Antenna v.4 BOLT PANEL ANTENNA V.4 WIRELESS Frequency Range 4.9 - 7.5 GHz Gain 14 and 16dBi Polarization 2x Horizontal, 5x Vertical for polarization Beam-width deg horizontal 75° 35° Beam-width deg vertical Impedance 50 ohm...
Need help?
Do you have a question about the BOLT 6 and is the answer not in the manual?
Questions and answers