
Related Manuals for Jetson JetKart 2.0


Summary of Contents for Jetson JetKart 2.0
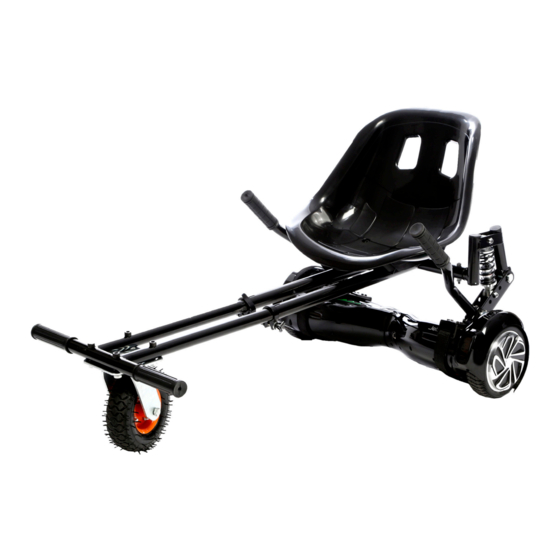
- Page 1 JetKart ® Hoverboard Attachment A guide for your ride. IMPORTANT: READ CAREFULLY AND RETAIN FOR FUTURE REFERENCE. MODEL: JKAR20-BK Designed in Brooklyn...
- Page 3 Jetson's top two riding rules: Be safe. Have fun!
-
Page 5: Table Of Contents
Contents Safety Warnings ......................4 What’s in the Box ......................6 Product Specs . -
Page 6: Safety Warnings
Safety Warnings • Before use, please read the user manual and safety warnings carefully, and make sure you understand and accept all the safety instructions. The user will be responsible for any loss or damage caused by improper use. • Before each cycle of operation, the operator shall perform the preoperation checks specified by the manufacturer: That all guards and pads originally supplied by the manufacturer are in proper place and in serviceable condition;... - Page 7 • Applying brakes too hard or too suddenly can lock up a wheel, which could cause you to lose control and fall. Sudden or excessive application of the brake may result in injury or death. • If the brake loosens, please adjust with the hexagon wrench, or please contact the Jetson Care Team. • Replace worn or broken parts immediately.
-
Page 8: What's In The Box
What’s in the Box 1. REAR FRAME (A) 2. FRONT FRAME (B) 3. HANDLE (×2) 4. SEAT 5. FOOT REST 6. WHEEL 7. VELCRO STRAP (×4, INCLUDING 2 SPARE) HARDWARE AND TOOLS: FRAME CLAMPS WASHERS SMALL BOLTS, LARGE BOLTS ALLEN KEYS WRENCH (×2) (×4) - Page 9 3 (RIGHT) 3 (LEFT) NOTE: IMAGES MAY NOT REFLECT EXACT APPEARANCE OF ACTUAL PRODUCT.
-
Page 10: Product Specs
Product Specs • WEIGHT LIMIT: 250 LBS • PRODUCT WEIGHT: 16.3 LBS • RECOMMENDED AGE: 12+ • WHEEL SIZE: 6” • DIMENSIONS: 37” (L) × 17” (W) × 18” (H) -
Page 12: Attaching The Handles
1. Getting Started Attaching the Handles 1. SLIDE LEFT HANDLE SUPPORT INTO THE LEFT SIDE OF THE REAR FRAME (A) SO THAT THE HOLE IN THE FRAME AND HANDLE SUPPORT ALIGN. 2. REPEAT WITH THE RIGHT HANDLE ON THE RIGHT-HAND SIDE OF THE REAR FRAME. - Page 13 3. INSERT A LARGE BOLT THROUGH THE TOP OF THE ALIGNED HOLES ON ONE SIDE OF THE FRAME. 4. GENTLY TWIST A NUT ONTO THE END OF THE BOLT. 5. STABILIZE THE POSITION OF THE NUT WITH THE WRENCH AND TIGHTEN THE BOLT INTO IT USING THE LARGE ALLEN KEY.
-
Page 14: Attaching The Seat
Attaching the Seat 1. ALIGN HOLES IN SEAT TO THE FOUR MATCHING HOLES ON SMALL BOLT THE REAR FRAME (A). 2. INSERT A SMALL BOLT THROUGH EACH SET OF ALIGNED HOLES. 3. GENTLY TWIST A SMALL NUT ONTO THE END OF EACH BOLT. 4. - Page 15 5. MAKE SURE THE BOLTS AND NUTS ARE TIGHT AND THE SEAT IS SECURED TO THE FRAME.
-
Page 16: Assembling The Frame
1. ALIGN THE TUBES ON THE FRONT FRAME (B) WITH THE TUBES ON THE REAR FRAME (A). (BE SURE THAT THE RIGHT SIDE OF THE FRAME IS ON TOP. IN CORRECT POSITION, THE JETSON LOGO WILL BE UPRIGHT.) PIN HOLE 2. - Page 17 3. CONTINUE PUSHING IN THE FRONT FRAME TUBES UNTIL THE PINS POP INTO PLACE IN THE FIRST PIN HOLES ON THE REAR FRAME TUBES. 4. UNSCREW AND REMOVE THE KNOBS FROM EACH FRAME CLAMP. SET ASIDE. 5. REMOVE ONE WHITE WASHER OFF OF EACH FRAME CLAMP AND SET ASIDE WITH THE KNOBS.
- Page 18 6. WORKING FROM THE OUTSIDE IN TOWARDS THE CENTER, INSERT ONE CLAMP STEM (WITH A SILVER WASHER AND PLASTIC WHITE WASHER STILL ON IT) THROUGH THE TWO HOLES ON THE UNDERSIDE OF ONE OF THE CLAMP BRACKETS. 7. SLIDE A WHITE WASHER ONTO THE END OF THE CLAMP STEM SO THAT THE SMALLER SIDE OF THE WASHER IS FACING IN.
- Page 19 9. TIGHTEN THE KNOB AND CLOSE THE CLAMP LATCH. * IMPORTANT: DO NOT OVER-TIGHTEN THE KNOB. OVER-TIGHTENING CAN PREVENT THE LATCH FROM OPENING AND CLOSING EASILY. 10. REPEAT STEPS 6 – 9 IN THE OTHER BRACKET WITH THE OTHER CLAMP COMPONENTS.
-
Page 20: Attaching The Wheel
LARGE NUT WASHER Attaching the Wheel 1. TURN THE JETKART UPSIDE-DOWN. 2. POSITION THE WHEEL BRACKET ON THE FRONT OF THE FRAME SO THAT THE 4 HOLES IN THE BRACKET ARE ALIGNED WITH THE 4 HOLES IN THE FRAME. 3. FROM THE UNDERSIDE, INSERT A LARGE BOLT THROUGH EACH OF THE HOLES IN THE FRAME AND UP THROUGH THE HOLES IN THE WHEEL BRACKET. -
Page 21: Attaching The Jetkart® 2.0 To A Hoverboard
Attaching the JetKart 2.0 to a Hoverboard ® 1. USING THE WRENCH, LOOSEN THE NUT ON THE BACK OF EACH BRACKET SUPPORTING THE HANDLES BY TURNING IT COUNTERCLOCKWISE. LOOSEN NUT. ADJUSTABLE BRACKET... - Page 22 2. PLACE ADJUSTABLE BRACKETS ON TOP OF HOVERBOARD. 3. EXTEND OR CONTRACT ADJUSTABLE BRACKET BY SLIDING IT SO THAT THE WIDTH OF THE BRACKET MATCHES THE WIDTH OF YOUR HOVERBOARD, AND THE BRACKET ARMS HUG THE FRONT AND BACK OF THE HOVERBOARD.
- Page 23 4. USE THE WRENCH TO TIGHTEN THE NUTS ON EACH BRACKET BY TURNING THEM CLOCKWISE AND SECURE THE BRACKET.
- Page 24 VELCRO STRAP VELCRO 5. SLIDE A VELCRO STRAP THROUGH THE SLOT ON THE FRONT OF EACH BRACKET. WRAP EACH STRAP UNDER THE HOVERBOARD AND UP THROUGH THE SLOTS ON THE REAR OF THE BRACKETS. 6. PULL STRAPS TIGHT AND FOLD THE ENDS OF THE STRAPS OVER. PRESS THE VELCRO ON EACH FOLDED END OF THE STRAP FIRMLY ONTO THE VELCRO ON THE MIDDLE OF THE STRAP.
- Page 25 7. CHECK THAT THE JETKART® 2.0 IS SECURELY ATTACHED TO THE HOVERBOARD.
-
Page 26: Adjusting Length
PIN HOLE CLAMP LATCH Adjusting Length WHEN SEATED AND WITH FEET RESTING ON THE FOOTREST, KNEES SHOULD KNOB BE SLIGHTLY BENT. TO ADJUST THE LENGTH OF THE FRAME: 1. OPEN THE CLAMP LATCHES ON BOTH SIDES OF THE FRAME AND TWIST BOTH KNOBS TO LOOSEN. -
Page 28: Getting On The Jetkart
2. Making Moves Getting on the JetKart ® • PLACE THE JETKART® 2.0 ON A FLAT SURFACE WITH THE HOVERBOARD TURNED OFF. • CAREFULLY SIT IN THE JETKART® 2.0 AND THEN PLACE YOUR FEET ON THE FOOTREST. • MAKE SURE THE HOVERBOARD IS LEVELED, AND, IF NECESSARY, REACH DOWN AND ROTATE THE HOVERBOARD'S FOOTPADS SO THEY ARE EVENLY ALIGNED AND PARALLEL TO THE GROUND. -
Page 29: Helmet Safety
Helmet Safety PROPER POSITIONING: IMPROPER POSITIONING: THE FOREHEAD IS COVERED THE FOREHEAD IS EXPOSED. BY THE HELMET. A FALL COULD RESULT IN SERIOUS INJURY. * WEAR A HELMET, APPROPRIATE CLOTHING, SHOES, AND SAFETY GEAR. AVOID CLOTHING THAT CAN GET CAUGHT INTO OR UNDER THE WHEELS. -
Page 30: Riding The Jetkart
Riding the JetKart ® IMPORTANT: TIGHTEN ALL BOLTS AND NUTS BEFORE EACH RIDE. TO GO FORWARD - PUSH DOWN BOTH HANDLES TO BRAKE/REVERSE - PULL UP BOTH HANDLES TO TURN RIGHT – PUSH DOWN LEFT HANDLE, TO TURN LEFT – PULL UP LEFT HANDLE, PULL UP RIGHT HANDLE PUSH DOWN RIGHT HANDLE... -
Page 32: Care & Maintenance
ONE-YEAR GENERAL LIMITED WARRANTY All new Jetson products are warranted against defects in materials and workmanship for a period of one year from the date of original retail purchase when used in accordance with Jetson's user manuals (refer to ridejetson.com/support). - Page 34 Stay connected. Be sure to follow @ridejetson on social media to learn about fantastic offers, giveaways, and all the latest Jetson news. Loving your ride? Then be sure to leave a review at ridejetson.com/reviews. We can’t wait to hear from you!
- Page 36 Date Code: 07/2022 Document Edition: v2.0 © 2022, JETSON. ALL RIGHTS RESERVED. Manufactured by JETSON ELECTRIC BIKES LLC. No portion of this document, including shape, copy, graphics, and design, may be reproduced or transmitted in any form or by any means.
Need help?
Do you have a question about the JetKart 2.0 and is the answer not in the manual?
Questions and answers