Table of Contents
Advertisement
Advertisement
Table of Contents

Related Manuals for Epson ELPDC11 Document Camera


Summary of Contents for Epson ELPDC11 Document Camera
- Page 1 Document Camera User's Guide...
-
Page 2: Important Safety Instructions
Important Safety Instructions Read this User's Guide and follow all safety instructions for your document camera. Keep this guide at hand for future reference. Warning This symbol indicates information that, if ignored, could possibly result in personal injury or even death due to incorrect handling. Caution This symbol indicates information that, if ignored, could possibly result in personal injury or physical damage due to incorrect handling. - Page 3 Electrical Safety Warning Never open any covers on the document camera except as specifically explained in the User's Guide. Never attempt to disassemble or modify the document camera. Refer all repairs to qualified service personnel. Unplug the document camera from the outlet and refer all repairs to qualified service personnel under the following conditions: •...
- Page 4 Securing the Document Camera Warning If you apply adhesives to prevent the screws from loosening, or if you use lubricants or oils on the document camera, the document camera housing may crack. This could cause serious injury. Do not use adhesives to prevent the screws from loosening and do not use oils or lubricants. Caution Do not place the document camera in an unstable location, such as on a shaky table or slanted surface.
- Page 5 General Use Caution Do not use excessive force when adjusting the document camera. The document camera may be broken, resulting in personal injury. Do not place heavy objects on document camera, or it may be damaged. Do not try to press the arm flat or fold it backwards, or it may get damaged. Remote Control Battery Safety Warning Incorrect battery usage may cause batteries to rupture and leak battery fluid, which could result in fire, injury, or corrosion of the remote control.
-
Page 6: Table Of Contents
Contents Important Safety Instructions ......2 Introduction Product Features ......... . . 9 Included Items . - Page 7 Contents Editing Saved Files ......... 45 Managing Saved Files .
-
Page 8: Introduction
Introduction You can use the Epson ELPDC11 document camera to capture and project pages from books or other documents, and even three-dimensional objects. With the included software, you can capture live audio and video, create time lapse photos, and annotate images produced by the document camera. -
Page 9: Product Features
Product Features • Versatile setup Connect the document camera to any projector using a standard VGA or composite video cable, or to other video equipment such as an external monitor. • Still image capture Capture still images in the document camera's 1GB internal memory, on an inserted SD card, or with a connected computer. -
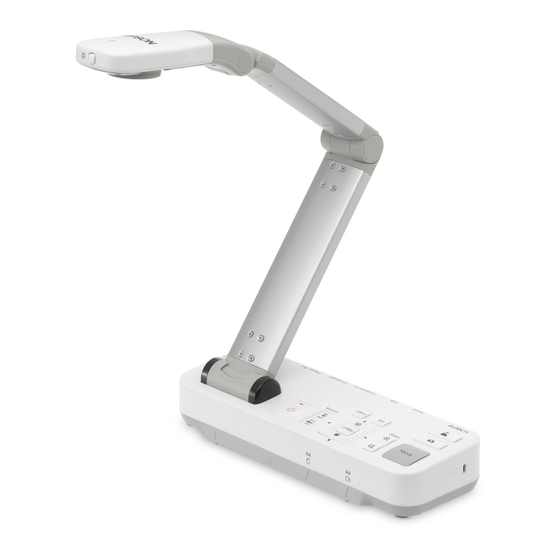
Page 10: Document Camera Parts
Document Camera Parts Top (Control panel)/Side/Rear Name Camera head Rotate the camera head ±90˚ to display images of a document or from a wall. Remote receiver Receives signals from the remote control. [t] button Turns the document camera power on or off. [Source] button [Enter] button [Zoom] button... -
Page 11: Camera Head
Document Camera Parts Name Composite port Outputs composite video signals to a projector or external monitor. Display Out port Outputs image signals to a projector. Security bar Lets you attach a commercially available security cable to lock the document camera in place. p.16 SD card slot Lets you save and display images on an SD card. -
Page 12: Base
Document Camera Parts Name Camera arm Extends or retracts the camera arm to adjust the height of the camera head. Base Name Mounting points You can attach the document camera to a table, cart, or stand with commercially available M4-size bolts. p.16 Security bar Lets you attach a commercially available security... -
Page 13: Remote Control Buttons
Remote Control Buttons Remote Control Name [t] button When used with an Epson projector, turns the projector on or off. You cannot operate the document camera with this button. [t] button Turns the document camera on or off. You cannot operate a projector with this button. - Page 14 Turns the video and audio on or off when you are connecting the document camera when used with an Epson projector. [Source Search] button When used with an Epson projector, changes the input source connected to the projector. Remote control Outputs remote control signals.
-
Page 15: Storing The Document Camera
Storing the Document Camera When you're not using the document camera, simply fold its arm down as shown. It cannot be folded flat. Caution Do not try to press the arm flat or fold it backwards, or it may get damaged. Attention When you see the black line on the bottom of the camera arm, never fold it more. -
Page 16: Securing The Document Camera
Securing the Document Camera You can secure the document camera by fastening a cable to the security bar, shown below, or by inserting a Kensington anti-theft cable into the Kensington security port. In addition, you can attach the document camera to a table, cart, or stand at the mounting points indicated below. -
Page 17: Basic Setup And Use
Basic Setup and Use Follow the instructions in this section to set up the document camera and give a presentation. -
Page 18: Plugging In And Turning On
Plugging In and Turning On Connect the power adapter as shown. Plug the adapter into a wall outlet. Press the [ ] power button to turn on the document camera. It takes about 10 seconds for the document camera to output an image. -
Page 19: Connecting To A Projector
Connecting to a Projector You can connect the document camera to a projector using a standard VGA cable or composite video cable, or to other video equipment such as an external monitor. You can also use the document camera with a computer. p.20 Choose the type of cable you will use, based on the type of port that's available on your projector or other video equipment:... -
Page 20: Connecting To A Computer
Connecting to a Computer When you connect the document camera to your computer, you can use the included software to capture, edit, and play back still images and videos. p.38 Connecting to a computer also lets you display PowerPoint slides or other applications. -
Page 21: Connect Without Using The Document Camera Software
Connecting to a Computer Connect Without Using the Document Camera Software This connection method lets you display PowerPoint slides or images from another application on your computer, but you can't use the included software. If you're using a desktop computer, disconnect the monitor from your computer. -
Page 22: Displaying A Document Or Other Materials
Displaying a Document or Other Materials Raise the camera arm. Position the camera head above the display area. Place your document on the table under the camera head. You can quickly align letter- or A4-size paper with the guides on the side of the document camera. Slide the lamp switch to illuminate the document. -
Page 23: Freezing An Image
Displaying a Document or Other Materials Press the [Focus] button on the document camera or the [Auto Focus] button on the remote control. Your document is automatically focused. To sharpen hard-to-focus objects, press the [Menu] button and select Image > Focus. Use the [ ] and [ ] arrow buttons to adjust the focus. -
Page 24: Displaying Live Action Or A Whiteboard
Displaying Live Action or a Whiteboard You can use the document camera to display a lecture or presentation at the front of a room, or to capture images of a whiteboard or chalkboard. If the document camera is connected to a computer with a USB cable, you can make an audio/video recording of the live presentation. -
Page 25: Switching Between Your Computer And The Live Camera Image
Switching Between Your Computer and the Live Camera Image If you've connected a computer ( p.20), you can show PowerPoint slides or images from any other application on your computer. You can easily switch back-and-forth between your computer application and the live camera image. -
Page 26: Image Adjustments And Effects
Image Adjustments and Effects The document camera provides a full range of image adjustments and effects, including freeze image, split screen, black-and-white, and the ability to display negative film in true color. -
Page 27: Using The On-Screen Menu
Using the On-screen Menu Press the [Menu] button on the document camera or remote control to view the on-screen menu. You see this screen: Use the [ ] [ ] [ ] arrow buttons to navigate the menu and adjust the settings. -
Page 28: Displaying A Split Screen
Displaying a Split Screen If you have images saved in the document camera's internal memory or on an SD card ( p.31), you can display two images at the same time. For example, you can show the live camera image side-by-side with an image selected from internal memory. - Page 29 Displaying a Split Screen Highlight the arrow and press [Enter] to view more images Use the [ ] [ ] [ ] arrow buttons to highlight the image you want to display, and press [Enter] to select it. (Press [Enter] again to deselect it.) A checkmark is added to the selected image.
-
Page 30: Making Other Settings
Making Other Settings Press the [Menu] button and select the Function menu to change the following camera settings: • USB Mode Changes how the document camera functions when connected with a USB cable. To capture and display images using the document camera software, select Application. -
Page 31: Saving Images And Displaying A Slideshow
Saving Images and Displaying a Slideshow You can display a slideshow of captured images. Images are stored in the document camera's internal memory. You can store up to about 4000 images (depending on their content), and then select just the ones you want to view. You can also export captured images to an SD memory card or view them from a connected computer. -
Page 32: Saving Images To The Internal Memory
Saving Images to the Internal Memory Display the live camera image you want to save. Adjust any settings, as needed. Press the [ ] button to capture the image. Press and release when you use the remote control, press and hold when you use the control panel. -
Page 33: Exporting Images To A Memory Card
Exporting Images to a Memory Card You can move captured images from the document camera's internal memory to an SD card. You can also use the images on the card to display a slideshow. p.37 When you insert the SD card, you can capture only to SD card. Insert your SD card face-up. - Page 34 Exporting Images to a Memory Card • If you want to leave the SD card in the document camera, press [Menu] or [Esc] to close the SD Card screen. • If you want to remove the SD card, press in on the card and then pull it straight out of the slot.
-
Page 35: Viewing And Managing Files From Your Computer
Viewing and Managing Files from Your Computer You can use your computer with a USB cable to access files stored in the camera's internal memory or on an inserted SD card. Before using the document camera like this, you have to change the function of its USB port as described below. - Page 36 Viewing and Managing Files from Your Computer Reconnect the projector. Press the [Menu] button and select Function > USB Mode. Change the setting back to Application. If you don't change the setting back, you won't be able to see a live camera image when you use the document camera software.
-
Page 37: Displaying A Slideshow
Displaying a Slideshow Once you have stored images in the document camera's internal memory or on an SD card, you can display a slideshow. In addition to images captured with the document camera, you can display photos taken with a digital camera by inserting its SD card. You can also display images copied to the document camera or an SD card from your computer (s p.35), but they must be in the proper format. -
Page 38: Using The Included Software
Using the Included Software The included software lets you use the document camera to capture still images, make time-lapse movies, record live videos with audio, and edit and play back captured files. The software also lets you annotate images from the document camera with text and graphics, and upload your videos to popular websites. Before starting, follow the instructions in this section to install the software. -
Page 39: Installing The Software
You can install the software on a Windows or Macintosh computer. See p.62 for system requirements. Insert the CD labeled "ArcSoft Application Software for Epson Document Camera". When you see the license agreement, click Yes. Follow the instructions on the screen to install all the software. -
Page 40: Starting The Software
Start the software: • Windows: From Programs or All Programs, select ArcSoft Application Software for Epson Document Camera. When the software does not start, install the Windows Media Player. • Macintosh: Open the Applications folder, then double-click ArcSoft Application Software for Epson Document Camera. -
Page 41: Annotating Images
Annotating Images You can annotate live images from the document camera with text and graphics while giving a presentation. When you capture an image, your annotations will be included with the image; if you record your presentation as a video, the recording will show your annotations as they're being added. -
Page 42: Capturing Still Images
Capturing Still Images You can capture a still image or a quick series of images (called a burst). If necessary, select the settings you want to use. Click the Settings button and select the Image tab. • Select the default image format, quality level, and other properties. •... -
Page 43: Making Time-Lapse Movies
Making Time-lapse Movies You can record a time-lapse movie to show gradual changes that occur over several hours. Click the Settings button and select the Time Lapse tab. • Set the time interval between each frame (5 seconds minimum). • Set the total capture duration (up to 72 hours). Click OK to close the Settings screen. -
Page 44: Recording Videos
Recording Videos You can make an audio/video recording of your presentation. Set the resolution under SXGA. If necessary, select the settings you want to use. Click the Settings button and select the Video tab. • Select the default video format, quality level, and other properties. •... -
Page 45: Editing Saved Files
Editing Saved Files You can use the Edit screen to improve the quality (such as brightness and contrast) of captured pictures and videos. With still images, you can zoom in on part of the image, rotate the image, or flip it to create a mirror image. You can also annotate still images. -
Page 46: Managing Saved Files
Managing Saved Files You can use the File Management screen to sort and locate captured images and videos. By rating them and applying "tags" or descriptive text, you can make it easier to find them later on. Click the File Management button to enter File Management mode. -
Page 47: Uploading And Sharing Your Videos
Uploading and Sharing Your Videos You can easily upload your videos to popular video-sharing websites, such as YouTube and SchoolTube. This feature is not available for Apple Macintosh systems. Click the Edit button. Select a video. Select a website. Follow the instructions on the screen to log in, provide a title for your video and other descriptive information, and upload the file. -
Page 48: Solving Problems
Solving Problems... -
Page 49: Problems And Solutions
Problems and Solutions Operation Problems No image appears on the screen • After you press the [ ] Power button, wait a few moments for the image to appear. It takes about 10 seconds for the document camera to output an image. •... -
Page 50: Problems Using An Sd Card
Problems and Solutions Problems Using an SD Card Certain images don't appear If you use your computer to copy images to the document camera's internal memory or an SD card, you need to make sure their format is correct: • Images must be DCF-compliant JPEG files to be displayed, such as from a digital camera. -
Page 51: Where To Get Help
Where to Get Help Addresses and phone numbers are subject to change. For the most current information, check the website of your regional sales office listed below. If you don't find one in your area, visit Epson's main website at www.epson.com. Europe ALBANIA ITD Sh.p.k. - Page 52 Generatorvej 8 C 2730 Herlev Tel: 44508585 Fax: 44508586 Email: denmark@epson.co.uk Web Address: http://www.epson.dk Hotline: 70279273 ESTONIA EPSON Service Center, Estonia c/o Kulbert Ltd. Sirge 4, 10618 Tallinn Tel: 00372 671 8160 Fax: 00372 671 8161 Web Address: http://www.epson.ee FINLAND...
- Page 53 Tel: +39 06. 660321 Fax: +39 06. 6123622 Web Address: http://www.epson.it Hotline: 02 26830058 KAZAKHSTAN EPSON Kazakhstan Rep Office Gogolya street, 39, Office 707 050002, Almaty, Kazakhstan Phone +3272 (727) 259 01 44 Fax +3272 (727) 259 01 45 Web Address: http://www.epson.ru...
- Page 54 II mezanin 1000 Skopie Tel: 00389 2 3093393 Fax: 00389 2 3093393 Web Address: http://content.epson.it/about/int_services.htm NETHERLANDS EPSON Europe B.V. Benelux sales office Entrada 701 NL-1096 EJ Amsterdam The Netherlands Tel: +31 20 592 65 55 Fax: +31 20 592 65 66 Hotline: 0900 5050808 Web Address: http://www.epson.nl...
- Page 55 Where to Get Help SLOVAKIA EPSON EUROPE B.V. Branch Office Czech Republic Slavickova 1a 638 00 Brno Hotline: 0850 111 429 (national costs) Email: infoline@epson.sk Web Address: http://www.epson.sk SLOVENIA BIROTEHNA d.o.o Litijska Cesta 259 1261 Ljubljana - Dobrunje Tel: 00 386 1 5853 410...
-
Page 56: Africa
Tel: 905-709-9475 or 905-709-3839 Web Address: http://www.epson.ca COSTA RICA EPSON Costa Rica De la Embajada Americana, 200 Sur y 200 Oeste Apartado Postal 1361-1200 Pavas San Jose, Costa Rica Tel: (506) 2210-9555 Web Address: http://www.epson.co.cr MEXICO EPSON Mexico, S.A. de C.V. -
Page 57: South America
Camacho 389 Edificio 1, Conjunto Legaria Col Irrigación, C.P. 11500 México, DF Tel: (52 55) 1323-2052 Web Address: http://www.epson.com.mx UNITED STATES Epson America, Inc. 3840 Kilroy Airport Way Long Beach, CA 90806 Tel: 562-276-4394 Web Address: http://www.epson.com South America ARGENTINA EPSON Argentina SRL. -
Page 58: Asia And Oceania
Where to Get Help Calle 4 con Calle 11-1 Edf. Epson La Urbina Sur Caracas, Venezuela Tel: (58 212) 240-1111 Web Address: http://www.epson.com.ve Asia and Oceania AUSTRALIA EPSON AUSTRALIA PTY LIMITED 3, Talavera Road, N.Ryde NSW 2113, AUSTRALIA Tel: 1300 361 054 Web Address: http://www.epson.com.au... - Page 59 Where to Get Help VI Customer Support Group: 4897 Shimauchi, Matsumoto-shi, Nagano-ken, 390-8640 JAPAN Tel: 0263-48-5438 Fax: 0263-48-5680 Web Address: http://www.epson.jp KOREA EPSON KOREA CO., LTD. 11F Milim Tower, 825-22 Yeoksam-dong, Gangnam-gu, Seoul, 135-934 Korea Tel: 82-2-558-4270 Fax: 82-2-558-4272 Web Address: http://www.epson.co.kr MALAYSIA Epson Malaysia SDN.
- Page 60 Where to Get Help THAILAND EPSON (Thailand) Co., Ltd. 42th Floor, Empire Tower, 195 South Sathorn Road, Yannawa, Sathorn, Bangkok 10120, Thailand. Tel: 02 685 9899 Fax: 02 670 0669 Web Address: http://www.epson.co.th...
-
Page 61: Notices
Notices... -
Page 62: Specifications
Specifications General Type of sensor 5 megapixel CMOS sensor Lens F=2.8 Imaging area 29.7 x 41.9 cm (11.7 x 16.5 inch) Zoom 10x digital (2x lossless for XGA/WXGA output, 1.9x for SXGA output) Output Analog: SXGA/WXGA/XGA USB: QVGA/VGA/SVGA/SXGA/XGA/UXGA Composite: NTSC/PAL Frame rate Up to 30 fps Memory (internal) -
Page 63: Fcc Compliance Statement
FCC Compliance Statement For United States Users This equipment has been tested and found to comply with the limits for a Class B digital device, pursuant to Part 15 of the FCC Rules. These limits are designed to provide reasonable protection against harmful interference in a residential installation. -
Page 64: Declaration Of Conformity
Declaration of Conformity According to 47CFR, Part 2 and 15 Class B Personal Computers and Peripherals; and/or CPU Boards and Power Supplies used with Class B Personal Computers Epson America, Inc. Located at: 3840 Kilroy Airport Way MS: 3-13 Long Beach, CA 90806... -
Page 65: Copyrights And Trademarks
Neither is any liability assumed for damages resulting from the use of the information contained herein. Neither Seiko Epson Corporation nor its affiliates shall be liable to the purchaser of this product or third parties for damages, losses, costs, or expenses incurred by the...
Need help?
Do you have a question about the ELPDC11 Document Camera and is the answer not in the manual?
Questions and answers