Table of Contents
Advertisement
Quick Links
Advertisement
Table of Contents

Related Manuals for Kokido xtrovac 200


Summary of Contents for Kokido xtrovac 200
- Page 1 Pool Vacuum Cleaner xtrovac 200 USER MANUAL...
-
Page 2: Safety Warnings & Instructions
SAFETY WARNINGS & INSTRUCTIONS Information contained in this Instruction Manual will help you operate the item safely, protect yourself and others from hazards, and prevent damage to the device and other property. SAVE THESE INSTRUCTIONS WARNING! This is not a TOY. Children should be kept out of reach from this pool vacuum and its accessories. - Page 3 You should not operate this pool vacuum when people/pets are present in the water. DO NOT use this pool vacuum without an intact filter bag in place, otherwise your warranty will be voided as a result. Suction entrapment hazard: This pool vacuum generates suction. Do not allow hair, body, and any loose parts of your clothing to make contact with the suction point of the pool vacuum during its operation.
- Page 4 CAUTION! This pool vacuum is designed for underwater use only; it is not an all-purpose vacuum cleaner. DO NOT attempt to use it to clean anything other than your pool. Use only original accessories delivered with this product. DO NOT use this pool vacuum right after pool-shocking. It is recommended to first leave the pool circulating for at least 24-48 hours.
-
Page 5: Getting Started
GETTING STARTED Charging The Battery IMPORTANT NOTE: Fully charge the pool vacuum (about 6 hrs) before using it for the first time. WARNING! Ÿ KEEP YOUR FINGERS AWAY FROM THE OPENING TO AVOID BEING HIT BY THE IMPELLER WHEN IT’S ON. Ÿ... -
Page 6: Set-Up Before Use
RED light - Charging GREEN light - Charged Ÿ Immediately disconnect the USB charger from the power source if you detect any of the following: - Offensive or unusual odor - Excessive heat - Deformation, cracks, leaks - Smoke 3. When charging is complete, disconnect the USB charger from the power source and unplug the charging cable from the main unit. - Page 7 Main body and vacuum head assembly Align and insert the main body's nozzle into the vacuum head's hole. Make sure the nozzle is completely inserted into the hole, and the small tab located on the nozzle opening is secured in the hole inside the vacuum head, as shown. To detach the main body from the vacuum head, follow the directional marking to turn the main body until it stops, and then detach the main body.
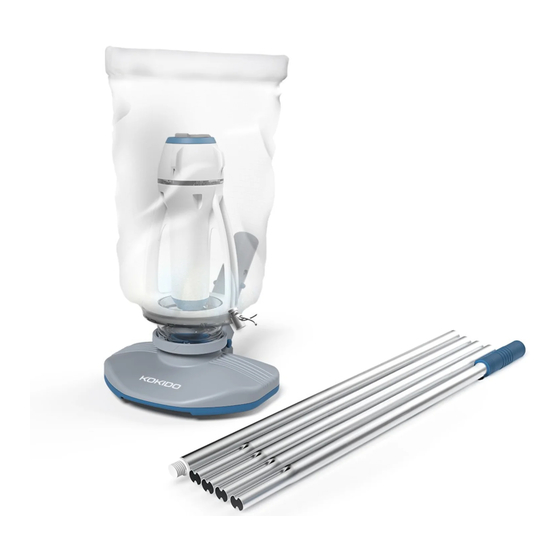
- Page 8 Lift up the bag to ensure it is totally secured before deploying the pool vacuum into water. Pole assembly Telescopic pole (not provided) assembly (for EU & US only) Press on the V-clip on the pole connector to retract its side pins. Slide the telescopic pole into the connector until it’s locked in place by the side pins and holes and then release the V-clip.
-
Page 9: Pool Preparation
Brush assembly Align and insert either end of the brush into the cavity underneath the tab; then press the whole brush into the cavity. To detach the brush, insert the tip of a small screwdriver into the corner notch and pry up the brush. - Page 10 Power indicator light Green Power On Red Impeller stops (clogged) and will automatically resume operation in 3 seconds, for which the light will turn green. To effectively vacuum up debris, ensure the pool vacuum is laid flat on the pool floor as you steer it back and forth in regular motion over debris patches for collection.
-
Page 11: Maintenance And Storage
Remove the duckboard and unroll the pool slat according to instructions from your pool cover manual. Attach a telescopic pole / specific telescopic pole (not provided) to the pool vacuum as instructed in the manual. Power on the vacuum then align it as shown in the image above before immersion. Once the cleaner reaches the pool floor, parallel it to the pool length as shown above and start vacuuming the sunken compartment. - Page 12 Ÿ Store them in a well-ventilated area away from sunlight, heat, ignition sources, pool chemicals, and from children. Ambient temperature for storage should be 10˚C – 25˚C (50˚F – 77˚F). NOTE: A higher storage temperature may reduce the battery life. WARNING! Under no circumstances should you attempt to disassemble the main unit and replace the impeller, motor, and battery by yourself.
-
Page 13: Battery Disposal
BATTERY DISPOSAL (To be carried out by authorized technician) Your pool vacuum is equipped with a maintenance-free rechargeable lithium-ion battery pack, which must be disposed of properly. Recycling is required; please contact your local authority for more information. WARNING! Never attempt to disassemble a battery pack Ÿ... -
Page 14: Troubleshooting
Toll-Free Voicemail: (866) 683-7672 without prior notice. International patents pending RoHS Download Instruction Manual & Videos: SAVE THESE INSTRUCTIONS QR Code: https://shop.kokido.com/pages/support-xtrovac-200 Manufacturer: Kokido Development Limited. Unit 1319, Sunbeam Centre, 27 Shing Yip Street, Kwun Tong, Kowloon, HK EV18/AMZ/US Made in China...
Need help?
Do you have a question about the xtrovac 200 and is the answer not in the manual?
Questions and answers