VTech DS6600, DS660V-1F, DS660V-1G, DS660V-1H, DS660V-1J Manual
- User manual (9 pages) ,
- User manual (11 pages)
Advertisement
What's in the box
Your telephone package contains the following items. Save your sales receipt and original packaging in case it is necessary to ship your telephone for warranty service.

Charger installation
Install the charger as shown below.

Battery installation and charging
Install the battery as shown below. Once you have installed the battery, you may be able to make and receive short calls. For best performance, charge the handset battery continuously for at least 12 hours.
- Plug the battery connector securely into the socket inside the handset battery compartment, matching the color-coded label.
![]()

- Place the battery with the label THIS SIDE UP facing up and the wires inside the battery compartment.


- Slide the battery compartment cover towards the center of the handset until it clicks into place.
![]()

- Place the handset in the telephone base or charger to charge.


Battery charging
Once you have installed the battery, the screen indicates the battery status (see the table below).
 NOTES
NOTES
- For best performance, keep the handset in the telephone base or charger when not in use.
- The battery is fully charged after 12 hours of continuous charging.
- If you place the handset in the telephone base or the charger without plugging in the battery, the screen displays No battery.
| Battery indicators | Battery status | Action |
The screen is blank, or displays Put in charger and  flashes. flashes. | Battery has no or very little charge. The handset cannot be used. | Charge without interruption (about 30 minutes). |
| The screen displays Low battery and flashes. | Battery has enough charge to be used for a short time. | Charge without interruption (about 30 minutes). |
| The screen displays HANDSET X. | Battery is charged. | To keep the battery charged, place it in the telephone base or charger when not in use. |
When the battery is fully charged, you can expect the following performance:
| Operation | Operating time |
| While in handset use (talking*) | Up to seven hours |
| While in speakerphone mode (talking*) | Up to three hours |
| While not in use (standby**) | Up to five days |
*Operating times vary depending on your actual use and the age of the battery.
**Handset is not charging or in use.
After you install your telephone or power returns following a power outage, the handset will prompt you to set the date and time. To skip setting the date and time, press OFF/CANCEL.
Add and register a handset
You can add new DS6600/DS660V handsets (purchased separately) to your DS6611/DS6621/DS662V telephone system. Each handset must be registered with the telephone base before use. When first purchased, each handset displays To register HS... and...see manual alternately. You may need to charge the handset before registering it to the telephone base. For more details on battery charging, see Battery installation and charging section.
To register a handset:
- Place the new/non-registered handset in the telephone base. The handset shows Registering....
The handset shows Registered and you hear a beep when the registration process completes. The registration process takes aboutn 90 seconds to complete.

Deregister handsets
If you want to replace a handset, or reassign the designated handset number of a registered handset, you must deregister all handsets that are registered to the telephone base. Then register each handset individually.
To make deregistration easier, read all of the instructions on this page before you begin.
Make sure that all handsets are out of the telephone base and chargers before you begin deregistration.
To deregister all handsets:
- Press and hold
![]() /FIND HANDSET on the telephone base for about 10 seconds until the IN USE light on the telephone base turns on and starts flashing.
/FIND HANDSET on the telephone base for about 10 seconds until the IN USE light on the telephone base turns on and starts flashing. - Release
![]() /FIND HANDSET and then press it again. You must press
/FIND HANDSET and then press it again. You must press ![]() /FIND HANDSET while the IN USE light is still flashing. The IN USE light flashes for approximately seven seconds.
/FIND HANDSET while the IN USE light is still flashing. The IN USE light flashes for approximately seven seconds.
 /FIND HANDSET on the telephone base for about 10 seconds until the IN USE light on the telephone base turns on and starts flashing.
All handsets show To register HS... and ...see manual alternately when the deregistration process completes. The deregistration process takes about 10 seconds to complete.
Operating range
This cordless telephone operates with the maximum power allowed by the Federal Communications Commission (FCC). Even so, this handset and telephone base can communicate over only a certain distance - which can vary with the locations of the telephone base and handset, the weather, and the layout of your home or office.
When the handset is out of range, the handset displays Out of range and no pwr at base alternately.
If there is a call while the handset is out of range, it may not ring, or if it does ring, the call may not connect well when you press  /HOME or
  /CELL. Move closer to the telephone base, and then press /HOME or /CELL to answer the call.
If the handset moves out of range during a telephone conversation, there may be interference. To improve reception, move closer to the telephone base.
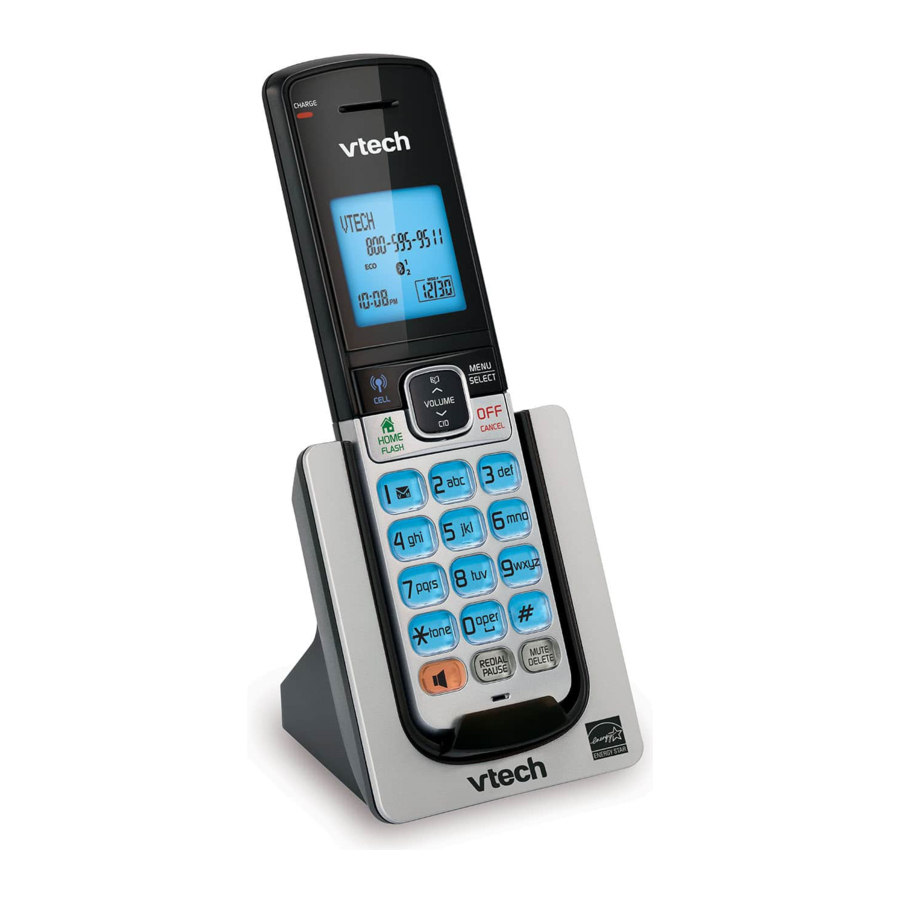
Handset overview

- Handset earpiece
- LCD display
- MENU/SELECT
- Show the menu.
- While in a menu, press to select an item, or save an entry or setting.
- OFF/CANCEL
- Hang up a call.
- Silence the ringer temporarily while the handset is ringing.
- Press and hold to erase the missed call indicator while the phone is not in use.
- Press to return to the previous menu; or press and hold to return to idle mode, without making changes.
![]()
- Press repeatedly to show other dialing options when reviewing a caller ID log entry.
-
MUTE/DELETE
- Mute the microphone during a call.
- Delete digits or characters while using the dialing keys.
- Silence the ringer temporarily while the handset is ringing.
-
REDIAL/PAUSE
- Press repeatedly to review the redial list.
- Press and hold to insert a dialing pause while entering a number.
- Microphone
![]()
- Make or answer a call using the handset speakerphone.
- During a call, press to switch between the speakerphone and the handset.
![]()
- Press to add a space when entering names.
![]()
- While you have set the dial mode to pulse and on a call, press to switch to tone dialing temporarily.
![]()
- Press repeatedly to add or remove 1 in front of the caller ID log entry before dialing or saving it to the phonebook.
- Press and hold to set or dial your voicemail number.
-
![]() /HOME/FLASH
/HOME/FLASH- Make or answer a home call.
- Answer an incoming home call when you hear a call waiting alert.
-
![]() /CELL
/CELL- Make or answer a cell call.
- Answer an incoming cell call when you hear a call waiting alert.
-
VOLUME/
![]()
- Review the phonebook when the phone is not in use.
- Increase the listening volume during a call.
- Scroll up while in a menu, or in the phonebook, caller ID log, or redial list.
- Move the cursor to the right when entering numbers or names.
VOLUME/![]() /CID
/CID - Review the caller ID log when the phone is not in use.
- Decrease the listening volume during a call.
- Scroll down while in a menu, or in the phonebook, caller ID log, or redial list.
- Move the cursor to the left when entering numbers or names.
- CHARGE light
- On when the handset is charging.


 /CID
/CIDTechnical specifications
| Transmit frequency | DECT frequency: 1921.536-1928.448 MHz Bluetooth frequency: 2402.000-2480.000 MHz |
| Channels | DECT: 5 Bluetooth: 79 |
| Nominal effective range | Maximum power allowed by FCC and IC. Actual operating range may vary according to environmental conditions at the time of use. |
 Power requirement | Handset: 2.4V Ni-MH battery Charger: DC 6V @ 0.4A |
| Memory | Phonebook: 1000 memory locations (shared between home and cell lines); up to 30 digits and 15 characters Caller ID log: 50 memory locations; up to 24 digits and 15 characters |

Telephones identified with this logo have reduced noise and interference when used with most T-coil equipped hearing aids and cochlear implants. The TIA-1083 Compliant Logo is a trademark of the Telecommunications Industry Association. Used under license.
Specifications are subject to change without notice.
© 2022 VTech Communications, Inc.
© 2022 VTech Technologies Canada Ltd
All rights reserved.

Go to www.vtechphones.com (US) to register your product for enhanced warranty support and latest VTech product news.
Go to phones.vtechcanada.com (CA) for latest VTech product news.
Scan the QR code for support information

DS6600 (US)

DS6600 (CA)

Documents / Resources
References
![www.vtechphones.com]() VTech Cordless Phones Official Site | Best Home Office & Business Phones
VTech Cordless Phones Official Site | Best Home Office & Business Phones![phones.vtechcanada.com]() VTech Cordless Phones | DECT 6.0 Phones | Best Home Phones - VTech® Cordless Phones
VTech Cordless Phones | DECT 6.0 Phones | Best Home Phones - VTech® Cordless Phones
Download manual
Here you can download full pdf version of manual, it may contain additional safety instructions, warranty information, FCC rules, etc.
Download VTech DS6600, DS660V-1F, DS660V-1G, DS660V-1H, DS660V-1J Manual
Advertisement


Need help?
Do you have a question about the DS6600 and is the answer not in the manual?
Questions and answers