Advertisement
Parts checklist
Your telephone package contains the following items. Save your sales receipt and original packaging in the event warranty service is necessary.

Charger overview

- Charging pole
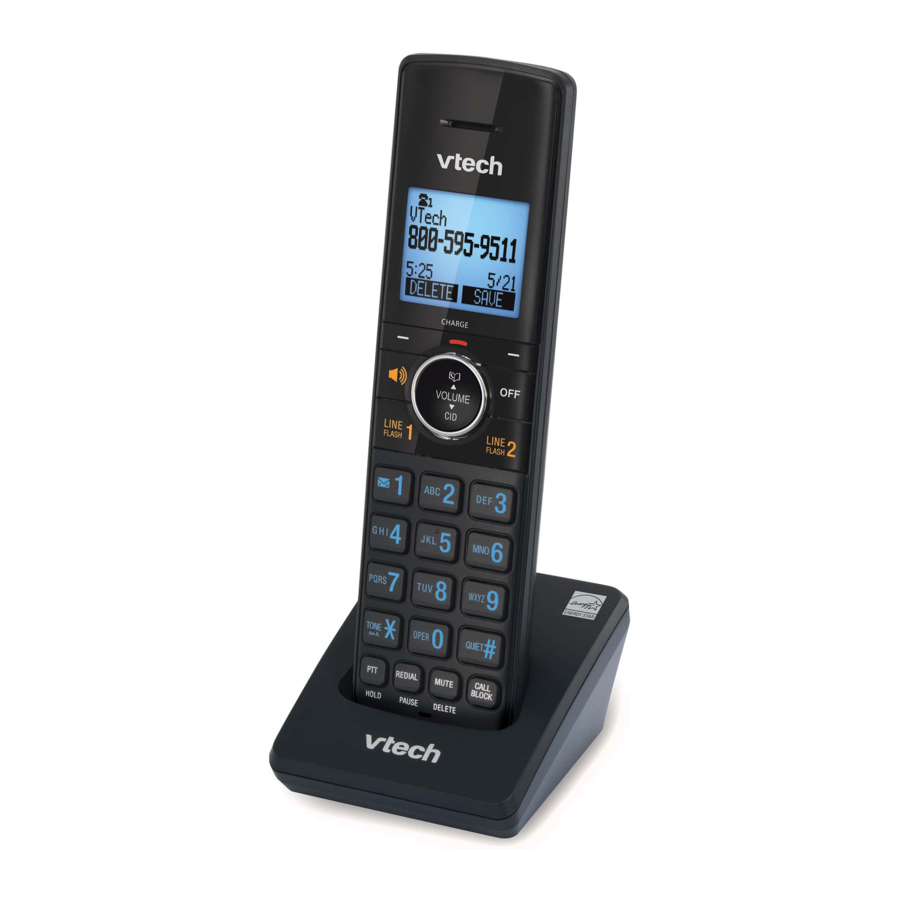
Handset overview

- Handset earpiece
- LCD display
- Softkeys (2)
- Press to select the menu item displayed above the key.
- While in a menu, press to select an item, save an entry or setting, cancel an operation, or back up to the previous menu.
- OFF
- During a call, press to hang up a call.
- While in a menu, press to cancel an operation, back up to the previous menu, or exit the menu display.
- When the handset is ringing, press to mute the ringer temporarily.
- Press and hold to erase the missed call indicator while the phone is not in use.
![]() VOLUME
VOLUME
- Press to show phonebook entries when the telephone is not in use.
- Press to increase the listening volume when on a call, or increase the message playback volume.
- Press to scroll up while in a menu.
- While entering names or numbers, press to move the cursor to the right.
VOLUME![]() /CID
/CID - Press to show the caller ID log when the telephone is not in use.
- Press to decrease the listening volume during a call, or decrease the message playback volume.
- Press to scroll down while in a menu.
- While entering names or numbers, press to move the cursor to the left.
- LINE 1/LINE 2/FLASH
- Press to make or answer a call on the corresponding line.
- During a call, press to answer an incoming call on the corresponding line when you receive a call waiting alert.
- During message playback, press to call back the caller if the caller's number is available.
- QUIET#
- Press repeatedly to show other dialing options when reviewing a caller ID log entry.
- While editing the name of a caller ID log entry, press repeatedly to re-arrange the order of the name.
- Press and hold to enter the quiet mode setting screen, or to deactivate quiet mode.
- OPER 0
- Press and hold to add a space when entering names.
- CALL BLOCK
- Press to block the incoming call when the telephone is ringing or during the call.
- When the handset is not in use, press to show the Smart call blocker menu.
- MUTE/DELETE
- During a call, press to mute the microphone.
- When the headset is ringing, press to mute the ringer temporarily.
- While reviewing the redial list, phonebook, caller ID log, allow list, block list, or the star name list, press to delete an individual entry.
- During message or announce playback, press to delete the playing message or the recorded announcement.
- While entering names or numbers, press to delete a digit or character.
- While entering names or numbers, press and hold to delete all digits or characters.
- Microphone
- REDIAL/PAUSE
- Review the redial list.
- Press and hold to insert a dialing pause while dialing or entering numbers into the phonebook.
- PTT/HOLD
- Press to display the PTT menu to begin a PTT call.
- Press and hold to begin a one-to-group broadcast when the handset is not in use.
- Press to put a call on hold.
- TONE
![]()
- Press to switch to tone dialing temporarily during a call if you have pulse service.
- While entering names, press to change the next letter to upper or lower case.
-
![]()
- Press and hold to set or dial your voicemail number.
- Press repeatedly to add or remove 1 in front of the caller ID log entry before dialing or saving it to the phonebook.
- Headset jack
- Plug in a wired headset for handsfree telephone conversation.
![]()
- Make or answer a call using the handset speakerphone via the first available line.
- Switch between the handset speakerphone and the handset earpiece during a call.
- CHARGE light
- On when the handset is charging in the telephone base or charger.
 VOLUME
 /CID
/CID

Display icons overview
 |
The battery icon flashes when the battery is low and needs charging. |
 |
The battery icon animates when the battery is charging. |
 |
The battery icon becomes solid when the battery is fully charged. |
 |
|
 |
|
 |
The handset ringer for line 1 is off. |
 |
The handset ringer for line 2 is off. |
 |
The handset ringers for line 1 and line 2 are turned off. |
 |
There are new voicemail received on line 1 from your telephone service provider. |
 |
There are new voicemail received on line 2 from your telephone service provider. |
 |
There are new voicemail received on line 1 and line 2 from your telephone service provider. |
 |
|
 |
|
 |
There are new answering system message(s) on line 1 and line 2. |
 |
The answering system of line 1 is turned on. |
 |
The answering system of line 2 is turned on. |
 |
The answering system of line 1 and line 2 is turned on. |
 |
The speakerphone is in use. |
 |
A wired headset is being used. |
 |
Indication of new missed call. |
 |
The microphone is muted. |
 |
You can perform 3-character alphabetical search to find entries quickly. |
Install the battery
Install the battery as shown below.
![]() Notes
Notes
- Use only the battery provided.
- If the handset will not be used for a long time, disconnect and remove the battery to prevent possible leakage.

Connect and charge the battery
![]() Notes
Notes
- Use only the power adapter supplied with this product.
- Charge the battery provided with or identified for use with this product only in accordance with the instructions and limitations specified in this manual.
Connect the charger

Charge the battery
Place the handset in the charger to charge.

Once you have installed the battery, the handset LCD display indicates the battery status (see the following table).
![]() Notes
Notes
- For best performance, keep the handset in the telephone base or charger when not in use.
- The battery is fully charged after 12 hours of continuous charging.
| Battery indicators | Battery status | Action |
The screen is blank, or shows Place in charger and  flashes. flashes.
|
The battery has no charge or very little charge. The handset cannot be used. | Charge without interruption (at least 30 minutes). |
|
The screen shows Low battery and flashes.
|
The battery has enough charge to be used for a short time. | Charge without interruption (at least 30 minutes). |
| The screen shows HANDSET X. | The battery is charged. | To keep the battery charged, place it in the charger when not in use. |
Before use
Add and register a handset
You can add new DS6250 handsets (purchased separately) to your DS6251/DS6251-2/DS6251-3/ DS6251-4 telephone system. Your telephone system supports a maximum of 12 handsets.
Each handset must be registered with the telephone base before use. When first purchased, each expansion handset displays To register, see user manual.
![]() Note
Note
- Charge the new handset without interruption for at least 30 minutes before registering it to the telephone base.
To register a handset to the telephone base:
- Place the new handset in the telephone base.

After about 10 seconds, the handset displays Registering... Please wait. When the registration process completes, both the handset and the telephone base display HANDSET X Registered (HANDSET represents the handset name, X represents the handset number) and both the handset and the telephone base beep.
-OR-
- Press and hold PAGE on the telephone base and it shows Registering... Please wait. Release PAGE.

- Quickly press QUIET# on the handset. The handset shows Registering... Please wait. When the registration process completes, both the handset and the telephone base display HANDSET X Registered (HANDSET represents the handset name, X represents the handset number) and both the handset and the telephone base beep.

If registration fails, the system will automatically try to register again. If registration fails after the third try, Registration failed appears on both screens. The handset shows To register, see user manual and the telephone base returns to idle mode. This may take up to five minutes to occur. Please start the registration process again.
![]() Note
Note
- You cannot register a handset if any other system handset is in use.
Deregister handsets
If you want to replace a handset or reassign the designated handset number of a registered handset, you must deregister all the handsets and then individually register each handset.
If you want to register a handset to another telephone base, you must deregister all handsets, and then register each handset individually to the desired telephone base.
To deregister all handsets from the telephone base:
- Press and hold PAGE on the telephone base and it shows Registering... Please wait for five seconds, then it shows Deregister all devices?. Release PAGE.
- Quickly press PAGE again or YES. The telephone base shows Deregistered all devices when the registration completes. It takes up to 10 seconds to complete the deregistration process. Before registering the handset again, wait for the cordless handset screen to display To register, see user manual.
![]() Notes
Notes
- If the deregistration process fails, you may need to reset the system and try again. To reset, unplug the power from the telephone base and plug it back in.
- You cannot deregister the handsets if any other system handset is in use.
- Even if the battery is depleted, you can still deregister the handsets by following the steps. After the handset is charged for at least 10 minutes, the screen shows To register, see user manual.
Operating range
This cordless telephone operates with the maximum power allowed by the Federal Communications Commission (FCC). Even so, this handset and telephone base can communicate over only a certain distance - which can vary with the locations of the telephone base and handset, the weather, and the layout of your home or office.
When the handset is out of range, the handset displays Out of range OR Base no power.
If there is a call while the handset is out of range, it may not ring, or if it does ring, the call may not connect well when you press LINE 1 or LINE 2. Move closer to the telephone base, and then press LINE 1 or LINE 2 to answer the call. If the handset moves out of range during a telephone conversation, there may be interference. To improve reception, move closer to the telephone base.
ECO mode
This power conserving technology reduces power consumption for optimal battery performance. The ECO mode activates automatically whenever the handset is synchronized with the telephone base.
General product care
Taking care of your telephone
Your cordless telephone contains sophisticated electronic parts, so it must be treated with care.
Avoid rough treatment
Place the handset down gently. Save the original packing materials to protect your telephone if you ever need to ship it.
Avoid water
Your telephone can be damaged if it gets wet. Do not use the handset outdoors in the rain, or handle it with wet hands. Do not install the telephone base near a sink, bathtub or shower.
Electrical storms
Electrical storms can sometimes cause power surges harmful to electronic equipment. For your own safety, take caution when using electrical appliances during storms.
Cleaning your telephone
Your telephone has a durable plastic casing that should retain its luster for many years. Clean it only with a dry non-abrasive cloth. Do not use dampened cloth or cleaning solvents of any kind.
Technical Specifications
| Frequency control | Crystal controlled PLL synthesizer |
| Transmit frequency | 1921.536-1928.448 MHz |
| Channels | 5 |
| Nominal effective range | Maximum power allowed by FCC and IC. Actual operating range may vary according to environment conditions at the time of use. |
| Power requirements | Handset: 2.4V Ni-MH battery Charger: 6V DC @ 400mA |
| Memory | Phonebook: 50 memory locations; up to 30 digits and 15 characters Caller ID log: 50 memory locations; up to 24 digits and 15 characters Call block: 1000 entries |
Go to www.vtechphones.com to register your product for to register your product for enhanced warranty support and enhanced warranty support and latest VTech product news. latest VTech product news.

Documents / ResourcesDownload manual
Here you can download full pdf version of manual, it may contain additional safety instructions, warranty information, FCC rules, etc.
Advertisement


Need help?
Do you have a question about the DS6250 and is the answer not in the manual?
Questions and answers