
Related Manuals for Parker V16 Series


Summary of Contents for Parker V16 Series
- Page 1 MSG30-5526-M1/UK Service/ Visit our homepage for additional support parker.com/pmde Spare Parts Manual Series V16 Effective: February, 2023 Supersedes: December, 2022...
-
Page 2: Table Of Contents
2.2046 lb 0.22481 lbf 1 bar 14.504 psi 0.21997 UK gallon 0.26417 US gallon 1 cm 0.061024 in 3.2808 feet 1 mm 0.03937 in 1 °C = 1.8 °F + 32 Parker Hannifin Pump & Motor Division Europe Trollhättan, Sweden... -
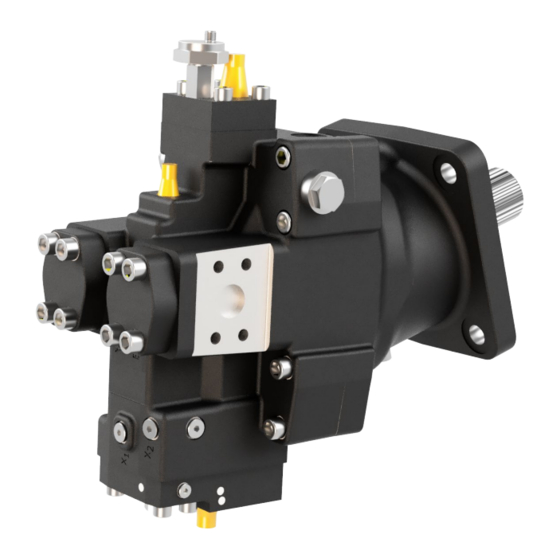
Page 3: General Information/New Features V16
• New design and simulation tools • Best in class displacement range - 5.5:1 • Position sensor and plug in speed sensor available together with a a flexible main port design Parker Hannifin Pump & Motor Division Europe Trollhättan, Sweden... -
Page 4: Cross Section / Specifications
- at 6° – 20°, max continuous 4950 4600 (x10 ) [kg m - at 0° , max continuous 5550 5000 Weight [kg] - min continuous Max 6 seconds in any one minute. Parker Hannifin Pump & Motor Division Europe Trollhättan, Sweden... -
Page 5: M And T Version / Valves Segment Orientation
2. See page 46 for assembly information The groove in the valve segment against the cover for The groove in the valve segment against the control motor assembled as M-version cover for motor assembled as T-version Parker Hannifin Pump & Motor Division Europe Trollhättan, Sweden... -
Page 6: Displacement Limiter
The tightening torque is 114 ± 10 Nm. 5. Assembly the end cover / control cover. The tighte- Note! See page 5 for M and T version ning torque is 114 ± 10 Nm for the screws. Parker Hannifin Pump & Motor Division Europe Trollhättan, Sweden... - Page 7 52.4 23.0 28.5 53.5 23.5 27.3 54.7 24.0 26.2 55.8 24.5 25.0 57.0 25.0 23.9 58.1 25.5 22.7 59.3 26.0 21.6 60.4 26.5 20.4 61.6 27.0 19.2 62.8 28.0 16.9 65.1 Parker Hannifin Pump & Motor Division Europe Trollhättan, Sweden...
- Page 8 52.4 23.0 28.5 53.5 23.5 27.3 54.7 24.0 26.2 55.8 24.5 25.0 57.0 25.0 23.9 58.1 25.5 22.7 59.3 26.0 21.6 60.4 26.5 20.4 61.6 27.0 19.2 62.8 28.0 16.9 65.1 Parker Hannifin Pump & Motor Division Europe Trollhättan, Sweden...
- Page 9 191.6 26.2 55.8 24.5 195.3 25.0 57.0 25.0 199.0 23.9 58.1 25.5 202.8 22.7 59.3 26.0 206.5 21.6 60.4 26.5 210.1 20.4 61.6 27.0 213.8 19.2 62.8 28.0 221.1 16.9 65.1 Parker Hannifin Pump & Motor Division Europe Trollhättan, Sweden...
- Page 10 191.6 26.2 55.8 24.5 195.3 25.0 57.0 25.0 199.0 23.9 58.1 25.5 202.8 22.7 59.3 26.0 206.5 21.6 60.4 26.5 210.1 20.4 61.6 27.0 213.8 19.2 62.8 28.0 221.1 16.9 65.1 Parker Hannifin Pump & Motor Division Europe Trollhättan, Sweden...
-
Page 11: Ordering Code
19. Pressure cut off EOA/EOB/EPA/EPB/HOC/HPC XXX – [bar] (000 = without pressure cut off) 20. Seal/protection cap on adjustement screws 0 – Standard seal cap in plastic S – Protection cap in steel Parker Hannifin Pump & Motor Division Europe Trollhättan, Sweden... -
Page 12: Installation Information
A 20 bar inlet pressure, measured at the motor inlet port, satisfies most operating conditions. Contact Parker Hannifin (Pump & Motor Div.) for more specific information on inlet pressure requirements Size 1500 3000 4000... - Page 13 8 mm²/s (cSt). Check valve At start-up, the viscosity should not exceed 1500 mm²/s. The ideal operating range for the V16 series is 15 to 30 Drain port mm²/s. The following information (available from Parker Han- nifin, Pump &...
-
Page 14: Controls And Gauge Ports
MSG30-8223/UK. Scan QR code below. All controls utilize a servo piston that connects to the valve segment. AC control function Refer to the catalogue MSG30-8223/UK. Scan QR code below. Parker Hannifin Pump & Motor Division Europe Trollhättan, Sweden... - Page 15 Servo supply pressure (before orifice) Port sizes: Pilot pressure – M14x1.5 (ISO version) Port sizes: – M14x1.5 (ISO version) – "-18 O-ring boss (SAE version). – "-18 O-ring boss (SAE version). Parker Hannifin Pump & Motor Division Europe Trollhättan, Sweden...
- Page 16 MSG30-5526-M1/UK Service/Spare Parts Manual Series V16 Controls and gauge ports EO/EP control function Refer to the catalogue MSG30-8223/UK. Scan QR code below. Parker Hannifin Pump & Motor Division Europe Trollhättan, Sweden...
- Page 17 3. Turn the adjustment screw counterclockwise to en- Servo supply pressure (after orifice) sure that the threshold spring is unloaded. Servo supply pressure (before orifice) Port sizes: – M14x1.5 (ISO version) – "-18 O-ring boss (SAE version). Parker Hannifin Pump & Motor Division Europe Trollhättan, Sweden...
- Page 18 MSG30-5526-M1/UK Service/Spare Parts Manual Series V16 Controls and gauge ports HO/HP control function Refer to the catalogue MSG30-8223/UK. Scan QR code below. Parker Hannifin Pump & Motor Division Europe Trollhättan, Sweden...
- Page 19 5. Start turn the threshold adjustment screw clockwi- se until the pressure gauge in port X1 starts to de- crease. Right threshold current has been reached. Parker Hannifin Pump & Motor Division Europe Trollhättan, Sweden...
- Page 20 MSG30-5526-M1/UK Service/Spare Parts Manual Series V16 Controls and gauge ports EPA/EPB/EOA/EOB/HPC/HOC control function Refer to the catalogue MSG30-8223/UK. Scan QR code below Parker Hannifin Pump & Motor Division Europe Trollhättan, Sweden...
- Page 21 5. Turn the cut off adjustment screw clockwise until the pressure gauge in port X6 starts to decrease. Correct cut off pressure has been reached. Note: One turn on the cut off adjustment screw corresponds to 57 bar. Parker Hannifin Pump & Motor Division Europe Trollhättan, Sweden...
-
Page 22: Disassembling
1. Remove the hex socket screws and remove the 2. Remove the hex socket screws and remove the cover. control cover. 3. Remove the spacer 4. Push down the setting piston. Parker Hannifin Pump & Motor Division Europe Trollhättan, Sweden... - Page 23 5. Assemble a screw and lift up the valve sleeve sligtly. 6. Use two screwdrivers and carefully lift up the valve sleeve. 7. Remove the valve sleeve. 8. Remove the valve spool. Parker Hannifin Pump & Motor Division Europe Trollhättan, Sweden...
- Page 24 O-ring and support ring Orifice 9. Remove the o-ring and support ring. 10. Remove the orifice. 11. Use a magnet and lift up the spring seat. 12. Remove the modulating spring. Parker Hannifin Pump & Motor Division Europe Trollhättan, Sweden...
- Page 25 14. Use a magnet and lift up the second spring seat. Hex socket 12 15. Loosen the hex socket bolts. 16. Carefully lift up the end cap by using a lift. Parker Hannifin Pump & Motor Division Europe Trollhättan, Sweden...
- Page 26 19. Remove the guide pins. 20. Remove the support pin that was assembled between cylinder barrel and joint shaft. Locate it and use a magnet to pick it up. Parker Hannifin Pump & Motor Division Europe Trollhättan, Sweden...
- Page 27 MSG30-5526-M1/UK Service/Spare Parts Manual Series V16 Disassembling 21. Remove the joint shaft with rollers. 22. Remove the rollers. Hex socket 10 23. Disassemble the o-ring. 24. Disassemble the hexagon screw. Parker Hannifin Pump & Motor Division Europe Trollhättan, Sweden...
- Page 28 28. Protect the ball sockets in the shaft with some ge and fit it on the bearing housing. paper or a cloth before you press out the bearing package. Note: See page 46 for information about the tool. Parker Hannifin Pump & Motor Division Europe Trollhättan, Sweden...
- Page 29 Service/Spare Parts Manual Series V16 Disassembling 29. Press out the bearing package. 30. Disassemble the retaining ring for the shaft seal. 31. Remove the support ring. 32. Tap out the shaft seal. Parker Hannifin Pump & Motor Division Europe Trollhättan, Sweden...
- Page 30 Hexagon 8 Hex socket 12 35. Make sure the valve segment is assembled before 36. Disassemble the hexagon screw. you disassemble the hex socket screw. Parker Hannifin Pump & Motor Division Europe Trollhättan, Sweden...
- Page 31 Series V16 Disassembling Hex socket 8 37. Remove the valve segment. 38. Disassemble the set screws. Hex socket 8 Hex socket 8 39. The outher set screw. 40. The inner set screw. Parker Hannifin Pump & Motor Division Europe Trollhättan, Sweden...
- Page 32 Disassembling 41. Lift up the connecting arm. 42. Remove the setting piston. Hexagon 10 Hex socket 5 43. Disassemble the seal nut. 44. Screw in the adjusting screw until it loosens. Parker Hannifin Pump & Motor Division Europe Trollhättan, Sweden...
- Page 33 MSG30-5526-M1/UK Service/Spare Parts Manual Series V16 Disassembling 45. Remove the adjusting screw. Parker Hannifin Pump & Motor Division Europe Trollhättan, Sweden...
-
Page 34: Assembling
2. Assemble the setting piston Hex socket 8 3. Place the connecting arm in the setting piston. 4. Fit the inner set screw. Make sure it is in right posi- tion in the connecting arm. Parker Hannifin Pump & Motor Division Europe Trollhättan, Sweden... - Page 35 0. Torque the outher set screw to 26 ± 5 Nm. screw. Note: See page 5 for instruction in what direction the valve segment should be assembled, differs between M and T version. Parker Hannifin Pump & Motor Division Europe Trollhättan, Sweden...
- Page 36 114 ± 10 Nm. 11. Make sure the valve segment is assembled before 12. Fit the setting piston head with a new seal. you torque the hex socket screw to 114 ± 10 Nm. Parker Hannifin Pump & Motor Division Europe Trollhättan, Sweden...
- Page 37 15. Choose the correct assembly tool for the bearing 16. Place the bearing housing on the assembly tool. package, ISO or SAE. Note: See page 46 for information about the tools. Parker Hannifin Pump & Motor Division Europe Trollhättan, Sweden...
- Page 38 Torque to 25 ± 5 Nm. Note! V16-270 shafts type D, S and H have a big diameter, use some tape on the shaft end to protect the sealing surface on the shaft seal. Parker Hannifin Pump & Motor Division Europe Trollhättan, Sweden...
- Page 39 Series V16 Assembling 21. Fit the support ring and carefully tap down the 22. Assemble the retaining ring. shaft seal and support ring. 23. Assemble the pistons. 24. Assemble the support pin. Parker Hannifin Pump & Motor Division Europe Trollhättan, Sweden...
- Page 40 25. Assemble the joint shaft with the first 3 rollers. 26. Put grease on the joint shaft. 27. Assemble the rollers, grease is needed to keep 28. Put a lot of grease in the cylinder barrel. them in place. Parker Hannifin Pump & Motor Division Europe Trollhättan, Sweden...
- Page 41 It should stop against the Once again, make sure that support pin and rollers support pin. You can also see grease coming up are in correct position. from the centre hole in the cylinder barrel. Parker Hannifin Pump & Motor Division Europe Trollhättan, Sweden...
- Page 42 34. Assemble the hex socket screws and torque them no surfaces are damaged. to 180 ± 10 Nm. 35. Locate and assemble the spring seat. 36. Locate and assemble the next spring seat. Parker Hannifin Pump & Motor Division Europe Trollhättan, Sweden...
- Page 43 MSG30-5526-M1/UK Service/Spare Parts Manual Series V16 Assembling 37. Locate and assemble the threshold spring. 38. Assemble the modulating spring. 39. Assemble the spring seat. 40. Locate and assemble the valve sleeve. Parker Hannifin Pump & Motor Division Europe Trollhättan, Sweden...
- Page 44 Service/Spare Parts Manual Series V16 Assembling 41. Carefully tap down the valve sleeve with a plastic 42. Assemble the Support ring. hammer. 43. Assemble the o-ring. 44. Assemble the valve spool. Parker Hannifin Pump & Motor Division Europe Trollhättan, Sweden...
- Page 45 47. Assemble the cover with o-rings. Make sure that 48. Assemble the hex socket screws and torque them the o-rings don’t fall out, use some grease to keep to 114 ± 10 Nm. them in place. Parker Hannifin Pump & Motor Division Europe Trollhättan, Sweden...
-
Page 46: Disassembling / Assembling
QR code – video tutorial QR code – video tutorial disassembly position sensor assembly position sensor QR code – video tutorial installation guide speed sensor Catalogue QR code for the catalogue series V16 - MSG30-8223/UK Parker Hannifin Pump & Motor Division Europe Trollhättan, Sweden... - Page 47 MSG30-5526-M1/UK Service/Spare Parts Manual Series V16 Splitview Splitview V16-220/-270 Parker Hannifin Pump & Motor Division Europe Trollhättan, Sweden...
- Page 48 Shaft kit SUPPORT WASHER Shaft kit SPACER WASHER Shaft kit RETAINING RING Shaft kit O-RING Seal kit BEARING HOUSING Bearing housing kit Bearing housing kit HEX SOCKET PLUG M14 Bearing housing kit Parker Hannifin Pump & Motor Division Europe Trollhättan, Sweden...
- Page 49 Description including Pos. 410, 413, 424 3724712 V16-220/-270 Part no. Description 3724700 V16-220 3724701 V16-270 Bearing housing Kit including Pos. 29, 61, 463, 501, 502, 515 Part no. Description 3724703 3724702 Parker Hannifin Pump & Motor Division Europe Trollhättan, Sweden...
- Page 50 Hex skt plug 9/16-18 Tightening Torque Pos. ISO 70 ± 5 / SAE 70 ± 5 14 ± 4 14 ± 4 25 ± 5 ISO: 38± 8; SAE: 25 ± 5 Parker Hannifin Pump & Motor Division Europe Trollhättan, Sweden...
-
Page 51: Split Views / Spare Parts V16-220/270
Note! Pos 722, O-ring for solenoid is shown on Pos. 707 0,8 mm, T-version splitview above. 716x4 725 (only for HO/HP) 707* 712x4 706* Note! 706* T-version with plug, M-version empty 707* T-version with orifice, M-version with plug Parker Hannifin Pump & Motor Division Europe Trollhättan, Sweden... - Page 52 1,0 mm orifice. All other controls according to product code. 703* For electric controls (EO, EP) open, no plug. For all other controls (AC, HO, HP) a plug should be assembled. Parker Hannifin Pump & Motor Division Europe Trollhättan, Sweden...
- Page 53 ADAPTER FITTING Control cover kit (only controls with cut off valve) HEX SKT PLUG Control cover kit (only controls with cut off valve) BALLS Control cover kit VALVE SEAT Control cover kit Parker Hannifin Pump & Motor Division Europe Trollhättan, Sweden...
- Page 54 707, 708 1.4 ± 0.2 65 ± 5 114 ± 10 796 (Hex Skt Plug) 65 ± 5 65 ± 5 796 (Adapter) 65 ± 5 114 ± 10 13 ± 2 Parker Hannifin Pump & Motor Division Europe Trollhättan, Sweden...
- Page 55 Pos. 701, 703, 705, 706, 707, 708 Part no. Description Remarks 3723156 V16-220/ V16-270 5 of each nozzle diam. Valve sleeve kit including Pos. 719, 720, 768, 771, 772, 775 Part no. Description Remarks 3724733 V16-220/ V16-270 Parker Hannifin Pump & Motor Division Europe Trollhättan, Sweden...
- Page 56 Hex skt plug M10 VSTI10X1EDVITCF Hex skt plug M10 VSTI10X1EDVITCF Hex skt plug M10 VSTI18X1,5EDVITCF Hex skt plug M18 VSTI14X1.5EDVITCF Hex skt plug M14 VSTI14X1.5EDVITCF Hex skt plug M14 VSTI14X1.5EDVITCF Hex skt plug M14 Parker Hannifin Pump & Motor Division Europe Trollhättan, Sweden...
- Page 57 Pos: 21, 22, 23, 24, 111, 493, 803 V16-220/270 3724717 3724718 Valve Cartridge Part no. Pos: 801 P230 20006727 493x8 P250 20004981 P280 20007439 P300 20005798 P350 20000990 P380 20006115 P420 00153491 Parker Hannifin Pump & Motor Division Europe Trollhättan, Sweden...
- Page 58 C version - pos 826 long hex plug, B-side 493x8 Flushing from A-side D version shown A-side B-side D version - pos 825 long hex plug, A-side 493x8 Flushing from B-side Parker Hannifin Pump & Motor Division Europe Trollhättan, Sweden...
-
Page 59: Test Procedure
3. Check the drain flow andcompare with the table. Max 220 bar / 3100 psi Max 150 bar / 2150 psi V16-220/270 Pump max drain flow Q ~30 lpm 6 lpm Parker Hannifin Pump & Motor Division Europe Trollhättan, Sweden... - Page 60 Position notification regarding Machinery Directive 2006/42/EC: Products made by the Pump & Motor Division Europe (PMDE) of Parker Hannifin are excluded from the scope of the machinery directive following the “Cetop” Position Paper on the implementation of the Machinery Directive 2006/42/ EC in the Fluid Power Industry.
Need help?
Do you have a question about the V16 Series and is the answer not in the manual?
Questions and answers