
Related Manuals for Güralp Certimus


Summary of Contents for Güralp Certimus
- Page 1 Güralp Certimus Technical Manual Document Number: MAN-CER-0001 Issue D – December, 2020 Designed and manufactured by Güralp Systems Limited 3 Midas House, Calleva Park Aldermaston RG7 8EA England...
-
Page 2: Table Of Contents
1.3 Manuals and Software....................7 1.4 Conventions.......................7 2 System Overview......................8 2.1 Key features.......................8 2.2 Typical applications....................8 3 System description......................9 3.1 Güralp Certimus digital seismometer................9 3.1.1 Liquid Crystal Display..................11 3.1.2 LED indicator....................11 3.1.3 Bluetooth connectivity..................12 3.1.4 MEMS accelerometer..................13 3.1.5 Data storage.....................13 3.1.6 WiFi connectivity....................16 3.1.7 Web interface....................17... - Page 3 Güralp Certimus 4.3 Güralp Discovery software installation..............24 4.4 Viewing waveforms and system state-of-health............27 4.4.1 Using Discovery’s “Live View” window.............27 4.4.2 Using Scream!....................33 5 LCD Display menu......................34 5.1 Main menu.......................35 5.2 Status........................35 5.3 Settings........................36 5.3.1 Settings → display...................37 5.3.2 Settings → network..................37 5.4 Alignment.........................39...
- Page 4 Güralp Certimus 7.10.3 MicroSD card data flushing and unmounting..........60 7.10.4 Download recorded data................61 7.10.5 Downloading data for specific time-intervals..........62 7.10.6 Bulk data extraction via network..............63 7.10.7 Time based data extraction via Network............64 7.10.8 Bulk data extraction..................65 7.10.9 The contents of the microSD card..............66 7.10.10 Request data from microSD card..............68...
- Page 5 Güralp Certimus 7.18.3 Configuring a Certimus for use with a registry..........121 7.18.4 Configuring Discovery for use with a registry..........122 7.18.5 Registry mode: using WAN or LAN addresses..........123 7.19 Updating Certimus firmware................125 7.20 Import / Export an existing configuration.............129 7.21 Control Centre.....................131 7.21.1 Mass Centring....................132...
- Page 6 Güralp Certimus 13.2 Power........................156 13.3 GNSS/serial......................157 14 Appendix 4 – Güralp Discovery installation............158 14.1 Installation in Linux....................158 14.2 Installation in Mac....................159 14.3 Installation in Windows..................162 14.4 Configuring Windows Firewall................165 14.5 Update.........................168 15 Appendix 5 – I.P. address configuration on PC or Laptop........172 15.1 On Linux......................172...
-
Page 7: Preliminary Notes
Güralp Certimus Preliminary Notes Preliminary Notes Proprietary Notice The information in this document is proprietary to Güralp Systems Limited and may be copied or distributed for educational and academic purposes but may not be used commercially without permission. Whilst every effort is made to ensure the accuracy, completeness and usefulness of the information in the document, neither Güralp Systems Limited nor any employee assumes responsibility or is liable for any... -
Page 8: System Overview
System Overview Thank-you for purchasing a Güralp Certimus digital Seismometer. This section describes the key components of a Certimus system. The Certimus unit is the main, standard product in the system; other components and accessories are optional and can be purchased separately. Please check your order confirmation to see which components were purchased with your system. -
Page 9: System Description
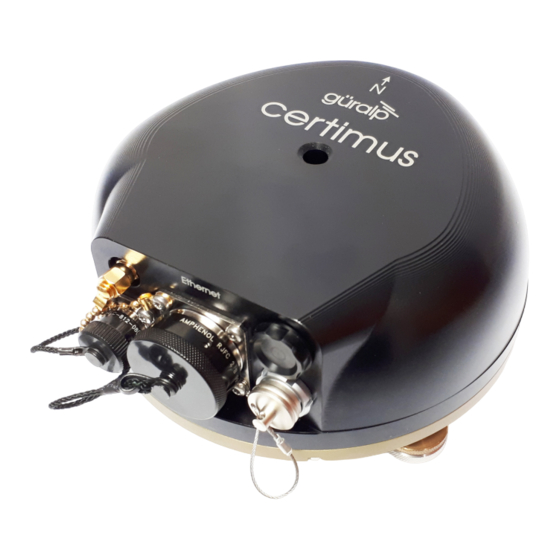
System description System description Güralp Certimus digital seismometer The Güralp Certimus is a broadband triaxial seismometer combined with a Minimus digitiser frontend. The Minimus acquires data from – and allows direct control of – the instrument. The labelled parts are:... - Page 10 An integrated digital bubble-level – available in the display menu – provides quick visual feedback during levelling. This is not essential for operation of the sensor. The Certimus is also available in a version without the LCD touch-screen, more suitable for direct burial. MAN-CER-0001...
-
Page 11: Liquid Crystal Display
The LCD features are described in detail in chapter 5 on page 34. 3.1.2 LED indicator The Certimus has an LED indicator on the upper surface, which provides status and configuration information. This information is encoded in sequences of coloured flashes. In general, red flashes... -
Page 12: Bluetooth Connectivity
The Bluetooth transmitter/receiver is in permanent standby mode and always ready to receive a connection from a phone or tablet. See Chapter 9 on page 138 for further details on connecting to the Certimus using a phone or tablet. MAN-CER-0001... -
Page 13: Mems Accelerometer
One card is internal and cannot be removed by the customer; the other is hot-swappable and easily accessible without any technical knowledge. The Certimus is supplied with two microSD cards that are of equal storage capacity (e.g. two 64 GB cards). MAN-CER-0001... - Page 14 Güralp Certimus System description 3.1.5.1 Primary (removable / hot-swappable) microSD card slot To remove a card, follow the sequence below: The microSD card is protected by a screw-in cap, located next to the Ethernet connector and above the GNSS connector Remove the cap by unscrewing it anticlockwise, as shown.
- Page 15 Güralp Certimus System description The card should now protrude enough that it can be grasped and withdrawn. To replace the card, remove any existing card, as shown previously, and then: Gently insert the replacement card into the slot with the logo facing upwards and the straight edge of the card on the left, as shown.
-
Page 16: Wifi Connectivity
To remove, grasp the knurled locking sleeve and turn anti-clockwise, as shown. See Section 7.5 on page 52 for further details on how to configure the Certimus to connect to a wireless network. -
Page 17: Web Interface
Güralp Certimus System description 3.1.7 Web interface The Certimus contains on-board firmware that presents monitoring and configuration interfaces. These are accessible through Güralp’s Discovery software (see Section 3.3 on page 20) or, with the built-in web server, via Discovery's browser interface or any standards-conformant web browser. -
Page 18: Accessory Package
3.2.1 Ethernet cable The Ethernet connector allows use of 10BASE-T, 100BASE-T or 1000BASE-T networks. The metal gland shell-type connector that connects to the Certimus is IP68-rated and ensures consistent connection in harsh installation environments. At the other end of the blue Ethernet cable, there is a standard 8P8C modular jack (often incorrectly called an RJ45) for attachment to all common networking devices (e.g. -
Page 19: Power Cable
Please see Section 13.2 on page 156 for the pin-out details. 3.2.4 Diagnostic GNSS to Serial cable adapter The Certimus comes with an adapter to connect the GNSS LEMO connector to a female nine-pin D-subminiature connector (DE9f), which can be used with a standard serial port to allow diagnosis and debugging of the Certimus using a serial terminal emulator. -
Page 20: Güralp Discovery Software
Discovery also provides simple, convenient instrument and data management with access to hardware State-of-Health (SoH), data streaming; GNSS location; response and calibration data. Discovery can download Certimus firmware from the Internet and remotely install it onto any connected Certimus. MAN-CER-0001... -
Page 21: Güralp Güvü Android And Ios App
Güralp Certimus System description Güralp GüVü Android and iOS app For added confidence during deployments in the field, Güralp GüVü, a Bluetooth App, displays waveforms, orientation, temperature and humidity data for instant checking of installation integrity. Please refer to Chapter 9 on page 138 for installation and usage instructions. -
Page 22: Getting Started
Unpacking and packing The Certimus is delivered in environmentally-friendly, flat-packable, suspension packaging. The packaging is specifically designed for the Certimus and should be re-used whenever you need to transport the sensor. Please note any damage to the packaging when you receive the equipment and unpack on a clean surface. The package should contain the digital accelerometer, the pigtail power cable, the GNSS receiver and cable, the Ethernet cable and the fixing bolt. -
Page 23: System Set-Up
To get started, connect the cables as shown in the figure above and as described in Section 3.2 on page 18. Power up the Certimus using a power supply with a DC output of between 10 and 36 Volts. Caution: Observe the correct polarity when connecting the power supply. -
Page 24: Güralp Discovery Software Installation
Güralp Certimus Getting started Güralp Discovery software installation To view live waveforms, and to control and configure the Certimus, you will need to use Güralp Discovery software. Visit www.guralp.com/sw/download-discovery.shtml for links for all available platforms (currently Windows 32-bit and 64-bit, macOS 64-bit and Linux 64-bit). - Page 25 Güralp Certimus Getting started is used to designate public networks such as WiFi hotspots at coffee shops, airports, and other locations. For a more complete discussion of this topic, please see www.tenforums.com/tutorials/6815-network-location-set-private-public-windows- 10-a.html or your Windows documentation. Once you have specified your firewall preferences, Discovery displays a main window which normally shows a list of both locally and remotely connected instruments.
- Page 26 Güralp Certimus Getting started The following dialogue is displayed: Enter the IP address of the Certimus (or other device, such as Güralp Minimus) to be added and click the button. The newly added device will appear in the device list.
-
Page 27: Viewing Waveforms And System State-Of-Health
Viewing waveforms and system state-of-health Waveform data recorded by the Certimus’ internal sensors and other connected sensors can be viewed using several methods, which are described in the following sections. - Page 28 Güralp Certimus Getting started The channels are divided in groups with different hierarchical importance. The most important are the velocity/acceleration channels with higher sample rates: these belong to group 1. The least important belong to group 6, which includes humidity, temperature, clock diagnostics etc . When the live view is launched, only the channels in group 1 are selected.
- Page 29 Güralp Certimus Getting started By selecting and dragging the mouse over a window of waveform data, the viewer will display similar statistics for the data within the selected window. When a window of data is selected, use the key to subtract the ADC offset from the maximum, minimum and average values.
- Page 30 The GDI protocol allows a receiver, such as Discovery, to select which channels to receive by use of a “channel subscription list”. This feature can be useful in cases where the connection between Certimus and Discovery has limited bandwidth. To subscribe to specific channels, right-click on a digitiser in Discovery’s main window and select “GDI Configuration”...
- Page 31 Güralp Certimus Getting started side are those to which Discovery subscribes. All available channels are listed on the right-hand side. Channels can be moved between lists – i.e. switched between being subscribed and being unsubscribed – by using the arrow buttons on the middle:...
- Page 32 Güralp Certimus Getting started 4.4.1.4 Backfill from microSD card Gaps in the waveforms due to network disconnections can be backfilled by requesting missing data to the local storage. In the Discovery GDI “Live View”, highlight the portion of data including the gap, right-click and select “Request backfill”.
-
Page 33: Using Scream
Güralp Certimus Getting started 4.4.2 Using Scream! Data from the Certimus can also be viewed and analysed using Güralp's Scream! Software. For full usage information on Scream!, please refer to the on-line Güralp manual MAN-SWA-0001. In Scream!’s Network Control window, add a UDP or TCP Server using the address reported under “LAN Address”... -
Page 34: Lcd Display Menu
It also allows configuration of the instrument as well as some control operations. While the Certimus is booting up, it displays a white screen with the Güralp logo in the middle and a progress-bar at the bottom. Once the Certimus has booted up completely, the LCD automatically displays the “status”... -
Page 35: Main Menu
Güralp Certimus LCD Display menu Main menu The main menu offers the following options: status • settings • alignment • waveform • maintenance • These are discussed in the following sections. Status The “status” page shows information about serial number, Bluetooth status, time and date, GNSS/PTP status, input voltage and power, humidity, temperature, microSD cards recording status, I.P. -
Page 36: Settings
Güralp Certimus LCD Display menu The messages that can be displayed are: Normal operation: • System OK : GNSS or PTP are locked, microSD cards are recording. ◦ Warnings: • Warning! SD card not fitted : At least one of the microSD cards is not ◦... -
Page 37: Settings → Display
Güralp Certimus LCD Display menu 5.3.1 Settings → display The "display" page allow control of brightness, the inactivity time-out and the orientation of the display. The brightness can be set to be adjusted automatically, based on the ambient • light level, or manually adjusted with the "lower" and "higher" buttons. - Page 38 Güralp Certimus LCD Display menu The current network mode is shown on the main status display: If you select DHCP mode from the network page, you are asked for confirmation but no other configuration is required: If you select static mode from the network page, you are prompted first for the IP...
-
Page 39: Alignment
Certimus. The red circle moves around the screen as the position of the Certimus is altered, mimicking the bubble in a real bubble level; i.e. the red circle moves towards the highest part of the top of the instrument. -
Page 40: Maintenance
Güralp Certimus LCD Display menu In "seismic" mode, the signals from the main acceleration outputs of the Certimus are displayed. In "accel…" mode, the outputs from the internal MEMS accelerometer are displayed. In "auxiliary" mode, the display graphs the output from the internal temperature sensor, the internal supply voltage and the power consumption. -
Page 41: Restore Factory Settings
Note: Once “settings” and “maintenance” are locked, they can only be re- enabled from the Certimus web page. See Section 7.8 on page 55 for more details. MAN-CER-0001... -
Page 42: Installation
Installation Permanent installation You will need a hard, clean surface such as a concrete floor, to install the Certimus. If you are in any doubt about how to install the sensor, you should contact Güralp Systems' Technical Support, via support@guralp.com. -
Page 43: Temporary Installations
The instrument is now installed and transducing ground motion. Temporary installations The Certimus is ideal for monitoring vibrations at field sites, owing to its ruggedness, high sensitivity and ease of deployment. Temporary installations will usually be in hand-dug pits or machine-augered holes. Once a level base is made, the accelerometer can be sited there and covered with a box or bucket. - Page 44 Güralp Certimus Installation 4. Install the sensor as above, then cover and back-fill the emplacement with soil, sand, or polystyrene beads. 5. Cover the hole with a turf-capped board to exclude wind noise and to provide a stable thermal environment.
-
Page 45: Direct Burial
Güralp Certimus Installation Direct Burial MAN-CER-0001 Issue D - December, 2020... -
Page 46: Installation In Hazardous Environments
Installation Installation in Hazardous environments The fully enclosed, aluminium case design of the Certimus makes it suitable for use in hazardous environments where electrical discharges due to the build up of static charge could lead to the ignition of flammable gasses. To ensure safe operation in... -
Page 47: System Configuration
Web Page”. Alternatively, the web interface can be viewed by navigating to the LAN address of the instrument from any standard web browser. Note: Some changes in the settings require a system reboot to be applied. This is notified on the top right of the Certimus web page with the Reboot Required message . - Page 48 Logging in with the administrator account unlocks all the configuration and control features available in the Certimus web page. The default user-name for the administrator user is admin with password admin.
-
Page 49: System Status
Serial number: the serial number of the Certimus; • Firmware version: the DIG firmware version running on the Certimus; • IPv4 address: the static or Dynamic LAN I.P. address of the Certimus; • SEED network and station: Network and Station SEED codes of the Certimus; •... -
Page 50: Station Meta-Data
In this mode, it is possible to specify the I.P. address, the Net Mask and the address of the Gateway (default router), as shown: Before any changes made here will take effect, the Certimus must be re-booted. To do this, click the button on the “Data Record”... -
Page 51: Ntp (Network Timing Protocol) Configuration
Güralp Certimus System configuration Note: By default, the static I.P. address assigned to each Certimus is unique and derived from the specific serial number of the device. These addresses are in the default network for link-local (APIPA) addresses: 169.254.0.0/16 (in CIDR notation). -
Page 52: Wifi
WiFi The Certimus can act as a WiFi client, connecting to an existing WiFi network. Both open and secure (WEP, WPA and WPA2) networks are supported. Note: The Certimus does not function as WiFi access point (AP) so it is not possible to connect a WiFi-enabled laptop, for example, directly to the unit. -
Page 53: Wifi Connection Status
7.5.3 Changing WiFi networks A different network can be selected from the "Access Points" drop-down menu – and the new password entered – while the Certimus is still connected to a network. The instrument will not connect to the new network until the button is clicked. -
Page 54: Gdi Push (Auto-Connection)
Güralp Certimus System configuration GDI push (auto-connection) A Certimus normally acts as a GDI server, where a client initiates a connection in order to pull data from it. This is the mechanism used when the GDI viewer in Discovery is launched. -
Page 55: Qscd
Controlling the LCD from the web interface In the “Setup” tab of the Certimus web page, the user can remotely control the LCD display settings. Locking and unlocking of the “settings” and “maintenance” features can be selected using the drop-down menu named “Display settings”:... - Page 56 Once disabled, touching the screen has no effect and no commands can be issued via the LCD. To restore normal operation, set "Touch sense" to "Enable" from the Certimus web page. Note: "Touch sense" can be re-enabled only from the web interface. It is not possible to re-enable it using the LCD screen.
-
Page 57: Data Storage
This page allows to configure the recording channels available in the Certimus. The names and contents of each file are described in Section 11 on page 151. Note: When changing a setting in the Certimus web page, ensure that you wait until the page refreshes before changing another setting. This allows time for the previous change to take effect. -
Page 58: Storage
(see Section 7.14.5 on page 88). Upon changing the sample rate, enabling a transform or changing Location and Channels codes, the Certimus will need to be restarted for the changes to come into effect; this can be done by pressing the button. -
Page 59: Microsd Card Re-Formatting
Güralp Certimus System configuration Data are stored on the microSD cards in miniSEED format. Each channel is saved as a series of 128 MiB files. Instrument and station meta-data (e.g. instrument response, coordinates, compression type etc.) are stored in "Dataless SEED" format. -
Page 60: Microsd Card Data Flushing And Unmounting
Güralp Certimus System configuration Note: A series of tests separated only by quick formats can leave some files with residual data in them. This is not normally a problem because a deployment will typically create data-sets longer than any test, over- writing any data remaining from the tests. -
Page 61: Download Recorded Data
Güralp Certimus System configuration button flushes the data from the buffers into the microSD cards and interrupts the recording. The recording restarts if a new card is inserted in the slot or if a quick-format (or full-format) is performed. 7.10.4 Download recorded data The “Storage”... -
Page 62: Downloading Data For Specific Time-Intervals
Güralp Certimus System configuration Multiple files can be downloaded simultaneously by ticking the boxes on the left of each link and clicking on button. The microSD cards are formatted with empty files which are filled with data as they become available. The file-names are also changed when the files are written to. -
Page 63: Bulk Data Extraction Via Network
Linus PC or from the WSL shell on a Windows PC: It extracts all files from the SD Card into a directory named after the date and the network address of the Certimus. #!/bin/bash... -
Page 64: Time Based Data Extraction Via Network
= UTCDateTime(start).timestamp #We use the 'start'&'end' to cut the data using Obspy endUNIX = UTCDateTime(end).timestamp # We use the 'startUNIX'&'endUNIX' to pull the # data from the Certimus if os.path.exists(r"{0}\tt.mseed".format(temp)): # See if temp file exists, if so delete. os.remove(r"{0}\tt.mseed".format(temp)) print(r"http://{0}/data? -
Page 65: Bulk Data Extraction
PC/laptop. Within a few seconds, the card should appear as a removable disk/drive. A microSD card formatted for the Certimus contains many "hidden" files. They are created at format time with no contents and then renamed, unhidden and filled with data as required. -
Page 66: The Contents Of The Microsd Card
Güralp Certimus System configuration 7.10.9 The contents of the microSD card The root directory of the disk contains seven items: a file named init.log. This “write-once” file contains the first 32 MiB of • system log information since the card was last formatted;... - Page 67 Güralp Certimus System configuration The typical contents of the all_miniSEED_files_are_in_here directory looks like this: The file-name consists of four components: The stream name, truncated to 16 characters – see Section 11 on page 151 for a • full list of these;...
-
Page 68: Request Data From Microsd Card
Discovery can be used as viewer of seismic data locally recorded in the microSD card of a Certimus. Select the Certimus of interested, right-click and choose “Data calendar view” to open the complete list of streams. The calendar shows two weeks of data preceding the time when the request is sent and it includes all the available channels recorded in the microSD card, distinct by stream name and predefined colour. - Page 69 Use the mouse-wheel scrolling (or track- / touch-pad scrolling on a laptop) or highlight a portion of data, right-click and select “Zoom in” to zoom into the data. Multiple channel are selectable using key In Discovery, right-click on the Certimus of interest and select “Live View” “GDI” to →...
- Page 70 Güralp Certimus System configuration In the calendar window select the portion of data to backfill into the viewer. Right- click and select “Request backfill”. The requested data is automatically imported in the GDI data viewer in Discovery. Note: The time required to upload the data depends on the window duration and the sample rate.
-
Page 71: Data Transmission
This page allows to configure the transmitted channels available in the Certimus. The names and contents of each channel are described in Section 11 on page 151. Note: When changing a setting in the Certimus web page, ensure that you wait until the page refreshes before changing another setting. This allows time for the previous change to take effect. -
Page 72: Scream! (Gcf Format + Scream Protocol)
(see Section 7.14.5 on page 88). Upon changing the sample rate, enabling a transform or changing Location and Channels codes, the Certimus will need to be restarted for the changes to come into effect; this can be done by pressing the button. -
Page 73: Gdi-Link Protocol
Earthworm software (www.isti.com/products/earthworm/) • GDI-link supports both data push and pull from/to the Certimus. See Section 7.6 on page 54 to configure data push to one or more remote clients, e.g. NAM. GDI-link provides a highly efficient, low latency method of exchanging data via TCP between seismic stations and data centres. -
Page 74: Seedlink Protocol
System configuration 7.11.3 SEEDlink protocol The Certimus can act as a SEEDlink server to send miniSEED data packets over a network connection. The SEEDlink server is enabled by default but it can be disabled and re-enabled if desired. The server has a configurable back-fill buffer. - Page 75 The number of samples in each packet, therefore, depends both upon this setting and on the sample rate. In the “Network” tab of the Certimus web page select the interval in deciseconds (1 decisecond = 100 ms or 0.1 seconds) between miniSEED packets.
- Page 76 DG_TEST_00_HNZ, 415 samples, 100 Hz, 2016,257,10:44:06.930000 (latency ~3.0 sec) ⋮ The SEEDlink server on the Certimus also supports the use of the “?” character as a wild-card within network, station and channel codes. This allows you to request multiple streams using a single command.
- Page 77 Güralp Certimus System configuration 7.11.3.1 MiniSEED extractor The miniSEED extractor serves two purposes: When an SD card is quick-formatted, each file is marked as unused but • previously recorded data can still remain in them. Subsequent recordings overwrite these files from the beginning but, if the previous recording had a longer duration, old data will remain in the files.
-
Page 78: Synchronisation Of The Sample-Clock
7.12 Synchronisation of the sample-clock The Certimus system synchronises its sample clock using an attached GNSS receiver or, if that is not available, Precision Time Protocol (PTP). The currently supported GNSS systems are Navstar (GPS), GLONASS, BeiDou and Galileo. - Page 79 Güralp Certimus System configuration Number of available satellites (in use / in view) • MAN-CER-0001 Issue D - December, 2020...
-
Page 80: Precision Time Protocol (Ptp)
Güralp Certimus System configuration 7.12.2 Precision Time Protocol (PTP) The Certimus system supports timing provided through PTP. The IEEE 1588 Precision Time Protocol (PTP) is a network protocol which uses modified network hardware to accurately time-stamp each PTP packet on the network at the time of transmission, rather than at the time that the packet was assembled. - Page 81 Güralp Certimus System configuration In the “Status” tab of the Certimus web page, a number of reporting parameters are given, including: PTP state • Last PTP time-stamp and last PTP lock date/time • PTP Stability: • Standby PTP is running but timing is provided by GNSS;...
-
Page 82: Deploy Modes
7.13 Deploy modes: The Certimus digitiser offers a number of deployment modes: "Normal" and "Full Power Save", "GPS power-save" , “LAN Power Save”, “LAN & GPS Power save” mode makes a number of configuration changes in order to reduce the unit's power consumption. -
Page 83: Full Power Save
Once in deploy mode, the only way to re-enable the Ethernet module is to connect to the Certimus via a serial connection (see Section 10 on page 145) or to use the GüVü Bluetooth app (see Section Error: Reference source not found on page Error:... -
Page 84: Configuration And Control Of The Seismometer
Güralp Certimus System configuration The application of PoE causes the system to boot in full mode. Access to the WEB page is possible at this point so the power modes can be reset. Standard record channel Fixed rate channel 7.14 Configuration and control of the seismometer 7.14.1 Seismometer... -
Page 85: Sensor Centring
Güralp Certimus System configuration 7.14.2 Sensor centring The Certimus seismometer automatically centres when it is powered up. To manually re-centre click on “Re-centre” button under the “Digital Sensors” section in the Setup tab. The Automatic centring function can be disabled – select “Centring Mode” to off. -
Page 86: Output Polarity
Güralp Certimus System configuration 7.14.3 Output polarity The polarity of output from each component of the instrument is as follows: Direction of ground Polarity of Z Polarity of N/S Polarity of E/W acceleration output output output Upwards positive zero zero... -
Page 87: Instrument Response Verification
Güralp Certimus System configuration 7.14.4 Instrument Response Verification Instrument response can be verified by exciting the instrument with a signal and measuring its response. There is a signal generator built in to the system which can generate a number of different signals. For measuring the frequency response, Güralp recommends the use of white noise. -
Page 88: Instrument Response Parameters
Güralp Certimus System configuration 7.14.5 Instrument response parameters Calibration is a procedure used to verify or measure the frequency response and sensitivity of a sensor. It establishes the relationship between actual ground motion and the corresponding output voltage. Calibration values, or response parameters, are the results of such procedures. - Page 89 A calibration procedure is also used to establish the relationship between the input voltage that a digitiser sees and the output, in counts, that it produces. The results are traditionally expressed in volts per count. Each Certimus is programmed at the factory so that it knows its own calibration values.
- Page 90 The ADC offset is the quiescent output seen when digitiser input is zero. This • field will be populated automatically with the correct value for this input channel of the Certimus. The Coil constant is the coil constant for the component being calibrated, in •...
- Page 91 RESP, by clicking on the “RESP file” link of each channel in the “Data flow” and “Data record” tab of the Certimus web page. Clicking on a RESP file link produces a page like this:...
- Page 92 Güralp Certimus System configuration Right-click anywhere and select “Back” to return to the Certimus web page. To save a RESP file, right click on it in the main list and select "Save Link": Note: RESP files are not available for channels that have a transform enabled.
-
Page 93: Setting Sensor Orientation And Depth Parameters
The procedure is explained at https://www.guralp.com/howtos/determining-sensor-orientation. The Relative Orientation extension of Scream! provides a correction angle that can be entered into the Sensor Orientation section of the Certimus web page. Note: The input rotation is automatically applied to both transmitted and recorded data. -
Page 94: Transforms
The Dip (tilt angle from vertical), Azimuth (tilt direction from North) and Depth of Certimus can be set in the “Setup” tab of the web interface in the section “Instrument Installation Parameters”. The instrument to which the displayed parameters apply is selected using the drop-down menu. - Page 95 Transform functions are enabled or disabled from the “Data Stream” and “Data Record” tabs for each channel. Note: To enable or disable a transform on any channel, it is necessary to reboot the Certimus. Transforms can be applied only on enabled channels. The available transforms are: Pass-through –...
-
Page 96: Pass-Through
Güralp Certimus System configuration To use customised parameters, visit the “Transform” tab and select the “Saved User Parameters” option in the “Parameter Source” drop-down menu. Type in the required parameters and then click to store them. It is possible to switch... -
Page 97: St Order Lpf
Güralp Certimus System configuration 7.16.3 1 order LPF This transform applies a first-order low-pass filter to the input data. The single configurable parameter is "Corner Frequency": this specifies, in Hz, the frequency at which the output power is attenuated by -3 dB. Above this frequency, output power is attenuated by a further 6 dB per octave or 20 dB per decade. -
Page 98: St Order Band/Notch Filter
Güralp Certimus System configuration The output is the difference between a low-pass filtered copy of the signal and the unfiltered signal. The single configurable parameter is "Corner Frequency": this specifies, in Hz, the frequency at which the output power is attenuated by -3 dB. Below this frequency, output power is attenuated by a further 6 dB per octave or 20 dB per decade. -
Page 99: Nd Order Biquad
Güralp Certimus System configuration The configurable parameters are the "High Pass Frequency" (HPF corner frequency as defined in Section 7.16.4 on page 97) and the “Low Pass Frequency” (LPF corner frequency as defined in Section 7.16.3 on page 97). 7.16.6 2 Order biquad This transform applies a second-order bi-quadratic filter to the input data. -
Page 100: Integration
Güralp Certimus System configuration 7.16.7 Integration This transform integrates the input data, e.g. if the selected channel unit is velocity ), the output produced is displacement (m). The integration transform is implemented as a configurable chain of three components: A DC filter (2 order high-pass bi-quadratic) removes any DC component, •... -
Page 101: Double Integration
Güralp Certimus System configuration 7.16.8 Double Integration This transform integrates the input data twice so, for example, if the selected channel is acceleration (ms ), the output produced is displacement (m). Analogously to the single integrator, the double integrator applies an initial DC high- pass filter and then two further high-pass filters, one at the output of each integrator. -
Page 102: Eew Parameter Observer
Güralp Certimus System configuration Apply DC filter, first integrator, interstage HPF, second integrator and ◦ second output HPF. 7.16.9 EEW Parameter Observer When an EEW trigger occurs (or is simulated – see below), the peak ground motion values (Peak Ground Acceleration (PGA), Peak Ground Velocity (PGV) and Peak... -
Page 103: Sta/Lta Ratio
Güralp Certimus System configuration "DC Cut-off Frequency": this specifies the -3 dB point (in Hertz) for the initial • high-pass filter; "Interstage Cut-off Frequency": this specifies the -3 dB point (in Hertz) for the • first integrator output high-pass filter. This is only used when the input signal is acceleration;... - Page 104 Güralp Certimus System configuration transform calculates the ratio between the result of the Short Term Average filter and the Long Term Average filter. The input signal is passed through a high-pass filter which removes any DC offset. The configurable parameters are: "DC Frequency (Hz)": this specifies the corner frequency (-3 dB point) in Hertz...
-
Page 105: Three-Dimensional Rotation
Güralp Certimus System configuration 7.16.11 Three-dimensional rotation This transform rotates three velocity/acceleration seismic components in space. Rotations are represented by unit quaternions (in preference to the more usual Euler angles: yaw, pitch and roll) because they are unambiguous and avoid the problem of gimbal lock. -
Page 106: Qscd Sender (Triplet)
QSCD calculations are implemented using transforms and configured via the Data Stream tab of the Certimus web page. The three input channels must all be configured with the QSCD (triplet) transform. (The transform is disabled if the sample rates of the input streams do not match.) -
Page 107: Mma Logger
Güralp Certimus System configuration In the Transform tab, the parameter “Period length” configures the number of samples to include in a QSCD packet. For example, QSCD20 requires the sample rate of the streams to be 20 sps so the “Period length” must be set to 20 (samples), in order to send a packet every second. -
Page 108: Earthquake Early Warning
Güralp Certimus System configuration 7.17 Earthquake Early Warning The “Trigger” tab is dedicated to Earthquake Early Warning settings. These are disabled by default because of the amount of processing resource – and hence, power – consumed by triggering calculations. The Triggers section of the web page enables the user to configure the triggering system. -
Page 109: Trigger Sources
Remote Source: This setting is used for multiple-source • triggering networks. The sources specified here are other Certimus or Minimus based instruments, specified by the I.P. addresses configured in the “Remote Inputs” section: The configurable fields in these cases are: Score: this assigns a number of points to this trigger. - Page 110 See Section 7.17.2 on page 112 for more information. Sensor number: this drop-down menu is required to enables the trigger on ◦ one of Sensor0, the Certimus. Tap: this drop-down menu select the stream to use as input of the trigger ◦...
- Page 111 Güralp Certimus System configuration “Timeout”: specifies the time to wait (in seconds), after the • threshold crossing, before accepting a new event; “Hysteresis Percentage”: defines the hysteresis point in terms of • percentage of threshold value below or above threshold. The hysteresis point is below the threshold for High Mode, above the threshold for Low Mode.
-
Page 112: Trigger Destinations
Güralp Certimus System configuration 1: shows the 3D resultant vector of Z, N and E components. 3D • resultant is shown in place of E/W component. Z and N/S components show normal seismic output. 7.17.2 Trigger destinations The options available form the various Destination fields are: CAP receiver: When a trigger is declared, the system will issue •... - Page 113 CAP Msg HMAC Key: a shared key used for signing the CAP message. All ◦ CAP messages generated by Certimus are signed. The user should set this key to a private value. The HMAC digest can then be used to both authenticate the sender and validate the contents of CAP messages by anyone who is privy to the shared key.
-
Page 114: Low Latency Mode
7.17.3 Low Latency Mode In the “Setup” tab, the “Low Latency Mode” drop-down menu controls the processor workload that affects the power-consumption of the Certimus. This control can be MAN-CER-0001 Issue D - December, 2020... -
Page 115: Cap Receiver
Güralp Certimus System configuration used to prioritise power-consumption at the expense of latency, to balance the two or to optimise latency regardless of the power consumption. Three settings are available: Minimum Power slow processing / higher latency; ⇒ "55" ⇒... - Page 116 Güralp Certimus System configuration The CAP receiver window allows specification of the listening port. Each Certimus from which messages should be received must have this value specified as the “CAP Port” in its triggering settings (see Section 7.17.2 on page 112). The value should be between 1025 and 65535.
-
Page 117: Seismic Event Table
This action does not affect the contents of the log-file. 7.17.5 Seismic Event Table The Certimus can generate a “Seismic Event Table”. This is list of events detected by the STA/LTA or threshold trigger enabled on taps. It contains information about the time when the event occurred, its duration, the channel that generated the trigger and the peak magnitude of the event. - Page 118 Güralp Certimus System configuration The table is located at the bottom of the “Trigger” tab in the Certimus web page. The Certimus allows the download of event data in miniSEED format in a time range that is user selectable. The user can select how many seconds before and after the event detection to include in the miniSEED file.
-
Page 119: Using A Registry
7.18 Using a registry Discovery can maintain a list of all Minimus and Certimus units in a local or cloud- based registry, simplifying management of medium to large networks and removing the need for static IP addresses at telemetered stations. Registered digitisers appear in the selection list in the main screen, regardless of whether they are on the local network or not. -
Page 120: Registry Management
IP address. 2. Choose one or more Group IDs for your digitisers 3. Set the Registry server address and Group ID in each Minimus/Certimus MAN-CER-0001 Issue D - December, 2020... -
Page 121: Configuring A Certimus For Use With A Registry
The address of the registry server and the chosen Group ID must be set individually for each participating Certimus. To do this, first connect the Certimus to the same network as a PC running Discovery and click the button, so that the Certimus appears in the main Discovery list. -
Page 122: Configuring Discovery For Use With A Registry
2. Type the chosen Group ID in the “Cloud registry group identifier” field and click Return to the main windows and test the configuration by clicking the button. All Certimus using the same Registry server and Group ID should appear in the main list. MAN-CER-0001... -
Page 123: Registry Mode: Using Wan Or Lan Addresses
Güralp Certimus System configuration 7.18.5 Registry mode: using WAN or LAN addresses When Discovery displays a list of devices found from a local scan, all access to those systems is initiated via the LAN address. When displaying a list of registered devices, you have the option of using either the LAN address or the WAN address. - Page 124 Güralp Certimus System configuration Entries for firmware updates, system and GDI configuration and web page access all now use the LAN address rather than the WAN address. In addition, all options on the Live View sub-menu use the LAN address:...
-
Page 125: Updating Certimus Firmware
Certimus digitiser. See Section 14.5 on page 168 for more details. If you have any recorded data that you value, backup all files from the Certimus microSD card: 1. Unplug the external microSD card from your Certimus. - Page 126 Güralp Certimus System configuration 3. In the “Firmware Update” tab, select “Güralp server – stable (online version: 2.0-****)” to obtain the new firmware from the Internet via a local Ethernet connection. Click MAN-CER-0001 Issue D - December, 2020...
- Page 127 Güralp Certimus System configuration Caution: If updating from any release of v1.2 to v2.0, select the option “Güralp server – version 2.0-**** (online)” only. Do not use “Local file” option unless agreed case-by-case with support@guralp.com. If updating from any release of below v1.2, contact support@guralp.com...
- Page 128 6. Discovery will confirm through another dialogue box that the file download is complete. Click to begin the firmware upload to the Certimus. 7. At the end of the uploading process, the dialogue box will ask to restart the Certimus. Click to finalise the process.
-
Page 129: Import / Export An Existing Configuration
13. Go to the “Status” tab of the Certimus web page. 14. Check that your Certimus firmware version is as expected. 15. Check that nothing red or yellow shows up in the “Status” tab of the Certimus web page. 7.20 Import / Export an existing configuration Updating the Certimus’... - Page 130 Güralp Certimus System configuration Select "Use configuration from one of the devices". If more than one device is available, select the one from which the configuration should be downloaded. Click button and browse to a suitable location (on your PC) into which to save the configuration file.
-
Page 131: Control Centre
7.21 Control Centre Several actions can be taken from within Discovery to control your Certimus digital accelerometer. These operations can be performed by right-clicking on the digitiser’s entry in the list and select “Control Centre” from the context menu. The meanings of the icons... -
Page 132: Mass Centring
±90°. To perform a manual centring of the masses, launch the Control Centre by right- clicking on the device in the Discovery main window. The Certimus is identified with the title “Instrument 1”. - Page 133 Güralp Certimus System configuration The mass positions can be adjusted manually: click the button to decrease the mass position value (i.e. make it less • positive or more negative). click the button to increase the mass position value (i.e. make it more •...
-
Page 134: Instrument State Of Health (Soh)
Güralp Certimus Instrument State of Health (SoH) Instrument State of Health (SoH) There are multiple ways of reporting and viewing the SOH of an instrument. Many of these are based on the network connection an can be scripted, fetched by HTTP or Discovery or the users application code. -
Page 135: Http And Web
Güralp Certimus Instrument State of Health (SoH) HTTP and web page access Several files containing data can be downloaded from the in-built WEB server. 8.2.1 ASCII Text status http://1.2.3.4/status.txt MAN-CER-0001 Issue D - December, 2020... -
Page 136: Station Xml
Güralp Certimus Instrument State of Health (SoH) 8.2.2 Station XML http://1.2.3.4/station.xml MAN-CER-0001 Issue D - December, 2020... -
Page 137: Dataless Seed
Güralp Certimus Instrument State of Health (SoH) 8.2.3 Dataless Seed This can be extracted dy downloading the DG.dataless file from the Storage TAB of the WEB interface. The same file is available by direct url http://1.2.3.4./DG.dataless 8.2.4 System Configuration http://1.2.3.4/config.txt returns name/value pairs of WEB interface parameters 8.2.5 Instrument response... -
Page 138: Güvü App
) to enable Bluetooth connectivity (if not already enabled) and to search for available devices with which to pair. 4. Select the appropriate Certimus device from the list of available devices. Wait a few seconds for the main viewer screen to show. - Page 139 Güralp Certimus GüVü app Once the device is connected, the main view of the app will be displayed. This screen displays a number of status indicators associated with both the digitiser and accelerometer. These features are summarised in the figure below:...
-
Page 140: View Settings
Güralp Certimus GüVü app Access the menu by pressing the menu icon ( ) on the main instrument status window: View settings The user can customise the view of the main instrument status window. Four different view options can be cycled through by tapping the menu icon (... -
Page 141: Instrument Control
Güralp Certimus GüVü app Instrument control Several features of the Certimus can be controlled and configured remotely over Bluetooth using GüVü: Mass centring • Clearing and un-mounting SD card • Rebooting the Certimus • Station meta-data (User Label, Station Name, Network Code, Site Name) •... - Page 142 Güralp Certimus GüVü app Note: After any modification to station settings, the Certimus must be rebooted before the changes will take effect. These options can be accessed by tapping the menu icon ( ) and choosing the "Device control" option. To access the instrument control and configuration sub-...
-
Page 143: Setting The Pin Code
Güralp Certimus GüVü app The default PIN code used to access the Instrument Control menu is "0000". Caution: Güralp recommends changing the PIN code from the default, as described in the following section, in order to maintain station security. Setting the PIN code The PIN code for accessing the instrument control menu of GüVü... - Page 144 Güralp Certimus GüVü app MAN-CER-0001 Issue D - December, 2020...
-
Page 145: Advanced Troubleshooting
Advanced troubleshooting In the unlikely event of the user experiencing problems with the operation of the Certimus, a diagnostics tool is available via the GNSS connector, which also acts as a terminal communications device via a Serial connection. The user should first plug in the serial adapter to the GNSS connector, which is then... -
Page 146: Reset All Settings During Boot Phase
@GURALP SYSTEMS and the firmware version number is displayed, key . This causes all settings (except Username, Password and Bluetooth PIN) to revert to their factory default values, and the Certimus will re-boot. It may be necessary to enter this key combination several times. - Page 147 Once the “@GURALP SYSTEMS” banner has been printed, keying (at least once) will cause all settings (except Username, Password and Bluetooth PIN) to revert to their default values and cause the Certimus to reboot. v2.0-7642 by teamcity on 10:41:19 12-Nov-2019 Vecbase: 300000 CPUid: 410fc051 Cache: c5187d...
- Page 148 0.07 | -> fram_init Installing NVR device. size 12640 0.10 | -> net_sockets_init 0.14 | -> newtask_init USE ADC Certimus 0.14 | -> display_init i2c_rd S_FAILED [bus: 2 | slave: 0x38] i2c_rd S_FAILED [bus: 2 | slave: 0x38] i2c_rd S_FAILED [bus: 2 | slave: 0x38]...
- Page 149 Güralp Certimus Advanced troubleshooting 2.70 | -> analog232_init 2.73 | -> start_timers 2.76 | -> spi_datalink_init_semaphores 2.79 | -> chain_init Using 251 coefficients. 2.87 | -> var_user_init 3.20 | -> calibration_init 4.86 | -> gcftx_init 4.89 | -> spi_datalink_chains_init Sensor0 is accelerometer 5.15 | ->...
- Page 150 Once the boot-up reaches this stage, pressing will no longer have any effect. was recognised during the second stage of boot-up, then the Certimus will reset and re-boot: Ctrl+R NVR load, resetting all vars to their default values and then rebooting...
-
Page 151: Appendix 1 - Instrument/Channel Names
Güralp Certimus Appendix 1 – Instrument/channel names Appendix 1 – Instrument/channel names The tables in this section show the names and codes of the streamed channels along with the record names and channel codes for recorded data. The first character “x”... - Page 152 Güralp Certimus Appendix 1 – Instrument/channel names Data streaming Data recording Mini Digital Live Sensor Comp. SEED filter Live stream name Stream Data record name channel mode code code Acausal S0MagN 0MAG20 S0MagN Acausal S0MagE 0MAG30 S0MagE Input voltage Acausal S0Voltage...
-
Page 153: Broadband Accelerometer Channels
Güralp Certimus Appendix 1 – Instrument/channel names 11.2 Broadband accelerometer channels Data streaming Data recording Mini Digital Live Sensor Comp. SEED filter Live stream name Stream Data record name channel mode code code S0SeisZ 0ACCZ0 S0SeisZA Acausal Vertical S0SeisZ 0ACCZ2... -
Page 154: Appendix 2 - Certimus Network Ports
Güralp Certimus Appendix 2 – Certimus network ports Appendix 2 – Certimus network ports The following network ports are used by the Certimus: Port Layer 4 Protocol Description HTTP server 1565 GDI transmission protocol 1567 TCP/UDP GCF transmission protocol 4242... -
Page 155: Appendix 3 - Connector Pin-Outs
Güralp Certimus Appendix 3 – Connector pin-outs Appendix 3 – Connector pin-outs 13.1 Ethernet This is an Amphenol RJField-series 8P8C connector. It consists of a standard ISO 8877 8P8C modular socket (often called RJ45) in a bayonet mounting compatible with MIL-DTL-26482 (formerly MIL-C-26482). -
Page 156: Power
Güralp Certimus Appendix 3 – Connector pin-outs 13.2 Power This is a standard 4-pin military-specification bayonet plug, conforming to MIL-DTL-26482 (formerly MIL-C-26482). Function Ground 10-36 V DC input not connected not connected Wiring details for the compatible socket as seen from the cable end (i.e. -
Page 157: Gnss/Serial
Güralp Certimus Appendix 3 – Connector pin-outs 13.3 GNSS/serial This is a 14-pin LEMO EEG.1K socket. Suitable mating connectors can be found in the LEMO FGG.1K.314 range. To engage the mating connector, line up the • red marks and push firmly home. -
Page 158: Appendix 4 - Güralp Discovery Installation
Güralp Certimus Appendix 4 – Güralp Discovery installation Appendix 4 – Güralp Discovery installation Güralp Discovery is a software package for Microsoft Windows, MAC and Linux, which facilitates the identification, configuration and management of Güralp digitisers and instruments. Güralp Discovery has a conventional .msi -based installer. Once installed, the software can check whether it is the current version and can update itself using a button on the Help About menu. -
Page 159: Installation In Mac
Güralp Certimus Appendix 4 – Güralp Discovery installation The script proceeds through the following installation stages: A confirmation prompt: Guralp Discovery will be installed in: /opt/guralp/discovery. [C]ontinue/[A]bort Type to continue installation in listed directory, or to abort and change directory using the -o execution parameter 2. - Page 160 Güralp Certimus Appendix 4 – Güralp Discovery installation 2. Either save the downloaded file on a local drive, or automatically open it with DiskImageMounter. If you saved the file to disk, navigate to the download location and open Discovery.dmg with DiskImageMounter.
- Page 161 Güralp Certimus Appendix 4 – Güralp Discovery installation 4. Successful mounting should result in the display of the Discovery drag and drop installation window: Drag and drop discovery.app to the Applications folder. 6. When finished, the installation is complete and the Discovery app can be found in Launcher or Applications folder in Finder.
-
Page 162: Installation In Windows
Güralp Certimus Appendix 4 – Güralp Discovery installation 14.3 Installation in Windows To install Güralp Discovery on a Windows machine: Download the appropriate installer – 32-bit or 64-bit – from https://www.guralp.com/sw/download-discovery.shtml 2. Double-click the downloaded file. You may be asked whether you wish to continue: answer yes. - Page 163 Güralp Certimus Appendix 4 – Güralp Discovery installation 4. The next screen asks whether you would like to place an icon for Discovery on the desktop: Tick the check-box if you wish and then click , key or key to continue.
- Page 164 Güralp Certimus Appendix 4 – Güralp Discovery installation 6. Once you have clicked , the installation begins and a progress screen is displayed: Pressing or keying now will remove all of the installed files (except the installer itself) and reverse any changes made so far.
-
Page 165: Configuring Windows Firewall
Güralp Certimus Appendix 4 – Güralp Discovery installation 14.4 Configuring Windows Firewall Windows Firewall can interfere with Discovery’s ability to send information to instruments and/or receive information from instruments over the network. If you use Windows Firewall, you should make special provision for allowing Discovery to communicate, as described in this section. - Page 166 Güralp Certimus Appendix 4 – Güralp Discovery installation communicate with networked devices in the “Domain” profile, the “Private” profile or the “Public” profile. (Profiles are also known as “network locations”.) The “Domain” profile applies to networks where the host system can authenticate to a domain controller.
- Page 167 Güralp Certimus Appendix 4 – Güralp Discovery installation 6. Highlight the “discovery” line and then click the button. The “Edit an app” window is shown: 7. Click the button. The “Choose network types” window is shown: 8. After making appropriate changes, click first in the “Choose...
-
Page 168: Update
Güralp Certimus Appendix 4 – Güralp Discovery installation 14.5 Update If a PC running Güralp Discovery has an Internet connection, Discovery can check whether an update is available. To initiate this, click About from the Help menu or type followed by A screen like the following is displayed: The currently installed version is shown. - Page 169 Güralp Certimus Appendix 4 – Güralp Discovery installation If a newer version is available, the screen will look like this: If you with to proceed with downloading the newer version, click the button. This does not commit to an immediate upgrade: it just downloads the installer.
- Page 170 Güralp Certimus Appendix 4 – Güralp Discovery installation When the download is complete, the following screen is displayed: If you wish to complete the installation immediately, click . If you would rather defer the installation, click and run the installer at a more convenient time.
- Page 171 Güralp Certimus Appendix 4 – Güralp Discovery installation The screen provides three check-boxes which indicate whether Discovery can communicate with networked devices in the “Domain” profile, the “Private” profile or the “Public” profile. (Profiles are also known as “network locations”.) The “Domain”...
-
Page 172: Appendix 5 - I.p. Address Configuration On Pc Or Laptop
With APIPA (Automatic Private I.P. Addressing), a laptop or PC can automatically configure itself with an IP address in the range 169.254.0.1 to 169.254.255.254. The default subnet mask is 255.255.0.0. Connect the Certimus to the laptop or PC using the blue Ethernet cable and power it 15.1 On Linux... -
Page 173: On Macos
, in the lower-left corner of the window, then click "Make Service Inactive." Click the "Apply" button to disable the NIC (Network Interface Card). 3. With the Certimus connected and powered up, click the button again, click "Make Service Active" and click "Apply" to re-enable the NIC. -
Page 174: On Windows
Güralp Certimus Appendix 5 – I.P. address configuration on PC or Laptop 15.3 On Windows On a Windows computer, key to open the "Run" dialogue, enter ncpa.cpl and key Right-click on the network adapter which is connected to the CertimusCertimus and select “Disable”... -
Page 175: Appendix 6 - Lcd Menu Map
Güralp Certimus Appendix 6 – LCD menu map Appendix 6 – LCD menu map MAN-CER-0001 Issue D - December, 2020... -
Page 176: Revision History
Güralp Certimus Revision History Revision History 2020-12-01 Additions to SoH 2020-01-06 Corrected labels for main illustration in system description. 2019-12-02 Updated web page screenshots. Updated Data Stream and Data Storage. Updated stream and file names. Updated and added Transforms. Updated EEW and Triggering.
Need help?
Do you have a question about the Certimus and is the answer not in the manual?
Questions and answers