
Related Manuals for Güralp CMG-EDU


Summary of Contents for Güralp CMG-EDU
- Page 1 CMG-EDU Educational Seismometer System Technical Manual Document Number: MAN-EDU-0001 Issue D – June 2022 Designed and manufactured by Güralp Systems Limited 3 Midas House, Calleva Park Aldermaston RG7 8EA England...
-
Page 2: Table Of Contents
CMG-EDU Contents Table of Contents 1 Introduction........................4 1.1 Unpacking and handling.....................4 1.1.1 Handling notes....................5 2 Installing the CMG-EDU....................6 2.1 Installing in vaults.......................6 2.1.1 Choosing a location.....................6 2.1.2 Temperature stability...................7 2.1.3 Other considerations...................8 2.2 Setting up........................8 3 Viewing data with Scream!...................10 3.1 The main window......................10... - Page 3 CMG-EDU Preliminary Notes 5 Advanced usage......................28 5.1 Using the command interpreter................28 5.2 General configuration....................29 5.2.1 SET-ID.......................29 5.2.2 .IDS........................29 5.2.3 BAUD.........................30 5.2.4 GO........................30 5.2.5 RE-BOOT......................30 5.3 GPS and timing systems..................30 5.3.1 XGPS.........................30 5.3.2 HR-CYCLE......................31 5.3.3 SET-RTC......................31 5.3.4 TIME?........................31 5.3.5 .FIX........................31 5.3.6 .POSITION......................32 5.4 Calibration.........................32...
- Page 4 CMG-EDU Preliminary Notes Preliminary Notes Proprietary Notice The information in this document is proprietary to Güralp Systems Limited and may be copied or distributed for educational and academic purposes but may not be used commercially without permission. Whilst every effort is made to ensure the accuracy, completeness and usefulness of the information in the document, neither Güralp Systems Limited nor any employee...
-
Page 5: Introduction
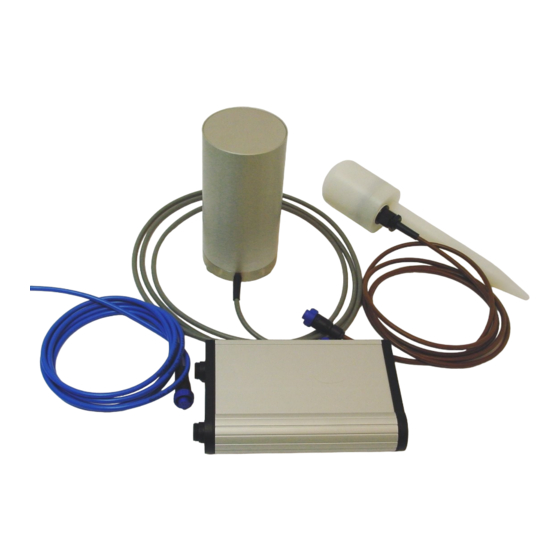
It is available in either vertical or horizontal form. The CMG-EDU is ready to record ground movements as soon as you provide it with power. It does not have to be unlocked or centred as long as its base is within 3 ° of horizontal. -
Page 6: Handling Notes
PC for recording the data. 2.1.1 Handling notes Although the CMG-EDU is relatively rugged, it can be damaged if mishandled. Do not bump, kick or drop the sensor. • Do not kink or walk on the data cable, nor allow it to bear the weight of the •... -
Page 7: Installing The Cmg-Edu
Installing the CMG-EDU Installing in vaults The CMG-EDU is a sensitive instrument designed to measure extremely small movements of the ground. These movements are the sum of all the vibrations arriving at the instrument: as well as distant earthquakes and nearby tremors, the ground responds to surf on nearby beaches, quarry blasts, heavy machinery, traffic, and even people moving around the building. -
Page 8: Temperature Stability
3.1.2 Temperature stability The CMG-EDU can operate over a wide temperature range (–10 °C to +75 °C). However, the sensor mass is sensitive to fluctuations in local temperature. This affects the response of the instrument at long periods. Sunlight and other bright lights can also cause small mechanical stresses that will be detected by the sensor. -
Page 9: Other Considerations
CMG-EDU Installing the CMG-EDU 3.1.3 Other considerations The sensor and cables should be situated well away from other electical • cables and appliances. Stray radiation from these sources may interfere with the sensor's electronics. The sensor should be placed on a smooth, level surface free from cracks. - Page 10 CMG-EDU Installing the CMG-EDU Connect the grey cable attached to the sensor to the SENSOR socket on the • digitizer. Connect the brown cable attached to the GPS unit to the GPS socket on the • digitizer. The remaining blue and grey cables are joined together at a 9-pin RS232 •...
-
Page 11: Viewing Data With Scream
CMG-EDU Viewing data with Scream! Viewing data with Scream! You can use Güralp Systems' Scream! software to view incoming seismic data, record it, and play events back later. Windows and Linux versions of Scream! are freely available from Güralp Systems. -
Page 12: Serial Ports
CMG-EDU Viewing data with Scream! Serial ports . If the Com Ports tab is not visible, bring it to the front. 1. Select File → Setup… If you are running Scream! for the first time, it will automatically bring up this window, together with a short tutorial. -
Page 13: The Stream Buffer
CMG-EDU Viewing data with Scream! down menu to have Scream! attempt to detect it for you. The instrument must be producing data for this to work. You can set all ports to the same baud rate by clicking on the column heading and choosing a suitable value from the drop-down menu. -
Page 14: The Source Tree
CMG-EDU Viewing data with Scream! The source tree The tree in the left panel of the main window shows all the data sources currently connected to Scream!. Scream!'s source tree has two main parts: Files , which contains all the files you have replayed (including automatic replay: see section 5.3 on page 26), and Network ,... -
Page 15: The Stream List
CMG-EDU Viewing data with Scream! If the top half is red , the instrument has not reported a satisfactory timing fix for over an hour. This will happen if the instrument has reported failures (as above), but also if it has not reported anything. If you have set the GPS system to power down for intervals longer than an hour, the icon will turn red even if the system is working normally. -
Page 16: Sorting Options
CMG-EDU Viewing data with Scream! End time and Date : the date and time of the most recent data, as measured by the data's own timestamp. This is not necessarily the latest data to arrive. RIC : The ‘Reverse Integrating Constant’. In effect this is the value of the last sample received. -
Page 17: Waveview Windows
CMG-EDU Viewing data with Scream! Waveview windows The most commonly used features of Scream! are accessed through Waveview windows. You can open as many Waveview windows as you like, on any combination of streams; the same stream can be part of several Waveview windows at once, at several different scales. -
Page 18: Zooming In And Out
CMG-EDU Viewing data with Scream! 4.6.1 Zooming in and out To zoom in and out vertically, click the vertical scale icons at the top left of the window, or use your mouse wheel. The current zoom factor is shown between the icons, as a ratio of pixels to counts. Zooming in and out affects every stream in the window. -
Page 19: Printing
CMG-EDU Viewing data with Scream! The distance between the cursors is given in the text of the Time Cursors or Ampl Cursors icon, in seconds and Hz or counts. You can have both vertical and horizontal cursors active at the same time. Because the limit of accuracy of the cursors is one pixel, you should zoom in to the range of interest before measuring. -
Page 20: Other Icons
CMG-EDU Viewing data with Scream! You can save this data to a file by clicking Save…: Select the directory and format for the file, and click OK to save the data with one file for each stream (using the format shown.) Some formats support multiple streams per file. -
Page 21: Viewing Status Streams
CMG-EDU Viewing data with Scream! Click the Bandpass Filter icon to make Scream! apply a band-pass filter to each of the displayed streams. This is most useful when long-period signals are causing the baseline to vary. The pass band is set as follows: Data at 1 or 2 samples/s is filtered with a 10 –... -
Page 22: Recording And Playback
CMG-EDU Recording and playback Recording and playback Scream! allows you to record all incoming data and store it on the local hard disk. To do this, you should select the streams you want to record from Scream!'s main window, right-click, and choose Start recording from the pop-up menu. The streams will display Yes in the Rec. - Page 23 CMG-EDU Recording and playback Auto Record—Enable for Data Streams causes all local data streams to be saved automatically, whilst Auto Record—Enable for Status Streams does the same for digitizer status streams (those ending in 00.) Auto-upload on heartbeat : If a digitizer has been configured to record data into its own Flash memory only (FILING mode) , it transmits heartbeat status messages.
-
Page 24: Files
CMG-EDU Recording and playback Files Another part of the Setup window allows you to alter the way Scream! files the data it receives. Click on the Files tab to open the following pane: The options you can change are: Base Directory: This specifies the root directory in which data files will be saved. - Page 25 CMG-EDU Recording and playback I the System ID , T the Stream ID (e.g. DM24Z2), C the component identifier (Z,N,E,M, etc. ), P the sample rate, in samples per second; A the name of the stream, if you have set a mapping, otherwise the same as T.
-
Page 26: Playback
CMG-EDU Recording and playback Post-processor: This option allows you to specify a program which Scream! will run every time it closes a file. The name of the file is passed as a parameter. You can use this feature to interface to other analysis or archival systems, for example: FTP or emailing files to remote data centres, •... - Page 27 CMG-EDU Recording and playback You can now select these files and drag them together into Scream!. 2. The main window will change to include the file(s) you selected: 3. Select streams from the files in Scream's main window, and view them in a Waveview window.
- Page 28 CMG-EDU Recording and playback Scream! will replay data into the stream buffer, which has a limited length. If your file is longer than the buffer, Scream! will eventually begin overwriting old data. To see this data, you will have to begin the replay again.
-
Page 29: Advanced Usage
CMG-EDU Advanced usage Advanced usage You can connect to the internal software of the CMG-EDU over its output serial port and communicate with it. To enter command mode from Scream!, right-click on the digitizer's icon and select Terminal… from the menu that pops up. A window will open, and once the digitizer... -
Page 30: General Configuration
Advanced usage example sessions, where information you enter is given in medium and messages returning from the CMG-EDU are given in bold. Some seldom-used commands are in the extended dictionary . To access these commands, you need to enable this dictionary with the command ok-1. The standard commands will still be available. -
Page 31: Baud
CMG-EDU Advanced usage This command is in the extended dictionary; to use it, first issue the command ok-1 and finish with [seal]. 6.2.3 BAUD Syntax: 0 baud-rate BAUD Sets the baud rate for the serial port on the CD24E1, in bytes per second. The CD24E1 has a single port, numbered 0. -
Page 32: Gps And Timing Systems
CMG-EDU Advanced usage GPS and timing systems 6.3.1 XGPS Syntax: on/off XGPS Switches on or off the GPS system. To save power consumption under normal operation, the CD24E1 only powers on the GPS occasionally to update timing information. You can override this with the XGPS command, where on/off is 0 to switch off the relay, and 1 to switch it on. -
Page 33: Fix
Instructs the CD24E1 to inject a sine-wave calibration signal, starting on the zero crossing. Z denotes the Z channel of the digitizer. This is used for the CMG-EDU's single component (whether vertical or horizontal.) freq-or-period and unit together determine the frequency of the calibration signal. -
Page 34: Squarewave
(by default, 2). The calibration is disconnected the same number of minutes after the negative edge. Z denotes the Z channel of the digitizer. This is used for the CMG-EDU's single component (whether vertical or horizontal.) You can alter the duration of each step using the MINUTE command, described below. -
Page 35: Minutes
6.4.7 RESP Syntax: value RESP Switches the CMG-EDU between response modes according to value: 0 : broadband mode (standard); 1 : 1 second response mode (for monitoring mass positions.) 6.4.8 MASSES? -
Page 36: Troubleshooting And Help
CMG-EDU Troubleshooting and help Troubleshooting and help Troubleshooting The installation is connected, but Scream! is not receiving any data. Choose File → Setup… from the main menu and open the Com Ports tab. • Check that the baud rate for the serial port attached to the digitizer is set to 19200, and that all the boxes are checked. -
Page 37: Limited Warranty
+44 (0) 118 981 9056 (2 pm – 5 pm GMT) You should also contact us if the CMG-EDU requires service, either during or after the warranty period. When you call, be ready to quote the serial number of the instrument. -
Page 38: Connector Pinouts
Sensor Connectors These are Bulgin Buccaneer 400-series 12-pin connectors. The chassis socket, as fitted to the CD24E1, is part- number PX0412/12S and the free plug, as fitted to the CMG-EDU sensor, is part-number PX0410/12P/5560. Function Velocity signal -ve Signal ground Screen... -
Page 39: Power/Data Connectors
CMG-EDU Connector Pinouts Power/Data Connectors These are Bulgin Buccaneer 400-series 10-pin connectors. The chassis plug, as fitted to the CD24E1, is part- number PX0412/10P and the free socket, as fitted to the power/data cable, is part-number PX0410/10S/5560. Pin Function not connected... -
Page 40: Data Connectors
CMG-EDU Connector Pinouts Data Connectors These are standard DE9 “subminiature” connectors conforming to DIN 41652 and MIL-DTL-42308. They are widely available from a variety of electronics and I.T. suppliers. Function not connected Received data (RxD) Transmitted data (TxD) not connected... -
Page 41: Gps Connectors
The chassis socket, as fitted to the CD24E1, is part- number PX0412/10S and the free plug, as fitted to the CMG-EDU sensor, is part-number PX0410/10P/5560. Pin Function not connected GPS received data (Rx) GPS transmitted data (Tx) -
Page 42: Revision History
CMG-EDU Revision History Revision History 6 Dec 2005 New Document 23 Oct 2009 Added connector pin-outs and revision history. 16 Nov 2021 Added note about 12-pin power/data connectors 1 June 2022 Fixed broken links, reformatted with current branding MAN-EDU-0001 Issue D - June 2022...
Need help?
Do you have a question about the CMG-EDU and is the answer not in the manual?
Questions and answers