Table of Contents
Advertisement
Quick Links
USER MANUAL
2kW Fan Heater
IG9022
PO Number:
IMPORTANT: THIS PRODUCT IS ONLY SUITABLE
FOR WELL INSULATED SPACES OR OCCASIONAL USE
Please read these instructions carefully before use and retain for future reference
Before switching on your appliance,
always check for any damage which may have been caused in transit
Advertisement
Table of Contents

Related Manuals for iGenix IG9022


Summary of Contents for iGenix IG9022
- Page 1 USER MANUAL 2kW Fan Heater IG9022 PO Number: IMPORTANT: THIS PRODUCT IS ONLY SUITABLE FOR WELL INSULATED SPACES OR OCCASIONAL USE Please read these instructions carefully before use and retain for future reference Before switching on your appliance, always check for any damage which may have been caused in transit...
-
Page 2: Table Of Contents
Safefty instructions ..............3-5 Technical Specification ............6 - 7 Appliance Overview ..............8 Operating Instructions ............8 - 9 Cleaning & Maintenance ............9 Troubleshooting ................ 10 Mains Plug Fuse Replacement ..........11 Product disposal and recycling ..........11 Igenix Warranty ..............12 - 13... -
Page 3: Safefty Instructions
SAFETY INSTRUCTIONS Important: Read and follow all of the instructions even if you feel you are familiar with the product, and find a place to keep this manual handy for future reference. 1. This appliance can be used by children aged from 8 years and above if they have been given supervision or instruction concerning the use of the appliance in a safe way and understand the hazards involved. - Page 4 15. Always turn off and unplug the appliance when not in use. 16. Do not use the heater in the immediate surroundings of a bath, shower or swimming pool. 17. Do not reach for an appliance that has fallen into water. Switch of at supply and unplug immediately 18.
- Page 5 30. The most common cause of overheating is deposits of dust or fluff in the appliance. Ensure these deposits are removed regularly by unplugging the appliance and vacuum cleaning the grilles. 31. Use this appliance only as described in the manual. Any other use is not recommended by the manufacturer and may case fire, electric shock or injury.
-
Page 6: Technical Specification
TECHNICAL SPECIFICATION Item Symbol Value Unit Item Unit Heat output Type of heat input, for electric storage local space heaters only (select one) Nominal heat output 2.000 manual heat charge control, with Minimum heat output 1.200 integrated thermostat (indicative) manual heat charge control with Minimum continuous 2.000 max,c... - Page 7 Test Data Commission Regulation (EC) No 1275/2008 Requirement Mode Ecodesign requirements , from 7 January 2013 Result - Remark Verdict Off mode Power consumption in ‘off mode’: Power consumption of equipment in any off- mode condition shall not exceed 0.50 W Standby mode Power consumption in ‘standby mode(s)’: The power consumption of equipment in...
-
Page 8: Appliance Overview
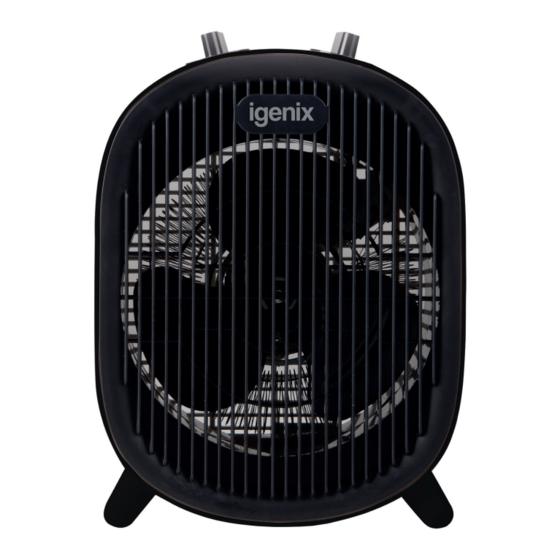
APPLIANCE OVERVIEW Power selection knob Temperature Power indicator light control knob Safety grill OPERATING INSTRUCTIONS Before turning on the machine ensure that the following has been checked: 1. Check that the power cord is not damaged. 2. This product uses a 220-240V AC power supply. Before use, ensure the rated current of the power socket meets the local requirements. -
Page 9: Cleaning & Maintenance
Safety Control Your heater is fitted with a safety device “Double Protector” that (1) switches off the heater by thermal cut-off in the event of overheating or malfunction and it will reset while the temperature reduces to a normal level. (2) Shuts off the heater by thermal fuse in the event of overheating or malfunction and prevents operation by some other accidental reason. -
Page 10: Troubleshooting
TROUBLESHOOTING GUIDE Please refer to the trouble shooting guide when experiencing an issue with your heater. If you still cannot determine the fault then please call our Customer Service number 01473 271272. Problem Possible Cause Possible Solution After the power is engaged, the The plug may not be plugged Check whether the plug is power indicator light does not... -
Page 11: Mains Plug Fuse Replacement
MAINS PLUG FUSE REPLACEMENT (Class II) Remove the central screw on the plug and open the shell. Take out the fuse and replace with a new fuse of the same Amp. Install the shell again and tighten the screws. DISPOSAL INFORMATION The European Directive 2012/19/EU on Waste Electrical and Electronic Equipment (WEEE), requires that old household electrical appliances must not be disposed of in normal unsorted... -
Page 12: Igenix Warranty
Igenix Warranty Terms & Conditions This product is guaranteed for a period of 12 months as standard from the date of purchase against mechanical and electrical defects. You can extend your warranty for a further 12 months by registering your product. - Page 13 To qualify for the 2 year warranty you must register your product within 30 days of purchase. The full Terms & Conditions of our warranty policy are shown on the opposite page. They are also available on our website. www.igenix.co.uk...
Need help?
Do you have a question about the IG9022 and is the answer not in the manual?
Questions and answers