Mitsubishi Electric CITY MULTI Mr. Slim PAR-SL100A-E Operation Manual
Control system and mitsubishi mr. slim air conditioners wireless remote controller
Hide thumbs
Also See for CITY MULTI Mr. Slim PAR-SL100A-E:
- Operation manual (32 pages) ,
- Installation manual (9 pages) ,
- Operation manual (184 pages)
Table of Contents
Advertisement
Available languages
Available languages
Quick Links
CITY MULTI Control System and
Mitsubishi Mr. Slim Air Conditioners
Wireless Remote Controller
PAR-SL100A-E
OPERATION MANUAL
BEDIENUNGSHANDBUCH
MANUEL D'UTILISATION
BEDIENINGSHANDLEIDING
MANUAL DE INSTRUCCIONES
ISTRUZIONI DI FUNZIONAMENTO
MANUAL DE OPERAÇÃO
DRIFTSMANUAL
DRIFTSMANUAL
FOR USER
FÜR BENUTZER
POUR L'UTILISATEUR
VOOR DE GEBRUIKER
PARA EL USUARIO
PER L'UTENTE
PARA O UTILIZADOR
TIL BRUGER
FÖR ANVÄNDAREN
English
Deutsch
Nederlands
Español
Italiano
Português
-
-
Advertisement
Table of Contents

Related Manuals for Mitsubishi Electric CITY MULTI Mr. Slim PAR-SL100A-E


Summary of Contents for Mitsubishi Electric CITY MULTI Mr. Slim PAR-SL100A-E
- Page 1 CITY MULTI Control System and Mitsubishi Mr. Slim Air Conditioners Wireless Remote Controller PAR-SL100A-E OPERATION MANUAL FOR USER English BEDIENUNGSHANDBUCH FÜR BENUTZER Deutsch MANUEL D’UTILISATION POUR L’UTILISATEUR BEDIENINGSHANDLEIDING VOOR DE GEBRUIKER Nederlands MANUAL DE INSTRUCCIONES PARA EL USUARIO Español ISTRUZIONI DI FUNZIONAMENTO PER L’UTENTE Italiano MANUAL DE OPERAÇÃO...
- Page 2 Contents time Note Annex II. Fig. 1 1. Safety Precautions WARNING: CAUTION: WARNING Do not dispose of the controller by yourself. Stop operation when an abnormality occurs.
-
Page 3: Safety Precautions
1. Safety Precautions WARNING Never modify or repair the controller by yourself. CAUTION Do not drop the controller. Do not place any dangerous substances near the controller. Do not wash with water. Do not touch any control button with wet hands. Do not disassemble the controller. -
Page 4: Controller Interface
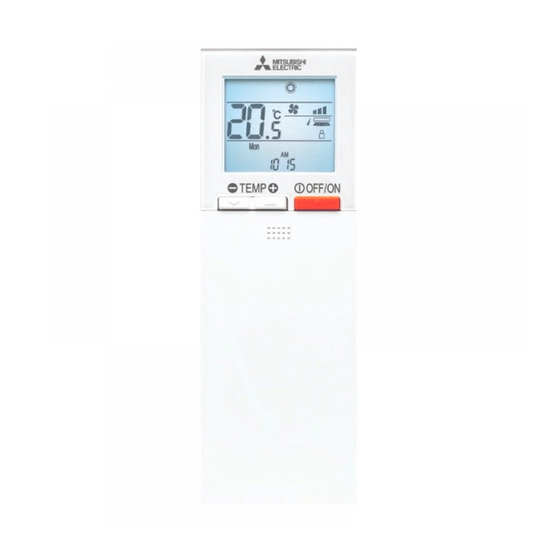
Controller interface Note: * This button is enabled or disabled depending on the model of the in- door unit. Display Operation mode Not available Battery replacement indicator Fan speed setting Temperature setting 3D i-see sensor (Air distribution) Vane setting... - Page 5 Note:...
-
Page 6: Before Operation
3. Before Operation 3.1. Replacing the batteries and how to set the current time How to set the current time... - Page 7 3. Before Operation 1) Switching to the initial setting mode Changing the temperature unit A 3) Changing the time display B 4) Changing the AUTO mode C Fig. 3-1 5) Changing the pair No. D 7) Completing the settings...
-
Page 8: Operation
4. Operation <Auto operation (dual set point) mode>... - Page 9 4. Operation When using the AUTO (dual set point) mode 4.3. Selecting a fan speed (FAN) Note:...
- Page 10 4. Operation For models with swing and automatic functions For models without swing and automatic functions For models with the louver setting function Note:...
- Page 11 4. Operation [Set the time to start the unit as follows] [Set the time to stop the unit as follows]...
- Page 12 4. Operation [Changing the set times] [Canceling the timer operation]...
- Page 13 4. Operation <Switching to the editing mode> <Selecting the setting pattern> <Selecting the operation settings> Fig. 4-1 <Deleting the settings> <Transmitting the settings> Fig. 4-3 Fig. 4-4 Fig. 4-5...
- Page 14 4. Operation 4.7. i-See sensor...
-
Page 15: Special Operation
5. Special Operation <Switching to the special operation mode> <Transmitting the settings> ton 3 <Exiting the special operation mode> Fig. 5-1 Note:... - Page 16 5. Special Operation panel Fig. 5-3 <When remote operation by other remote controllers is prohibited> <When a wireless remote controller is operated during central control> 7. Troubleshooting <When the indoor unit beeps 4 times and the operations are ineffective>...
- Page 17 Index Ce symbole est utilisé uniquement pour les pays de I’UE. Remarque la directive 2006/66/CE. Fig.1 1. Consignes de sécurité Avertissement: Précaution: Avertissement Contrôlez les conditions d’installation. Ne jetez pas la télécommande vous-même. Arrêtez la télécommande en cas d’anomalie de fonctionnement.
-
Page 18: Consignes De Sécurité
1. Consignes de sécurité Avertissement Arrêtez la télécommande si le témoin de fonctionnement du récepteur de la télécommande clignote ou si une anomalie survient. Evitez tout court-circuit des piles alcalines. Ne démontez jamais les piles, ne les exposez pas à la chaleur et ne les jetez pas au feu. -
Page 19: Interface De La Télécommande
2. Noms et fonctions des composants du contrôleur Interface de la télécommande Remarque : * Cette touche peut être activée ou désactivée selon le modèle d’appareil intérieur. Mode de fonctionnement Non disponible Témoin de remplacement de la pile Réglage de la température Réglage de la vitesse du ventilateur... - Page 20 2. Noms et fonctions des composants du contrôleur Remarque :...
-
Page 21: Avant Utilisation
3. Avant utilisation 3.1. Remplacement des piles et réglage de l’heure Insertion/remplacement de la pile Réglage de l’heure... - Page 22 3. Avant utilisation 3.2. Mode initial Passage en mode de réglage initial Changement de l’unité de température A Fig. 3-1 Changement du mode AUTO C Changement du nº de paire D Changement du réglage du rétro-éclairage E Fig. 3-2...
- Page 23 4. Fonctionnement 4.1. Mise en marche/arrêt de l’appareil...
- Page 24 4. Fonctionnement 4.2. Sélection d’une température Remarque :...
- Page 25 4. Fonctionnement Pour les modèles avec fonctions d’oscillation et automatiques Pour les modèles sans fonctions d’oscillation et automatiques Pour les modèles avec fonction de réglage des ailettes Remarque :...
- Page 26 4. Fonctionnement 4.5. Utilisation de la minuterie Marche/Arrêt [Réglez l’heure de démarrage de l’appareil de la ma- nière suivante] [Réglez l’heure d’arrêt de l’appareil de la manière suivante]...
- Page 27 4. Fonctionnement [Annulation de la minuterie]...
- Page 28 4. Fonctionnement 4.6. Utilisation de la minuterie hebdoma- daire Fig. 4-1 Fig. 4-2 Fig. 4-3 Fig. 4-4 Fig. 4-5...
- Page 29 4. Fonctionnement 4.7. Capteur i-See...
- Page 30 5. Fonctionnement spécial Fig. 5-1 Fig. 5-2 Remarque :...
-
Page 31: Guide De Dépannage
5. Fonctionnement spécial 5.2. Utilisation du panneau ascendant/ descendant Fig. 5-3 6. Commande centralisée 7. Guide de dépannage...
Need help?
Do you have a question about the CITY MULTI Mr. Slim PAR-SL100A-E and is the answer not in the manual?
Questions and answers