Table of Contents
Advertisement
Quick Links
Advertisement
Table of Contents

Subscribe to Our Youtube Channel
Related Manuals for Streamax AD Plus


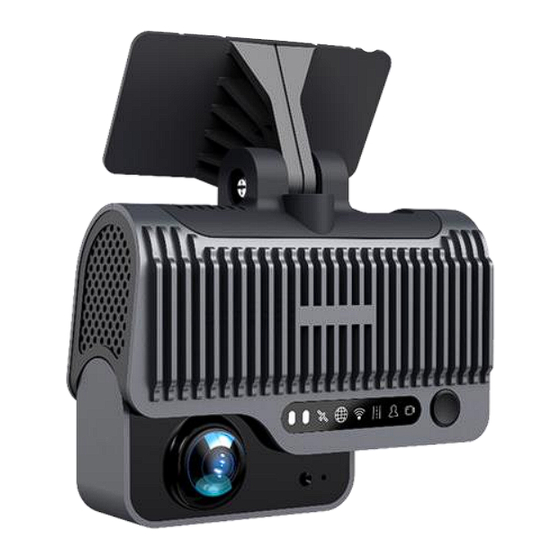
Summary of Contents for Streamax AD Plus
- Page 1 AD Plus Installation Guide...
- Page 2 V1.6 Revision History Date Revision Modification Description Author April 16, 2021 V 1.0 First draft of AD Plus solution May 10, 2021 V 1.1 Modification of format and content June 17,2021 V 1.2 Modification of the device image Supplementary precautions...
-
Page 3: Table Of Contents
3.2 Preparation of Installation Tools ..................... 10 3.3 Preparation of SIM Card and Micro SD Memory Card ..............12 Installation of AD Plus ........................12 4.1 Installation of SIM Card and Memory Card ..................12 4.2 Selection of DVR Installation Area ....................13 4.3 Installation of DVR Bracket ...................... - Page 4 6.1.1 Requirements for Installation Position ................... 32 6.1.2 Requirements for Installation Angle ..................33 6.1.3 Requirements for Installation Details ..................34 6.1.4 Installation Steps ........................34 6.1.5 Calibration Requirements ....................... 39 6.2 BSD Installation and Calibration ..................... 42 6.2.1 Top View Camera Installation and Calibration ..............
-
Page 5: Foreword
Foreword This AD Plus Installation Guide is hereby prepared to better guide engineering personnel to install AD Plus and its accessories properly and quickly, and to improve installation efficiency. This document mainly includes the following parts: foreword, system overview, preparation for installation, introduction to installation, and acceptance and cleaning. - Page 6 Foreign Android (Google Store) IOS (Apple Store) Page 6 of 52...
-
Page 7: System Overview
The deep learning technology is adopted for the intelligent algorithm of AD Plus. AD Plus has the features of advanced driver-assistance system (ADAS) and... -
Page 8: Preparation For Installation
For details of this power supply mode, please refer to the accompanying AD Plus Product Manual in the AD Plus packing box. It will not be detailed here. Power supply connection through discrete wire: This mode requires operation by specialized installation personnel. -
Page 9: Connection Of Necessary Signal Cables
Connection of Necessary Signal Cables Where required, the following signal cables must also be connected to enable the intelligent assisted driving functions of AD Plus: (1) Vehicle speed pulse cable or CAN data cable - to obtain accurate vehicle speed data;... -
Page 10: Preparation Of Installation Tools
Preparation of Installation Tools Before installation, the following installation accessories and tools shall be made available. List of Installation Tools and Accessories Picture Name of Tool Purpose Qty. Torsion drill Tighten screws 1 pcs Common Tighten screws; optional 1 pcs... - Page 11 List of Installation Tools and Accessories Picture Name of Tool Purpose Qty. Install the EasyCheck App for Smartphone/pad video preview and parameter 1 pcs configuration Measure the installation height of the forward-facing Steel tape ADAS camera lens and assist...
-
Page 12: Preparation Of Sim Card And Micro Sd Memory Card
Micro SIM card and a Micro SD memory card that meets the quality requirements before installation. Installation of AD Plus Installation of SIM Card and Memory Card Take out the main unit (without powering on), and turn the card slot panel at the bottom of the main unit counterclockwise with the L-shaped socket head wrench in the package to open the panel. -
Page 13: Selection Of Dvr Installation Area
After installation of SIM card and Micro SD card, fasten the card slot panel. Selection of DVR Installation Area Requirements for installation area of AD Plus: (1) The DVR must be installed in the middle of the front windshield. It is generally installed in the rearview mirror area above the centerline of the front windshield. -
Page 14: Installation Of Dvr Bracket
The installation position shall be determined in such a way that the DVR will not hinder the driver from viewing the front blind spot reflector, and there is no obstruction (such as interior rearview mirror or glass coating) within the field of view in front of and around the internal and external cameras lens. - Page 15 Park the vehicle on the horizontal ground, and then stick the level horizontally above the target area (adjust the inclination angle of the level to center the bubble). Stick the bracket with the connection of the bracket facing down (with the toothed side facing left).
-
Page 16: Installation Of Dvr
Installation of DVR After fixing the bracket horizontally, remove the level, align it and stick on the right side of the main unit in the area as shown in the figure below: Connect the DVR to the bracket with the front side facing inward (with the teeth on... -
Page 17: Adjustment And Fixation Of Dvr
Adjustment and Fixation of DVR Adjust the DVR back and forth to center the bubble in the level (indicating that the DVR is vertical at this moment). Page 17 of 52... -
Page 18: Power Supply Connection, Connection Of Signal Cables And Wiring
Fasten the bracket stud to ensure that the angle of the DVR will not be changed easily. Remove the level, and fix the DVR. * Notes: Make sure that the connection between the bracket and the main unit is fastened (the device is rigidly connected with the vehicle), so that the main unit will not shake easily. - Page 19 (1) If the mode of quick power supply connection through OBD interface is adopted, locate the OBD interface of the vehicle and directly connect with the interface. (2) If the mode of power supply connection through discrete wire is adopted,...
- Page 20 After the connection is completed, log in to the Veyes APP to connect the AD Plus. Enter the configuration interface, and set the speed source of the equipment as "Pulse". At the same time, drive the vehicle for a short distance at the installation site to test the accuracy of vehicle speed pulse data.
- Page 21 After the connection is completed, log in to the Veyes APP to connect the AD Plus. Enter the configuration interface, set the CAN model and baud rate of the equipment, and set the speed source as "OBD". At the same time, drive the vehicle for a short distance at the installation site to test the accuracy of vehicle speed pulse data.
-
Page 22: Wiring
4.6.3 Wiring Upon the completion of connection of main cables according to the schematic diagram of system connection, as well as power supply connection and connection of signal cables, arrange these cables using a crow plate according to the diagram below and conceal them in the interior trim panel or the panel of the dashboard (i.e. -
Page 23: Calibration Of Ad Plus
When the fixed position is selected, tear 3M cellophane wrapping the power box and fix it on the right side-trim of in the driving seat area. Please see below: Calibration of AD Plus ADAS Calibration 5.1.1 Connection with APP Start the vehicle and wait for the power status light of the DVR to turn on. -
Page 24: Installation Parameters Measurement Of The Adas Camera Lens
ADAS camera lens to the license plate). Refer to the figure below for the example of distance measurement. Note: When the vertical height from the ground to the AD Plus front camera lens is measured, read the height value after making sure that the box staff or tape is perpendicular to the ground. -
Page 25: Calibration Of Adas Camera Lens
5.1.3 Calibration of ADAS Camera Lens 5.1.3.1 Calibration Parameter settings After entering the Veyes operation interface, click [Preferences]> [Alarm]> [AI App]> [Algorithm], as shown in the figure below: The ADAS calibration height can be in centimeters or inches. In the parameter input... - Page 26 Enter the real-time preview interface, double click the ADAS channel screen to enter the main stream; click the "AI Calibration" button at the lower left corner of the screen to enter the AI calibration selection interface to perform ADAS calibration Select the calibration channel.
- Page 27 Confirm that the ADAS is installed at a proper position of the front windshield and within the working range of the wipers, and then click [Next] In the parameter input boxes, fill in the installation height and left margin of ADAS camera lens, front end width, and front end length as specified in 5.1.2...
- Page 28 Click [Next] to enter the interface as shown below. Click [Next] to enter the interface as shown below. Since ADPlus is capable of automatic calibration, it is only required to click [Next] directly without adjusting the device in this interface.
-
Page 29: Dsc Calibration
Return to the real-time preview interface of the ADAS channel (by double clicking the ADAS channel to enter the main stream), and check and confirm that there is no calibration line superimposed on the screen at this time, a condition suggesting the normal operation of the ADAS channel. -
Page 30: Cab Camera Angle Adjustment
5.2.2 Cab Camera Angle Adjustment In the operation interface of Veyes, click [Preview] to enter the preview interface, double click Channel 2 to zoom in and view the cab screen. Open the card slot panel at the bottom of the DVR and adjust the angle of the cab camera lens with an L-shaped Allen wrench at the adjustment hole of the cab camera lens angle. -
Page 31: Installation And Calibration Of Optional Components
Installation and Calibration of Optional Components DMS Camera For different usage scenarios, three types of DMS cameras connected externally to ADPlus can be selected at present: A-pillar side mounted CA29M, A-pillar side glass mounted CA29M, and countertop mounted CA29M. -
Page 32: Requirements For Installation Position
Choose countertop-mounted Choose side-mounted CA29M? CA29M Guide the user to choose the countertop-mounted type Choose CA29M with a glass Airbag on A-pillar? mounting bracket Choose conventional A-pillar side-mounted CA29M 6.1.1 Requirements for Installation Position If the A-pillar camera (CA29M, the recommended model under normal circumstances) is selected, the DMS camera shall be installed on the driver side A pillar, with the camera side facing the driver's face. -
Page 33: Requirements For Installation Angle
Different cameras have different "camera and driver distance" coverage, and the coverage is described as follows: For cameras larger than 100 cm, DMS or ADkit is recommended. 6.1.2 Requirements for Installation Angle Auxiliary adjustment through real-time preview screen after the equipment is... -
Page 34: Requirements For Installation Details
6.1.3 Requirements for Installation Details If A-pillar installation (3mm lens, crescent CA29M, with side mounting bracket) or A-pillar side glass mounting bracket installation (3mm lens, crescent CA29M, with glass mounting bracket) is adopted, the labeling surface of DMS camera must face toward the A-pillar (with the arc side facing toward the driver). - Page 35 If the screen is upright, there is no need to set the installation type of the DMS camera, and go directly to step 3; If the driver is upside down or skewed on the screen, select the channel corresponding to the DMS camera (the Channel 3) by clicking [Preferences]>...
- Page 36 Adjust the left and right angle joints of the DMS camera through the hexagon socket screws, so as to adjust the angle of the DMS camera left and right. After adjusting the angle of the DMS camera up and down/left and right, make...
- Page 37 (3) Make sure that there is no other object (such as steering wheel) in the DMS video screen that will block the driver's face and the seat belt features. (4) Make sure that there is no other object (for example, the steering wheel) in the DMS video screen that will obstruct the driver's face and the seat belt features.
- Page 38 (2) The installation position must ensure that the camera viewing angle is the upward viewing angle. (3) After the glass-mounted camera is installed, the upper part of the driver's body (above the chest) can be displayed on the camera screen. It shall be ensured that the seat belt features and face features can be seen, and the driver's face appears in the middle of the screen.
-
Page 39: Calibration Requirements
DMS video screen that will obstruct the driver's face and the seat belt features. Tighten the screws on the right side of DMS camera bracket to ensure that the camera will not shake. 6.1.4.3 Installation Requirements for CA29M Camera Vertically Mounted on... - Page 40 Select DMS for calibration. Select the corresponding channel of the DMS camera (select Channel 3 here). Click Calibration to move on to the next step. Confirm the prompts - click Next to move on to the next step. Installation Location of DMS Camera The left A-pillar, the right A-pillar, the front side of the countertop, and the lateral side of the countertop are available.
- Page 41 *Note: Before clicking Next to start formal calibration, the driver shall sit in the normal driving posture and look straight ahead. Click Next to move on to the next step for automatic face calibration. During calibration, make sure that the driver sits still according to normal driving habits and posture and looks straight ahead.
-
Page 42: Bsd Installation And Calibration
Calibration is completed: Click Finish to complete the calibration and exit the calibration mode. BSD Installation and Calibration 6.2.1 Top View Camera Installation and Calibration For installation of top view cameras, namely the front-top view camera, right-top view camera and left-top view camera, large wide-angle cameras are adopted and installed near the front end. - Page 43 [Installation position] The camera shall be installed on the upper part of the front end, and the coverage shall be 4m long on both the left and right sides, and 3m wide counting from the line from the installation position vertically to the ground point. The specific...
- Page 44 [Calibration Debugging] Step 1: Connect the mobile phone to the device hotspot, enter EasyCheck App, input the user name and password, and click Login.
- Page 45 Step 3: Choose BSD. Step 4: Choose Simple Left Top View BSD. Step 5: Choose the channel to connect the camera. Step 7: Put the yellow line close to the side edge of the vehicle body, and input the installation height.
-
Page 46: Calibration For Lateral Side Installation
6.2.2 Calibration for lateral side installation Later side installation means installation on the right side and left side. The principles and steps for their installation and calibration are the same. It is to introduce the left-side installation here. The camera is CA24S, and the installation position is shown in the figure. - Page 47 Step 1: Connect the mobile phone to the device hotspot, enter EasyCheck App, input the user name and password, and click Login. Step 2: After logging into EasyCheck App, choose Preview - AI Calibration. Step 3: Choose BSD Page 47 of 52...
- Page 48 Step 4: Choose Left Top View Blind Area Step 5: Choose the channel to connect the camera. Page 48 of 52...
- Page 49 Step 6: Place the traffic cone at a location within the range of 2-3m longitudinally distanced from the front end and 0.8m laterally distanced from the front end (the specific location shall be determined based on the actual car situation; taking...
-
Page 50: Calibration Of Blind Spot In Front Top View
Input the accurate installation height and the distance from the camera to the front end, and click Finish. 6.2.3 Calibration of Blind Spot in Front Top View Step 1: Connect the mobile phone to the device hotspot, enter ezinstall, input the user name and password, and click Login. -
Page 51: Principle Of Actual Vehicle Routing
Step 5: Draw the blind spot area into a rectangle by moving four points (the drawn area shall cover all the blind spots in front of the vehicle). Click Save to complete the calibration. 6.2.4 Principle of Actual Vehicle Routing If the front end shall not be perforated, it is suggested to install the camera on the cargo box or the connector. -
Page 52: Installation Acceptance
Installation Acceptance Conduct acceptance for the installation details and parameter setup item by item according to the acceptance list provided by the customer. (1) Focus on inspection of parameter setup, and save screenshots. (2) Focus on inspection of video images, and capture and save videos.
Need help?
Do you have a question about the AD Plus and is the answer not in the manual?
Questions and answers