
Related Manuals for TruVision TVW-DVM


Summary of Contents for TruVision TVW-DVM
- Page 1 TruVision Wedge Dome Back Box and Dual View Mount Installation Guide P/N 1073093-EN • REV C • ISS 28JUL21...
- Page 2 © 2021 Carrier. All rights reserved. Specifications subject to change without prior notice. TruVision names and logos are a product brand of Aritech, a part of Carrier. Contact information EMEA: https://firesecurityproducts.com Australian/New Zealand: https://firesecurityproducts.com.au/ Product documentation Please consult the following web link to retrieve the electronic version of the product documentation.
-
Page 3: Table Of Contents
Product overview 2 Product and package contents 2 TVW-DVM dual view mount 2 TVW-AWB-1 outdoor angled back box 5 TVW-AWB-2 indoor angled back box 7 TVW-2G-AD adapter plate 9 Installation 11 Specifications 23 TruVision wedge camera bracket and mount 23 Installation Guide... -
Page 4: Product Overview
Product overview This is the installation guide for the following TruVision wedge camera models: TVW-DVM (dual view mount) (use with TVD-PPB) TVW-AWB-1 (angled back box for outdoor application) TVW-AWB-2 (angled back box for indoor application) TVW-2G-AD (adapter plate for wedge camera with 2-gang ... - Page 5 Camera mount: Tube adapter (30 x 12 mm): Conduit cover/plug: Template B: Template A Installation Guide...
- Page 6 Screw 3 x 10 m (5 pcs m): Screw (10 pcs): Drywall anchor 7.5 x 24.5 mm M4 screw 4 x 25 mm Screw 3 x 8 mm (2 pcs): Screw 4 x 10 mm (5 pcs): Installation Guide...
-
Page 7: Tvw-Awb-1 Outdoor Angled Back Box
Rubber ring: Figure 1: Cameras attached using the dual view mount TVW-AWB-1 outdoor angled back box The TVW-AWB-1 outdoor angled back box (purchased separately) is weather resistant and includes a G1 threaded conduit access and plug. It conceals the interconnect cables and eliminates the blind area below the camera when the camera is installed on a wall. - Page 8 Camera back box: Tube adapter (30 x 12 mm): Conduit cover/plug: Template A: Rubber ring: Installation Guide...
-
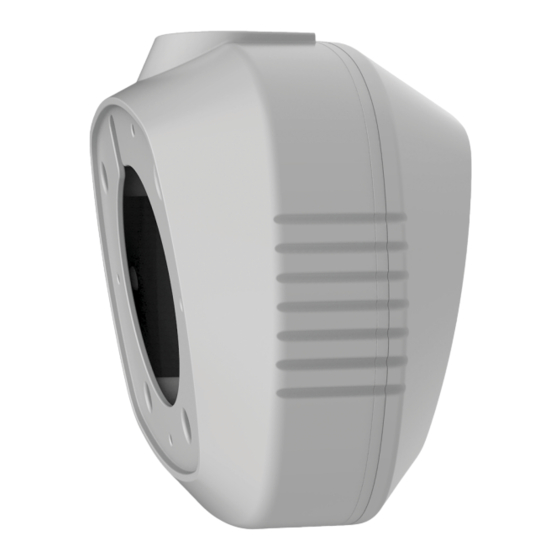
Page 9: Tvw-Awb-2 Indoor Angled Back Box
Screw (5 pcs): Screw 3 x 10 mm (5 pcs): Drywall anchor 7.5 x 24.5 mm M4 screw 4 x 25mm Screw 3 x 8 mm (2 pcs): Screw 4 x 10 mm (3 pcs): Figure 2: Camera mounted on an outdoor back box TVW-AWB-2 indoor angled back box The TVW-AWB-2 indoor angled back box (purchased separately) conceals the interconnected cables and eliminates... - Page 10 Camera back box: Template B Screw 5 pcs: Drywall anchor (7.5 x 24.5 mm) M4 screw (4 x 25 mm) Screw 3 pcs (4 x 10 mm): Installation Guide...
-
Page 11: Tvw-2G-Ad Adapter Plate
Figure 3: Camera mounted on an indoor back box TVW-2G-AD adapter plate The TVW-2G-AD adapter plate (purchased separately) allows you to attach the panoramic wedge camera to a standard 4-inch 2 gang box. Camera adapter plate: Installation Guide... - Page 12 Template A: Rubber ring: Screw 5 pcs: Screw 3 x 8 mm (2 pcs): Drywall anchor (7.5 x 24.5 mm) M4 screw (4 x 25 mm) Screw 4 x 10 mm (3 pcs): Installation Guide...
-
Page 13: Installation
Installation To mount two wedge cameras on a dual view mount: Attach the TVW-DVM dual view mount to an installed pendant mount tube. An adapter is included in the kit that, if required, can be used to match-up with the threading (G1 male or G1 female) of the pendant mount tube. - Page 14 Loosen the screws with the tamper-resistant hex wrench (supplied) to remove the camera cover. Pull the cables through the bracket tube and to both back boxes, conect the cables to cameras and place the connecters and cables into the back boxes. Installation Guide...
- Page 15 Mount the two cameras on both sides of the TVW-DVM dual view mount. Installation Guide...
- Page 16 Re-attach the camera covers to the cameras. To mount the wedge camera on an outdoor angled back box: Drill the holes for the mounting hardware in the mounting surface using the supplied drill template. Detach the TVW-2G-AD adaptor plate from the back box. Installation Guide...
- Page 17 Mount the TVW-2G-AD adaptor plate to the mounting surface using the supplied hardware. Mount the outdoor angled back box to the TVW-2G-AD adaptor plate using the supplied hardware. Loosen the screws with the tamper-resistant hex wrench (supplied) to remove the camera cover. Installation Guide...
- Page 18 Connect the cables, conceal the cables and connectors inside the back box and mount the camera base to the outdoor angled back box. Re-attach the dome cover to the camera. Installation Guide...
- Page 19 To mount the wedge camera on an indoor angled back box: Drill the holes for the mounting hardware in the mounting surface using the supplied drill template. Mount the indoor back box to the mounting surface by using the supplied hardware. Installation Guide...
- Page 20 Loosen the screws with the tamper-resistant hex wrench (supplied) to remove the camera cover. Installation Guide...
- Page 21 Connect the cables, conceal the cables and connectors inside the back box, and mount the camera base to the indoor angled back box. Re-attach the dome cover to the camera. Installation Guide...
- Page 22 To mount the wedge camera on a 2-gang box: Install the 2-gang box (separately purchased) in the wall according to the local applicable codes and regulations Attach the TVW-2G-AD adapter to a pre-installed 2-gang box on wall. Installation Guide...
- Page 23 Attach the enclosed rubber ring to the 2-gang box adapter. Loosen the screws with the tamper-resistant hex wrench (supplied) to remove the camera cover. Installation Guide...
- Page 24 Connect the cables, conceal the cables and connectors inside the 2-gang box and mount the camera base to the 2-gang box adapter. Re-attach the camera cover to the camera. Installation Guide...
-
Page 25: Specifications
Specifications TruVision wedge camera bracket and mount TVW-DVM Dimensions (L × W × H) 134.2 × 131.2 × 86.2 mm (5.28 × 5.16 × 3.9 in.) Weight 422 g (0.93 lb.) TVW-AWB-1 Dimensions (L × W × H) 134.1 × 130.9 × 54 mm (5.27 ×... - Page 26 TVW-AWB-2 Dimensions (L × W × H) 133.9 × 130 × 32.2 mm (5.27 × 5.12 × 1.26 in.) Weight 101 g (0.22 lb.) TVW-2G-AD Dimensions (L × W × H) 134.1 × 130 × 13.5 mm (5.27 × 5.12 × 0.53 in.) Weight 129 g (0.28 lb.) Installation Guide...
Need help?
Do you have a question about the TVW-DVM and is the answer not in the manual?
Questions and answers