Table of Contents
Advertisement
Available languages
Available languages
Quick Links
NL - Installatie handleiding
FR - Installation manuelle
ENG - Installation manual
PL - Instrukcja instalacji
Elektrische Voorverwarmer: Zelfregulerend
11VE44260 – Elec. Preheater D150 – 700W
11VE44270 – Elec. Preheater D180 – 700W
11VE44280 – Elec. Preheater D180 – 1400W
Deze handleiding bevat technische details en relevante
Lees voor de montage, inbedrijfstelling en voor alle andere
werkzaamheden aan dit product de handleiding aandachtig door!
Vasco
Kruishoefstraat 50
3650 Dilsen-Stokkem
België
Tel.: +32(0)89790411
__________________________________________________________________________
Elektrische Voorverwarmer: Zelfregulerend
11VE44260, 11VE44270 & 11VE44280
veiligheidsinstructies.
Aangeraden ventilatie unit
D275EP, D275EP II, D275(EP) III (E)
D300E (II), D400EP (II), D_T_X350 (E), D_X425 (E), DX4 (E)
D500E (II), T_X500 (E), DX5 (E), DX6 (E)
90.01.06.63.B
p. 1 – 7
p. 8 – 15
p. 16 – 23
p. 24 – 31
Advertisement
Chapters
Table of Contents

Related Manuals for Vasco 11VE44260


Summary of Contents for Vasco 11VE44260
- Page 1 24 – 31 Elektrische Voorverwarmer: Zelfregulerend Aangeraden ventilatie unit 11VE44260 – Elec. Preheater D150 – 700W D275EP, D275EP II, D275(EP) III (E) 11VE44270 – Elec. Preheater D180 – 700W D300E (II), D400EP (II), D_T_X350 (E), D_X425 (E), DX4 (E) 11VE44280 –...
-
Page 2: Table Of Contents
3. Onderhoud ............................ 3 4. Technische informatie ........................3 5. Installatie handleiding ......................4-6 A) Verpakking inhoud ....................4 B) Installatievoorwaarden .................... 4 C) Montage ....................... 4-6 6. Garantievoorwaarden ........................7 7. Conformiteitsverklaring ………………………………………………………………………………………………………….7 Vasco Kruishoefstraat 50 3650 Dilsen-Stokkem België Tel.: +32(0)89790411 __________________________________________________________________________... -
Page 3: Introductie
Garantie Vasco is niet aansprakelijk voor schade ontstaan door het niet naleven van de veiligheidsinstructies of het niet opvolgen van de instructies in de handleiding. De garantievoorwaarden vindt u op pagina 7 van deze handleiding. -
Page 4: Onderhoud
3. Onderhoud Vasco adviseert om het elektrisch voorverwarmingselement elke 4 jaar te reinigen. 1) Haal de stekkers van de ventilatie-unit en het voorverwarmingselement uit de stopcontacten. 2) Wacht 10 minuten totdat het voorverwarmingselement is afgekoeld 3) Neem het voorverwarmingselement van de installatie... -
Page 5: Installatie Handleiding
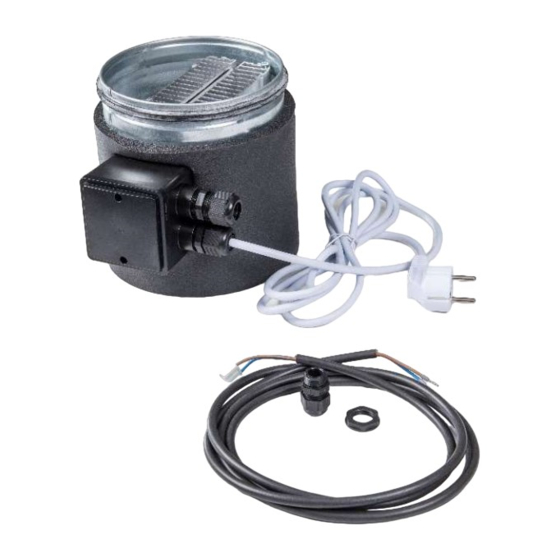
Houd er rekening mee dat de max. afstand tussen voorverwarmingselement en printplaat van de ventilatie-unit 2m is, dit voor de kabelverbinding die gemaakt moet worden tussen de 2 apparaten. Het voorverwarmingselement kan horizontaal of verticaal gemonteerd worden. Vasco Kruishoefstraat 50 3650 Dilsen-Stokkem België... - Page 6 Stap 1) Sluit de zwarte voedingskabel aan op de printplaat van de ventilatie unit op aansluiting X17. Gebruik de zwarte wartel als doorvoer voor de zwarte kabel in de metalen behuizing van de ventilatie unit zoals te zien op onderstaande afbeeldingen. Vasco Kruishoefstraat 50 3650 Dilsen-Stokkem België...
- Page 7 -A2 connector van het schakelrelais. Stap 5) Doe alles netjes terug in de kabeldoos, sluit de kabeldoos op het voorverwarmingselement en de installatie is klaar voor gebruik. Steek de stekker in het stopcontact om de installatie te vervolledigen. Vasco Kruishoefstraat 50 3650 Dilsen-Stokkem België...
-
Page 8: Garantievoorwaarden
Garantievoorwaarden Vasco verklaart gedurende 2 jaar na aankoopdatum, garantie te verlenen op de Vasco Elec. Preheater D150 - 700W, Elec. Preheater D180 - 700W en Elec. Preheater D180 - 1400W. De factuurdatum van het installatiebedrijf geldt als bewijs van aankoopdatum. Als er geen factuur beschikbaar is, geldt de productiedatum als aankoopdatum. - Page 9 Installation Manuelle Préchauffeur Electrique : Autorégulateur Unité de ventilation recommandée 11VE44260 – Elec. Preheater D150 – 700W D275EP, D275EP II, D275(EP) III (E) 11VE44270 – Elec. Preheater D180 – 700W D300E (II), D400EP (II), D_T_X350 (E), D_X425 (E), DX4 (E) 11VE44280 –...
- Page 10 5. Installation manuelle ......................12-14 A) Contenu de l’emballage ..................12 B) Conditions d’installation ..................12 C) Emplacement ....................12-14 6. Conditions de garantie ......................15 7. Déclaration de conformité …………………………………………………………………………………………………..15 Vasco Kruishoefstraat 50 3650 Dilsen-Stokkem Belgique Tel.: +32(0)89790411 __________________________________________________________________________...
-
Page 11: Introduction
L'élément de préchauffage est conçu pour être installé dans un système de ventilation double-flux Vasco. En fonctionnement normal, il permet à l'air extérieur d'être préchauffé à une température cible souhaitée. La température max. est limitée par la puissance max. de l'élément de préchauffage et en fonction de la température souhaitée et de la quantité... -
Page 12: Entretien
3. Entretien Vasco conseille de nettoyer l'élément de préchauffage électrique tous les 4 ans. 1) Retirez les fiches de l'unité de ventilation et de l'élément de préchauffage des prises. 2) Attendez 10 minutes que l'élément de préchauffage refroidisse 3) Retirez l'élément de préchauffage de l'installation 4) Nettoyez les éléments métalliques à... -
Page 13: Installation Manuelle
Gardez à l'esprit que le max. la distance entre l'élément de préchauffage et le circuit imprimé de l'unité de ventilation est de 2m, ceci pour le raccordement par câble qui doit être réalisé entre les 2 appareils. L'élément de préchauffage peut être monté horizontalement ou verticalement. Vasco Kruishoefstraat 50 3650 Dilsen-Stokkem Belgique Tel.: +32(0)89790411... - Page 14 Etape 1) Branchez le câble d'alimentation noir sur la carte de circuit imprimé de l'unité de ventilation sur la connexion X17. Utilisez le pivot noir comme passage pour le câble noir dans le boîtier métallique de l'unité de ventilation comme indiqué sur les images ci-dessous. Vasco Kruishoefstraat 50 3650 Dilsen-Stokkem Belgique Tel.: +32(0)89790411...
- Page 15 Etape 5) Remettez le tout joliment dans la boîte de jonction, fermez la boîte de jonction sur l'élément de préchauffage et l'installation est terminée. Branchez le cordon d'alimentation dans la prise pour terminer l'installation. Vasco Kruishoefstraat 50 3650 Dilsen-Stokkem Belgique Tel.: +32(0)89790411...
-
Page 16: Conditions De Garantie
Conditions de garantie Vasco déclare accorder une garantie sur le Vasco Elec. Preheater D150 - 700W, Elec. Preheater D180 - 700W et Elec. Preheater D180 - 1400W pendant 2 ans à compter de la date d'achat. La date de facturation de la société d'installation sert de preuve de la date d'achat. Si aucune facture n'est disponible, la date de production compte comme date d'achat. - Page 17 11VE44260, 11VE44270 & 11VE44280 Installation Manual Electrical Preheater: Self-regulating Recommended ventilation unit 11VE44260 – Elec. Preheater D150 – 700W D275EP, D275EP II, D275(EP) III (E) 11VE44270 – Elec. Preheater D180 – 700W D300E (II), D400EP (II), D_T_X350 (E), D_X425 (E), DX4 (E) 11VE44280 –...
- Page 18 4. Technical information ....................... 20 5. Installation manual ......................22-25 A) Packaging content ....................22 B) Installation conditions ................... 22 C) Mounting ......................20-25 6. Warranty conditions ........................26 7. Declaration of Conformity……………………………………………………………………………………………………27 Vasco Kruishoefstraat 50 3650 Dilsen-Stokkem Belgium Tel.: +32(0)89790411 __________________________________________________________________________...
-
Page 19: Introduction
Guarantee Vasco is not liable for damage caused by failure to observe the safety instructions or by not following the instructions in the manual. The warranty conditions can be found on page 23 of this manual. -
Page 20: Maintenance
3. Maintenance Vasco advices to clean the electric preheating element every 4 years. 1) Remove the plugs of the ventilation unit and the preheating element from the sockets. 2) Wait 10 minutes for the preheating element to cool down 3) Take the preheating element off the installation... -
Page 21: Installation Manual
Keep in mind that the max. distance between the preheating element and the circuit board of the ventilation unit is 2m, this for the cable connection which has to be made between the 2 devices. The preheating element can be mounted horizontally or vertically. Vasco Kruishoefstraat 50 3650 Dilsen-Stokkem Belgium Tel.: +32(0)89790411... - Page 22 Step 1) Connect the black power cable to the ventilation units circuit board on the X17 connection. Use the black swivel as transit for the black cable in the metal casing of the ventilation unit as seen on the images below. Vasco Kruishoefstraat 50 3650 Dilsen-Stokkem Belgium Tel.: +32(0)89790411...
- Page 23 Step 5) Put everything nicely back into the cable box, close the cable box on the preheating element and the installation is finished. Plug the power cord into the socket to complete the installation. Vasco Kruishoefstraat 50 3650 Dilsen-Stokkem Belgium Tel.: +32(0)89790411...
-
Page 24: Warranty Conditions
WARRANTY CONDITIONS Vasco declares to grant a warranty on the Vasco Elec. Preheater D150 - 700W, Elec. Preheater D180 - 700W and Elec. Preheater D180 - 1400W for 2 years from the date of purchase. The invoice date of the installation company serves as proof of purchase date. If no invoice is available, the production date counts as the purchase date. - Page 25 11VE44260, 11VE44270 & 11VE44280 Instrukcja instalacji Nagrzewnica elektryczna samoregulująca Zalecana do rekuperatora 11VE44260 – Elec. Preheater D150 – 700W D275EP, D275EP II, D275(EP) III (E) 11VE44270 – Elec. Preheater D180 – 700W D300E (II), D400EP (II), D_T_X350 (E), D_X425 (E), DX4 (E) 11VE44280 –...
- Page 26 A) Zawartość opakowania ..................32 B) Warunki instalacji ....................32 C) Montaż ......................32-34 6. Warunki gwarancji ........................35 7. Deklaracja zgodności …………………………………………………………………………………………………..………. 35 Vasco Group Sp. z o.o. ul. Jaworzyńska 295 59-220 Legnica Polska Tel.: +48 (0) 76 850 83 90...
-
Page 27: Wstęp
1. Wstęp Nagrzewnica elektryczna jest przeznaczona do instalacji w systemie wentylacyjnym Vasco. We współpracy z odpowiednim rekuperatorem umożliwia wstępne podgrzanie powietrza zewnętrznego do pożądanej temperatury docelowej. Maks. temperatura docelowa jest ograniczona przez maks. moc grzewczą elementu grzejnego w zależności od temperatury i ilości nawiewanego powietrza. -
Page 28: Konserwacja
3. Konserwacja Vasco zaleca regularne czyszczenie nagrzewnicy elektrycznej w zależności od potrzeb minimum co 4 lata. 1) Wyjmij wtyczkę zasilania rekuperatora z gniazdka, a także osobną wtyczkę zasilania nagrzewnicy. 2) Poczekaj 10 minut, aż element grzejny ostygnie. 3) Wymontuj nagrzewnicę elektryczną z urządzenia/kanału powietrznego. -
Page 29: Instrukcja Instalacji
Pamiętaj, że odległość między nagrzewnicą elektryczną, a płytką sterującą rekuperatora wynosi maks. 2m. Dotyczy to połączenia kablowego, które należy wykonać między tymi dwoma urządzeniami. Nagrzewnicę elektryczną można zamontować poziomo lub pionowo. Vasco Group Sp. z o.o. ul. Jaworzyńska 295 59-220 Legnica Polska Tel.: +48 (0) 76 850 83 90... - Page 30 Krok 1) Podłącz wtyczkę czarnego kabla zasilającego do płytki sterującej rekuperatora do gniazda X17. Użyj czarnego dławika jako przejścia dla czarnego kabla przez metalową obudowę rekuperatora, jak pokazano na poniższych zdjęciach. Vasco Group Sp. z o.o. ul. Jaworzyńska 295 59-220 Legnica Polska Tel.: +48 (0) 76 850 83 90...
- Page 31 -A2 przekaźnika przełączającego. Krok 5) Włóż wszystko starannie z powrotem do skrzynki i zamknij ją, a instalacja zostanie zakończona. Podłącz przewód zasilający do gniazdka, aby zakończyć instalację. Vasco Group Sp. z o.o. ul. Jaworzyńska 295 59-220 Legnica Polska Tel.: +48 (0) 76 850 83 90...
-
Page 32: Warunki Gwarancji
WARUNKI GWARANCJI Vasco udziela gwarancji na Vasco Elec. Preheater D150 - 700W, Elec. Preheater D180 - 700W oraz Elec. Preheater D180 - 1400W przez 2 lata od daty zakupu. Data wystawienia faktury przez firmę instalacyjną stanowi dowód daty zakupu. Jeśli nie jest dostępna faktura, data produkcji jest liczona jako data zakupu.
Need help?
Do you have a question about the 11VE44260 and is the answer not in the manual?
Questions and answers