Jøtul F 520 Installation And Operating Instructions Manual
Hide thumbs
Also See for F 520:
- Installation & operating instructions manual (11 pages) ,
- Installation and operating instructions manual (68 pages)
Table of Contents
Advertisement
Quick Links
UKCA Information
UK -
Installation and operating instructions
Manualen må oppbevares under hele produktets levetid. Manualen skal opbevares under hele produktets levetid.
Manualen skall sparas under hela produktens levtid. Käyttöohje on säilytettävä tuotteen koko käyttöiän ajan.
Jøtul F 520 UKCA
2
3
Advertisement
Table of Contents

Subscribe to Our Youtube Channel
Related Manuals for Jøtul F 520


Summary of Contents for Jøtul F 520
- Page 1 Jøtul F 520 UKCA UKCA Information UK - Installation and operating instructions Manualen må oppbevares under hele produktets levetid. Manualen skal opbevares under hele produktets levetid. Manualen skall sparas under hela produktens levtid. Käyttöohje on säilytettävä tuotteen koko käyttöiän ajan.
- Page 2 Attention! Use this approval label when the stoves has been installed (only for UK). Cut off the bottom part and replace the label already attached with this one. It is important that the lot + pin number is viewable. Note: An approved CO monitor should be installed in the same room as the appliance.
-
Page 3: Table Of Contents
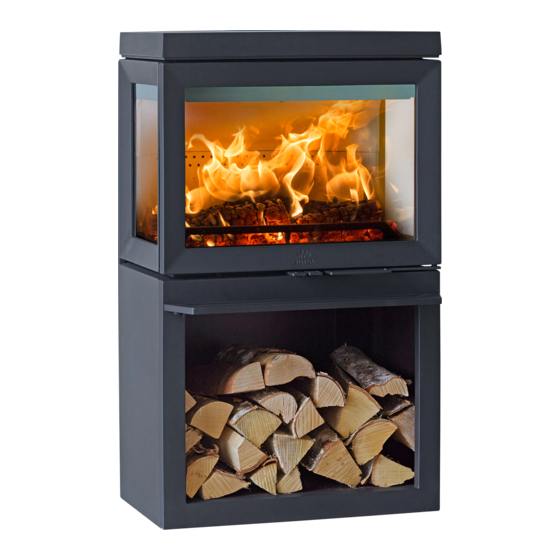
Outside air connection: Ø80 / Ø100 mm Weight: 10.0 Recycling ..........16 Jøtul F 520: 170 kg Jøtul F 520 + Jøtul f 520 High Top: 201 kg Optional extras Cover for outside air 11.0 Warranty ..........16 through base Product dimensions, distances: See Fig. -
Page 4: Safety
ENGLISH 3.0 Safety 3.2 Floor NB! To guarantee optimal performance and safety, Jøtul Foundation recommends that its stoves are fi tted by a qualifi ed You need to make sure the foundation is suitable for a fi replace. installer (see www.jotul.com for a complete list of dealers). See “2.0 Technical Data”... - Page 5 ENGLISH...
- Page 6 ENGLISH...
- Page 7 Fig. 2C, through the fl oor and basement The amount of combustion air for Jøtul’s products is approximately 20-40 m 3 /h. The outside air connection may be fi tted directly to the Jøtul F 520 through: • the bottom/rear •...
-
Page 8: Installation
NB: Read the Installation and Operating instructions carefully before installing the fi replace! 4.1 Prior to installation - Jøtul F 520 Fig. 3 4. Lift the stove from the pallet. 5. Set up the stove and adjust using a cap wrench to a horizontal position with the 4 height adjustment screws 1. - Page 9 4.2 Outside air connection through the base Through a rear outlet Fig. 7 Jøtul F 520 is delivered with air inlet mounted underneath the product. If needed, the air inlet may be mounted in the rear of the product. Fig. 6 Click •...
- Page 10 ENGLISH 4.4 Chimney and fl ue pipe Fig. 8 • The fi replace must only be connected to a chimney and fl ue pipe approved for solid fuel fi replaces with fl ue gas temperatures as specifi ed in «2.0 Technical Data». •...
-
Page 11: Daily Use
By quality wood we mean most well-known types of wood such as birch, spruce and pine. The logs should be dried so that the moisture content is The Jøtul F 520 is equipped with the following no more than 20%. operating options: To achieve this, the logs should be cut during the late winter. - Page 12 ENGLISH Be especially careful never to use the following materials Adding fi rewood as fuel in your fi replace: Stoke the stove frequently but only add small amounts of fuel • Household rubbish, plastic bags, etc. at a time. If the stove is fi lled too full, the heat created may •...
-
Page 13: Maintenance
ENGLISH 6.0 Maintenance 7.0 Servicing Warning! Any unauthorised changes to the product are 6.1 Cleaning the glass illegal! Only original spare parts may be used! The product is equipped with an air wash for the glass. Air is 7.1 Service/replacing parts in the burn sucked in through the air vent on the top of the product and down along the inside of the glass. - Page 14 ENGLISH Fig. 16 Fig. 18 5. Lower the exhaust defl ector and lift it out. 6. When refi tting, follow the same procedure in reverse order. 7.2 Replacing the air duct and 3. Turn one corner towards you and pull it out sideways. inner bottom Fig.
- Page 15 ENGLISH 7.3 Self-closing door Fig. 20 By making this change, you make the door self-closing. Fig. 22 2. Take hold of the hole (B) at the front edge of the inner bottom (A) and lift it up. Fig. 21 1. Loosen the two Allen screws. 2.
-
Page 16: Operational Problems - Troubleshooting
) or too moist / wet wood. 2.3. Installation of optional extras for the purpose of rectifying local draught conditions, air supply or other circumstances 9.4 Jøtul F 520 High Top beyond Jøtul’s control. 2.4. Cases involving alterations / modifi cations to the fi replace Item no. - Page 17 ENGLISH Pellets stoves, glass, stone, concrete, enamel and paint fi nish (e.g. but not limited to chipping, cracking, bubbling or discolouration and crazing) are applicable to the national legislation governing the sale of consumer goods. This guarantee is valid for purchases made within the territory of the European Economic Area.
- Page 18 Jøtul arbeider kontinuerlig for om mulig å forbedre sine produkter, og vi forbeholder oss retten til å endre spesifi kasjoner, farger og utstyr uten nærmere kunngjøring. Jøtul bemüht sich ständig um die Verbesserung seiner Produkte, deshalb können Spezifi kationen, Farben und Zubehör von den Abbildungen und den Beschreibungen in der Broschüre abweichen. Jøtul pursue a policy of constant product development.
Need help?
Do you have a question about the F 520 and is the answer not in the manual?
Questions and answers